Deploying Servers that Boot from a SAN with the RDP

 <  Day Day Up  >  

This section provides instructions for modifying the Windows-scripted install jobs provided with the RDP to deploy servers that boot from SAN. For information about supported servers or for RDP documentation, go to http://www.hp.com/servers/rdp.

warning

HP strongly suggests that you make a backup copy of each file or deployment job before making any changes.


1. Install the Fibre Channel Driver Boot Support for RDP 1.40 software:

  • Obtain the Fibre Channel Driver Boot Support for RDP 1.40 software from http://www.hp.com/servers/rdp and install the files on your Deployment Server.

    note

    This software contains the Emulex 4.82a16 and the QLogic 8.2.0.72 drivers. If newer drivers are available, deploy them after the initial SAN boot installation.

  • Extract the files in the SoftPaq to a new folder on your Deployment Server.

  • From the command prompt, move to the folder containing the extracted files.

  • Enter the command cscript install.wsf to install the files to the appropriate location on the Deployment Server.

2. Copy a scripted install job provided with the RDP to use for your Boot from SAN deployment job:

  • Right-click on the title bar of the Jobs pane, and choose Create a New Folder.

  • Enter the desired name for your Boot from SAN jobs folder.

  • Select the either Microsoft Windows 2000 or Microsoft Windows 2003 Scripted Install Job for your target system hardware (BL or ML/DL). Right-click the job and choose Copy.

  • Right-click the Boot from SAN folder, and choose Paste to copy the job into the folder.

  • To rename the job, right-click the job and choose Rename.

  • Enter a descriptive name for the job. Figure 9.34 shows a completed Deployment Server Console Jobs pane.

    Figure 9.34. Deployment Server Console Jobs pane.


Figure 9.35 shows the Job Properties dialog box entry for installing the job with the RDP.

Figure 9.35. Windows scripted install job as provided with RDP.


3. Edit the copied job to enable Boot from SAN deployment:

  • Select the newly created job.

  • Highlight the first task, Run Script ”Set Hardware Configuration and click Modify.

  • Add REM to the beginning of the set aryfile= line

  • Click Finish.

Figure 9.36 shows the Run Script dialog box with the modified script information.

Figure 9.36. Set the Hardware Configuration task modified for Boot from SAN Deployment.

4. Delete the Run Script “ Set Disk Partition or the first Run Script “ (embedded) task.

5. In place of the deleted Run Script “ Set Disk Partition or the first Run Script “ (embedded) task, add a Distribute Disk Image task.

  • Choose DOS_ONLY.IMG from the Images folder.

  • Deselect the Automatically Perform Configuration Task After Completing This Imaging Task check box.

  • Choose Finish.

    Figure 9.37 shows the resulting Distribute Disk Image dialog box.

  • Select the Deploy Image “ ”.\Images\DOS_ONLY.IMG task and press the up arrow three times to place it between the two Power Management (Reboot) tasks . This places the Deploy Image task in the location of the deleted Run Script “ Set Disk Partition task as shown in Figure 9.37.

    Figure 9.37. Deploy image task created for boot from SAN deployment.

6. Edit the first Run Script ”Install OS task.

7. Add the following text as a new line before the call to w2k.bat (for Windows 2000 jobs) or wnet.bat (for Windows 2003 jobs): set skipformat=yes

Figure 9.38 shows a completed Run Script “ Install OS task.

Figure 9.38. Run Script “ Install OS task modified for boot from SAN deployment.

8. Choose Finish to save the changes to the Run Script “ Install OS task.

9. Click the modified job, as shown in Figure 9.39 for task verification.

Figure 9.39. Windows scripted install job, modified for Boot from SAN deployment.


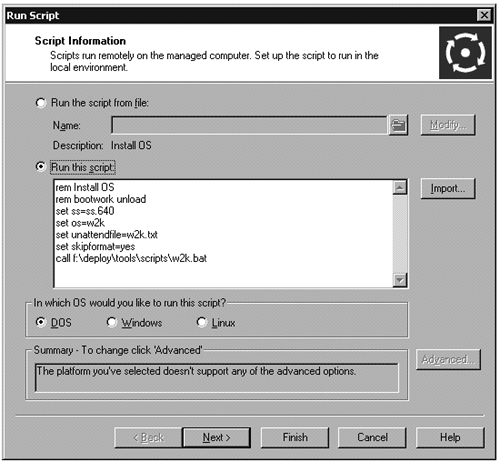
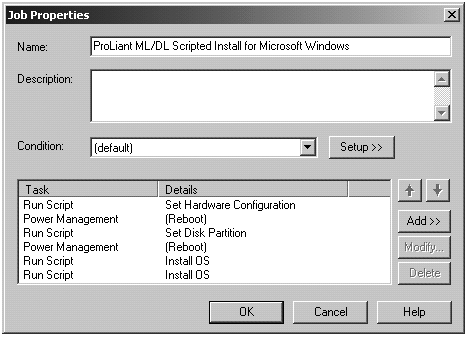
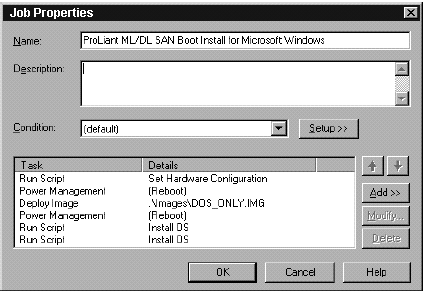
Figure 9.39 shows the Job Properties dialog box for the modified job.

10. Edit the Microsoft Windows unattended install file(s) as follows :

  • For Windows 2000:

  • From the extracted files folder, open the \w2k\ unattend.txt file (source file).

  • Open the eXpress\deploy\ configs \ w2k.txt file (target file).

  • Copy the driver descriptions from the [MassStorageDrivers] section from the source and paste them into the same section in the target file.

  • Copy the driver names from the [OEMBootFiles] section of the source and paste them into the same section in the target file.

  • For Windows 2003:

  • From the extracted files folder, open the \wnet\ unattend.txt file (source file).

  • Open the eXpress\deploy\configs\ wnet.txt file (target file).

  • Copy the driver descriptions from the [MassStorageDrivers] section from the source to the target file.

  • Copy the driver names from the [OEMBootFiles] section of the source to the target file.

11. Manually configure a reference server of the type you plan to deploy:

  • Disable the Integrated SmartArray Controller (if present). Use the RBSU PCI settings to do so.

  • Set the Controller Boot Order to place the desired HBA (host bus adapter) as the first controller to boot.

12. Capture the Hardware Configuration of the reference server:

  • Boot the reference server from the PXE or Bootworks floppy disk so it is available in the RDP console.

  • Drag the Capture Hardware Configuration job from the SmartStart Hardware Configuration Events folder to the reference server.

  • When the job completes, it creates the file CPQCAP-H.INI in the \eXpress\deploy\configs\ directory.

  • Rename the CPQCAP-H.INI file to the name specified on the set hwrfile= line in the Run Script “ Set Hardware Configuration in step number 3.This automatically sets your hardware configuration on each server deployed with your Boot from SAN job.

The customized job is now ready to deploy servers that boot from SAN.

 <  Day Day Up  >  


Windows Server 2003 on Proliants. Deployment Techniques and Management Tools for System Administrators
ISBN: B004C77T6A
EAN: N/A
Year: 2004
Pages: 214

flylib.com © 2008-2017.
If you may any questions please contact us: flylib@qtcs.net