Making the Most of Visual Studio .NET
| I l @ ve RuBoard |
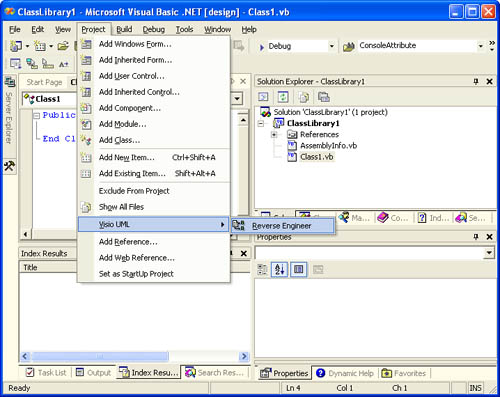
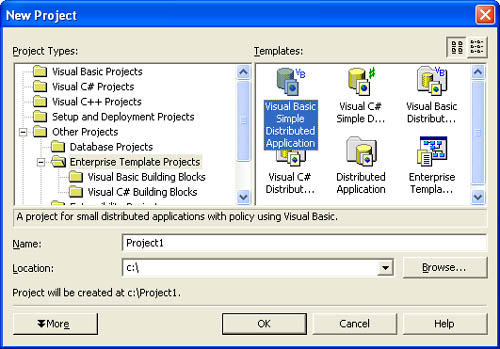
| Lest you get bored by repeatedly hearing about the "powerful tools" included with Visual Studio .NET Enterprise Architect, it's time you actually saw some of them. Modeling ToolsVisual Studio .NET Enterprise Architect comes with Visio for Enterprise Architects , which allows you to do UML code modeling and helps you generate application architecture and functional models. Visio is a powerful tool, but it's not for the faint of heart. UML takes a significant investment of time just to learn, let alone master. Visual Studio tries to make this process easier and somewhat more natural, however. When you design your application, it can be worthwhile to create skeleton code ”to essentially define the object interfaces and hierarchy. If you take this route, you can translate your code into UML models that you can then enhance to your heart's content. This process is referred to as reverse-engineering . Figure A-1 shows how to use the Reverse Engineering command. Figure A-1. The UML Reverse Engineer command. Using Visual Studio in conjunction with Visio, you can reverse-engineer existing code into UML diagrams and generate new code in the language of your choice from UML diagrams. Check out the documentation that accompanies Visio to find out more about what you can do. More Info For more information about UML and resources to help you understand the process, check out the Rational Web site's UML Resource Center (http://www.rational.com/uml/index.jsp). Enterprise TemplatesEnterprise templates allow you to define project and architecture templates. Using templates, system architects can define the initial structure of a complex project. Creating templates is easy ”you can do it from the New Project dialog box (shown in Figure A-2). Just select Enterprise Template Project in the list of templates. Figure A-2 also shows the default templates that are available right out of the box:
Figure A-2. Creating a new project based on an enterprise template. Delving further, under the Visual Basic Building Blocks folder, you'll also find components for various types of systems, including the following project types:
One difficulty that development teams face when they develop multitier applications is the sheer number of items (classes, assemblies, and references) that can be added to projects. Template Definition Language (TDL) provides a way to define a policy to enforce with enterprise templates. A policy can filter the items available to build each portion of the application, leaving out unneeded features ( methods , properties, and so forth) that provide no advantage or might create significant problems. Each template can be assigned a policy, and subtemplates can be assigned different policies. You can exclude objects, control the use of Visual Studio menu commands, and allow and disallow the addition of specific items to projects. The TDL files are formatted in XML and can be easily edited from Visual Studio .NET. The following is a excerpt from one of the default templates: <ELEMENT> <ID>elementName</ID> <CONTEXT> <CTXTKEYWORD>HelpKeyword1</CTXTKEYWORD> <CTXTATTRIBUTE> <NAME>Product</NAME> <VALUE>VS</VALUE> </CTXTATTRIBUTE> </CONTEXT> <IDENTIFIERS> <IDENTIFIER> <TYPE>identifierType</TYPE> <IDENTIFIERDATA> <NAME>identifierName</NAME> <VALUE>identifierValue</VALUE> </IDENTIFIERDATA> </IDENTIFIER> </IDENTIFIERS> <PROTOTYPES> <PROTOTYPE>[VB]\VBProjects\WizardName.vsz</PROTOTYPE> <PROTOTYPE>[VB]\VBProjects\FileName.ext</PROTOTYPE> </PROTOTYPES> <CONSTRAINTS> <PROPERTYCONSTRAINTS> <PROPERTYCONSTRAINT> <NAME>propertyName</NAME> <READONLY>1</READONLY> <DEFAULT>defValue</DEFAULT> <MINVALUE>0</MINVALUE> <MAXVALUE>9999</MAXVALUE> </PROPERTYCONSTRAINT> </PROPERTYCONSTRAINTS> <MENUCONSTRAINTS> <MENUCONSTRAINT> <ID>menuProject.AddUserControl</ID> <ENABLED>0</ENABLED> </MENUCONSTRAINT> </MENUCONSTRAINTS> <TOOLBOXCONSTRAINTS> <TOOLBOXCONSTRAINT> <ID>tboxDataSQLConnection</ID> <ENABLED>0</ENABLED> </TOOLBOXCONSTRAINT> </TOOLBOXCONSTRAINTS> </CONSTRAINTS> <ELEMENTSET> <DEFAULTACTION>EXCLUDE</DEFAULTACTION> <ORDER>INCLUDEEXCLUDE</ORDER> <INCLUDE>elementName</INCLUDE> <INCLUDE>categoryName</INCLUDE> <EXCLUDE>elementExpression</EXCLUDE> <CONSTRAINTS> <PROPERTYCONSTRAINTS> <PROPERTYCONSTRAINT> <NAME>propertyName</NAME> <READONLY>1</READONLY> <DEFAULT>defValue</DEFAULT> <MINVALUE>0</MINVALUE> <MAXVALUE>9999</MAXVALUE> </PROPERTYCONSTRAINT> </PROPERTYCONSTRAINTS> <MENUCONSTRAINTS> <MENUCONSTRAINT> <ID>menuProject.AddUserControl</ID> <ENABLED>0</ENABLED> </MENUCONSTRAINT> </MENUCONSTRAINTS> <TOOLBOXCONSTRAINTS> <TOOLBOXCONSTRAINT> <ID>tboxDataSQLConnection</ID> <ENABLED>0</ENABLED> </TOOLBOXCONSTRAINT> </TOOLBOXCONSTRAINTS> </CONSTRAINTS> <MEMBERCONSTRAINTS> <MEMBERCONSTRAINT> <ID>memberID</ID> <PROPERTYCONSTRAINTS> <PROPERTYCONSTRAINT> <NAME>propertyName</NAME> <READONLY>1</READONLY> <DEFAULT>defValue</DEFAULT> <MINVALUE>0</MINVALUE> <MAXVALUE>9999</MAXVALUE> </PROPERTYCONSTRAINT> </PROPERTYCONSTRAINTS> <MENUCONSTRAINTS> <MENUCONSTRAINT> <ID>menuProject.AddUserControl</ID> <ENABLED>0</ENABLED> </MENUCONSTRAINT> </MENUCONSTRAINTS> </MEMBERCONSTRAINT> </MEMBERCONSTRAINTS> </ELEMENTSET> </ELEMENT> As you can see, interesting possibilities are available for controlling how developers can use the Visual Studio IDE. By limiting what can be used, you can ensure a greater degree of consistency within your projects. More Info The help files that accompany Visual Studio provide much more detail on how to use these policy files. The example here shows all of the available options, but typical entries might use only a subset of these features. Visual SourceSafe and Source ControlSource control is important for any serious development project and is crucial in a multideveloper project. The ability to track file changes and reverse changes is a significant advantage as more people are added to projects. We all make mistakes from time to time, and the chances that mistakes will be made grows exponentially as more people become involved. Microsoft provides an integrated solution for source control called Visual SourceSafe. You're probably familiar with Visual SourceSafe ”it's been around for years . Visual SourceSafe has been an excellent single-developer solution and, with a little help, can work well in a multiple-developer situation. Visual Studio .NET provides higher-level integration with Visual SourceSafe than Visual Studio ever has in the past. A primary benefit of the unified IDE is that the source control mechanism is consistent across projects and solutions. There are three main issues that you need to worry about:
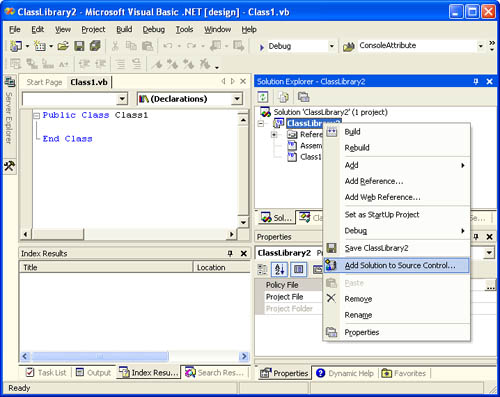
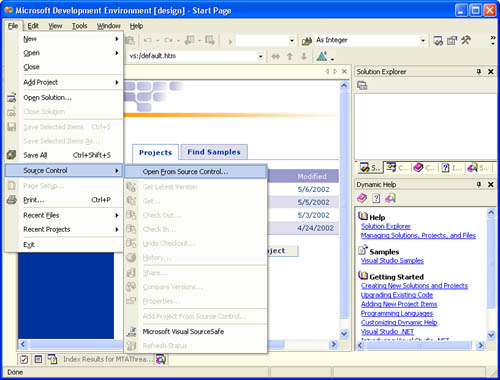
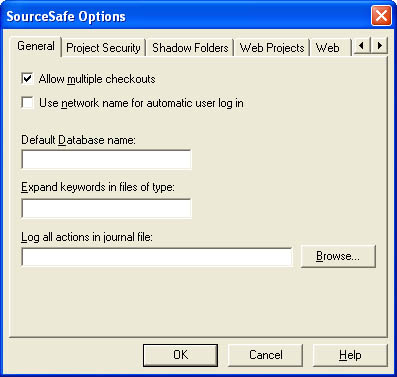
Adding a Project to the Source Control RepositoryFor simple projects, you don't need to do anything special to place a project under source control. You can right-click on the project or solution to place the entire solution under source control (as shown in Figure A-3). Any additional projects that you create or add to the solution will then be added to Visual SourceSafe as well. Figure A-3. Adding a project to the source control repository. You might have to get a little creative to best manage your Visual SourceSafe project hierarchy. Adding separate solutions to the source control repository can lead to frustrating attempts to maintain your project hierarchies. I've found that a good approach is to create a single solution that represents the entire development project. When you need to add a code project to the repository, open the solution file and add the project. This will ensure that the newly added project ends up as a subproject of the solution file and as a peer to the other existing projects. You'll have to experiment a little with Visual SourceSafe to understand what I'm saying, but creating a single, master solution is generally a good strategy. Creating a Project from the Source Control RepositoryCreating a project from the source control repository is just as easy as adding a project. The File menu's Source Control submenu has a host of commands related to source control, including ones for opening a project or a solution from the source control repository (as shown in Figure A-4). Figure A-4. Opening a solution from the source control repository. You have several options when it comes to individual projects. You can open the entire solution stored in Visual SourceSafe, or you can be more selective. If you create additional projects that are not already in the source control repository, you can add projects to that solution (using the Add Project From Source Control option) on a project-by-project basis. Exclusive CheckoutsVisual SourceSafe can be a fairly flexible source control system, but is not set up by default to handle multideveloper development very well. First, Visual SourceSafe defaults to allowing only exclusive file checkouts. This prevents other developers from making modifications to files if any one developer already has it checked out. Of course, there's a way around this problem. Your Visual SourceSafe administrator must open the database with the Administration tool and, in the SourceSafe Options dialog box (shown in Figure A-5), select the Allow Multiple Checkouts option. Figure A-5. The Visual SourceSafe database administrator's SourceSafe Options dialog box. More than one developer can then check out the same file. If a file is checked in with conflicting changes, the developer checking in the overlapping code must merge his changes with the version in Visual SourceSafe. The merging tool, built into Visual SourceSafe, allows you to see where any conflicts in the code occur. This tool is automatically brought up when conflicting changes have been checked into the database. If you're already familiar with the interface provided by WinDiff (a Windows file comparison tool that is also included with the Visual Studio .NET installation but is not on by default), you'll be instantly comfortable with this tool. As a part of the check-in process, you must accept or reject certain changes. This allows you to merge the contents of two separate files and preserve the correct changes. You must do this with care because accepting or rejecting the wrong change can cause problems. Not to worry, though ”you can always roll back any changes you might have made. Managing Web ProjectsManaging the development of Web projects (ASP.NET or Web services) can be challenging. There are three main ways that ASP.NET applications can use Visual Studio .NET:
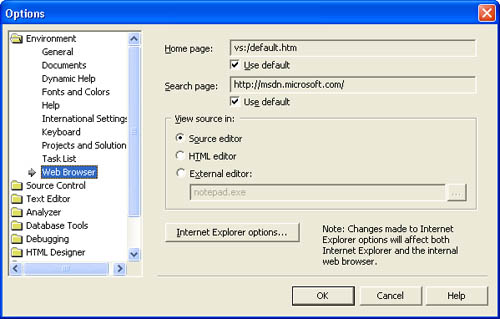
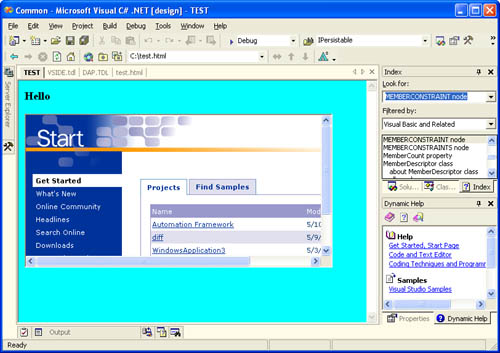
The first method is the recommend approach because when a developer debugs a project on a Web server, the debugger locks the assemblies on that server. This presents a real problem when you have other active developers making changes or attempting to build their components. Local development with Visual SourceSafe makes the process more manageable. You simply have to be sure that you have the latest source code before you check in your changes (to reduce the possibility of introducing incompatible code into the system). Managing DependenciesDependencies take many forms in Visual Basic .NET applications, and managing those dependencies can be a challenge. For the most part, dependencies take the form of references: project, assembly, and Web references. Wherever possible, you should use project references rather than file references. Project references help the Visual Studio .NET build system resolve project dependencies and build your application. They also help you avoid circular references and use the appropriate configuration settings (debug or retail) for all projects. When you use file references, the individual project files store the relative path to the assembly if the referenced assembly is from a local drive, and they store the complete path if the assembly is located on a network share. Every assembly reference has a property called Copy Local . The default is False for components that exist in the Global Assembly Cache (GAC) and true for all other assemblies. For the most part, you shouldn't need to change these settings. When Copy Local is True , Visual Studio will automatically copy the referenced assemblies (and any assemblies it might depend on) to the project's bin folder. The advantage of this is that every time a project is built, Visual Studio will automatically check the date and time stamp for each referenced assembly and, if the assembly has been modified, copy it locally to the bin directory. Warning You should never directly add a Copy Local reference to components that exist in the GAC. There should ever be only a single instance of an assembly registered in the GAC. Copying locally would produce applications that are not running with the latest version of those assemblies, potentially opening up your applications to security or performance problems. If you have multiple solutions and have to use file references, you can store the assemblies in a UNC path (or you can use a common mapped drive). The advantage of picking up file references from a common build server is that your project will always have the latest assembly and the drive letter or UNC path will work from any development machine. The disadvantage is that you have no control over how and when you pick up the latest assembly, and that can break your application. Also, the build server must always be available, which prevents you from working off line. If using references from a build server is too problematic for your needs, you can periodically copy stable builds locally. Database DependenciesIt is not uncommon for developers to use a development, or staging, database server. To make it easier to work within your own environment, you can take advantage of the app.config configuration file. A production app.config might declare a configuration file like this: <configuration> <appSettingsfile="developer.config"> <addkey="databaseConnection" value="server=ProductionDatabase;IntegratedSecurity=SSPI;database= myDatabase"/> </appSettings> </configuration> An alternative configuration file, developer.config, might contain the following database connection value: <appSettings> <addkey="databaseConnection" value="server=(local);IntegratedSecurity=SSPI;database= myDatabase "/> </appSettings> The code in your application to retrieve the configuration information might look like this: PrivateFunctiongetDatabaseConnectoin()AsString ReturnConfigurationSettings.AppSettings("databaseConnection") EndFunction COM DependenciesAs explained in Chapter 4, you should use primary Interop assemblies (PIAs) whenever possible. When it is not possible, you should manually generate an interop assembly using Visual Studio, by adding a COM reference to your project, or using the TlbImp utility, and then you should be sure that all developers are using the same version of the Interop assembly. Note that the COM type library for the component must exist on all developer machines; otherwise , there will be problems. Including the interop assemblies only on the developer machines is not sufficient ”the COM component itself must be registered on each machine that the application is intended to run on. Customizing the Start PageAnyone who has launched Visual Studio .NET has seen the Start page (shown in Figure A-6). But did you know that you can customize it? In fact, you can replace it altogether. This can be helpful for managing your projects and aiding communication between team members . You can also use it to provide common documentation or reference materials. Figure A-6. The Visual Studio .NET Start page. Making the change is simple. From the Tools menu, choose Options. In the Options dialog box, select the Web Browser option (as shown in Figure A-7). You can then alter both the Home page and the Search page. Figure A-7. The Web browser options in the Options dialog box. Creating a custom page is absurdly simple. Creating a good one, on the other hand, is a little more challenging. (Seasoned Web developers will appreciate what I'm saying). To help demonstrate how easy the process is, I created my own simple, and ugly, Start page. I created a file called c:\Start.htm and tossed in the following HTML: <HTML> <HEAD> <TITLE>TEST</TITLE> </HEAD> <BODYBGCOLOR="CYAN"> <H3>Hello</H3> <IFRAMEsrc="vs:/default.htm" WIDTH=500HEIGHT=250></IFRAME> </BODY> </HTML> I then went back to the Visual Studio Options dialog box and gave the Home page the same path as my new Start page. That's it. Now I have a really hideous Start page (as shown in Figure A-8). Figure A-8. An ugly custom Start page. That pretty much wraps things up. You'll find as you delve deeper into the collaborative features provided by Visual Studio .NET that they give you rather sophisticated control over projects, policies, and design methodologies. Going forward, you should consider how you can leverage some or all of these features in your own projects. Bringing order out of chaos is well worth the effort! |

| I l @ ve RuBoard |
EAN: 2147483647
Pages: 103