Understanding COM and Enterprise Services
| I l @ ve RuBoard |
Understanding COM+ and Enterprise ServicesYou can think of COM+ as a foundation for your enterprise applications. COM+ was designed as a services framework with built-in features such as transaction processing, synchronization, and object pooling that developers can use instead of having to roll their own solutions. COM+ relieves the developer from having to worry about the core technologies and lets them focus on the actual problems being solved by their applications. In other words, COM+ services provide a solid foundation on which to build scalable and robust enterprise applications. The subject of COM+ services is huge, and I cannot possibly do it justice in one chapter. So I will focus on a core set of features that most developers can leverage in their applications. At the core of all of the COM+ technologies in Visual Basic .NET is the System.EnterpriseServices.ServicedComponent class. Deriving your objects from this class puts a whole set of COM+ services at your fingertips, including just-in-time activation, object pooling, and transactions. You'll find that all classes derived from the ServicedComponent class are known as serviced components . Any serviced component can be hosted by a COM+ application and use services provided by COM+. Table 8-1 lists some of the COM+ services that can be supported by serviced components. Table 8-1. Some COM+ Services That Can Be Supported by Serviced Components
Services such as transactions and queued components are configured through the use of attributes of the serviced component class. These features must be specified at design time. You can implement other services by calling methods of other serviced components or overriding methods of your own component. Some services can flow from one component to another. Transactions are an excellent example of this flow. COM+ RequirementsTo take advantage of COM+, a component must meet all of the following requirements:
Creating a Serviced ComponentServiced components can be contained in any application or assembly type. You must perform a few basic steps to implement a serviced component in your applications. You start with a new project in Visual Basic .NET and then do the following:
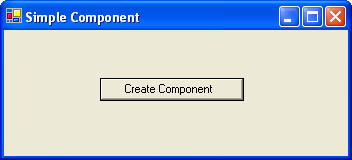
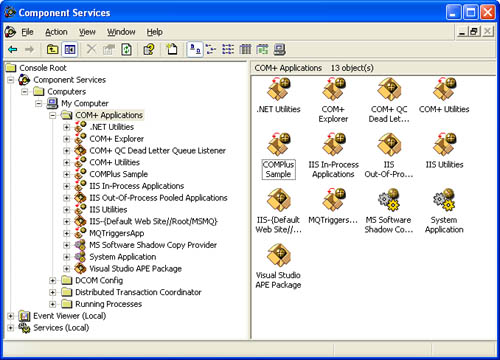
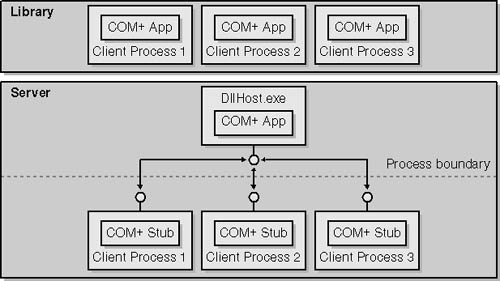
I've already explained why you need to use the ServicedComponent class, but the last two steps need some explanation. When you create a serviced component, it must be registered with Component Services before it can be used. Any component that is available through Component Services is globally available on your system. As a result, you must provide a strong name for your assembly. When we discussed primary Interop assemblies (PIAs) in Chapter 4, I introduced the Strong Name tool (sn.exe). Using this tool, you can generate a key file for signing your assembly (specified by the AssemblyKeyFile attribute). This provides a unique identity for your assembly that prevents any potential assembly and namespace confusion and makes COM+ and the .NET runtime happy. Note You can share a key file between multiple projects in your application if you want. Let's see what this looks like in code. You can find this class in the SimpleComponent sample application. Our class definition is pretty simple: ImportsSystem.EnterpriseServices PublicClassMyServicedComponent InheritsServicedComponent EndClass When you create a new Visual Basic .NET project, the IDE creates a file called AssemblyInfo.vb. This is usually the best place to store all of your assembly-level attributes. You are by no means required to store all of your assembly attributes, but doing so helps keep things organized and makes your life easier. So our minor addition to this file would look like this: ImportsSystem.EnterpriseServices ImportsSystem.Reflection <Assembly:ApplicationName("COMPlusSample")> <Assembly:AssemblyKeyFile("myKeyFile.snk")> To test our application, I've created a form with a single button. (See Figure 8-1.) This button simply creates an object and then disposes of it: DimcAsNewMyServicedComponent() ServicedComponent.DisposeObject(c) This demonstrates two things. First, creating an instance of a COM+ object is simple and easy. Second, when a client is done with a component, it should call DisposeObject to ensure that the reference is correctly released. Tip Calling DisposeObject is critical if you need your application to be able to scale well. If you don't you call it, you'll make extremely poor use of your system's computing resources (both memory and CPU). Figure 8-1. The SimpleComponent sample application. What is not immediately obvious from this sample is that your COM+ components are self-registering. When you click the button, your application will try to create an instance of the MyServicedComponent class. When COM+ realizes that the application hasn't yet been registered, it will add your application to the COM+ catalog before completing the construction of your component. To see the results of this registration process, you can check out the Component Services management console, as shown in Figure 8-2. Figure 8-2. Checking the Component Services console for our sample application. You have other options for registering your COM+ applications. In some situations, self-registration is not feasible ”for example, if you have a component library that contains COM+ components. In this case, you need to register the component using the Service Registration utility (regsvc.exe). Note Registering your COM+ application causes your assembly to be added to the local machine's Global Assembly Cache (GAC). This makes the public components available to all applications on the system. Understanding Application ActivationCOM+ supports two forms of component activation: library activation and services activation. The activation dictates how your clients work with your components, and it can have a critical effect on performance. Put simply, library activation causes your component to be created within the process of the client application itself (in-process). Server activation, on the other hand, causes the components to be created in an out-of-process host application. This means that all client calls to your COM+ components are out-of-process. In-process calls are, by definition, less expensive than equivalent out-of-process calls because an out-of-process call requires a lot of marshaling overhead to make it happen and in-process calls are directly accessible to your client's process. Another way to look at this is that library COM+ applications are duplicated for each process they're created in. If the process exits, so does the COM+ application. Server applications stand alone from all other processes on the system, regardless of what the client applications do. In addition, server applications are shared between all clients on the machine instead of being re-created for each client application. This can have certain advantages, especially when you're implementing something like object pooling ”your object pools can be global, which allows you to retain greater control over the performance of your application. (See Figure 8-3.) Figure 8-3. How server and library applications work. You can control the way a COM+ application is activated by using the ApplicationActivation assembly-level attribute. The two possible settings are ActivationOption.Library and ActivationOption.Server . In our previous example, we didn't define this attribute at all, and you might wonder how I got away with that. It turns out that the default application activation for a COM+ application in Visual Basic .NET is library. That's why I didn't need to define it explicitly. However, to be pedantic I could add a line to the AssemblyInfo.vb file that looks like this: <Assembly:ApplicationActivation(ActivationOption.Library)> If you look at the SimpleComponent sample application, you'll find that I did define this attribute, if only for completeness. Understanding COM+ ContextsEvery COM+ component has a context . The context contains all of the information regarding the current state of an instance of a component. This context information is stored by COM+ in a context object. It is usually created when a component is activated and destroyed when it is deactivated. The context also provides information about the environment the component is running in and represents everything the component needs to know about its world. Once the context has been created, it is immutable until the context is invalidated (either through object deactivation or destruction). When creating a context for a component, the COM+ runtime evaluates your component's attributes to determine what services are supported. These services, and their requirements, become a part of the context and represent a contract between the client and the component. This contract includes information about transactional requirements and security settings, all of which must be satisfied to allow the component to be used. To access your component's COM+ context, you must use the ContextUtil class from System.EnterpriseServices . This class provides a host of shared properties and methods that provide information about your current context and allow you to manipulate the context in specific ways. Table 8-2 lists the shared properties supported by the ContextUtil class. All of the members of the class are shared for one important reason: your component can have access only to its own context. COM+ does not allow one component to access another component's context, so you can never have more than one instance of a context object. The only possible exception is when contexts are permitted to flow from one component to another. In that case, however, the shared context is still the only context accessible by those components. This renders the distinction moot: a component can have access to only one context at a time. Table 8-2. Shared Properties of ContextUtil
Most of the properties are read-only because they merely indicate the current state of your component's context. You manipulate the context by using one of the shared methods of ContextUtil (described in Table 8-3). These methods allow you to manipulate the current state of your transactions, evaluate security state, and retrieve any application-specific variables . (ASP.NET provides a set of IIS intrinsic objects that are accessible if your component is called by ASP.NET.) Table 8-3. Shared Methods of ContextUtil
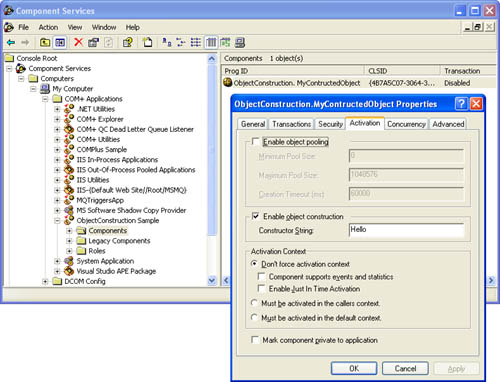
COM+ Object ConstructionA difficulty arises when you try to configure a ServicedComponent . The component is activated by the COM+ runtime environment, so you have no opportunity to provide constructor parameters. This presents some challenges when you want to configure a component for use on multiple machines. The solution to this is object construction. COM+ supports an activation model that enables the passing of object construction parameters without using the object's physical constructor. You need to do two things to support object construction. First, you must specify the ContructionEnabled attribute on your component. Second, you need to override the Construct method of the ServicedComponent class. The following example, also found in the ObjectConstruction sample, illustrates how this works: ImportsSystem.EnterpriseServices <ConstructionEnabled([Default]:="Hello")>_ PublicClassMyContructedObject InheritsServicedComponent ProtectedOverridesSubConstruct(ByValsAsString) 'Dostuff EndSub EndClass The Construct method will be called only if you first specify the ConstructionEnabled attribute. Using this attribute, you can also specify a default setting for the construction parameter. The above example provides a default value for the construction string in the attribute itself. I set the Default property of the ConstructionEnabled attribute to "Hello" . That's it. Once we have this component, we should register it. This chapter's samples include the ObjectContruction project to demonstrate this. The project itself is just a component library, so you must manually register the assembly to see it in action. Running the regsvcs.exe tool on the assembly generates output that looks much like the following: Microsoft(R).NETFrameworkServicesInstallationUtilityVersion1.0.3705.0 Copyright(C)MicrosoftCorporation1998-2001.Allrightsreserved. InstalledAssembly: Assembly:C:\Samples\ObjectConstruction\bin\ObjectConstruction.dll Application:ObjectConstructionSample TypeLib:c:\samples\objectconstruction\bin\ObjectConstruction.tlb After we register this component, we can view its properties through the Component Services management console, shown in Figure 8-4. Figure 8-4. Our newly registered component with object construction enabled and the correct default settings. You can open the properties sheet for your component, and on the Activation tab you can see, among other things, the settings for object construction. Notice that the Constructor String text box is automatically filled in with the default construction string that we specified in our code. By changing this value in the text box, you can customize the string passed to the Construct method. These things often include connection strings, the machine name, and any other configuration settings you might think appropriate. Object PoolingObject pooling is a mechanism that allows you to create a reusable "pool" of certain COM+ objects. Pooling is typically used to save CPU resources by creating a set number of objects and reusing them again and again. When you have an object that requires significant startup and initialization time, being able to create it once and then reuse it allows you to amortize the original startup costs across multiple uses. It also helps improve your application's response time and general throughput because less time is spent on object creation and more time is spent doing real work. Object pools are created on a component-by-component basis. If I want five components to be pooled, five component pools will be created. Each pool is managed independently and can be configured differently. A COM+ object pool support three parameters: MinPoolSize , MaxPoolSize , and CreationTimeout . The MinPoolSize setting specifies the minimum number of objects in the pool. On startup, COM+ will create as many objects as needed to satisfy the minimum requirement, regardless of whether there are enough clients to use them. Similarly, if an object, once used, cannot be returned to the pool, COM+ will create a new instance to take its place in the pool if it is necessary to maintain the minimum number of pooled objects. The MaxPoolSize property sets the upper bound on the number of components allowed in a pool. Typically, if a client request comes in and there are no available objects in the pool (they are all in use), COM+ will create a new instance of the component and attempt to add it to the pool when the client is done with it. This causes the pool size to grow over time. The MaxPoolSize prevents COM+ from growing the pool to an arbitrarily large size and consuming excessive resources. If the pool reaches the maximum size, COM+ will queue incoming requests and wait for a pooled object to be made available. The CreationTimeout property works in conjunction with the MaxPoolSize property. Because incoming requests are queued, if there are no available objects, you can use the CreationTimeout property to manage how long COM+ will wait until a pooled object is made available. If the queued request exceeds the timeout setting, an exception will be thrown. The Life Cycle of a Pooled ObjectA pooled object has a definite and predicable lifecycle starting with its creation. (See Figure 8-5.) There are two reasons for a poolable object to be created. First, a poolable object can be created by COM+ to satisfy the minimum pool size requirement. This creation is not in response to a client invocation and can happen when the pool is first created or when an already existing object cannot be returned to the pool and must be destroyed. In this case, the newly created object will be put directly into the pool and await a client request. Figure 8-5. The life cycle of a pooled object. The other possibility is that an instance of the object is created by COM+ to satisfy an incoming client request when no other pooled objects are currently available. In this case, the object is created, activated, and then passed back to the client. Otherwise, an incoming request will be satisfied by an existing unused object residing in the pool. Regardless of why an object is created, at some point before it is passed to a client, it must first be activated. This is a way to signal the object that it must immediately perform whatever client-specific initialization is needed. Then the object reference is passed to the client and is used just like any other object. When the client is done with the object, COM+ signals it to deactivate. This is when the object performs whatever operation is necessary to eliminate any client-specific state or other information it has acquired since it was activated. This also gives the object a chance to evaluate whether it is still poolable. Note If an object cannot recover its original state, it should not be returned to the pool. Returning an object to a pool that hasn't reverted to its original state might result in unpredictable behavior. Not good! Once the object has been deactivated, COM+ will ask it whether it can be returned to the object pool. If the object replies in the affirmative , it is merrily returned to the pool to await another incoming request. If the object states that it cannot be pooled, COM+ will destroy it. Requirements for Pooled ObjectsAn object that supports COM+ object pooling must do several things. First and foremost, it must specify the ObjectPooling attribute in the class definition. This attribute allows you to specify not only that an object supports pooling but also various properties of the pool itself. In addition to the ObjectPooling attribute, two key methods of the ServicedComponent class that are related to pooling: Activate and Deactivate . By overriding these methods, you can customize your object's behavior as it is activated and deactivated by COM+. A poolable object must also be stateless. This means a poolable object can retain no client-specific state between activations. This is necessary to maintain proper security, consistent behavior, and isolation. You can perform any context-specific initialization in your Activate method, but you must clean up and eliminate any context-specific state in your Deactivate method. Your object must also be threading-model - agnostic . A poolable object can assume that it will run on a single thread at any given time. Poolable objects must run as free threads (the default) or in a multi-threaded apartment. You cannot mark a poolable object as running in an apartment-threaded thread. Poolable objects also should not use such things as thread local storage (TLS). Other Pooling ConsiderationsWhen you define a pooled component, you must also consider what the configuration settings of the pool should be. We've already discussed the three main properties of any pool: MaxSize , MinSize , and CreationTimeout . Each of these properties has defaults, but I can't say I'd recommend them. When you create your pool, there are typically several considerations:
Creating a Poolable ObjectI've already discussed the requirements for a pooled object, but let's look at the steps for creating a basic, well-behaved poolable component:
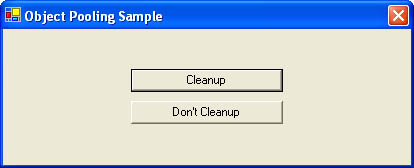
Here's what a pooled object might look like: 'Enablepoolingwithaminimumsizeof10andamaximumsizeof20 'CreationTimeoutisleftatitsdefaultofinfinite. <ObjectPooling(True,10,20)>_ PublicClassMyComponent InheritsServicedComponent ProtectedOverridesSubActivate() 'Performanyinitializationyouneedhere EndSub ProtectedOverridesSubDeactivate() 'Cleanupyourobjectandeliminateanyclient-specificstate EndSub ProtectedOverridesFunctionCanBePooled()AsBoolean 'Returnavaluetoindicateyourabilitytobeplacedback 'intothepool ReturnTrue EndFunction EndClass Of course, this sample doesn't do anything. In this respect, it is a perfect pooled component because it retains no client state. Unfortunately, that's not particularly useful. So I created a sample called ObjectPooling (Figure 8-6) that demonstrates how object pooling works. Figure 8-6. The ObjectPooling sample application. When you launch the application and click the Cleanup button, you cause an instance of the MyPooledObject class to be created, among other things. The code is as simple as the following three lines: DimmyObjAsNewMyPooledObject() myObj.HelloWorld() ServicedComponent.DisposeObject(myObj) The other button does exactly the same thing but omits the call to Serviced Component.DisposeObject . What actually happens under the covers at this point is interesting. Of course, the first time you run this, the COM+ application is registered ”you know that part already. What's also interesting is the pooling mechanism's behavior. But before I get into that, let's take a look at the pooled object in question, MyPooledObject : ImportsSystem.EnterpriseServices <ObjectPooling(5,10)>_ PublicClassMyPooledObject InheritsServicedComponent PrivateShareds_CountAsInteger=0 Privatem_CountAsInteger Privatem_CanBePooledAsBoolean=True PublicSubNew() MyBase.New() 'Becausemorethanoneinstancemaybecreatedatonce, 'weimplementsynchronizationtoensurecorrectness m_Count=System.Threading.Interlocked.Increment(s_Count) Debug.WriteLine(m_Count& " MyPooledObject:NewCreated ") EndSub ProtectedOverridesFunctionCanBePooled()AsBoolean Debug.WriteLine(m_Count& " MyPooledObject:CanBePooledcalled") Returnm_CanBePooled EndFunction ProtectedOverridesSubActivate() 'Performactivationcode Debug.WriteLine(m_Count& " MyPooledObject:Activatecalled") EndSub ProtectedOverridesSubDeactivate() 'Performdeactivationcode Debug.WriteLine(m_Count& " MyPooledObject:Deactivatecalled") EndSub PublicFunctionHelloWorld()AsString Return "HelloWorld" EndFunction EndClass What's going on here? The ObjectPooling sample is intended to do one thing: demonstrate the actual behavior of COM+ object pooling. To this end, the MyPooledObject does a couple of things. First, it keeps track of the number of instances of the class and assigns each new instance a unique ID. This is implemented in the class's constructor and uses the shared variable s_Count and the member variable m_Count . Note You'll notice that the constructor uses the method Interlocked.Increment to increment the shared member s_Count . This is for thread safety reasons ”to prevent incorrect incrementing behavior (which can happen if two instances of MyPooledObject are created concurrently). For more information on the Interlocked class, see Chapter 3. To make the code easier to debug, I added debug statements to each method and displayed the object's ID with each statement. I also configured the COM+ application as a library application, which means that the object pool is created in the process of the calling application. This makes it easy to see the results of the debug statements ”you only need to view the contents of the Output window in the IDE. When I first run the application and click the Cleanup button, I get the following output: 1MyPooledObject:NewCreated 2MyPooledObject:NewCreated 3MyPooledObject:NewCreated 4MyPooledObject:NewCreated 5MyPooledObject:NewCreated 1MyPooledObject:Activatecalled 1MyPooledObject:Deactivatecalled 1MyPooledObject:CanBePooledcalled This demonstrates well how the pool works. When I first try to create MyPooledComponent , COM+ sees that there's no pool and creates one. It then fills the pool with objects. (This is the reason for five consecutive calls to New .) Then COM+ activates the first component and returns it to the client. The client then calls DisposeObject when it is done. COM+ deactivates the component and calls CanBePooled . The object is then returned to the pool. If I click the same button again, I can see that the same object is being returned again and again. Here I click the Cleanup button twice: 1MyPooledObject:Activatecalled 1MyPooledObject:Deactivatecalled 1MyPooledObject:CanBePooledcalled 1MyPooledObject:Activatecalled 1MyPooledObject:Deactivatecalled 1MyPooledObject:CanBePooledcalled Something different happens when I click the Don't Cleanup button. As I mentioned before, this button omits the call to DisposeObject . This keeps the reference to the COM+ object around (at least until the next garbage collection happens ”and who knows when that will be). This is easy to see; the only calls are to Activate : 1MyPooledObject:Activatecalled If I keep clicking this button, I'll quickly go through all of the objects in the pool until I run out. Then a new object will be created and returned ”just like this: 2MyPooledObject:Activatecalled 3MyPooledObject:Activatecalled 4MyPooledObject:Activatecalled 5MyPooledObject:Activatecalled 6MyPooledObject:NewCreated 6MyPooledObject:Activatecalled If you keep clicking this button, the application will eventually hang because it will exceed the pool size and wait indefinitely in the request queue for an object that might never be made available. This helps highlight two things: how the pooling mechanism works, and why it is so important to call DisposeObject . The only other thing I would point out is the way the CanBePooled method is implemented. I used a member variable to track the ability of the object to be pooled. This object might conceivably have performed an operation that it cannot cleanly recover from, thereby preventing reuse. In this situation, I would cause CanBePooled to return false ” which means the object instance will be destroyed instead of just deactivated. So any method in the class could detect an unrecoverable error that effectively invalidates the class forever. By setting this member variable to false , the object will be destroyed rather than reused. Next, we'll move on to a related topic: JIT activation. Just-in-Time ActivationJIT activation is another service provided by COM+. JIT activation can enable more efficient use of computing resources, especially when you're implementing a system that is intended to be scalable. If a component is marked as JIT-activated, COM+ can deactivate an instance of the object while a client still has a reference to it. Each time the client calls a method of that object, COM+ will transparently reactivate the object. In other words, objects are activated and reactivated just in time to service the incoming client request. Clients can thus obtain references to objects and retain them for as long as needed. At the same time, server resources can be freed up on an as-needed basis. So, from the client perspective, JIT activation makes its life easier. The client doesn't need to be concerned about how it uses server resources and the potential expense. JIT activation frees the client from needing to be aggressive about releasing server resources. Note JIT activation isn't a substitute for cleaning up after your components. You should still call DisposeObject . But it does free you from worrying whether you should dispose of an object between method calls. (This has been done in the past to improve system scalability.) The benefits of JIT combined with long-lived object references become greater the farther the client is from the server. Without JIT activation, the cost of activating and marshaling the object, opening the communications channel, setting up the object proxy and stubs, and so forth becomes an overwhelming performance hit. Doing whatever you can to minimize the number of expensive round-trips to the server is extremely advantageous. Each time you create an instance of a COM+ component remotely requires a round-trip, so using JIT activation with a single long-lived object reference (rather than multiple short-lived references) offers a definite performance advantage. Note JIT activation is often combined with object pooling because they complement each other quite nicely . One allows pooling and reuse of expensive objects, and the other allows efficient use of the allocated objects. This significantly speeds object reactivation while retaining whatever resources they might be consuming. Creating a JIT-Activated ComponentLike most of the COM+ features in Visual Basic .NET, JIT activation is enabled with the use of a class-level attribute, in this case JustInTimeActivation . There is little else you need to worry about. You can override the Activate and Deactivate methods because they are called by COM+ before and after the component is activated and reactivated. That is where you should provide any code that you need to reestablish any resources you might be using. The following example demonstrates how you can enable a class to implement both JIT activation and object pooling: ImportsSystem.EnterpriseServices <ObjectPooling(5,10),JustInTimeActivation()>_ PublicClassMyJitPooledObject InheritsServicedComponent PrivateShareds_CountAsInteger=0 Privatem_CountAsInteger Privatem_CanBePooledAsBoolean=True PublicSubNew() MyBase.New() 'Becausemorethanoneinstancemaybecreatedatonce, 'weimplementsynchronizationtoensurecorrectness m_Count=System.Threading.Interlocked.Increment(s_Count) Debug.WriteLine(m_Count& " MyJitPooledObject:NewCreated ") EndSub ProtectedOverridesFunctionCanBePooled()AsBoolean Debug.WriteLine(m_Count& " MyJitPooledObject:CanBePooledcalled") Returnm_CanBePooled EndFunction ProtectedOverridesSubActivate() 'Performactivationcode Debug.WriteLine(m_Count& " MyJitPooledObject:Activatecalled") 'Thisobjcan'tbepooleduntilitisdeactivated m_CanBePooled=False EndSub ProtectedOverridesSubDeactivate() 'Performdeactivationcode Debug.WriteLine(m_Count& " MyJitPooledObject:Deactivatecalled") 'Iamre-allowingpoolingofthisobject m_CanBePooled=True EndSub PublicFunctionHelloWorld()AsString Return "HelloWorld" EndFunction EndClass Modeled after the MyPooledObject class from the Object Pooling section, the MyJitPooledObject provides many of the same debugging features you've already seen. You can find this class in the JustInTime sample application. Now let's move on to the granddaddy of all COM+ technologies: transactions. COM+ TransactionsA transaction is a collection of tasks that must all succeed, or else they will have no effect. If any part of a transaction fails, the transaction must be aborted, returning the system to its original, pre-transaction, state. Consider a situation in which you need to perform a series of actions that are highly dependent on each other ”say, transferring money from one bank account to another. In this scenario, there are two steps. First, you must deduct the correct amount from the source account. Then you need to add the correct amount to the destination account. What if the first operation succeeds but the second fails? What happens? If you took no precautions , the money would probably be lost in the ether , never to be found again. However, if you used a transaction, both steps would be a part of a larger, single (or atomic) operation. If the second step were to fail, you would abort the transaction, which would cause the original account deduction to be undone (rolled back). If, on the other hand, the second operation were to succeed, the transaction would go into a commit phase. This happens when all participants in a transaction agree that any changes they have made should be permanent. This is handled through a voting scheme. Each participant performs some action. When that action is completed, the participant votes to either commit or abort. If all participants vote to commit, the transaction is committed. A transaction can be confined to a single resource (for example, a database or a message queue) or can span multiple resources (more than one database or message queue or any combination thereof). Distributed transactions allow you to integrate a series of distinct operations that span multiple systems into a single transaction. This provides a great deal of reliability in a complex system. It doesn't prevent system failures, but it can help you manage complex systems, ensure data consistency, and avoid corruption issues. The ACID RulesTransactions are not a new concept. In fact, the notion has been around for many years . As with anything that's been around long enough, common rules have developed that all transactions must obey. This set of rules, commonly referred to as the ACID rules , identify the role that transactions play in mission-critical applications. ACID stands for atomicity, consistency, isolation, and durability:
Creating a Transactional ComponentGetting started with a transactional component is fairly straightforward. Let's walk through an example of transferring money from one bank account to another. We'll modify the previous example of a simple serviced component: ImportsSystem.EnterpriseServices <Transaction()>PublicClassMyTransactionalComponent InheritsServicedComponent EndClass We first indicate that the component supports transactions. You can do this by using the Transaction attribute. This attribute has five options: Disabled , NotSupported , Supported , Required , and RequiresNew . Each option implies a different set of rules for client applications. Table 8-4 describes each of these transactional configuration options. You can get away without specifying a transaction type because the default type, with a parameterless constructor, is Required . Table 8-4. Values for the Transaction Attribute
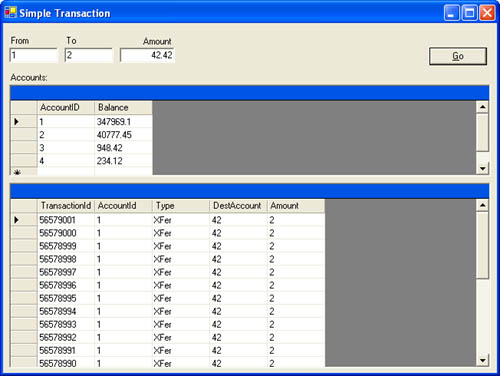
We now have a basic class that supports transactions. Unfortunately, we don't seem to be doing much with it. We need to correct this. Let's look at a real example to see how we can do this. Building a Transactional ComponentThe scenario I have concocted is a simple bank account application. (See Figure 8-7.) The purpose of the application is to transfer money from one account to another. To this end, I created an MSDE database called Bank that contains two user tables: Accounts and Transactions. The general idea is that a monetary transfer between accounts consists of three individual actions: a deduction from the source account, an addition to the destination account, and a new record inserted into the Transactions table. None of these operations can be performed independently. They must all succeed or all fail. Otherwise, you could end up with a database whose contents are suspect. In other words, we need to treat all three actions as a single, atomic super-action. If any part of the transaction fails, no data is affected. Period. Figure 8-7. The Simple Transaction sample application. So how do you preserve data integrity? Thankfully, you don't really need to track individual values or previous states. This sample communicates with a system that supports transactions. (MSDE, like SQL Server, supports transactions.) Therefore, if I make a call to MSDE, SQL Server, or any other DTC provider, my transactional context will automatically flow to the system. I leave the actual task of preserving the original data up to the underlying system (in this case) MSDE. Note If I were manipulating a custom data store, I'd have to implement my own transactional support. The MyTransactionalClass ObjectTo support the features I need in the SimpleTransaction sample application, I created the MyTransactionalClass class to implement the transaction. Let's walk through it step by step. First, we have the class definition. As you might expect, I used the Transaction attribute. The default value for the transaction type is Required , so the class supports two different scenarios. The first possibility is that the class methods are called by a client that is not part of a transaction. In this case, Required forces a new transaction to be created when the client calls into the MyTransactionalClass object. Once that initial call is completed, the transaction is either committed or aborted, depending on what happened during the transaction. The other possibility is that this class is called by a client that's already part of an existing transaction. In this case, method calls on this class will participate as a part of the larger transaction. If I decide that I don't want my class to participate in any other transaction, I can specify TransactionOption.RequiresNew , which will force a new transaction to be created each time. I also take advantage of object construction for the connection string to the database. Rather than hardcoding the value, I decided to show one useful way to use the ConstructionEnabled attribute: <Transaction(),ConstructionEnabled(Default:="server=(local)\NetSdk; " &_ "Trusted_Connection=yes;database=Bank")>_ PublicClassMyTransactionalClass InheritsServicedComponent ... EndClass Now that I have a class definition, I need this class to actually do something. First, I create a set of three private methods that actually do the work. Remember that we're trying to tie together three separate operations: deduct, add, and insert. To implement this, I created the following methods: Deduct , Add , and InsertTransaction . <AutoComplete()>_ PrivateSubDeduct(ByValacctIdAsInteger,ByValamountAsSingle) DimsqlAsString sql=String.Format("UpdateAccounts " &_ "SetBalance=Balance-{0} " &_ "WhereAccountId={1}",amount,acctId) DimcmdAsNewSqlCommand(sql,m_connection) 'ThrowNewException("Thisisamanualfailure") cmd.ExecuteNonQuery() EndSub PrivateSubAdd(ByValacctIdAsInteger,ByValamountAsSingle) DimsqlAsString sql=String.Format("UpdateAccounts " &_ "SetBalance=Balance+{0} " &_ "WhereAccountId={1}",amount,acctId) DimcmdAsNewSqlCommand(sql,m_connection) cmd.ExecuteNonQuery() 'ThrowNewException("Thisisamanualfailure") ContextUtil.SetComplete() EndSub <AutoComplete()>_ PrivateSubInsertTransaction(ByValsourceAcctIdAsInteger,_ ByValtypeAsString,_ ByValAmountAsSingle,_ ByValdestAcctIdAsInteger) 'Insertarecordinthetransactiontable DimsqlAsString sql= "InsertintoTransactions " &_ "(AccountID,Type,Amount,DestAccount) " sql&=String.Format("Values({0},'{1}',{2},{3})",_ sourceAcctId,type,destAcctId,Amount) DimcmdAsNewSqlCommand(sql,m_connection) cmd.ExecuteNonQuery() 'ThrowNewException("Thisisamanualfailure") EndSub The same basic principle applies to all of these methods. Each performs an operation on the database using the SqlClient managed providers. The methods use a shared SqlConnection object (shown later) to do all of their work. Notice that I don't have to do anything explicit to pass the transaction context to the SqlConnection ; it's done transparently. It's actually pretty easy to forget that it is happening at all ”but it is. You'll also notice the use of a method attribute called AutoCommit . This attribute is used to specify methods that will automatically vote to commit a transaction, unless the method terminates abnormally (generates an exception). This is handy because it frees you from having to explicitly add commit code. You can still vote to abort the transaction ”by calling the ContextUtil.SetAbort method ”if you need to. I designed these three methods to demonstrate how you can implement a method both with and without the AutoCommit attribute. You can always use the ContextUtil.SetCommit and ContextUtil.SetAbort methods explicitly if you want to, but if you can let the environment do some of the work for you, why do it yourself? You'll also notice that all of these methods are declared as Private . This is for a good reason. No external client should be able to directly call any of these methods. I made one Public method available to allow the client to perform the balance transfer that can then call the methods that do the actual work: Transfer . <AutoComplete()>_ PublicFunctionTransfer(ByValsourceAcctIdAsInteger,_ ByValdestAcctIdAsInteger,_ ByValamountAsSingle)AsBoolean Deduct(sourceAcctId,amount) Add(destAcctId,amount) InsertTransaction(sourceAcctId, "Xfer",amount,destAcctId) 'ThrowNewException("Thisisamanualfailure") EndFunction Yet again, I used the AutoComplete attribute of this method and then called each private method. Note how easy it is to deal with transactions. The transactional context flows transparently from method to method. You don't need to do anything other than call the methods. Also note that, in most cases, the Transfer method represents the top-level method in the transaction. This means that when the method terminates normally, the transaction will commit. If, on the other hand, an exception is thrown in this method even after the other methods have been called, the transaction will still fail. Each part of the chain must succeed. Each method includes something a little odd: a commented Throw statement. I added it because it allows you to play with the sample by uncommenting certain exceptions and seeing how it affects the transaction. You should notice that whenever an exception occurs in the transaction call hierarchy, the transaction is automatically aborted and no data is changed. The following is the complete MyTransactionalClass so you can see everything in place. (This is also available in the SimpleTransaction sample application.) ImportsSystem.Data.SqlClient ImportsSystem.EnterpriseServices ImportsSystem.Reflection <Transaction(),ConstructionEnabled(Default:="server=(local)\NetSdk; " &_ "Trusted_Connection=yes;database=Bank",ObjectPooling())>_ PublicClassMyTransactionalClass InheritsServicedComponent Privatem_ConnectionStringAsString ProtectedOverridesSubConstruct(ByValsAsString) m_ConnectionString=s EndSub Privatem_connectionAsSqlConnection ProtectedOverridesSubActivate() m_connection=NewSqlConnection(m_ConnectionString) m_connection.Open() EndSub ProtectedOverridesSubDeactivate() m_connection.Close() EndSub <AutoComplete()>_ PublicFunctionTransfer(ByValsourceAcctIdAsInteger,_ ByValdestAcctIdAsInteger,_ ByValamountAsSingle)AsBoolean Deduct(sourceAcctId,amount) Add(destAcctId,amount) InsertTransaction(sourceAcctId, "Xfer",amount,destAcctId) 'ThrowNewException("Thisisamanualfailure") EndFunction <AutoComplete()>_ PrivateSubDeduct(ByValacctIdAsInteger,ByValamountAsSingle) DimsqlAsString sql=String.Format("UpdateAccounts " &_ "SetBalance=Balance-{0} " &_ "WhereAccountId={1}",amount,acctId) DimcmdAsNewSqlCommand(sql,m_connection) 'ThrowNewException("Thisisamanualfailure") cmd.ExecuteNonQuery() EndSub PrivateSubAdd(ByValacctIdAsInteger,ByValamountAsSingle) DimsqlAsString sql=String.Format("UpdateAccounts " &_ "SetBalance=Balance+{0} " &_ "WhereAccountId={1}",amount,acctId) DimcmdAsNewSqlCommand(sql,m_connection) cmd.ExecuteNonQuery() 'ThrowNewException("Thisisamanualfailure") ContextUtil.SetComplete() EndSub <AutoComplete()>_ PrivateSubInsertTransaction(ByValsourceAcctIdAsInteger,_ ByValtypeAsString,_ ByValAmountAsSingle,_ ByValdestAcctIdAsInteger) 'Insertarecordinthetransactiontable DimsqlAsString sql= "InsertintoTransactions " &_ "(AccountID,Type,Amount,DestAccount) " sql&=String.Format("Values({0},'{1}',{2},{3})",_ sourceAcctId,type,destAcctId,Amount) DimcmdAsNewSqlCommand(sql,m_connection) cmd.ExecuteNonQuery() 'ThrowNewException("Thisisamanualfailure") EndSub EndClass That's it for the sample. Go ahead and run it. (You'll first need to attach the database to an instance of MSDE or SQL Server.) You can play with the sample by commenting out different exceptions and seeing what effect that has. |

| I l @ ve RuBoard |
EAN: 2147483647
Pages: 103