Installing and Configuring Printers on Windows Servers
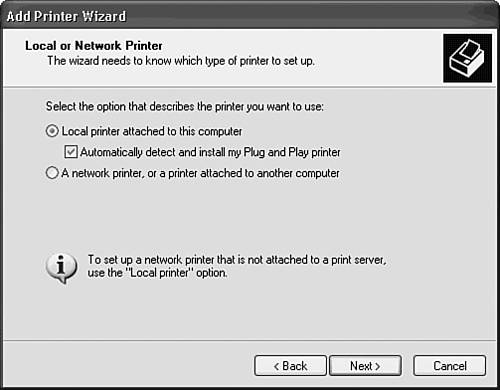
Installing and Configuring Printers on Windows ServersAll versions of Windows server operating systems support multiple printing protocols. In this section you will learn how to install and configure printers using Windows NT, Windows 2000, and Windows XP. Although Windows XP Professional is a client operating system, it is included here because it can provide print services in a small network (such as the SOHO environment) where a server operating system is not needed. Windows 2003 server operating systems use similar or the same wizard dialog boxes as used by Windows 2000 computers. Also, you'll learn what some of the prompts mean and how you can improve printer performance on the network. Windows NT 4.0To begin adding a new printer, select Add Printer from the Printers folder that you find under My Computer. The Add Printer Wizard asks you a few simple questions. Where Will the Printer Be Managed?This first question can be confusing if you are not familiar with Windows NT 4.0 printing. These are the available choices:
The wizard is not asking you where the printer will be connected . For example, if you select My Computer, this does not mean that the physical printer device will be connected to the LPT1: port on your server (although it might be). Instead, the prompt is asking you where the printer will be managed . If you select My Computer, the necessary drivers for the printer are loaded on the local computer and are responsible for any settings or other management functions for the printer on this computer. If you select Network Printer Server, the wizard enables you to connect to a printer that is already on the network or is being offered by another server (such as a Unix host). The wizard then prompts you to load a driver for the printer, unless one is already loaded on the server that hosts the printer. When you connect to a printer using this method, you can send print jobs to the printer but you cannot manage its properties. Port SelectionIf you chose My Computer as the place where the printer will be managed, the next wizard prompt asks for the name of the port to which the printer is attached. This can be a local port, such as LPT1:, LPT2:, or even COM1:, and so on. You can select to have the printer set up to send the print job to a file instead, although this is a feature more useful for tasks such as capturing the output from an application that doesn't provide such a function. If you want this logical printer to manage documents that are sent to a printer elsewhere on the network, select Add Port, and then supply the necessary configuration information that the wizard needs in order to create a port for the printer. The following kinds of ports are supported under Windows NT Server 4.0:
Highlight the port you want to create, and then click the New Port button. Depending on the choice you make, a dialog box appears to prompt you for more information for the specific kind of port you want to create. Fill in the name you want to give the port, and then select the 12-digit LAN (MAC) hardware address that corresponds to the address of the printer. You can get the address for the HP printer by printing a self-test page, or, if you're really bored, by going through the printer's I/O configuration menus . If no addresses appear on this dialog box, the printer might be powered off or there might be a network error preventing the server from obtaining it. If you click the Options or Timers button, you can customize this printer port further by specifying such things as the logging level that will be performed (information, warning, error) and values for timers associated with the DLC protocol. Selecting Printer DriversAfter you complete the dialog box for the port you want to use and return to the main dialog box, click the Next button to bring up a dialog box from which you can specify the manufacturer and type of printer. This information is used to determine which drivers Windows NT needs to load for this printer. You also can click the Have Disk button if your printer is not listed and you have a driver from the manufacturer that you can use. Because the purpose of a print server is to accept print jobs from clients , be sure to load drivers for each kind of operating-system client on the network that needs access to this printer. When the client prints the first time, it downloads the driver from the server so that the print job can be rendered into the correct format for the particular printer. Giving the Printer a NameNext, the wizard prompts you to enter a name to use for the printer. This name won't be used as the printer share name; instead, it's a descriptive name for the printer. Use the radio buttons at the bottom of the dialog box to set this printer as the default for this server if applicable . This does not set the printer as the default for users who connect to it over the network; it sets the printer as the default that shows up when you send print jobs from applications while you are logged in to this server locally. Sharing the Printer on the NetworkThe last dialog box you see enables the printer to be offered as a printer share for network clients. In this dialog box you must select the Shared radio button, and then give the printer a name that will be displayed to users. Note that the Share Name field defaults to the type of printer and the first eight characters to be available to clients that have restrictions on the length of resource names , such as older MS-DOS clients. You can edit this field and use any name that makes sense to your users. It's usually best to use a name that indicates both the location of the printer and the kind of printer. This dialog box also can be used to load additional drivers for clients that connect to the printer over the network. For example, if you have Windows 95 clients on your network, you should select Windows 95 from the dialog box. When this type of client must send a print job to the printer, Windows NT Server downloads the driver to the client so that the print job is formatted correctly for the printer. If the driver you specify is not already loaded on the system (for another printer, for example), you are prompted for the location of the driver. When you have finished specifying a share name for the printer and have selected any additional printer drivers you want to load, click the Next button. Another dialog box asks whether you want to print a test page. This step is highly recommended because if the test page doesn't print, nothing else is going to print. If the test page does not print, review the selections you have made to be sure they are accurate. Or you might have a network problem that needs to be looked into. If this is a TCP/IP-networked printer, for example, you might try pinging the printer to determine whether it's reachable on the network. If you are using another protocol, try printing from a different computer that is configured similarly and determine whether this succeeds. If not, a network problem (such as a router configuration) might need to be resolved. Print Server Properties, Printer Properties, and Document Properties for Windows NT 4.0 ServerWindows NT 4.0 Server enables you to configure properties for the print server as a whole and configure properties that are specific to each printer you create. You can also configure default properties that are applied to documents printed on the server. Print Server PropertiesTo bring up the properties sheet for the print server, choose File, Properties in the Printers folder. There are three tabs on this properties sheet:
Forms are used to define certain properties of the output page that will be printed, including the size of the paper and the margins. Windows NT Server comes with several standard forms already defined, including most standard paper sizes and envelopes. If you have a special form that you have created for your business, such as an invoice format, you can define a new form using the Forms tab. If you plan to set up several printers but want to get some of the work out of the way beforehand, you can use the Ports tab to create the necessary ports. When you actually get around to creating the printers, you can select the appropriate port rather than create it. This also can be useful in an environment in which one administrator is responsible for network functions and another is responsible for printing. The network administrator who is aware of network addresses used by certain devices can create the ports and send a list to the printer administrator, who can then create and manage the printers that use the ports. The Advanced tab is an important one to remember for troubleshooting purposes in which the more information you have, the better chance you have of solving your problem. You can enable the following notification and logging categories:
The Log Spooler Error Events option sets a logging severity level for events that will be placed into the System Event Log. You can use the Event Viewer administrative tool to examine the logged events. If users are complaining that their print jobs are not being printed, enable all three of the Log Spooler check boxes and, after they have attempted to print, review the records found in the Event Log.
The information recorded in the Event Log helps you determine why the users' jobs are not printing. The Log Spooler Information Events check box also can be used to keep track of the pages printed by individual users. It can be tedious to use the graphical interface provided by the Event Viewer to review each record. To overcome this obstacle , you can create a comma-delimited file that contains the information found in the file. However, to do this you need the Dump Event Log (DUMPEL.EXE) utility, which can be found in the Windows NT Server 4.0 Resource Kit. Another useful thing you can do on this tab of the properties sheet is change the spooling directory used by the server. If performance is a problem with the server, you might want to locate the spooling directory on a disk by itself to speed up access. For a low-volume print server, this probably won't be necessary. Printer PropertiesYou can access the properties page for any printer by using either of the following:
The properties page for a printer is divided into six property sheets that enable you to control a wide variety of properties for each printer on an individual basis:
The General tab enables you to modify informational text about the printer that users can view, such as the location of the printer. You also can use this tab to select an existing separator page or create a new separator page. Separator pages can be used to print a page before each user 's job so that it's easy for an operator to separate each print job on a high-volume printer used by many users. Separator pages also can be used to send printer-specific codes to a printer that determines how it prints the document. Windows NT Server comes with three separator pages designed for this purpose:
You can design your own separator pages using escape codes to include information such as the user's name, print job number, date, and any additional text you want on the page. You also can print a test page from the General tab when troubleshooting the printer. Another useful feature on this page is the New Driver button, which you can use to load an updated printer driver. This might be necessary when a manufacturer releases a printer driver that is more current than the one found on the Windows NT Server source CDs. The Ports tab is similar to the ports display that you see when you create a printer or when you view ports using the Print Server properties page. Here, however, you can change the port used by this printer, which comes in handy when a printer is moved to a new location and a new network connection is required. You don't have to delete and re-create the printer; just go to the Ports tab and select or create the new port after the printer has been moved. Then, go back to the General tab and print a test page to determine whether the port has been successfully created. The Scheduling tab enables you to set the time of day that a printer is available for use. Generally, a printer is available 24 hours per day, but you can use this tab to change that if you need to. Note that users can still send print jobs to a printer outside its available time range. Their documents are stored and then printed when the printer is available for use. If you allow users to schedule jobs to be printed later, you also must be aware of the disk space that will be used for spooling the documents that must wait. For large files, such as those containing complex graphics, you'll need a lot of space. This feature can be used to force certain print jobs, such as lengthy reports , to be delayed until after-hours when ordinary users no longer need the printer. For example, you can set up several logical printers. You can make one logical printer available to your normal workday users and set another to allow printing after hours. Applications that produce voluminous print jobs can send their documents to this latter printer, and users can retrieve their documents the next morning when they come into work. The Scheduling tab enables you to specify several other configuration options:
Normally, your documents must be spooled before they print so that users notice a faster response time. However, when troubleshooting, you might want to send documents directly to the printer, bypassing the spooling operation. Also, if space becomes a problem on the disk that holds the spooling directory, you can cause jobs to be sent directly to the printer to avoid using additional disk space. Because this option is selectable by printer, you can set up some printers to use the spool directory and others to send jobs directly to the printer. The Sharing tab enables you to modify the selections you chose when you created the printer and to either allow or disallow the printer to be shared with network users. You also can use this tab to load additional client drivers when new clients are brought into the network, or to change the share name the printer uses on the network. The Security tab enables you to set up permissions that control which users or groups can use this printer, and that control auditing features for the printer. Users can be denied access to the printer, be allowed to print and manage documents, or be given full control to the printer. Full control allows users to perform the following functions:
Usually, only print operators or network administrators are given full control over a printer. Most users need only the Print permission. This enables users to send print jobs and control their print jobs, but not those of other users. Auditing can help print operators and network administrators monitor printer usage to determine whether changes in permissions are necessary. The Auditing functions on the Security tab allow you to record events to the Event Log for later review. See Chapter 47, "Auditing and Other Monitoring Measures," to learn more about auditing print events and using the Event Viewer to review the data captured. The Device Settings tab enables you to configure device-specific values for the printer. This includes information on tray selection, font cartridges, and so on, depending on the features available for the specific printer type. Managing PrintersAfter you create a printer, users can connect to it and use it to print. The administrator, or other users who have the appropriate permissions, can view the status of documents waiting to print and can manage the printer. You can access this dialog box by double-clicking a printer in the Printers folder. Documents that are currently being printed or waiting to print are displayed, showing the title of the document, the user, the size of the print job, the port the printer uses, and the date and time the job was submitted. You can use the Printer menu and the Document menu to manage the printer or any document. The Printer menu allows you to perform the following actions:
This menu is useful when you're experiencing problems with a particular printer. You can pause the printer, which stops printing but keeps any documents waiting to print, to fix a minor problem and then resume printing after the trouble has been resolved. You also can remove all documents from the printer, which is handy when a user or an application has sent numerous documents to a printer by mistake. You can bring up the Properties page for the printer, discussed earlier in this chapter, and modify items as you see fit. The Documents menu is used to individually pause, restart, or cancel print jobs. You can selectively highlight individual documents waiting to print and then cancel them. This view of the printer is most often used by print operators who are responsible for managing printer resources on the network. Adding a Printer on a Windows 2000 ServerAgain, Microsoft provides the Add Printer Wizard to guide you through installing a printer on a Windows 2000 Server. Earlier in this chapter, for Windows NT 4, you learned the basic steps for creating a printer using a TCP/IP port. Now, you'll see the other possible choices you have for a Windows 2000 Server. To bring up the Add Printer Wizard, click Start, Settings, Printers and then double-click the Add Printer icon. In the same manner as with the Windows NT 4.0 Wizard, you are prompted to create a printer for a local printer or a networked printer. Remember, this refers to where the printer will be managed. If you want to connect to a network printer so that the server can send documents to that printer, select the Network Printer check box. However, you won't be able to manage this printer or offer it as a share to other computers. If you want to manage the printer locally (even if it is a printer on the network), select Local Printer and click the Next button. In the next dialog box, titled Select the Printer Port (shown in Figure 45.3), you choose an existing port by selecting the Use the Following Port option button. The list should include the standard printer ports (that is, LPT1:), as well as any ports you might have created in the past. To connect to a networked printer, however, use the Create a New Port option button. This selection can also be used to create local ports. Figure 45.3. You can connect to a printer that is directly attached to the computer or one that resides on the network. If you select Local Port as the new kind of port to create, you have the following options:
In addition to using local ports, you can use the Create a New Port option to create ports for printers that reside on the network. The options that you'll find depend on the protocols and services you've installed on the Windows 2000 server. The following additional ports can be created:
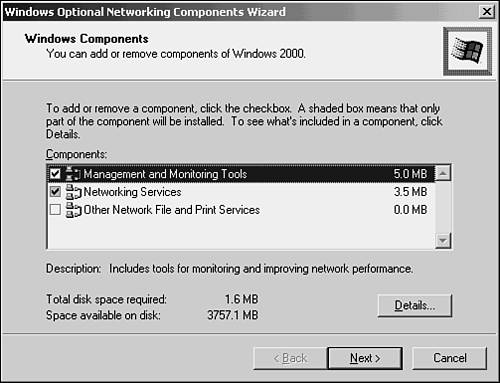
In the preceding list, the most likely choice today is to create a standard TCP/IP port, because almost all printers and printing appliances support it. However, if you need to use one of the other port types, be sure to install the prerequisite protocols or services. For example, to install Print Services for Unix, you can add the component easily by clicking Start, Settings, Network, Dial-up Connections. Next, select Add Network Components. In Figure 45.4, you can see the dialog box that allows you to add networking components . Note that the last check box is Other Network File and Print Services. Figure 45.4. You must first install the necessary protocols and services for some printers. To choose which protocols to install, select the Other Network File and Print Services check box and click the Details button. In Figure 45.5, you see the additional printing services that can be installed on a Windows 2000 computer. Figure 45.5. You can select which printing service to install from this dialog box. You can install print services for Macintosh or Unix printers. After you make your selection, you are prompted for additional information, and the service is installed. To install additional protocols, such as AppleTalk or DLC, use the following steps:
After you have installed the necessary protocol(s) and service(s), you should see them as options when you elect to create a printer port on a Windows 2000 server. The remaining prompts displayed by the Add Printer Wizard depend on the protocol you've chosen . As with Windows NT 4.0, you also must select the printer manufacturer and the model of the printer. You are prompted to make the printer your default on the local computer and are asked whether you want to share it on the network. Finally, you get to print a test page, and then you're done with the Add Printer Wizard. Print Server Properties, Printer Properties, and Document Properties for Windows 2000 ServerJust as with Windows 4.0 Server, you can manage Windows 2000 print servers and individual printers. You can also set up default properties for documents. To begin, click Start, Settings, Printers to bring up the Printers window. Choose File, Server Properties. As you can see in Figure 45.8, Windows 2000 adds a new Drivers tab to the Print Server Properties page. Figure 45.8. The Print Server Properties page allows you to manage global properties for the print server. The other standard tabs are there, and work just like they did for Windows NT 4.0 Server. You can design forms, modify ports, and use the Advanced tab to set up logging and other notifications. The Drivers tab, shown in Figure 45.9, allows you to load additional printer drivers for clients that will access the printer. Figure 45.9. You can load additional printer drivers for clients on your network using the Drivers tab. To add additional printer drivers, click the Add button. The Add Printer Wizard pops up again. Click Next to go back to the dialog box that allows you to choose a manufacturer and a printer model. Or you can use the Have Disk option to load a driver that is not part of the standard Windows 2000 distribution. You also can remove drivers by highlighting them and clicking the Remove button. If you need to update a driver, use the Update button. This is a powerful function because, in this one place, you can update a driver that is used by multiple printers. The Properties button allows you to view properties pages specific to the driver you have highlighted. Casual users shouldn't change items on a printer driver's properties page. Make these changes only if you are thoroughly proficient in the printer workings and understand the changes you are making. Printer PropertiesAgain, the properties page for a printer in Windows 2000 is similar to that used in Windows NT 4.0 Server, but with a few differences, as you can see in Figure 45.10. Figure 45.10. You can manage properties for each printer individually. Note that the Scheduling tab no longer shows up. This function is now located on the new Advanced tab. In addition to the tabs that were available under the Windows NT 4.0 Server version, the following tabs now show up on a printer's properties page:
All the other functions found in Windows NT 4.0 are still here; you might have to spend just a minute or two looking through the various tabs to find them. Managing Printer PropertiesFor day-to-day printer management, you double-click a printer icon in the Printers folder. You can start, stop, and pause the printer or a particular document. You can also purge the printer of all documents waiting to print or selectively cancel documents. Publishing Printers in the Active DirectoryThe Active Directory can hold information about users, computers, and resources such as printers. First, you can publish a printer in the Active Directory if you are logged in to a domain that is part of the Active Directory (for either Windows 2000 or Windows Server 2003). To do so, follow these steps:
If you want to share a printer that is not managed by a Windows 2000 or Windows Server 2003 computer, the process is a little different. First you must create the printer on the computer (such as a Windows NT Server). The printer share will then be accessible on the network using the Universal Naming Convention (UNC). For example, \\zira\hplj would indicate that a printer named hplj on the computer named zira is being offered to the network as a printer share. Next, use the Active Directory Users and Computers utility to add the printer to the directory. For Windows 2000, use Start, Programs, Administrative Tools, and then select the Active Directory Users and Computers utility. For Windows Server 2003, click on Start, Administrative Tools, and then Active Directory Users and Computers. Choose the container object where you want to place the printer. This can be a domain, or a container object beneath a domain, or a container object that holds several domains. For more information about container objects and domains in the Active Directory, see Chapter 31, "Using the Active Directory." Right-click on the container object, and select New, Printer. In the dialog box that appears, enter the UNC name described previously for the printer you want to publish. Click OK. Managing Printers Using the Internet Printing Protocol (IPP)One new feature that Windows 2000 offers is support for the Internet Printing Protocol (IPP) that was discussed in the preceding chapter. In addition to allowing clients to use a browser to connect to a printer on a Windows 2000 print server, you can also use a browser to manage printers. To use IPP, you must install Internet Information Services (IIS) on the print server as a prerequisite. This can be done during the initial operating-system installation. Or use the Add/Remove Programs icon in the Control Panel and select Add/Remove Windows Components to install IIS later. When you've installed IIS, you'll find a new entry in the Administrative Tools folder: Internet Services Manager. Managing Access to the Web-Based Printers FolderAs with the other administrative tools, the Internet Services Manager is written as a snap-in for the Microsoft Management Console (MMC). When you first launch the application, you'll see the MMC console tree in the left pane, listing the IIS Web servers that are in your domain. Select a server by clicking it once, and then click the plus sign that appears next to the server to expand the tree. A list of Web sites for the server appears. In the example shown in Figure 45.12, you can see that the Default Web Site has been expanded to show the objects that fall beneath it in the tree. The Printers folder is at the bottom of the list. Figure 45.12. You can manage printers using IPP from the Internet Services Manager application. Right-click the Printers folder and select Properties. In Figure 45.13, you can see the properties page that appears, with the Virtual Directory tab selected. Figure 45.13. You can manage printers via an Internet browser using Windows 2000 and IPP.
For the most part, you can ignore most of this first tab and keep the defaults. If you are running a Web site using IIS, you might have reason to make changes here, but for ordinary printing tasks the defaults should suffice. Leave the virtual directory on the local computer so that information about printers will be stored on the print server. You'll need to leave Read Access enabled so that users can browse for printers. The Log Visits check box can be useful for troubleshooting purposes later. You can configure permissions to restrict access to this Web-printing management on the Directory Security tab (see Figure 45.14). Figure 45.14. You can restrict access to printer management using the Directory Security tab. If you click the Edit button under Anonymous Access and Authentication Control, you can select the kind of access allowed for managing printers. You can choose the authentication method for users wanting to connect to a printer from the following:
You can use the IP Address and Domain Name Restrictions section on the Directory Security tab to further control access. When you click the Edit button for this section, you'll see a dialog box similar to that shown in Figure 45.15. Figure 45.15. You can allow or deny access based on IP addresses. You can choose to add records for IP addresses that are allowed to use the printer, or you can specify those addresses that are denied access. To allow access to most users, and restrict just a few addresses, select the Granted Access option and use the Add button to add exclusions. This is the easiest method for granting access if the printer is to be available to most of your users. Alternatively, you can choose the Denied Access option and use the Add button to add IP addresses of those specific computers that are allowed to access the Printers folder on this server. Figure 45.16 shows the dialog box that appears when you click the Add button. In this example, the Group of Computers option is selected, which is more efficient than entering individual IP addresses. Instead, you specify a network ID and the subnet mask for that network. Thus, you can allow or deny entire groups of computers based on their network address. This is helpful when using DHCP to configure client computers. In that situation, you know the network address for any particular subnet, but you don't know which IP address will be assigned to any particular client. If your network is organized in a logical manner by department, for example, you can control access for different departments if they are each on a different subnet. Simply specify the subnet network address and address mask using this dialog box. Figure 45.16. You can specify an individual address or a particular network using the Add Button dialog box. Note also that you can use the Domain Name option in the Add Button dialog box, in which case you can control access based on a domain name. This method, however, requires additional overhead and can slow server performance. Finally, the Directory Security tab allows you to require secure communications using a certificate server. You must have a certificate server on the network for this functionality to be available. This is the most secure form of communications you can choose for managing the Printers folder. Managing Printers Using a Web BrowserTo view the printers on a print server that has been IPP enabled by the installation of IIS, use the URL http:// servername /printers . In Figure 45.17, you can see a listing of the printers that are shared on the print server Popeye. You can quickly check the status of printers using this URL. Figure 45.17. You can view all the printers shared by a Windows 2000 print server. To see details about a particular printer, click the printer in this display. Figure 45.18 shows the page that is displayed for a single printer. Figure 45.18. You can view information about each printer using a Web browser. In this figure, the functions available are just about the same as you get when you double-click a printer icon in the Printers folder. However, the display is in Web-browser form instead of the traditional dialog boxes and windows used in the past. Most of the display is used to show documents waiting to print and status information, such as the owner and when the print job was submitted. On the left side of the Web page, you'll see three sections of options for management purposes:
Figure 45.19 shows the Properties page for a printer. This is helpful when choosing a printer. Figure 45.19. Use the Properties page for a printer when trying to decide which printer to use, based on the printer's capabilities. The Properties page for a printer can be used to determine a printer's capabilities. The Comment and Location fields would have been nice to see in this figure. When this printer was created, the administrator was obviously in a hurry. Finally, Figure 45.20 shows the Device Status page for a printer, which can be useful when troubleshooting. Note the other information you can see from this view, including information from the printer's front panel display, the status of paper trays, and any error messages that might be outstanding for the printer. Figure 45.20. You can check the status of the device using this Web-based view. Because IPP allows you to print to printers literally anywhere on the Internet, it will be more widely implemented in the near future as the standards committee finishes the next version of the specification. Although the usual Windows printer-management utilities allow you to manage printers remotely, by using a browser you can manage printers from just about anywhere , as long as you set up management user access securely. Installing and Configuring Printing on a Windows XP ComputerAlthough Windows XP Professional is a client operating system, and not in the same class as Windows server operating systems, it is very popular in SOHO networks that contain just a few computers and do not require a more robust server operating system. If you are operating in the SOHO environment, Windows XP can be configured to share printer(s) as well as file shares. In this section you will find out how to configure a printer on Windows XP Professionalusing TCP/IPto enable it to share printers with other computers. Windows XP Professional can share a printer that is directly connected to the computer via its physical ports (such as a parallel port, USB, or FireWire port). In addition, like Windows 2000, Windows XP Professional can be used to satisfy client print requests by sending print jobs to printers on other computers, or printers that have their own network connection. If you do not need to use the Windows XP computer as a print server, you can also let clients connect to any printer on the network. Thus, there are three ways you can set up a printer connection in a Windows SOHO network. Each client can make a connection directly to a networked printer (in which case the XP computer is not required to act as a server), a connection can be made directly to a printer physically connected to an XP computer, or a client can print to a shared printer on a Windows XP client that is redirected to a networked printer that the XP computer communicates with. In Figure 45.21 you can see an overview of the choices. Figure 45.21. There are a few ways you can connect clients in a SOHO network to a printer that uses Windows XP Professional. The first scenario demonstrates that network computers can connect to a printer that has its own network connection. This can be an easy solution in a small network where you do not need to control access to networked printers, but rather let clients connect directly to the printers they want to use. In the second example, a Windows XP computer has a print device connected to one of its ports, and clients send print jobs to the Windows XP computer, which then sends the print job to the physical printer. By using this method, the Windows XP computer can act as a gateway controlling access to the computer. This means that you can create print shares on the Windows XP computer and grant or deny access to individual clients on the LAN. In the third example, a Windows XP computer can establish connections to printers that are attached to the network. As with the second example, clients send their print requests to the Windows XP computer and it will make the connection to the networked printer. This example also allows the Windows XP computer to control access to the printer.
Configuring a Printer Using Windows XP Professional
Use the following steps to easily configure Windows XP for printing:
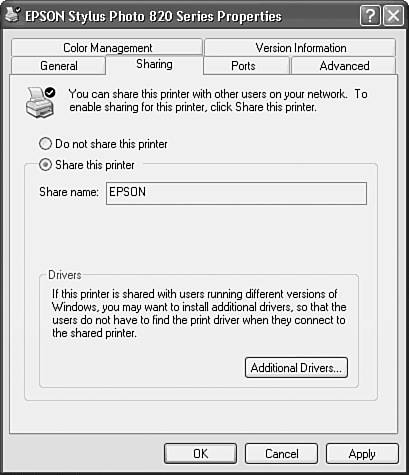
After you have configured the printer, you can use the Properties pages for the printer to enable sharing the printer with other computers. Use the following steps to enable sharing the printer with other client computers on the network:
To ensure that the printer has been properly configured for sharing on the network, use another computer on the network to connect to the printer share and print a document. In addition to the Sharing tab on the printer's properties sheets, you will find other tabs, depending on the type of printer you have configured on the system. For example, a Color Management tab would be present for a color printer but not for a monochrome laser printer. You might want to check out all of these tabs that are created for your printer to determine whether there are other features you might want to configure. |


EAN: 2147483647
Pages: 434