User Administration
| Several files are generally associated with the user logon process for Unix systems. These files can be located in different directories, and the fields within some of these files can vary from one implementation to another. However, the following two files are generally used:
The /etc/passwd FileThe Unix operating system usually authenticates users by comparing their credentials with those stored in one or more files on the server. This is similar to the method used for the older Novell-based bindery, in which users must authenticate to each server they want to access. The typical username/password exchange is used, and the /etc/passwd file is the standard file used to store most user information. It is a simple text file that stores data using ASCII characters, and it's world-readable because access to the file is required during the logon process. The fields in this file store information such as the username, the home directory, the default shell, and an encrypted password, among other things. This file is one of the most vulnerable and soughtafter files by hackers. You might think that it's a safe file because the password field in this file is encrypted. Not true! After a hacker has access to this file, a large number of utilities can be downloaded from the Internet to run against a password file to decrypt the password. Many hackers just use a dictionary and known encryption techniques and then compare the result with the value found in your /etc/password file. When a match is found, the hacker knows your password for that account. Keep in mind that this file is world-readable. That means after someone has broken into even the most restricted account, if they can get to a shell command prompt, they can most likely copy this file and use it to further compromise accounts that have been granted much greater access rights to the system. Note This chapter covers files used to secure individual or groups of Unix servers and workstations in a network. It should be obvious that managing a large number of workstations, even using things such as NIS, can be a difficult task from a security standpoint. For this reason, every network that connects to another outside network, or the Internet, needs a good firewall. The authentication files discussed in this chapter help protect an individual Unix system. A firewall can help protect the entire network from outsiders. Chapter 45, "Firewalls," contains more information on this important topic. After the root password is discovered, or the password to any account that has administrator-equivalent privileges is discovered, your system is wide open to attack. This is just one of many reasons why it is very important to use a long, meaningless, and complex password consisting of a mix of letters, numbers, and symbols. Password complexity makes it more difficult to use either dictionary or brute-force attacks to break a password. However, don't make your password so difficult to remember that you have to write it down. This is the format for the /etc/passwd file, on most systems: username:password:uid:gid:GECOS:homedir:shell Note that the colon character (:) is used to separate fields. If a field is to be left blank, you'll see two colons in a row. The fields in this file are detailed here:
A typical entry in the /etc/passwd file looks like this: jdoe:Gfjhjo9Uia$jpo2dYtaGGdsh:223:100:John Doe:/home/jdoe:bash rsmith:HuiTytsm$ld34tTbd9Saa2:119:110:Rob Smith:/home/rsmith:bash Note that the second field, the password field, appears to have nonsense characters. This is the encrypted password that is highly prized by network intruders. Using a Shadow Password FileTo plug the password security hole presented by the /etc/passwd file, a technique called a shadow password file is usually used. This file contains the actual passwords, also in encrypted format. However, the shadow password file is not world-readable, and permissions are set so that only the root account can access this file. On many systems, the name of the shadow password file is /etc/shadow. Check your documentation to determine the exact path on your system. Also note that on some older systems (and a few current ones), you'll have to load an extra component to install the shadow password file capabilities. Keep up-to-date by consulting your vendor's Web site. The contents of this file also can vary from one system to another. However, the following format contains the fields used in most implementations: username:password:last:may:must:warn:expire:disable:reserved The following list describes these fields:
As you can see, using a shadow password file gives you additional control over accounts, such as setting password expiration values. It also gives you informational fields (such as last and disable that can be used when managing user accounts. The /etc/groups FileThis file contains a list of user groups and a numerical value used to identify the group. The syntax for entries in this file is as follows: groupname:grouppassword:groupID:username1,username2 ...
Users can be members of more than one group. If this is the case, the first group is the user's primary group, and the GID of this group is used when files are created or saved. Users can use the groups command to view the group(s) of which they are a member. The command chgrp can be used to change the current default group. Adding or Removing User AccountsTo add or remove a user from a Unix/Linux box, you can edit the password and group files. However, whenever you make an edit to such an important file, there is always the chance that something will go wrong and you'll end up rendering an account, or possibly a system, unusable. It's advisable to always make a backup of an important file before making any edits. After making entries in the /etc/passwd and /etc/groups files, you'll have to create the user's home directory and install any files that are part of your standard distribution, such as shell files. However, on most systems you won't have to go through all this trouble. Instead, most versions of Unix or Linux provide a program that can be used to perform all the functions needed to add or remove a user. On FreeBSD Unix, for example, the adduser command can be used. The syntax for this command is as follows: adduser [-dDv] [-c changetime] [-C class] [-e expiretime] [-g primarygroup]
If you enter the adduser command with no command-line arguments, the command will prompt you for the information it needs (such as a username) to create the new account. You can use the large number of options available with the command to construct your own command to add users. If you need to add a large number of users at a time, or if you use the same command-line options frequently, create script files that can be used to invoke the adduser command for your customized requirements. By using this command, you not only make the necessary entries into the /etc/passwd and /etc/groups files, but also create the user's home directory. The rmuser command can be used to remove a user. Simply follow the command with the username that is to be removed. The -v option is the only other command-line option available with this command. The addgroup command works similar to the adduser command and helps automate the process of managing entries in the /etc/groups file. The syntax for this command is much simpler because there are fewer fields in the groups file, and no directories or other data structures need to be created. The syntax for this command is as follows: addgroup [-vd] [-g gid] [-m members] [groupname...]
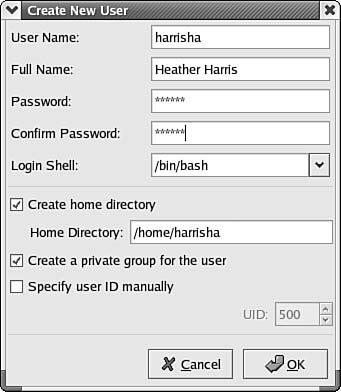
Other versions of Unix/Linux have similar programs. For example, Compaq's True64Unix uses the useradd command. The syntax is similar to that of the adduser command, but a few other options are available. For example, the -x option enables you to further specify options relating to NIS, password expiration times, and so on. Red Hat's Linux distribution enables you to use a similar useradd command. However, it also offers a more complex tool called linuxconf, which can be used in text mode, and also in a GUI mode using an X Window Systems interface or a Web browser. This tool goes far beyond simple user configuration tasks, including options for managing groups, file systems, system services, and many other objects. Check the documentation of your Unix or Linux version to determine the commands and exact syntax for any script files or other utilities that can be used to automate user management. Tip In addition to any printed documentation you get with the Unix or Linux product you purchase, you can get online help. The command MAN followed by a topic will display text for the command you specify. The term MAN comes from Manual Pages. Consider this as a first resort when you need help with command syntax, and so on. Using a Linux GUI Utility to Manage UsersBoth Unix and Linux systems come with a graphical interface that can be used to perform many of the functions you can do at the command line. Some of these utilities provide all the functionality of the command-line version, whereas others offer a subset. For example, in Figure 38.1 you can see an example from Linuxthe Red Hat User Manager. Figure 38.1. Unix and Linux also enable you to manage users using a GUI interface.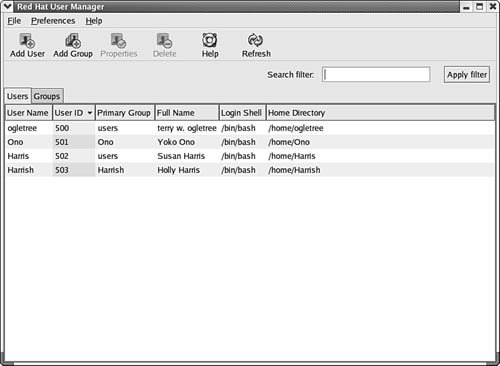 To bring up this utility, click on the Red Hat (the equivalent of the Windows Start button), and then from the menu click on System Settings and finally Users and Groups. The only account that exists on this computer now is the root account, which exists on the computer when it is first booted. It was set up during the operating-system installation. As the "superuser" account, this has the rights and privileges to do anything on the computer, depending on what mode the Linux box is booted into. You can also enter user accounts during the installation and use the user manager utility to add or modify accounts later. To add users, use the Add User button at the top of the window. Similarly, to add a new group that you can use to categorize users, use the Add Group button. In Figure 38.2 you can see an example of the Create New User dialog box. Figure 38.2. The Create New User dialog box allows you to enter the basic information about a new user. Here you can enter information that looks a lot like that used in Windows NT 4.0. There are just a few fields such as these:
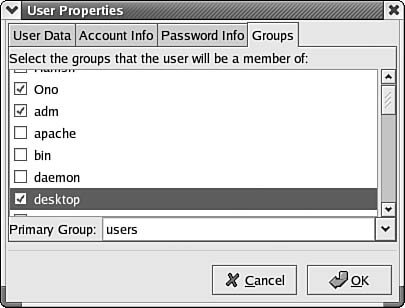
When you are finished entering information for a new user, click the Cancel button if you've changed your mind (or any time when you are entering information and are not sure of what data needs to be entered). If the information is correct, click on the OK button. The new user account then shows up in the window shown earlier in this chapter, in Figure 38.1. As you enter information in this dialog box, you'll notice that other fields are filled in automatically with default information. For instance, when you enter the username, the Home Directory field expands from /home/ to /home/<username>, where username is the name you chose for the login username. If you like this method for naming home directories for clients, this utility will save you a lot of time. When you want to review a user's account properties, you can click on the user in the main Red Hat Users Manager and use the Properties button. Figure 38.3 shows the basic information entered in the Create New User dialog box. Note that you can use this dialog box after the account has been created to change the user's password, something the Help Desk has to do often in many networks. You can also update additional information by using the tabs at the top of the dialog box. Figure 38.3. The Properties button on the Red Hat User Manager utility allows you to review a user account, and make changes. These are the tabs you can use:
The first tab (User Data) enables you to change the basic information you entered when creating the account, such as changing the password. You can use the Account Info tab to enforce an account expiration date or lock the account. The Password Info tab lets you find out the last date that the password was changed, and enable a password change policy. These are the items that make up this policy:
Figure 38.4. The Groups tab allows you to view user groups, including membership. This simple graphical interface allows you to perform a number of functions that would require many command-line interface commands. As the fast pace of computer and software development continues, it's possible, and very likely, that Linux may become a competitor for the desktop. The main driving forces for the desktop are cost, ease of use, and the applications. Windows operating systems can be more complex. In many cases Linux can be implemented more easily and at a much lower cost. In the main window (shown in Figure 38.1), there is another tab right next to the Users tab: the Groups tab. Selecting this tab enables you to manage the groups of users on your network. If you simply click on the Groups tab, you will see a name for the group(s) on the computer, the group ID (GID), and the members of each group. You can use tabs at the top of this window to change this data. In Figure 38.5 you can see the Group Members window, which lets you see the members of each group. Figure 38.5. This tab enables you to see the name of each group, its GID, and the members of the group.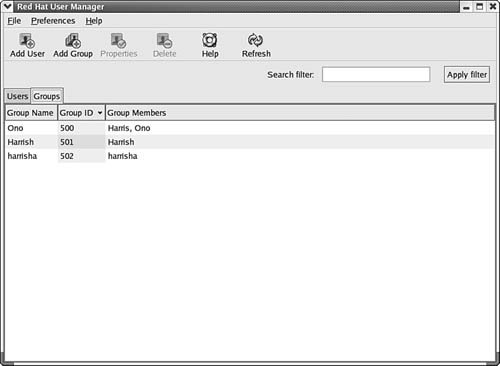 You can also click on any group to select it and then use the Properties button at the top of the window to see a dialog box showing the group name and the members of the group, should the member accounts not fit on the main display. Lastly, the Delete button (in Figure 38.1) can be used to remove a user account from the system. |

EAN: 2147483647
Pages: 411