Selecting the Print Driver and Finishing
|
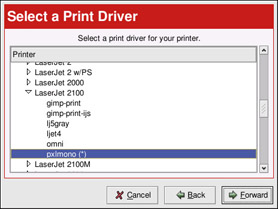
After you’ve selected the queue type of the printer, the next step in adding a printer is to select the print driver. You will see a window similar to the one shown in Figure 8-13. If you are configuring a local printer and the model was autodetected, the recommended driver is autoselected and marked with an asterisk (*). If it was not autodetected, select the driver from the list. The printers are divided by manufacturers. Click the arrow beside the manufacturer for your printer. Find your printer from the expanded list and click the arrow beside the printer name. A list of drivers for your printer will appear. Select one.
| Tip | To learn more about the print drivers, go to http://www.linuxprinting.org/printer_list.cgi. |
| Tip | You can select a different print driver after adding a printer by starting the Printer Configuration Tool, selecting the printer from the list, clicking Edit, clicking the Driver tab, selecting a different print driver, and applying the changes. |
The print driver processes the data that you want to print into a format the printer can understand. Since a local printer is attached directly to your computer, you need to select a print driver to process the data that is sent to the printer. If you are configuring a remote printer (LPD, SMB, or NCP), the remote print server usually has its own print driver. If you select an additional print driver on your local computer, the data will be filtered more than once, and the data will be converted to a format that the printer cannot understand. To make sure the data is not filtered more than once, first try selecting Raw Print Queue or PostScript Printer if you are configuring a remote printer.
After applying the changes, print a test page to test this configuration. If the test fails, the remote print server might not have a print driver configured. Try selecting a print driver according to the manufacturer and model of the remote printer, applying the changes, and printing another test page.
Confirming Printer Configuration
The last step is to confirm your printer configuration. Click Apply to add the print queue if the settings are correct. Click Back to modify the printer configuration if necessary. Click the Apply button in the main window to save your changes to the /etc/printcap configuration file and restart the printer daemon (lpd). After applying the changes, print a test page to ensure that the configuration is correct. Refer to the section “Printing a Test Page” for details.
If you need to print characters beyond the basic ASCII set (including those used for languages such as Japanese), you need to go to your driver options and select Prerender PostScript. Refer to the section “Modifying Existing Printers” for details. You can also configure options such as paper size if you edit the print queue after adding it.
Printing a Test Page
After you have configured your printer, print a test page to make sure the printer is functioning properly. To print a test page, select the printer that you want to test from the printer list and select the appropriate test page from the Test pull-down menu. If you change the print driver or modify the driver options, print a test page to test the different configuration.
Modifying Existing Printers
To delete an existing printer, select the printer and click the Delete button on the toolbar. The printer will be removed from the printer list. Click Apply to save the changes and restart the printer daemon.
To set the default printer, select the printer from the printer list and click the Default button on the toolbar. The default printer icon appears in the first column of the printer list beside the default printer.
If you want to modify an imported printer’s settings, note that you cannot do so directly. You must override the printer. You can override only an imported printer that has been imported using the alchemist libraries. Imported printers have a symbol beside them in the first column of the printer list. To override the printer, select the printer and choose File > Override Queue from the pull-down menu. After you’ve overridden a printer, the original imported printer will have a symbol beside it in the first column of the printer list.
After adding your printer(s), you can edit settings by selecting the printer from the printer list and clicking the Edit button. The tabbed window shown in Figure 8-14 will appear. The window contains the current values for the printer that you selected to edit. Make any changes, and click OK. Click Apply in the main Printer Configuration Tool window to save the changes and restart the printer daemon.
Names and Aliases
If you want to rename a printer, change the value of Queue Name in the Names and Aliases tab. Click OK to return to the main window. The name of the printer should change in the printer list. Click Apply to save the change and restart the printer daemon.
A printer alias is an alternate name for a printer. To add an alias for an existing printer, click the Add button in the Name and Aliases tab, enter the name of the alias, and click OK. Click OK again to return to the main window. Click Apply to save the aliases and restart the printer daemon. A printer can have more than one alias.
Queue Type
The Queue Type tab shows the queue type that you selected when adding the printer and its settings. You can change the queue type of the printer or just change the settings. After making modifications, click OK to return to the main window. Click Apply to save the changes and restart the printer daemon. Depending on which queue type you choose, you will see different
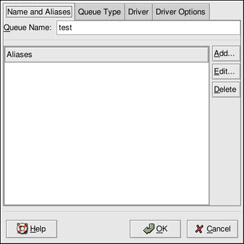
Figure 8-14: Editing a printer
options. Refer to the section of this chapter that describes your particular printer; options unique to your printer are listed there.
Driver
The Driver tab shows which print driver is currently being used. This is the same list that you used when you added the printer. If you change the print driver, click OK to return to the main window. Click Apply to save the changes and restart the printer daemon.
Driver Options
The Driver Options tab displays advanced printer options. Options vary for each print driver. Common options include:
-
Select Send Form-Feed (FF) if the last page of your print job is not ejected from the printer (for example, the form feed light flashes). If selecting this option does not force the last page out of the printer, try selecting Send End-of-Transmission (EOT) instead. Some printers require both Send Form-Feed (FF) and Send End-of-Transmission (EOT) to eject the last page.
-
Select Send End-of-Transmission (EOT) if sending a form-feed does not work. Refer to Send FF above.
-
Select Assume Unknown Data is Text if your print driver does not recognize some of the data sent to it. Select it only if you are having problems printing. If this option is selected, the print driver will assume that any data that it cannot recognize is text and try to print it as text. If you select this option and Convert Text to PostScript, the print driver will assume the unknown data is text and then convert it to PostScript.
-
Select Prerender PostScript if you are printing characters beyond the basic ASCII set (such as Japanese characters) but they are not printing correctly. This option will prerender nonstandard PostScript fonts so that they print correctly. If your printer does not support the fonts you are trying to print, try selecting this option. For example, you should select this option if you are printing Japanese fonts to a non-Japanese printer. Extra time is required to perform this action. Do not choose it unless you are having problems printing the correct fonts. You should also select this option if your printer cannot handle PostScript level 3. This option converts it to PostScript level 1.
-
Convert Text to Postscript is selected by default. If your printer can print plain text, try unselecting this when printing plain text documents to decrease the time it takes to print.
-
Page Size allows you to select the paper size for your printer, such as US Letter, US Legal, A3, and A4.
-
Effective Filter Locale defaults to C. If you are printing Japanese characters, select ja_JP. Otherwise, accept the default of C.
-
Media Source defaults to Printer default. Change this option to use paper from a different tray.
If you modify the driver options, click OK to return to the main window. Click Apply to save the changes and restart the printer daemon.
Saving the Configuration File
When you save your printer configuration using the Printer Configuration Tool, it creates its own configuration file, which is used to create the /etc/printcap file that the printer daemon (lpd) reads. You can use the command-line options to save or restore this file. If you save your /etc/printcap file and overwrite your existing /etc/printcap file with the saved file, your printer configuration will not be restored. Each time the printer daemon is restarted, it creates a new /etc/printcap file from the special Printer Configuration Tool configuration file. If you have configured a backup system for your configuration files, you should use the following method to save your printer configuration. If you added any custom settings in the /etc/printcap.local file, you should save it as part of your backup system also.
To save your printer configuration, type this command as root:
/usr/sbin/redhat-config-printer-tui --Xexport > settings.xml
Your configuration is saved to the file settings.xml. If you save this file, you can restore your printer settings. This is useful if your printer configuration is deleted, you reinstall Red Hat Linux and no longer have your printer configuration file, or you want to use the same printer configuration on multiple systems. To restore the configuration, type this command as root:
/usr/sbin/redhat-config-printer-tui --Ximport < settings.xml
If you already have a configuration file (you have configured one or more printers on the system already) and you try to import another configuration file, the existing configuration file will be overwritten. If you want to keep your existing configuration and add the configuration in the saved file, you can merge the files with the following command (as root):
/usr/sbin/redhat-config-printer-tui --Ximport --merge < settings.xml
Your printer list will then consist of the printers you configured on the system as well as the printers you imported from the saved configuration file. If the imported configuration file has a print queue with the same name as an existing print queue on the system, the print queue from the imported file will override the existing printer.
After importing the configuration file (with or without the merge command), you must restart the printer daemon with the command /sbin/service lpd restart or by starting the Printer Configuration Tool and clicking Apply.
|
EAN: 2147483647
Pages: 278