Adding a Slave Zone
|
To add a slave zone (also known as a secondary master), click the Add button and select Slave Zone. Enter the domain name for the slave zone in the Domain name text area. A new window will appear, as shown in Figure 16-4, with the following options:
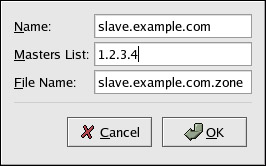
Figure 16-4: Adding a slave zone
-
Name — The domain name that was entered in the previous window.
-
Masters List — The nameserver from which the slave zone retrieves its data. This value must be a valid IP address. You can enter only numbers and dots (.) in the text area.
-
File Name — File name of the DNS database file in /var/named.
The configuration shown in Figure 16-4 creates the following entry in /etc/named.conf:
zone "slave.example.com" { type slave; file "slave.example.com.zone"; masters { 1.2.3.4; }; }; The configuration file /var/named/slave.example.com.zone is created by the named service when it downloads the zone data from the master server(s). After configuring the slave zone, click OK to return to the main window as shown in Figure 16-1. From the pull-down menu, choose File > Apply to write the /etc/named.conf configuration file and have the daemon reload the configuration files.
|
EAN: 2147483647
Pages: 278