| The TreeView control displays a list of information in a hierarchical manner. Rather than use an Items collection like all other list-based controls, the TreeView uses a Nodes collection to manage the data in the tree. Each item in the tree is a TreeNode . Each TreeNode can, in turn , consist of a collection of other TreeNodes . The TreeView class has properties such as ShowLines, ShowLinesAt-Root , and ShowPlusMinus that control its appearance. The control may also be associated with an image list in order to display icons. Other interesting properties and methods include: -
SelectedNode indicates which node is currently selected. -
Sorted indicates whether the nodes are sorted. -
FullRowSelect indicates whether the selection highlighted is as wide as the tree control. -
GetNodeCount returns the number of nodes in the tree. -
GetNodeAt retrieves a node at a specified (x, y) coordinate. Interacting with TreeNodes Because the TreeView control displays nodes in a hierarchical manner, you must indicate the parent node when adding any other node. To add a root node and obtain a reference to it, you must use the Add method of the Nodes collection: Dim root As TreeNode root = someTree.Nodes.Add("Leslye & Randy") To add child nodes to the root node above, you could write this: root.Add(New TreeNode("Mollye") root.Add(New TreeNode("Ranse") To add a node as a child of the currently selected node, you must write this: someTree.SelectedNode.Nodes.Add(New TreeNode("Freddy")) To remove the currently selected node, you must use the Remove method and pass it a reference to the node to remove. In the following example, we remove the current selection from the TreeView: someTree.Nodes.Remove(someTree.SelectedNode) In addition, all nodes in the TreeView control can be removed using the Clear method: someTree.Nodes.Clear() Iteration becomes a bit tricky. The easiest way to iterate through each node in a TreeView is to use a recursive procedure. To begin with, you would examine each node at the root level. Dim node As TreeNode For Each node In someTree.Nodes ExamineNode(node) Next Each node, however, can itself have child nodes. So you must examine each child node in that node. This recursive process continues until the node being examined has no child nodes of its own. Sub ExamineNode(ByVal node As TreeNode) ' Process node ... ' Examine child nodes Dim childNode As TreeNode For Each childNode In node.Nodes ExamineNode (childNode) Next End Sub Example: Using the TreeView Control  | This section uses the Tree View application to illustrate the use of the TreeView control. The program displays a list of departments and employees in a tree. A context menu allows employees to be added or removed from the departments. See Figure 8-24. | Figure 8-24. Using the TreeView control. 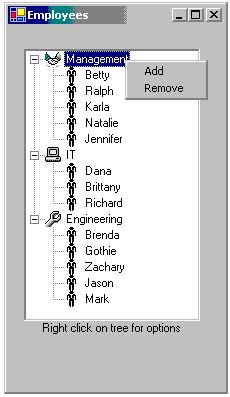 To completely understand the following code, you must know that we performed the following setup steps: -
Added a TreeView control to the form named trePeople . -
Added an ImageList to the control named imgDepts . -
Added four images to the image list (one for each of the three departments we will add and one to represent employees). -
Set the ImageList property of trePeople to imgDepts . -
Added a ContextMenu control to the form named mnuContext . Step 1: Initializing the Control We must define three variables to manage the three root nodes ( mgmtRoot for the management, ITRoot for the IT department and engRoot for the Engineering department). We must also define a variable that represents the node under the context menu. In the form's load event, we will build the context menu with Add and Remove options. We will also use the three root TreeNode variables to create the three departments. The TreeNode constructor requires three parameters that represent the 1) text in the node, 2) the image index from the ImageList associated with the entry, and 3) the image index from the ImageList used when the entry is selected. Finally, we will add two employees to the tree. Public Class TreeViewForm Inherits System.Windows.Forms.Form Dim mgmtRoot, ITRoot, engRoot As TreeNode Dim contextMenuNode As TreeNode ... Private Sub TreeViewForm_Load(ByVal sender _ As System.Object, ByVal e As System.EventArgs) _ Handles MyBase.Load ' Define the context menu mnuContext.MenuItems.Add("Add", AddressOf AddOne) mnuContext.MenuItems.Add("Remove", _ AddressOf RemoveOne) ' Add the three departments Dim n As Integer n = trePeople.Nodes.Add(_ New TreeNode("Management", 2, 2)) mgmtRoot = trePeople.Nodes(n) n = trePeople.Nodes.Add(New TreeNode("IT", 1, 1)) ITRoot = trePeople.Nodes(n) n = trePeople.Nodes.Add(_ New TreeNode("Engineering", 0, 0)) engRoot = trePeople.Nodes(n) ' Add the two employees ITRoot.Nodes.Add(New TreeNode("Dana")) EngRoot.Nodes.Add(New TreeNode("Brenda")) End Sub ... End Class Step 2: Handling the Context Menu To determine whether the context menu should be displayed when the user right-clicks on the tree, we must determine where the right-click occurred. If it occurred on a node, we can display the context menu. Otherwise, no context menu is displayed. In the MouseDown event handler for the tree control, we will use the GetNodeAt method to determine the node that the user right-clicked on. The node is saved in the variable contextMenuNode . Private Sub trePeople_MouseDown(ByVal sender As Object, _ ByVal e As System.Windows.Forms.MouseEventArgs) _ Handles trePeople.MouseDown ' If the right button is down If e.Button = MouseButtons.Right Then ' Find the item that was clicked on contextMenuNode = trePeople.GetNodeAt(e.X, e.Y) ' If found, display the context menu If Not IsNothing(contextMenuNode) Then mnuContext.Show(trePeople, e.X, e.Y) End If End If End Sub Step 3: Adding a Node If the user selects Add from the context menu, we will collect a new employee name using the InputBox function. The InputBox function is a part of VB.NET and collects one textual piece of data from the user (see Figure 8-25). If the user clicks Cancel when interacting with the InputBox , a zero-length string is returned. Figure 8-25. Using the TreeView control. 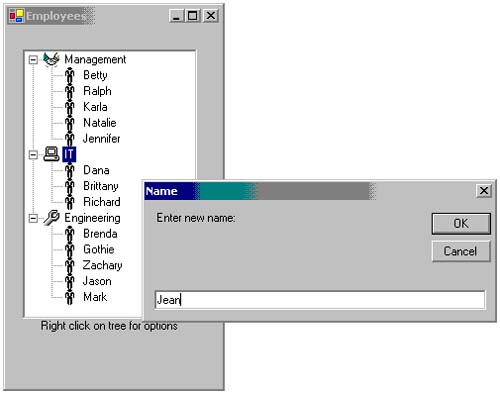 We must then determine the department of the node that is selected. (Note: the user may have right-clicked on a person or a department!) We can determine if the selected node is a department by referencing the node's Parent . Private Sub AddOne(ByVal sender As System.Object, _ ByVal e As System.EventArgs) Dim parent As TreeNode = contextMenuNode.Parent() ' Prompt for a name using the InputBox function (it is ' a simple dialog similar to the MessageBox dialog) Dim name As String name = InputBox("Enter new name:", "Name", "") If name = "" Then Return ' If the user clicked on a person, add under department If Not IsNothing(parent) Then parent.Nodes.Add(New TreeNode(name)) Else ' ... clicked on a department, add here contextMenuNode.Nodes.Add(New TreeNode(name)) End If End Sub Step 4: Removing a Node If the user selects Remove from the context menu, we must determine whether the node they selected was a department or an employee. If it was an employee, we can use the Remove method to remove the TreeNode representing the employee. Private Sub RemoveOne(ByVal sender As System.Object, _ ByVal e As System.EventArgs) Dim parent As TreeNode = contextMenuNode.Parent() ' If the user clicked on a person, remove them If Not IsNothing(parent) Then trePeople.Nodes.Remove(contextMenuNode) Else ' ... clicked on a department, display error MessageBox.Show("Cannot delete entire department!") End If End Sub  | 