| Dialog boxes provide an easy way for a user to interact with a Windows application. A dialog box provides a number of controls to facilitate data input and/or data output. Dialog boxes are types of forms that have special characteristics. For example, they typically do not have a system menu, they have no minimize or maximize buttons , and they have a border that does not permit them to be resized. These can be set using the form's ControlBox , MinimizeBox , MaximizeBox , and FormBorderStyle properties. A dialog box can be a modal dialog or a modeless dialog. When a modal dialog is displayed, the user cannot work elsewhere in the application until the dialog is closed. If the user tries to do something else on the main form while the dialog is open, he or she hears a beep. When a modeless dialog is displayed, the user can work elsewhere in the application while the dialog is open. This chapter discusses modal dialogs. Modeless dialogs are discussed in Chapter 12. A modal simple dialog that you have already used is the .NET MessageBox class. It can be used to display an informational message or allow a user to answer a yes or no question. .NET Dialog Documentation Dialogs are explained clearly in the Documentation in the .NET Framework. Look in "Dialog Boxes in Windows Forms" under "Creating Windows Forms Applications." It is noteworthy that the principles of dialog boxes are the same in all .NET languages. This is in sharp contrast to the days before .NET, when, for example, dialogs in Visual Basic and in Visual C++ were totally different. Figure 7-19 shows the entry point to this documentation. Figure 7-19. Documentation on dialog boxes using the .NET Framework. 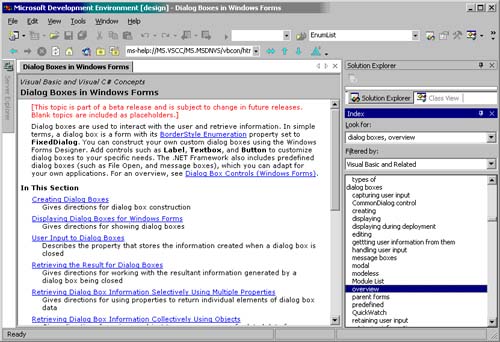 MessageBox The .NET MessageBox class is the simplest form of a dialog. It contains text, buttons, and symbols that provide and/or gather information. To display a message box, you must call the shared method Show , which has several parameters that define: -
The message text. -
The title of the message box window. -
The buttons that are displayed (a value from the MessageBoxButtons enumeration which include OK, OkCancel, YesNo, YesNoCancel and others). -
The icon that is displayed (a value from the MessageBoxIcon enumeration which include None , Question , Information , Exclamation , and Error ). -
The identity of the default button displayed (a value from the MessageBoxDefaultButton enumeration which includes Button1, Button2 , and Button3 ). To display a message that indicates the user has failed to complete all required fields on an input dialog, you can write the following code. See Figure 7-20. Figure 7-20. Using a message box. 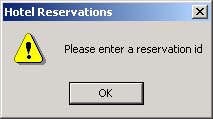 MessageBox.Show(_ "Please enter a reservation id", _ "Hotel Reservations", _ MessageBoxButtons.OK, _ MessageBoxIcon.Exclamation) Custom Dialogs Custom dialogs can be created and used by performing the following actions: -
Add a second form to an existing project, and configure various properties on the new dialog to control its appearance. -
Add properties to the dialog to access data in the dialog's controls. -
Configure the OK and Cancel button's DialogResult property so that you can determine which button was pressed. -
Write code to display the dialog. -
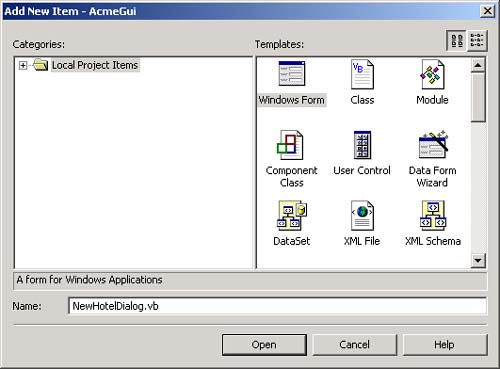
Write code to respond to the dialog result.  | To demonstrate modal dialogs, we work on a simple GUI version of our Acme Travel Agency. Starter code has been provided in Demos\HotelAdmin , backed up in HotelAdmin\Version 0 . Solution code for this demo is provided in HotelAdmin\Version 1 . Figure 7-21 illustrates the design of our main window (which leaves some empty areas on the form for additional features). | Figure 7-21. The main window design for Hotel Administration. 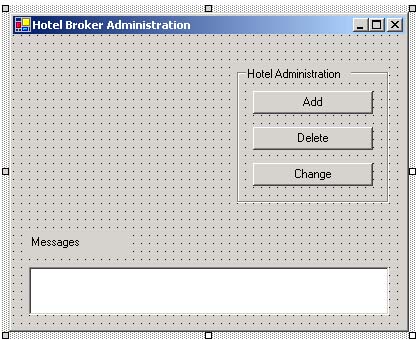 Step 1: Creating a New Dialog This new form is inserted in our project and is now shown in the Solutions Explorer window. We can begin placing controls on it from the Toolbox and configuring the properties as needed. For this example, we have designed our form using four labels, four textboxes and four buttons as shown in Figure 7-23. Figure 7-23. Designing a new dialog.  We must now set the properties for the controls and form as shown in Table 7-2. Table 7-2. Property values for the NewHotelDialog form | Control Type | Name | Text | Other Properties | | Label | lblCity | City | | | Textbox | txtCity | (blank) | | | Label | lblHotelName | Hotel | | | Textbox | txtHotelName | (blank) | | | Label | lblNumberRooms | Rooms | | | Textbox | txtNumberRooms | (blank) | | | Label | lblRate | Rate | | | Textbox | txtRate | (blank) | | | Button | cmdOK | OK | DialogResult: OK | | Button | cmdCancel | Cancel | DialogResult: Cancel | | Form | NewHotelDialog | New Hotel | AcceptButton: cmdOK CancelButton: cmdCancel FormBorderStyle: FixedDialog MaximizeBox: False MinimizeBox: False | The DialogResult property provides predetermined behavior for buttons. It can be set to any of several values, including OK, Cancel, Yes , and No . For each of the values (except None ), the button automatically closes the dialog and assigns the button's DialogResult property to the form's DialogResult property. The form's DialogResult property is returned from the form's ShowDialog method and can be used to determine which button was pressed to close the form. You should now add properties to NewHotelDialog that can be used to access the values in the controls. Add the following code to your dialog: Public Property City() As String Get Return txtCity.Text End Get Set(ByVal Value As String) txtCity.Text = Value End Set End Property Public Property HotelName() As String Get Return txtHotelName.Text End Get Set(ByVal Value As String) txtHotelName.Text = value End Set End Property Public Property NumberRooms() As Integer Get Return Convert.ToInt32(txtNumberRooms.Text) End Get Set(ByVal Value As Integer) txtNumberRooms.Text = Value.ToString() End Set End Property Public Property Rate() As Decimal Get Return Convert.ToDecimal(txtRate.Text) End Get Set(ByVal Value As Decimal) txtRate.Text = Value.ToString() End Set End Property It is a good idea to set your dialog's properties to respond like other Windows dialogs. Set the form's AcceptButton property to the control used for your OK button and it will interpret an Enter key as a click on the OK button. Set the form's CancelButton property to the control used for your Cancel button, it will interpret the Escape key as a click on the Cancel button. Step 2: Displaying a Dialog In Step 1 of the HotelAdmin project, we have already added the following code to reference the HotelBroker and HotelListItems . Public Class MainAdminForm Inherits System.Windows.Forms.Form Private hotelBroker As HotelBroker Private currHotel As HotelListItem ... Public Sub New() MyBase.New() InitializeComponent() hotelBroker = New HotelBroker() End Sub ... End Class To display the NewHotelDialog form, trap Click event on cmdAdd and add the following code: Private Sub cmdAdd_Click(ByVal sender As System.Object, _ ByVal e As System.EventArgs) Handles cmdAdd.Click Dim dlg As NewHotelDialog = New NewHotelDialog() If currHotel.HotelName <> "" Then dlg.City = currHotel.City dlg.HotelName = currHotel.HotelName dlg.NumberRooms = currHotel.NumberRooms dlg.Rate = currHotel.Rate Else dlg.City = "" dlg.HotelName = "" dlg.NumberRooms = 0 dlg.Rate = 0 End If Dim status As DialogResult = dlg.ShowDialog() If status = DialogResult.OK Then Dim comment As String = hotelBroker.AddHotel(_ dlg.City, dlg.HotelName, dlg.NumberRooms, dlg.Rate) If comment = "OK" Then txtMessages.Text = "Hotel " & dlg.HotelName _ & " has been added" Else txtMessages.Text = comment End If End If End Sub When you run the program, you should now be able to press the Add button and enter new hotels. The hotel is added to the HotelBroker . A confirmation message is placed in the txtMessages textbox. In a future step, we will add the ability to display all hotels that have been added in a list box. Step 3: Validating a Dialog's Data Many dialogs do not blindly accept all data. Instead, they enforce rules relating to the content, format, and range of data before allowing the user to successfully choose an OK button. We are going to enforce the rule that a user must enter a non-blank city and hotel, and the rooms and rate boxes must be non-negative numeric values. We will also enforce the rule that the user may not edit an item in a list box so that it becomes blank. To begin, add the new .NET ErrorProvider control to your form and name it errHotel . It does not appear on the form, but rather in a special section below the form. (See Figure 7-24.) We use it to display an error icon and error messages next to invalid data. Figure 7-24. Placing an ErrorProvider control on a form.  To implement these data validation requirements, we will write the following code in the Click event of cmdOK . If the data is invalid, we will call the SetError method on the ErrorProvider control to indicate the error message and the control it is associated with. We then prohibit the closing of the dialog by assigning the form's DialogResult property the value None . Private Sub cmdOK_Click(ByVal sender As System.Object, _ ByVal e As System.EventArgs) Handles cmdOK.Click Dim dataOK As Boolean = True ' Remove any earlier error messages errHotel.SetError(txtCity, "") errHotel.SetError(txtHotelName, "") errHotel.SetError(txtNumberRooms, "") errHotel.SetError(txtRate, "") If Trim(txtCity.Text) = "" Then dataOK = False errHotel.SetError(txtCity, "City must be non-blank") End If If Trim(txtHotelName.Text) = "" Then dataOK = False errHotel.SetError(txtHotelName , "Hotel must be non-blank") End If If Not (IsNumeric(txtNumberRooms.Text) AndAlso _ Convert.ToInt32(txtNumberRooms.Text) >= 0) Then dataOK = False errHotel.SetError(txtNumberRooms, _ "Number of rooms must be " & _ "non-negative, numeric value") End If If Not (IsNumeric(txtRate.Text) AndAlso _ Convert.ToInt32(txtRate.Text) >= 0) Then dataOK = False errHotel.SetError(txtRate, _ "Rate must be non-negative, " & _ "numeric value") End If If Not dataOK Then Me.DialogResult = DialogResult.None End If End Sub Figure 7-25 shows the New Hotel dialog with invalid data. The error message is displayed as a tool tip over the error icon. Figure 7-25. Using the ErrorProvider to display error messages.  Step 4: Adding ToolTips for Controls A user-friendly feature to add to your user interface is tooltips. They display help strings when the mouse hovers over a control (as we saw with the ErrorProvider control in the previous section.). To begin, add the new .NET ToolTip control to your form and name it tipsHotel . It appears alongside of the ErrorProvider control. After the ToolTip control is added, the Properties window for most visible controls on the form now list a ToolTips property. (See Figure 7-26). Figure 7-26. Placing a ToolTip control on a form.  To finish out Step 1 of the HotelAdmin demonstration, set the ToolTips property of each control to the value shown in Table 7-3. Table 7-3. ToolTip Property Values for the NewHotelDialog Form | Control Type | Name | ToolTip | | Textbox | txtCity | Enter the city where the hotel is located | | Textbox | txtHotelName | Enter the hotel name | | Textbox | txtNumberRooms | Enter the number of rooms available | | Textbox | txtRate | Enter the rate per night | Figure 7-27 illustrates how tool tips are displayed at run time. Figure 7-27. Using the ToolTip control to display help strings. 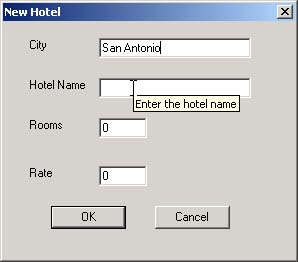 |