| Most people have at least an intuitive understanding of users, groups, and passwords. MTS and COM+ have provided an additional security system based on roles . The best place to start a more detailed look at .NET security is with user identities and roles. First, we will look at this from the point of view of a Windows application and then from the point of view of an ASP.NET application. Principals and Identities Each thread has associated with it a CLR principal. That principal contains an identity that represents the current user ID that is running that thread. The static property Thread.CurrentPrincipal will return the current principal associated with the current thread. Principal objects implement the IPrincipal interface. IPrincipal has one method and one property. The Identity property returns the current identity object, and the method IsInRole is used to determine whether a given user is in a specific role. The RoleBasedSecurity example illustrates the use of principals, identities, and roles. Currently there are two principal classes in the .NET Framework: WindowsPrincipal and GenericPrincipal . The GenericPrincipal class is useful if you need to implement your own custom principal. The WindowsPrincipal represents a Windows user and its associated roles. Since the RoleBasedSecurity example is a Windows (console) application, we will have a WindowsPrincipal associated with the CurrentPrincipal property.  ... [3] Dim ip As IPrincipal ip = Thread.CurrentPrincipal ' verify Current Principal is a Windows Principal Dim wp As WindowsPrincipal = ip If wp Is Nothing Then Console.WriteLine(_ "Thread.CurrentPrincipal NOT a WindowsPrincipal") Else Console.WriteLine(_ "Thread.CurrentPrincipal is a WindowsPrincipal") End If ... ... [3] Dim ip As IPrincipal ip = Thread.CurrentPrincipal ' verify Current Principal is a Windows Principal Dim wp As WindowsPrincipal = ip If wp Is Nothing Then Console.WriteLine(_ "Thread.CurrentPrincipal NOT a WindowsPrincipal") Else Console.WriteLine(_ "Thread.CurrentPrincipal is a WindowsPrincipal") End If ... [3] The program starts out with a demand for a SecurityPermission and then proceeds to set the application domain principal policy. While the reasons for this will be discussed later, the quick answer is to make sure that the example functions properly on your machine. If you get an exception, you will have to set the policy on your local machine to allow you to run the example. This should not normally happen. What to do if it does is discussed later in this chapter. An identity object implements the IIdentity interface. The IIdentity interface has three properties: -
Name , which is the string associated with the identity. This is given to the CLR by either the underlying operating system or authentication provider. ASP.NET is an example of an authentication provider. -
IsAuthenticated , which is a Boolean value indicating whether the user was authenticated or not. -
AuthenticationType , which is a string that indicates which authentication type was used by the underlying operating system or authentication provider. Examples of authentication types are Basic, NTLM, Kerberos, and Passport. There are several types of identity objects. Since this is a Windows program, we will have a WindowsIdentity object associated with the WindowsPrincipal . The example next prints out the property information associated with the identity object. Dim ii As IIdentity = ip.Identity Console.WriteLine(_ "Thread.CurrentPrincipal Name: {0} Type: {1} IsAuthenticated: {2}", _ ii.Name, _ ii.AuthenticationType, _ ii.IsAuthenticated) On my machine this output is displayed: Thread.CurrentPrincipal Name: HPDESKTOP\Administrator Type: NTLM IsAuthenticated: True Therefore, the operating system on this machine (HPDESKTOP) has authenticated the user (Administrator) running this program using the NTLM protocol. The example then validates that this is indeed a WindowsIdentity object. The WindowsIdentity object has additional properties and methods beyond those of the IIdentity interface. One of them is the Win32 account token ID associated with the currently running user. Dim wi As WindowsIdentity = wp.Identity If Not wi Is Nothing Then Console.WriteLine(_ "WindowsPrincipal.Identity Name: {0} Type: {1} Authenticated: {2} Token: {3}", _ wi.Name, wi.AuthenticationType, _ wi.IsAuthenticated, wi.Token) End If You can use the name of the user to decide (i.e., authorize) in an if statement whether the user has the right to undertake certain actions by executing or refusing to execute certain code paths. .NET Windows Roles Instead of checking each individual user name, you can assign users to roles . You can then check to see if a user belongs to a certain role. The standard administrators group is an example of how a role works. You do not have to individually assign a user identity all the privileges that an administrator has and then check to see if individual users have certain privileges. Instead, you just assign the user to the administrators group. Code can then check to see if the user is in the administrator's group before attempting actions such as creating a new user. .NET roles are similar to, but distinct from, COM+ roles. You define roles by defining groups in NT4 or Windows 2000. Each group represents one role. To do this, go to the Control Panel and select Administrative Tools. From the Administrative Tools list, select Computer Management. In the Computer Management MMC snap-in, expand the Local Users and Groups node. As Figure 16-1 shows, if you select Groups, you will see all the Groups defined on your machine. Figure 16-1. Groups defined on a machine. 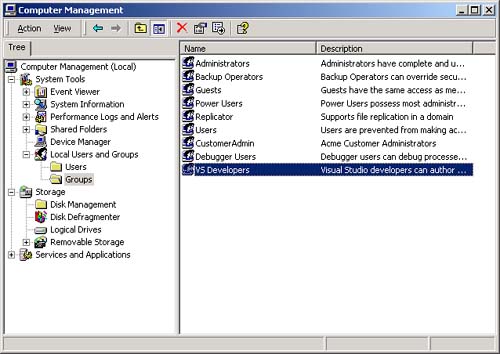 Some groups, such as Administrators and Guests, are "built-in" because they are predefined for you. The CustomerAdmin group shown in Figure 16-1 is a user-defined group that represents administrators who have the right to modify the Acme Customer application information. To add a new group to the local machine, right mouse click on the Groups node, select New Group, and a dialog box that you can fill in pops up. Figure 16-2 shows this dialog is filled in for a new group entitled Hotel-Admin, which is designed to have all users on the machine who can add or modify information about hotels in the HotelBroker application. Clicking the Create button will add the group to the system. You can use the Add and Remove buttons to add or remove users from the group. Figure 16-2. Dialog to create a HotelAdmin group. 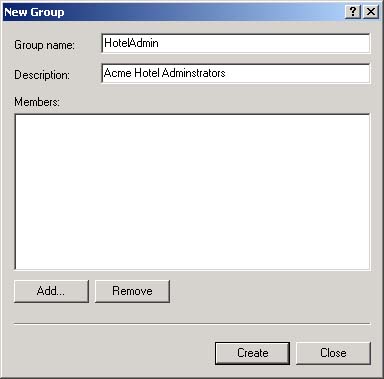 To modify an existing group, select that group, right mouse click, and select Properties. Clicking the Add button will bring up a dialog of all users on the system. You can then select users and add them to the group. Figure 16-3 shows a user about to be added to the HotelAdmin group. The Remove button is used to remove users from the group. Figure 16-3. User JaneAdmin about to be added to the HotelAdmin group. User PeterT has already been added. 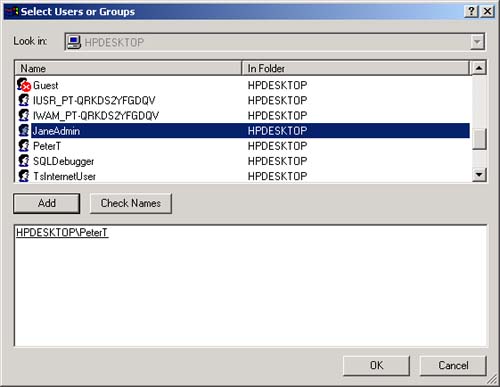 Within code you can qualify the name using the domain or machine name. The CustomerAdmin role is referred to as HPDESKTOP\CustomerAdmin. For groups that are preinstalled , such as the Administrators group, you use the BUILTIN prefixfor example, BUILTIN\Administrators. To avoid translation and internationalization problems, the System.Security.Princi pal.WindowsBuiltInRole enumeration can be used to refer to built-in roles. Instead of using the BUILTIN\Administrators string, you can refer to the Administrators group as WindowsBuiltInRole.Administrator . The RoleBasedSecurity example now checks to see if the current user is in a role. You can either pass the role as a string or use the WindowsBuiltInRole enumeration. Remember to modify the program to use the name of your machine when you run the book samples on your computer. Dim inRole As Boolean = _ wp.IsInRole("HPDESKTOP\CustomerAdmin") Console.WriteLine(_ "In Customer Administrator role?: {0}", inRole) ' using built in roles inRole = wp.IsInRole(WindowsBuiltInRole.Administrator) Console.WriteLine(_ "Is in Administrators group: {0}", inRole) inRole = wp.IsInRole(WindowsBuiltInRole.Guest) Console.WriteLine("Is in Guests group: {0}", inRole) inRole = wp.IsInRole(WindowsBuiltInRole.User) Console.WriteLine("Is in Users group: {0}", inRole) The program produces the following output, assuming that you are logged in as Administrator. Note that because the Administrator user ID was added to the CustomerAdmin group in the Computer Management MMC snap-in described earlier, the call to wp.IsInRole("HPDESKTOP\CustomerAdmin") results in the value True . Demanding right to change AppDomin principal policy AppDomain Principal Policy changed to WindowsPrincipal Thread.CurrentPrincipal is a WindowsPrincipal Thread.CurrentPrincipal Name: HPDESKTOP\Administrator Type: NTLM IsAuthenticated : True WindowsPrincipal.Identity Name: HPDESKTOP\Administrator Type: NTLM Authenticated : True Token: 308 In Customer Administrator role?: True Is in Administrators group: True Is in Guests group: False Is in Users group: True Other Identity Classes Now let us look into more detail at the other Identity classes. Currently there are four in the .NET Framework: -
FormsIdentity is used by the FormsAuthenticationModule class. We will discuss this class when we discuss ASP.NET forms authentication. -
GenericIdentity can represent any user. This class is used with the GenericPrincipal for generic or custom identities and principals. -
PassportIdentity is used with Passport authentication. Since we do not discuss Passport, we will not discuss this class. -
WindowsIdentity represents a Windows user. A WindowsPrincipal instance will have a WindowsIdentity instance as its Identity property. For authenticated users, the type of authentication used (NTLM, Kerberos, and so on) is available. Note that the properties of the IIdentity interface are read-only and therefore cannot be modified. Even if your users are unauthenticated, you can get the WindowsIdentity for any thread, using the static method WindowsIdentity.GetCurrent to get the WindowsIdentity instance of the current user. You can then use the WindowsPrincipal constructor to build a WindowsPrincipal instance from this WindowsIdentity . What this identity represents will be discussed in the next section. The AcmeGui case study program has been modified so that you cannot run it if you are not in the HotelAdmin role. See the file MainAdminForm.vb in the HotelBrokerAdministrationRoles example. Private Sub Form1_Load (_ ByVal sender As System.Object, _ ByVal e As System.EventArgs) Handles MyBase.Load Dim sp As SecurityPermission = _ New SecurityPermission(_ SecurityPermissionFlag.ControlPrincipal) Try sp.Demand() Catch se As SecurityException MessageBox.Show(se.Message) Close() End Try Dim ap As AppDomain = AppDomain.CurrentDomain ap.SetPrincipalPolicy(_ PrincipalPolicy.WindowsPrincipal) Dim ip As IPrincipal ip = Thread.CurrentPrincipal Dim inRole As Boolean = _ ip.IsInRole("HPDESKTOP\HotelAdmin") If inRole = False Then MessageBox.Show(_ "Cannot run. Must be a Hotel Administrator.", _ "Acme Customer Management System", _ MessageBoxButtons.OK, MessageBoxIcon.Exclamation) Close() End If End Sub ASP.NET Roles Now that we have a fundamental understanding about principals, identities, and roles, we can apply this to our AcmeReservationSystem Web site. The Web site has been modified so that you can link to a HotelAdministration page where you can add, modify, or delete the hotels that are part of the HotelBroker system. This example is found in AcmeWeb under the Step0 subdirectory of the ASP.NET_Roles directory. To run this example, make sure that the Chap16 directory is a virtual directory with the name Chap16 . Figure 16-4 and Figure 16-5 show the new Web pages. Figure 16-4. The new Acme home page with the link to the administration page. 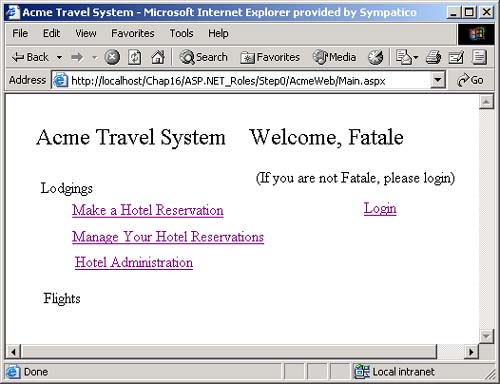 Figure 16-5. The administration page for the AcmeReservation system. 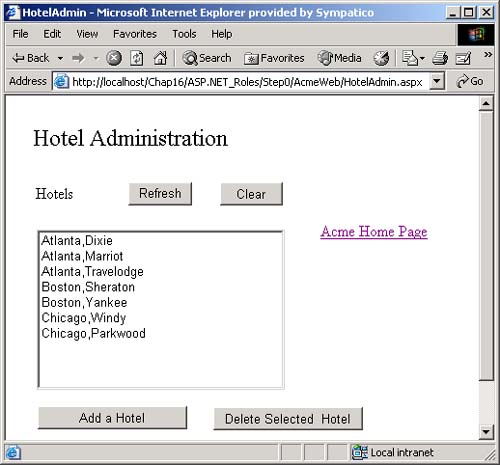 At this point there is no security associated with these pages. Anyone who can access the Web site can also access the administration page and modify the hotel information. We have also modified the login page to print out the principal and identity information currently running the application as well as the information associated with the current Windows identity. Dim ip As IPrincipal ip = Thread.CurrentPrincipal Dim ii As IIdentity = ip.Identity Dim isAnonymous As Boolean Dim wit As Type If TypeOf ii is WindowsIdentity Dim wii As WindowsIdentity = ii isAnonymous = wii.IsAnonymous() wit = GetType(WindowsIdentity) ElseIf TypeOf ii Is GenericIdentity Then isAnonymous = True wit = GetType(GenericIdentity) End If Dim principalText As String = _ "Current Principal: " & wit.ToString() & Chr(10) & _ " IsAnonymous: " & isAnonymous & Chr(10) & _ " Name: " & ii.Name & Chr(10) & _ " Is current Principal authenticated? : " & _ ii.IsAuthenticated.ToString() & Chr(10) & _ " AuthenticationType: " & _ ii.AuthenticationType & Chr(10) Dim wi As WindowsIdentity = WindowsIdentity.GetCurrent() Dim identityText As String = _ "Current Windows Identity: " & Chr(10) & _ " IsAnonymous: " & wi.IsAnonymous & Chr(10) & _ " Name: " & wi.Name & Chr(10) & _ " Is current Windows Identity Authenticated?: " & _ wi.IsAuthenticated & Chr(10) & _ " AuthenticationType: " & _ wi.AuthenticationType & Chr(10) Dim text As String = principalText & identityText IdentityInfo.Text = text As Figure 16-6 illustrates, looking at the information on the login page, we find that we have an unauthenticated principal for the thread, yet the current Windows identity indicates that we are running as the authenticated SYSTEM account. What does this mean? In the previous examples, we used the IsInRole method associated with the current principal. But that user is now not authenticated, so the IsInRole method will always return false and is therefore now useless! Figure 16-6. Principal and Windows identity information for AcmeWebSecurity Step0.  Operating System Identity and CLR Identity As we mentioned at the start of the chapter, .NET security sits on top of the underlying operating system security. The identity associated with a thread by the CLR and the identity associated with that thread by the operating system are not the same identities. The identity of the thread from the operating system's perspective is indicated by the WindowsIdentity object returned by the static Windows.IdentityGetCurrent method. The CLR identity is indicated by the value of the Thread.CurrentPrincipal object. What values the current WindowsIdentity and Thread.CurrentPrincipal have are set in different places: IIS Settings and the ASP.NET configuration files. Recall from the start of this chapter that if you access a file from within .NET, both the managed (.NET) and unmanaged (Win32) identities must have rights to the file within their respective environments. Unauthenticated Users Every machine that runs .NET has a machine.config file that has the default configuration for the computer. This file is found in the \WINNT\ Microsoft.NET\Framework\v1.0.2914\CONFIG directory, where v1.0.2914 would be replaced by the version of Microsoft .NET that is running on your machine. A Web or Web service application may have a web.config file that has the configuration settings for that application. The settings for web.config affect all applications in the directory where it lives and all its subdirectories. web.config files in the subdirectories override the settings in the higher level directories. If you look in the settings in web.config for the Step0 project, you will see the following setting: <authentication mode="Windows" /> This sets the CLR-based identity returned by Thread.CurrentPrincipal . If you were to change this authentication mode from Windows to None, then Thread.CurrentPrincipal would return a GenericPrincipal . Leaving this authentication mode set to Windows, however, causes Thread.CurrentPrincipal to return a WindowsPrincipal , but it is still unauthenticated and has no name associated with it. Other possible values for this authentication mode are Forms and Passport. Figure 16-7 shows the result of changing the authentication mode to None. Figure 16-7. Results when authentication mode is set to None. 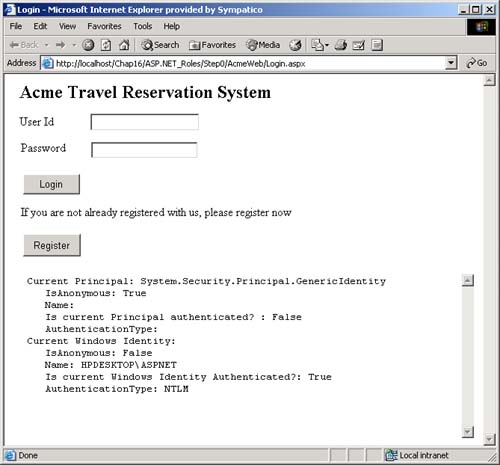 Next, add the following code to the web.config file to set identity impersonate to true, and see what effect that has. <identity impersonate="true" /> Figure 16-8 shows the results of setting the identity impersonation tag to true. Figure 16-8. Results when identity impersonate is set to true.  Where does the identity HPDESKTOP\IUSR_HPDESKTOP come from? This user is the identity that is set in the properties for this Web application for anonymous access. Select this Web application in the Internet Services Manager, right mouse click and select Properties. Navigate to the Directory Security tab. Click on the Edit button associated with Anonymous access and authentication control. Note that the Anonymous access checkbox is checked. Click the Edit button associated with Account used for anonymous access, and you will see this user account listed. Figure 16-9 shows Internet Services Manager and the Anonymous User Account dialog box. You could change this setting to some other account, but this is the default value set when IIS was installed, according to your machine name at that time. Figure 16-9. Internet Services Manager settings for anonymous access. 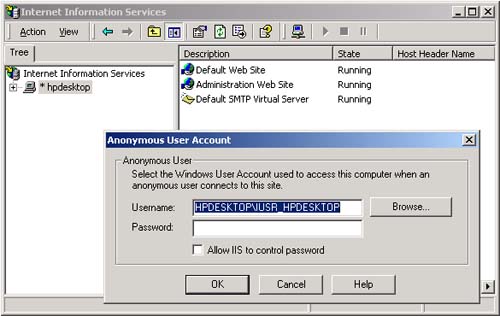 Actually, if you set the identity impersonate tag to true, you will see the identity HPDESKTOP\IUSR_HPDESKTOP, regardless of whether the authentication mode is set to None or Windows. Only if you set the identity impersonation tag to false or remove it altogether do you see the identity change back to the default HPDESKTOP\ASPNET. Authenticated Users Now let us use the Internet Services Manager to set our Web application to use Windows Integrated Security instead of anonymous access, as shown in Figure 16-10. We uncheck the Anonymous access box and check the Integrated Windows authentication box. Running our application, still with the identity impersonate tag to true, gets the results in Figure 16-11. Figure 16-10. Internet Services Manager settings for authenticated access. 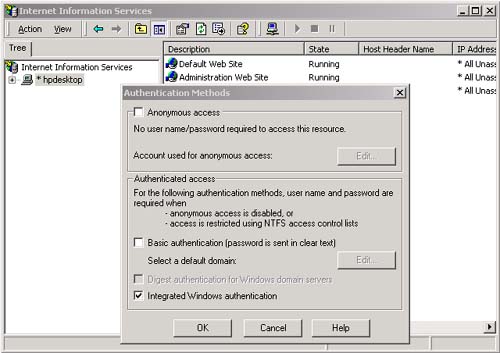 Figure 16-11. Authenticated access gets us an authenticated WindowsPrincipal.  We now have an authenticated Thread.CurrentPrincipal whose identity is the same as the current WindowsIdentity . They are associated with whatever user account is currently logged in. Both the managed and unmanaged principals are now the same, and the technique of calling IsInRole will now work again. Now uncheck the Integrated Windows authentication box and check the Basic authentication box in the Internet Services Manager dialog. If you run the application, still with the identity impersonate tag to true, you see a user and password dialog appear. You now have to enter the user name and password associated with an account on the system. Again, when the login page appears, both the Thread.CurrentPrincipal and current WindowsIdentity identities are the same, but they are associated with whichever user account you entered into the dialog box, as shown in Figure 16-12. Figure 16-12. Authenticated Access with principal based on Basic login dialog.  Within ASP.NET you can access the Thread.CurrentPrincipal through the User object. Step1 of the ASP.NET_Roles example adds the following code to the Page_Load method of main.aspx.vb: If (User.IsInRole("HPDESKTOP\HotelAdmin")) Then HotelAdminLink.Visible = True Else HotelAdminLink.Visible = False The effect of this is to hide the link to the Hotel Administration Web page unless you are logged into Windows as a hotel administrator. For this to work, we must ensure that the Internet Services Manager security settings are set at Windows Integrated Security, with no Anonymous access. We must also ensure that the following settings exist in the application's web.config file: <authentication mode="Windows" /> <identity impersonate="true" /> Therefore, if a user who is logged into Windows is a member of the Hotel-Admin group, he or she will see the Administration link; otherwise , the user will not. Of course, what name you enter into the login page has nothing to do with what you see happening here. It is the identity of the thread that matters. If you want to test your Web application as a different user, you do not have to log out and log in as that user. Instead, just navigate to Internet Explorer on the Start menu, and right mouse click while holding down the shift key . You will then see menu item Run As, as shown in Figure 16-13. Of course, without the shift key, this menu item will not appear. Select it, and in the dialog box that comes up, log in as the user you want to use. That particular instance of Internet Explorer will then be running under that user identity. Figure 16-13. RunAs Menu item to run as a different user. 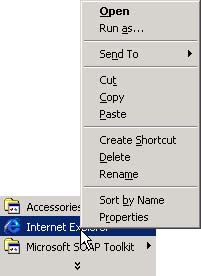 Problems with Impersonation It would seem that all we have to do is make sure that the user ID that the thread impersonates is a member of the HotelAdmin group that does not have any more privileges than are absolutely needed (i.e., not SYSTEM or Administrator, and with no ACL rights to any unnecessary files, and so on), and then everything would be just fine. Unfortunately, life is not so simple. Impersonation is designed for use by a server to alter its rights by running a thread as another user. When the server is done impersonating a user, however, it can revert to its original set of rights by calling the RevertToSelf Win32 API. If you call out to a third-party assembly or any unmanaged DLL after it has made the call to RevertToSelf , it would then be running as SYSTEM. As SYSTEM, the assembly or DLL could cause havoc on your computer if it was malicious or even just buggy . Step 2 of ASP.NET_Roles uses the following code to demonstrate this: [4] [4] You use the PInvoke interop facility to access the Win32 function. The DllImport attribute and PInvoke are discussed in Chapter 17. Imports System.Runtime.InteropServices ... <DllImport("Advapi32.dll")> _ Public Shared Function RevertToSelf() As Boolean End Function ... Dim text As String text = "Windows Identity: " & _ WindowsIdentity.GetCurrent().Name & Chr(10) text = text & "CLR Identity: " & User.Identity.Name & Chr(10) text = text & "Calling RevertToSelf()..." & Chr(10) Dim bRet As Boolean = RevertToSelf() text = text & "Windows Identity: " & _ WindowsIdentity.GetCurrent().Name & Chr(10) text = text & "CLR Identity: " & _ User.Identity.Name & Chr(10) txtInfo.Text = text On the Acme home page, calling RevertToSelf changes the identity of the thread from the point of view of unmanaged code. The identity from the CLR perspective is unchanged. The HotelAdmin link will be visible or not, depending on the original impersonated identity. Figure 16-14 shows the results. Figure 16-14. Acme home page showing changes in Thread Identities. 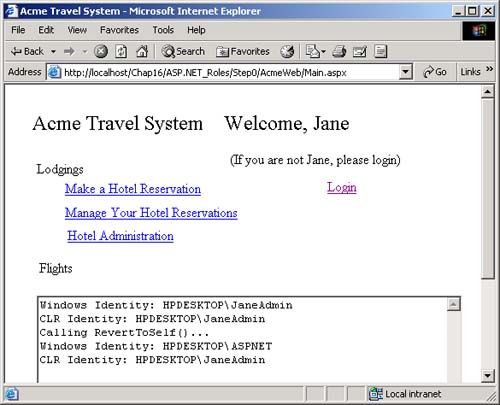 To avoid running as the HPDESKTOP\ASPNET account, you can set the identity of the process that your Web application runs under. [5] If you look in machine.config under the <ProcessModel> tag, you will find the userName and password attributes. [5] HPDESKTOP\ASPNET is the identity of the process token used by IIS. Unless impersonating, all threads in the Web application would use that token. Calling RevertToSelf removes the impersonation from the thread and reverts back to this original identity. <processModel enable="true" ... userName="machine" password="AutoGenerate" ... /> Because of this, by default, your application process runs under the HPDESKTOP\ASPNET account. You can modify this value in the machine.config file. We can therefore change this value to be a specific user name: [6] [6] You will have to stop and start the WWW service on your machine to make the changes to machine.config effective. <processModel enable="true" ... userName="JaneAdmin" password="midas" ... /> Figure 16-15 shows the results. [7] As you can see, the password for this user is written in plain text inside machine.config . By default, machine.config is readable by everyone, so if you use this approach, then rights to that file should be restricted. [7] If you have problems running with a user id you supply here, that id will probably need ACL rights to various system directories on your machine, such as the ASP.NET temporary file directory. Figure 16-15. Results of using RevertToSelf when a specific user is set in <processModel>. 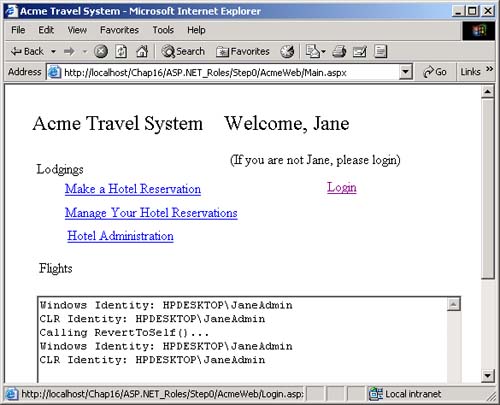 To summarize, if impersonation is turned off, as Figure 16-16 shows, then you would run as whatever identity is specified in the process model. If you use Anonymous access, then Figure 16-17 shows the results you would expect: that the CLR thread identity is unauthenticated. Figure 16-16. Impersonation turned off, MACHINE specified in <processModel>. 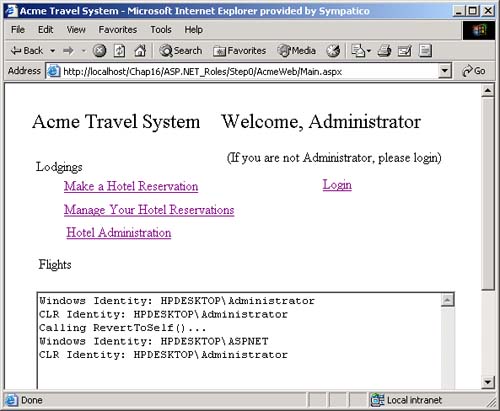 Figure 16-17. Impersonation turned off, Anonymous access, MACHINE specified in <processModel>.  This discussion also makes clear that the ACLs on machine.config and web.config should be set so that only administrators can modify these files. Who can read the files should be restricted appropriately as well. You have to also guard against someone browsing and downloading from those files. Specifying Users and Groups for Access in Web.Config ASP.NET allows you to specify groups and users who are allowed to access the Web site. Inside the <authorization> section of web.config , you can use the <allow> and <deny> elements with user accounts or groups. To specify groups, you use the roles attribute; to specify users, you use the users attribute. The asterisk (*) symbol used with one of those elements means all. A question mark (?) used with a user attribute means Anonymous access. <allow roles=" HPDESKTOP\HotelAdmin" users=" HPDESKTOP\Peter"> <deny users=" HPDESKTOP\John> A reference to a specific user overrides that user's membership in a group or a wildcard. Deny references take precedence over allow references. These settings do not help you in assigning users to particular roles or prevent access to different areas of the Web site. Only access to the entire Web site is controlled. | 