 | In the main part of this chapter, we write programs to access databases. We work primarily with SQL Server, but we will also illustrate an Access database, and we will see how easy it is to write programs that access different data sources in a consistent manner. An Access database is self-contained in an .mdb file. Our sample Access database is AcmeCustomer.mdb in the Databases folder in the chapter directory. A script, AcmeCustomer.sql , is provided for creating a SQL Server database AcmeCustomer . This script is run as part of the database setup discussed earlier in the chapter. To gain practice in working with the database tools provided with Visual Studio, let's create our own version of this database, MyAcme , by hand. | Sample Database Our sample database stores ID information for customers of the Acme Travel Agency. There is only one table, CustomerIds , with the following columns . -
LoginName stores a name used by customers of Acme to identify themselves . It will be used in Chapter 14 for logging in to Acme's Web site. -
Password is provided for authentication, which will be used when we discuss security in Chapter 16. -
HotelBrokerCustomerId stores an ID that is used by the Hotel Broker. -
AirlineBrokerCustomerId stores an ID that is used by the Airline Broker. The Visual Studio .NET Server Explorer Visual Studio .NET Server Explorer is a useful tool for working with databases. Although not as powerful as the SQL Server Enterprise Manager, it can give you the basic functionality you need when writing or debugging database applications. It will be very useful when we work with the examples in this chapter. To access the Server Explorer, use the View Server Explorer menu item. The Server Explorer is a dockable window that can be moved around as required. Figure 13-1 illustrates the Server Explorer window after the book databases have been set up. Figure 13-1. The Visual Studio .NET Server Explorer window. 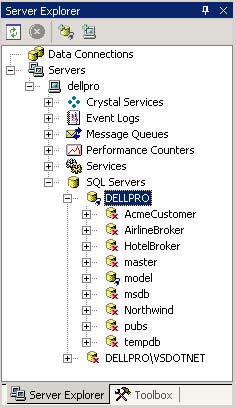 You can find information about all the fields in a table, or you can look at and edit the data in the tables. You can create or edit stored procedures, and you can design tables. The first thing to notice in the left-panel tree view is a list of SQL Servers installed on your system. If MMMM is the name of your machine, you may have a SQL Server named MMMM if you have SQL Server itself installed. If you have installed the MSDE that comes with Visual Studio, you likely have a SQL Server named MMMM\VSDOTNET. Below a particular SQL Server is a list of the databases on that server. Some sample databases ship with SQL Server, including the Northwind database. If you click the plus (+) next to a particular database, you see Database Diagrams, Tables, Views, and so on, which you can further expand by clicking the corresponding +. We will see further features of the Server Explorer when we go through the steps of creating our sample database. Creating a Database It is extremely easy to create a database using SQL Server. You don't have to worry about a "database device" or initially allocating enough storage for the database, because SQL Server, beginning with version 7.0, can automatically "grow" databases as required. Follow these steps to create a database called MyAcme . -
In Server Explorer, expand the tree view to show the databases on your server, as shown previously in Figure 13-1. -
Right-click over the SQL Server Database node. -
From the context menu that comes up, choose New Database. -
Enter "MyAcme" as the name of your new database. -
Select Use SQL Server Authentication, enter "sa" for the Login Name, and leave the Password blank. (Naturally, you would NEVER have such open security for a real database). -
Click OK. Creating Tables You can also create tables using Server Explorer. Follow these easy steps: -
Click the "+" to expand the node corresponding to your new database MyAcme . -
Right-click over Tables and from the context menu, choose New Table. -
Enter information as shown in Figure 13-2 to define four columns. Figure 13-2. Defining the schema for a table. 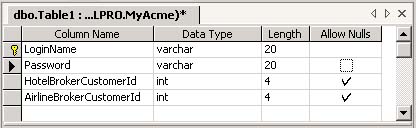 -
Clear the check mark from the Allow Nulls, except for the HotelBrokerCustomerId and AirlineBrokerCustomerId fields. -
Right-click over the first column, LoginName , and choose Set Primary Key from the context menu. Close the window you were using to define the new table, say "Yes" to saving the changes, and enter "CustomerIds" for the name of your new table. Inserting Data into a Table You can insert data into a new table using Server Explorer. We will enter data into the CustomerIds table. In the left pane, right-click over the table and choose Retrieve Data from Table from the context menu (or you could just double-click on the table). You can now type some sample data, like that shown in Figure 13-3. We just type in a few login names and passwords, and we leave the other two columns as <NULL>. Figure 13-3. Entering data into a table using Server Explorer. 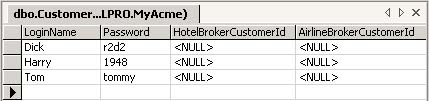 Performing Queries After your database is set up, you can start to perform queries against it, making use of SQL. For example, to retrieve all the data from the CustomerIds table, you can perform the following query. select * from CustomerIds In this chapter our focus is on writing database programs using VB.NET and the ADO.NET classes. But it is useful to perform a simple query now as a quick check that your database has been set up properly. Also, as you go along in the chapter, you may want to test your SQL by using a query tool. Using Query Analyzer If you have SQL Server installed on your system (not merely MSDE), you can make use of the Query Analyzer tool. This GUI program is easy to use. You can launch this tool by going to Start Programs Microsoft SQL Server Query Analyzer. A login window appears. Select the SQL Server against which you want to perform queries, and enter the Login name and Password. Click OK. From the database dropdown list, choose MyAcme. You can now type your query, and then click the  toolbar button (or from the menu, choose Query Execute). The results of your query are displayed in a lower pane, as illustrated in Figure 13-4. toolbar button (or from the menu, choose Query Execute). The results of your query are displayed in a lower pane, as illustrated in Figure 13-4. Figure 13-4. Performing a query with Query Analyzer. 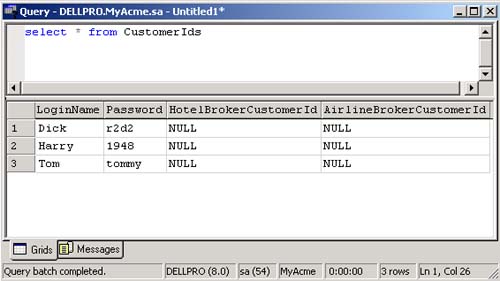 Using OSQL Command Line Tool An alternative to Query Analyzer is a command-line tool, which is invoked with the command osql . You can enter the following at the command prompt to execute the same simple select (you should type it all on one line and use the name of your own server): osql /Usa /P /S DELLPRO /Q "select * from MyAcme..CustomerIds" where we have used the following options: /U user name /P password /S server /Q query In the SQL code for the query, we have prefixed the table name by the name of the database followed by two periods. Here is the result of this query (the format has been adjusted): LoginName Password Hotel...ID Airline...ID --------- -------- ---------- ------------ Dick r2d2 NULL NULL Harry 1948 NULL NULL Tom tommy NULL NULL (3 rows affected)  | 