| 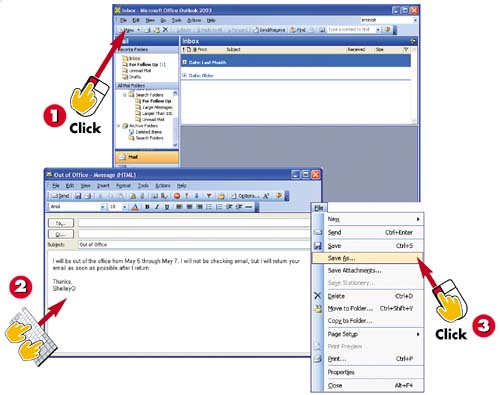 -
 | In the Inbox, click the New button on the toolbar in the main Outlook window to create a new mail message. | -
 | A blank message window opens. Leaving the To field blank, type the autoreply's subject into the Subject field and type the text you want to appear in the message body. | -
 | Open the File menu in the message window and choose Save As . | INTRODUCTION Suppose you will be out of the office and want to alert anyone who sends you an e-mail of that fact so they'll know when they can expect you to respond. In that case, you can set up Outlook to send an autoreply to anyone who sends you a message. This feature is also useful if you change your e-mail address; if someone sends a message to your old address, an autoreply with your new address can be sent. To create an autoreply, you first must create the message that will be sent, saving it as a template. | 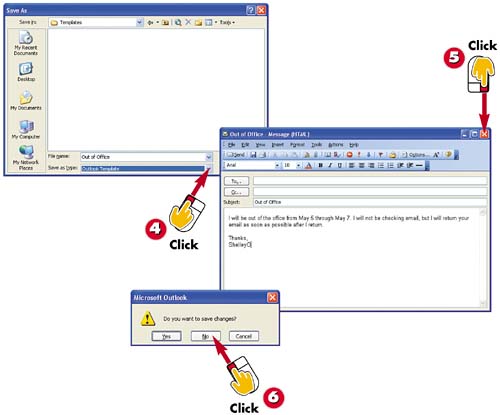 -
 | Click the down arrow next to the Save As Type field and choose Outlook Template . Type a filename for your message in the File Name field and click Save . | -
 | Click the Close ( x ) button on the message window to close the message. | -
 | When prompted to save the message, click No . | HINT Saving in the Templates Folder When you select Outlook Template as the file type, Outlook opens the Outlook Template folder in the Save As dialog box, where all Outlook templates are stored. | 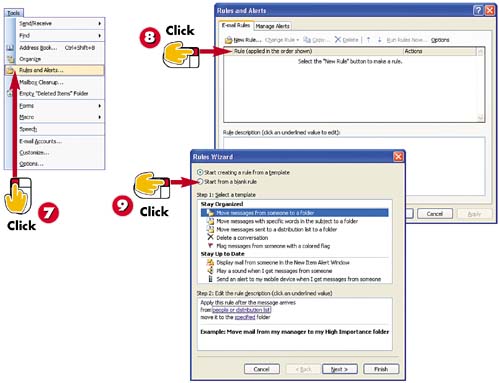 -
 | Open the Tools menu and choose Rules and Alerts . | -
 | The Rules and Alerts dialog box opens; click the New Rule button. | -
 | Outlook launches the Rules Wizard. You can create rules using a template or by starting with a blank rule; for an autoreply, click the Start from a Blank Rule option button. | HINT Rules for Sent Messages You can also create rules for when messages are sent. To see the available options for this type of rule, select Check Messages After Sending in the screen shown for step 10, and then follow the wizard steps for this type of rule. | TIP Selecting Other Conditions or Actions You can build a wide variety of message rules by selecting the appropriate conditions and actions. For instance, for actions, you can select to forward a message, move it, mark it as important, and so on. | 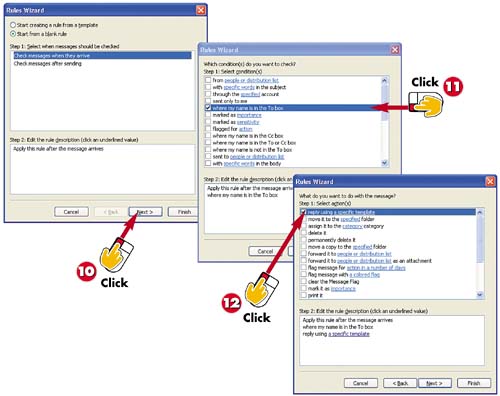 -
 | The wizard displays the options for creating a blank rule. For step 1, the default is to check messages when they arrive ; leave that option selected and click Next . | -
 | Select the conditions for the rule by checking the appropriate check boxes. (Here, the Where My Name Is in the To Box check box is checked.) Then click Next . | -
 | Select the action to take when the conditions are met by checking the appropriate check box. (For an autoreply, check Reply Using a Specific Template .) | HINT Creating Other Mail Rules As you can see, Outlook provides wizards for creating other common mail rules. You can use the templates, for instance, to create a rule to play a sound when you receive a message from a particular person. To create one of these template-based rules, select the template and follow the steps in the wizard. |  -
 | In the Step 2 area, click the A Specific Template link to select the template (message) to use. | -
 | The Select Reply Template dialog box appears. Open the folder that contains the template you want to use, click the template to select it, and click Open . | -
 | The rule conditions and actions are listed. Click Next . | HINT Changing Template Folders If your template is not listed in the Select a Reply Template dialog box, display the Look In drop-down list and select User Templates in File System . | 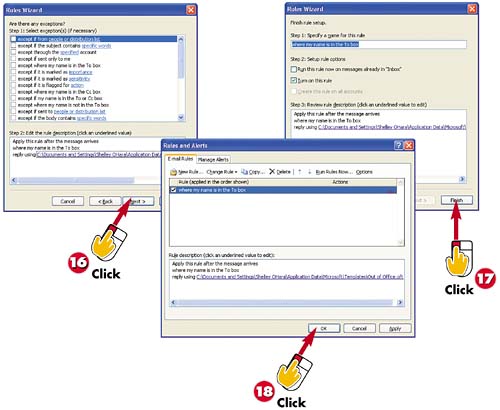 -
 | In the wizard screen that appears, you can click any of the various check boxes to specify any exceptions, but none are needed for the autoreply. Click Next . | -
 | Outlook displays the completed mail rule. Click Finish . | -
 | The new mail rule is listed in the Rules and Alerts dialog box. Click OK . Now, anyone who sends you a message will receive this reply. | HINT Deleting a Rule To delete a rule, click Tools and Rules and Alerts . You see the rules listed. Click the rule you want to delete and then click the Delete button. |  |