Flylib.com

Books Software


Categorizing Messages


Categorizing Messages

graphics/04inf12.jpg

graphics/one_icon.jpg

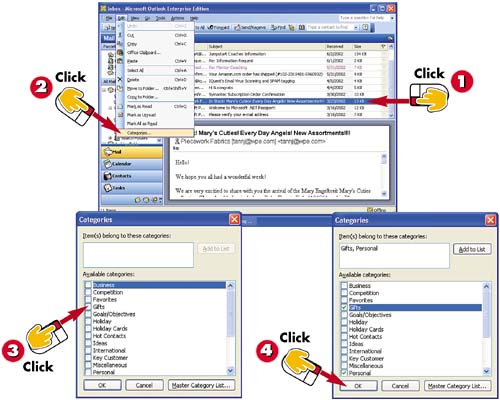
Select the message (or messages) to which you want to assign a category.

graphics/tow_icon.jpg

Open the Edit menu and choose Categories .

graphics/three_icon.jpg

The Categories dialog box opens. Click the check box next to any categories that should be assigned to the selected message. (You can choose more than one.)

graphics/foure_icon.jpg

The Item(s) Belong to These Categories field in the Categories dialog box lists the categories you selected. Click OK to assign the categories to the selected message.

INTRODUCTION

Yet another way to organize messages is to categorize them. Outlook provides several default categories, including Business, Personal, VIP, and others. In addition, you can create your own category. After you've assigned categories to your messages, you can view your messages.

TIP

Adding Categories

If Outlook doesn't include the category you need, you can add it. To do so, click the Master Category List button in the Categories dialog box. Then, type a name for the new category and click Add .

HINT

Viewing Messages

To view messages by category click View, Arrange By, Category .


Emptying the Deleted Items Folder

graphics/04inf13.jpg

graphics/one_icon.jpg

Open the Tools menu and choose Empty "Deleted Items" Folder .

graphics/tow_icon.jpg

Outlook asks whether you're sure you want to empty the folder; click Yes to confirm the deletion. The folder is emptied.

INTRODUCTION

An important part of keeping your messages organized is deleting those you no longer need. When you learned how to delete messages in Part 3, you also learned that messages you delete are in fact moved to the Deleted Items folder but are not deleted from your system. You should empty this folder periodically to reclaim disk space used by these messages.


Archiving Messages

graphics/04inf14.jpg

graphics/one_icon.jpg

Open the File menu and choose Archive .

graphics/tow_icon.jpg

Select the folder or folders containing messages you want to archive.

graphics/three_icon.jpg

Click the down arrow to the right of the Archive Items Older Than field and select a date. Messages in the folder that are older than the selected date will be archived.

INTRODUCTION

If you want to keep older messages, but not have them displayed in your mail folders, you can archive them. Most commonly, you archive messages within a certain date range. If needed, you can display the archived messages at any time.

TIP

Viewing Archived Messages

To open and view an archived message, click the plus sign ( + ) next to Archive Folders in the All Mail Folders list, and then double-click the folder with messages you want to view (deleted items, sent items, and so on) . Those messages are displayed. You can double-click a message to open it.

graphics/04inf15.jpg

graphics/foure_icon.jpg

In the Archive File field, Outlook lists the folder in which the archived messages will be stored by default. To choose a different folder, click the Browse button.

graphics/five_icon.jpg

The Open Personal Folders dialog box opens. Navigate to and select the folder in which you want to archive your messages and click OK .

graphics/six_icon.jpg

Click OK in the Archive dialog box. The messages are removed from the mail folders and archived.

HINT

Viewing AutoArchive Settings

You can use Outlook's AutoArchive settings to automatically archive messages on a set schedule. To do so, open the Tools menu, choose Mailbox Cleanup , and click the AutoArchive button.

TIP

More on Mailbox Cleanup

For easy access to tools that will help you keep your mailbox tidy, use Outlook's Mailbox Cleanup dialog box (open the Tools menu and choose Mailbox Cleanup ) . From this dialog box, you can archive messages, empty your Deleted Items folder, and more.