Flylib.com

Books Software


Building a Query from Scratch


Building a Query from Scratch

graphics/06inf05.jpg

graphics/one_icon.jpg

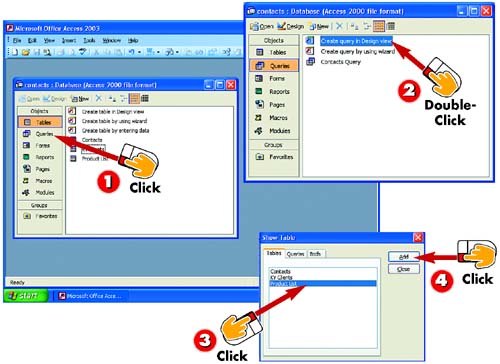
After you've opened the database on which you want to base a query, click the Queries button in the Objects bar.

graphics/two_icon.jpg

Double-click the Create query in Design view option.

graphics/three_icon.jpg

The Show Table dialog box opens, displaying a list of the tables contained in the open database. Click the table you want to use for your query.

graphics/four_icon.jpg

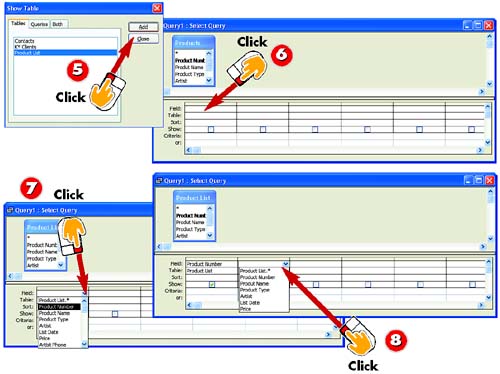
Click the Add button to add a list of the fields in the selected table to the Design window.

INTRODUCTION

In addition to using a wizard to select the fields for a query, you can also build a query from scratch using the Design view to add the fields. As with the wizard, you still need to enter the criteria for the query after you build it from scratch; you'll learn how later in this part.

TIP

Pulling from Multiple Tables

If you want, you can create a query that pulls data from multiple tables; simply select the tables from the Show Table dialog box. For information on building a query with fields from multiple tables, consult Access's online help.

graphics/06inf06.jpg

graphics/five_icon.jpg

Click the Close button in the Show Table dialog box to close it.

graphics/six_icon.jpg

Click in the Field box in the lower half of the Query Design window; a down arrow appears.

graphics/seven_icon.jpg

Click the down arrow in the Field box and choose the first field that you want to add to the query from the list that appears.

graphics/eight_icon.jpg

The field is added. To add another field, click the box immediately to the right of the field you just added. A down arrow appears; click it and choose the field you want to add.

TIP

Dragging Fields

If you prefer, you can drag a field from the field list to the Field column in the design grid.

graphics/06inf07.jpg

graphics/nine_icon.jpg

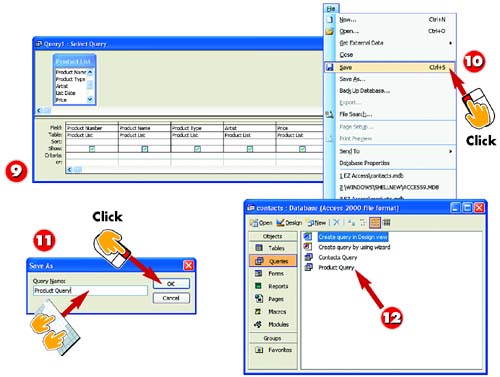
Continue adding fields until the query contains all the fields you need.

graphics/ten_icon.jpg

You now have the structure for your query and are ready to save and name it. To begin, open the File menu and choose Save .

graphics/eleven_icon.jpg

The Save As dialog box opens. Type a name for the query in the Query Name field and click OK .

graphics/twelve_icon.jpg

The query is saved. When you close the query, it will be listed in the database window under the name you typed in step 10.

TIP

Saving the Query

If you prefer, you can click the Save button on the toolbar to open the Save As dialog box. If you try to close the query without saving first, you will be prompted to save; click Yes to save the query.


Viewing the Query Design

graphics/06inf08.jpg

graphics/one_icon.jpg

If the query is not already open , select it in the database window and then click the Design button in the toolbar in the database window.

graphics/two_icon.jpg

If the query is open, click the Design button in the main Access window's Standard toolbar.

graphics/three_icon.jpg

The query design window opens. The top part of the design window contains the list of fields in the table on which the query is based.

graphics/four_icon.jpg

The bottom part of the design window contains a grid that displays each of the fields you selected when you created the query as well as the table in which each field resides.

INTRODUCTION

After you have set up the query structure, including the fields you need, you can then enter the criteria that will enable the query to select the set of records you want. To do this, you change to Design view and then enter the criteria. In this task, you'll explore the Query Design window.

TIP

Switching to Design View

If you are using a wizard to build a query, the query will be open, and you can simply switch to Design view. If you are modifying an existing query, you'll start from the database window, click the Queries option in the Objects bar, select the query you want to open, and then click the Design button.

graphics/06inf09.jpg

graphics/five_icon.jpg

Use the Sort row to specify which field is used to sort the query. (See the task "Sorting Query Results" later in this part for more information.)

graphics/six_icon.jpg

If you do not want to display a field in the query results but still use that field for building criteria, uncheck it.

graphics/seven_icon.jpg

Use the Criteria row to enter the value or range you want to match. Other tasks in this part provide several examples of entering criteria.

graphics/eight_icon.jpg

To close the query design window, click its Close button.

TIP

Changing Views

You can change back to the query's Datasheet view by clicking the Datasheet button.