18.3 An MVC Clock
| < Day Day Up > |
| With our core MVC structure in place, we can create a real-world MVC application ”a clock with analog and digital displays. The default MVC framework and source files for the clock are available at http:// moock .org/eas2/examples. Figure 18-3 shows the graphical user interface for the clock. Notice that in addition to the analog and digital displays, the clock includes buttons to start, stop, and reset the clock's time. Figure 18-3. The Clock graphical user interface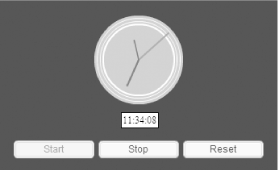 Our clock application includes seven classes, as follows :
Figure 18-4 shows how our application's classes integrate into the core MVC structure we built earlier in this chapter. In Figure 18-4, note that ClockUpdate instances are info objects sent by the ClockModel to its views ( ClockAnalogView , ClockDigitalView , and ClockTools ) at update time. The View interface specifies operations for registering the model ( ClockModel ) and controller ( ClockController ), while the Observer interface specifies the operation used by the model ( ClockModel ) to send updates to its views (again, ClockAnalogView , ClockDigitalView , and ClockTools ). The ClockAnalogView and ClockDigitalView classes use null for their controller while the ClockTools class uses a ClockController instance for its controller. Finally, Figure 18-4 does not show the Clock class, which creates the clock using the ClockModel class and its views. Figure 18-4. Clock application architecture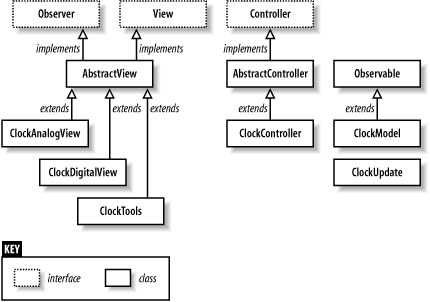 We've already looked at the supporting classes and interfaces in the mvc and util packages. The classes specific to the clock application are all stored in the package mvcclock . Let's look at them one at a time. 18.3.1 The ClockModel ClassThe ClockModel class extends Observable . It provides methods for setting the time and runs an internal ticker that updates the time once per second. Whenever the time changes, the ClockModel class uses notifyObservers( ) to broadcast the change to all registered views. Here are the properties defined by the ClockModel class. Remember that the model class's properties represent its current state.
Here are the public methods of the ClockModel class. These methods are used by the ClockController class and the Clock class to manipulate the clock's data:
Notice that the ClockModel class does not define a reset( ) method, despite the fact that the clock's user interface has a Reset button. Instead, the ClockController class defines a resetClock( ) method, used to set the time to midnight. This functionality does not belong in the ClockModel class because it is not a logical requirement of the clock's basic operation. That is, the clock provides a means of setting the time, starting it, and stopping it ”other classes can and should decide that "setting the time to midnight" constitutes a so-called "reset," while setting the time to, say, 6 p.m. constitutes a setToDinnerTime( ) operation. These value judgments should be layered on top of the clock's core functionality, not incorporated into it. Here are the private methods of the ClockModel class. These methods are used internally by the ClockModel class to update the time and to validate data:
The range-checking functions are properly implemented as private methods of the model class so that all updates from all controllers use the same data validation. Thus, we minimize duplicate code, standardize the notion of valid clock data, and simplify maintenance. Note that although the clock class itself determines that, say, 25 is not a legal hour, it is up to the controller classes to format the time into 24-hour format before sending change requests to the model. Each controller must take responsibility for formatting the data according to the requirements of the model. For example, if a view accepts text input, the controller is responsible for converting the text string into a number before sending the time update to the model. To register views and notify them when the time changes, the ClockModel class relies on its superclass's methods: addObserver( ) , removeObserver( ) , and notifyObservers( ) . Example 18-5 shows the code for the ClockModel class. In particular, note the setTime( ) method's use of setChanged( ) to indicate whether an update should be broadcast when the time is set. If setTime( ) is called but the new time specified is the same as the existing time, then no update is sent. An update is sent only if the time has actually changed. (In this case, the time must change by at least one second. Implementing a version that issues updates more frequently, such as every tenth of a second, is left as an exercise for the reader. Naturally, you wouldn't bother unless you were implementing a digital display that displayed the fractional seconds or some other view that relied on the greater resolution.) Updates take the form of a ClockUpdate object passed to each view's update( ) method. The setChanged( ) method is inherited from the Observable class, discussed in Chapter 16. Example 18-5. The ClockModel class import util.Observable; import mvcclock.*; /** * Represents the data of a clock (i.e., the model of the * Model-View-Controller triad). */ class mvcclock.ClockModel extends Observable { // The current hour. private var hour:Number; // The current minute. private var minute:Number; // The current second. private var second:Number; // The interval identifier for the interval that // calls tick( ) once per second. private var tickInterval:Number; // Indicates whether the clock is running or not. private var isRunning:Boolean; /** * Constructor */ public function ClockModel ( ) { // By default, set the clock time to the current system time. var now:Date = new Date( ); setTime(now.getHours( ), now.getMinutes( ), now.getSeconds( )); } /** * Starts the clock ticking. */ public function start ( ):Void { if (!isRunning) { isRunning = true; tickInterval = setInterval(this, "tick", 1000); var infoObj:ClockUpdate = new ClockUpdate(hour, minute, second, isRunning); setChanged( ); notifyObservers(infoObj); } } /** * Stops the clock ticking. */ public function stop ( ):Void { if (isRunning) { isRunning = false; clearInterval(tickInterval); var infoObj:ClockUpdate = new ClockUpdate(hour, minute, second, isRunning); setChanged( ); notifyObservers(infoObj); } } /** * Sets the current time (i.e., the hour , minute , and second properties). * Notifies observers (views) of any change in time. * * @param h The new hour. * @param m The new minute. * @param s The new second. */ public function setTime (h:Number, m:Number, s:Number):Void { if (h != null && h != hour && isValidHour(h)) { hour = h; setChanged( ); } if (m != null && m != minute && isValidMinute(m)) { minute = m; setChanged( ); } if (s != null && s != second && isValidSecond(s)) { second = s; setChanged( ); } // If the model has changed, notify views. if (hasChanged( )) { var infoObj:ClockUpdate = new ClockUpdate(hour, minute, second, isRunning); // Push the changed data to the views. notifyObservers(infoObj); } } /** * Checks to see if a number is a valid hour * (i.e., an integer in the range 0 to 23). * * @param h The hour to check. */ private function isValidHour (h:Number):Boolean { return (Math.floor(h) == h && h >= 0 && h <= 23); } /** * Checks to see if a number is a valid minute * (i.e., an integer in the range 0 to 59). * * @param m The minute to check. */ private function isValidMinute (m:Number):Boolean { return (Math.floor(m) == m && m >= 0 && m <= 59); } /** * Checks to see if a number is a valid second * (i.e., an integer in the range 0 to 59). * * @param s The second to check. */ private function isValidSecond (s:Number):Boolean { return (Math.floor(s) == s && s >= 0 && s <= 59); } /** * Makes time pass by adding a second to the current time. */ private function tick ( ):Void { // Get the current time. var h:Number = hour; var m:Number = minute; var s:Number = second; // Increment the current second, adjusting // the minute and hour if necessary. s += 1; if (s > 59) { s = 0; m += 1; if (m > 59) { m = 0; h += 1; if (h > 23) { h = 0; } } } // Set the new time. setTime(h, m, s); } } Notice that our ClockModel class defines methods for setting the current time but does not define any methods for retrieving it. That's because the clock's time is pushed to all views via a ClockUpdate object; views do not need to query the state of the model in our example. However, we could just as sensibly have required views to retrieve the new time from the model. Typically, the push system (in this case, sending the time) is used if pulling information from the model (in this case, retrieving the time) is too processor intensive . That limitation doesn't apply here, so both the push and pull systems are appropriate. 18.3.2 The ClockUpdate ClassThe ClockUpdate class is a simple data holder used to transfer the state of the ClockModel to views when the time changes or the clock is started or stopped . It defines four properties ” hour , minute , second , and isRunning ”which are accessed directly. To avoid distracting from the issues at hand, we won't implement accessor methods such as getMinute( ) for these properties. The ClockUpdate class is simply a data vessel, used like an associative array or a hash, so the direct property access is arguably appropriate. Example 18-6 shows the code for the ClockUpdate class. Example 18-6. The ClockUpdate class /** * An info object sent by the ClockModel class to * its views when an update occurs. Indicates the * time and whether or not the clock is running. */ class mvcclock.ClockUpdate { public var hour:Number; public var minute:Number; public var second:Number; public var isRunning:Boolean; public function ClockUpdate (h:Number, m:Number, s:Number, r:Boolean) { hour = h; minute = m; second = s; isRunning = r; } } 18.3.3 The ClockAnalogView and ClockDigitalView ClassesThe ClockAnalogView and ClockDigitalView classes extend AbstractView, which implements the Observer and View interfaces. They are display-only views; that is, the user interface they create has no inputs and therefore needs no controller. Accordingly , neither ClockAnalogView nor ClockDigitalView overrides the AbstractView.defaultController( ) method. Both classes simply use null as their controller, as returned by the AbstractView.defaultController( ) method. If you were to make the clock hands on the analog display draggable, you would implement an appropriate controller class to notify the model of the specified input obtained via the view's GUI. Likewise, if the hours, minutes, and seconds of the digital clock were editable, you would implement an appropriate controller for that view as well. The ClockAnalogView class is responsible for rendering the clock as a traditional circle with moving hands. The ClockDigitalView class is responsible for rendering the clock as a numeric display. Both classes have the same basic structure, which includes the following two public methods:
In addition to those two methods, the ClockDigitalView class defines two private utility methods ” formatTime12( ) and formatTime24( ) ” for adjusting the format of the time to 12-hour or 24-hour display (the analog view always displays 12-hour time). Each view is responsible for translating raw information provided by the model into some particular interface representation. Hence, the time-formatting methods belong in the ClockDigitalView class, not in a hypothetical controller for that class (whose job would be to process input) nor in the model class (whose job is to manage raw data, not to transform that data for the needs of some particular rendering). That said, formatting time is a particularly common operation that might be required throughout an application. We might, therefore, have alternatively chosen to implement the time-formatting methods in a general utility class, say DateFormat . Indeed, date- and time-formatting functionality is built directly into many languages, but is not built into ActionScript. The ClockDigitalView class creates its user interface entirely via code in the makeClock( ) method (there are no author-time movie clips). The ClockAnalogView class, by contrast, creates its user interface by attaching an instance of a movie clip symbol ( ClockAnalogViewSymbol ) from the Flash document's Library. We won't cover the creation of that symbol in detail here except to say that it contains a circle shape and three movie clips that represent the hands of the clock: hourHand_mc , minuteHand_mc , and secondHand_mc . To see the ClockAnalogViewSymbol , download the sample files from http://moock.org/eas2/examples. The analog clock is an excellent demonstration of Flash's unique ability to combine hand-drawn graphics with OOP code. Readers of ActionScript for Flash MX: The Definitive Guide may recognize some of the code in Example 18-7 from the analog clock developed in Example 13-7 of that book, which is posted at http://moock.org/asdg/codedepot. Recipe 10.8 in the ActionScript Cookbook , by Joey Lott (O'Reilly), also implements an analog clock created entirely on-the-fly . Example 18-7 shows the code for the ClockAnalogView class, which implements the analog display of the time. Example 18-7. The ClockAnalogView class import util.*; import mvcclock.*; import mvc.*; /** * An analog clock view for the ClockModel class. This view has no user * inputs, so no controller is required. */ class mvcclock.ClockAnalogView extends AbstractView { // Contains an instance of ClockAnalogViewSymbol , which // depicts the clock on screen. private var clock_mc:MovieClip; /** * Constructor */ public function ClockAnalogView (m:Observable, c:Controller, target:MovieClip, depth:Number, x:Number, y:Number) { // Invoke superconstructor, which sets up MVC relationships. // This view has no user inputs, so no controller is required. super(m, c); // Create UI. makeClock(target, depth, x, y); } /** * Creates the movie clip instance that will display the * time in analog format. * * @param target The clip in which to create the movie clip. * @param depth The depth at which to create the movie clip. * @param x The movie clip's horizontal position in target . * @param y The movie clip's vertical position in target . */ public function makeClock (target:MovieClip, depth:Number, x:Number, y:Number):Void { clock_mc = target.attachMovie("ClockAnalogViewSymbol", "analogClock_mc", depth); clock_mc._x = x; clock_mc._y = y; } /** * Updates the state of the on-screen analog clock. * Invoked automatically by ClockModel.notifyObservers( ) . * * @param o The ClockModel object that is broadcasting an update. * @param infoObj A ClockUpdate instance describing the changes that * have occurred in ClockModel . */ public function update (o:Observable, infoObj:Object):Void { // Cast the generic infoObj to the ClockUpdate datatype. var info:ClockUpdate = ClockUpdate(infoObj); // Display the new time. var dayPercent:Number = (info.hour>12 ? info.hour-12 : info.hour) / 12; var hourPercent:Number = info.minute/60; var minutePercent:Number = info.second/60; clock_mc.hourHand_mc._rotation = 360 * dayPercent + hourPercent * (360 / 12); clock_mc.minuteHand_mc._rotation = 360 * hourPercent; clock_mc.secondHand_mc._rotation = 360 * minutePercent; // Dim the display if the clock isn't running. if (info.isRunning) { clock_mc._alpha = 100; } else { clock_mc._alpha = 50; } } } Example 18-8 shows the code for the ClockDigitalView class, which implements the digital display of the time. In ClockDigitalView , for the sake of contrast, we create the clock interface entirely in code. Specifically, ClockDigitalView.makeClock( ) creates a text field in which we display the time. If desired, we could also have made the earlier ClockAnalogView entirely in code instead of using the authoring tool approach, in which we create the clock as a movie clip ( ClockAnalogViewSymbol ). Both approaches are valid Flash development practices. You might choose to draw your interface manually in the Flash authoring tool to save time (if the code equivalent would be complex) or to allow the interface to be redesigned by a nonprogrammer. Example 18-8. The ClockDigitalView class import util.*; import mvcclock.*; import mvc.*; /** * A digital clock view for ClockModel . This view has no user * inputs, so no controller is required. */ class mvcclock.ClockDigitalView extends AbstractView { // The hour format. private var hourFormat:Number = 24; // The separator character in the clock display. private var separator:String = ":"; // The text field in which to display the clock, created by makeClock( ) . private var clock_txt:TextField; /** * Constructor */ public function ClockDigitalView (m:Observable, c:Controller, hf:Number, sep:String, target:MovieClip, depth:Number, x:Number, y:Number) { // Invoke superconstructor, which sets up MVC relationships. super(m, c); // Make sure the hour format specified is legal. If it is, use it. if (hf == 12) { hourFormat = 12; } // If a separator was provided, use it. if (sep != undefined) { separator = sep; } // Create UI. makeClock(target, depth, x, y); } /** * Creates the onscreen text field that will display the * time in digital format. * * @param target The clip in which to create the text field. * @param depth The depth at which to create the text field. * @param x The text field's horizontal position in target . * @param y The text field's vertical position in target . */ public function makeClock (target:MovieClip, depth:Number, x:Number, y:Number):Void { // Make the text field. target.createTextField("clock_txt", depth, x, y, 0, 0); // Store a reference to the text field. clock_txt = target.clock_txt; // Assign text field characteristics. clock_txt.autoSize = "left"; clock_txt.border = true; clock_txt.background = true; } /** * Updates the state of the on-screen digital clock. * Invoked automatically by ClockModel . * * @param o The ClockModel object that is broadcasting an update. * @param infoObj A ClockUpdate instance describing the changes that * have occurred in ClockModel . */ public function update (o:Observable, infoObj:Object):Void { // Cast the generic infoObj to the ClockUpdate datatype. var info:ClockUpdate = ClockUpdate(infoObj); // Create a string representing the time in the appropriate format. var timeString:String = (hourFormat == 12) ? formatTime12(info.hour, info.minute, info.second) : formatTime24(info.hour, info.minute, info.second); // Display the new time in the clock text field. clock_txt.text = timeString; // Dim the color of the display if the clock isn't running. if (info.isRunning) { clock_txt.textColor = 0x000000; } else { clock_txt.textColor = 0x666666; } } /** * Returns a formatted 24-hour time string. * * @param h The hour, from 0 to 23. * @param m The minute, from 0 to 59. * @param s The second, from 0 to 59. */ private function formatTime24 (h:Number, m:Number, s:Number):String { var timeString:String = ""; // Format hours... if (h < 10) { timeString += "0"; } timeString += h + separator; // Format minutes... if (m < 10) { timeString += "0"; } timeString += m + separator; // Format seconds... if (s < 10) { timeString += "0"; } timeString += String(s); return timeString; } /** * Returns a formatted 12-hour time string (not including AM or PM). * * @param h The hour, from 0 to 23. * @param m The minute, from 0 to 59. * @param s The second, from 0 to 59. */ private function formatTime12 (h:Number, m:Number, s:Number):String { var timeString:String = ""; // Format hours... if (h == 0) { timeString += "12" + separator; } else if (h > 12) { timeString += (h - 12) + separator; } else { timeString += h + separator; } // Format minutes... if (m < 10) { timeString += "0"; } timeString += m + separator; // Format seconds... if (s < 10) { timeString += "0"; } timeString += String(s); return timeString; } } We've now seen two view classes that do not accept user input and therefore have no controller. Next , we'll consider a view class, ClockTools , which accepts user input and shows how to process that input with a controller. 18.3.4 The ClockTools ClassLike the ClockAnalogView and ClockDigitalView classes, the ClockTools class is a view for ClockModel , so it extends AbstractView . The ClockTools class creates the Start, Stop, and Reset buttons below the analog and digital clock display, as shown in Figure 18-3. A .fla file that uses ClockTools must contain the Flash MX 2004 Button component in its Library and have it exported for ActionScript (see Chapter 12 for information on components ). Unlike ClockAnalogView and ClockDigitalView , the ClockTools view includes a functional controller to process user input. The general structure of ClockTools follows the structure of ClockAnalogView and ClockDigitalView ”ClockTools has a makeTools( ) method that creates the user interface and an update( ) method that makes changes to that interface based on ClockModel updates. However, the makeTools( ) method does more than just render the user interface; it also creates the all-important connection from that interface to the controller (and, indeed, creates the controller itself). Because ClockTools has a functional controller, it also overrides the AbstractView.defaultController( ) method. The ClockTools.defaultController( ) method returns an instance of ClockController , the default controller for the ClockTools view. Example 18-9 shows the code for the ClockTools class. Read it through, then we'll study the important makeTools( ) and update( ) methods in detail. Example 18-9. The ClockTools class import util.*; import mvcclock.*; import mvc.*; import mx.controls.Button; /** * Creates a user interface that can control a ClockModel . */ class mvcclock.ClockTools extends AbstractView { private var startBtn:Button; private var stopBtn:Button; private var resetBtn:Button; /** * Constructor */ public function ClockTools (m:Observable, c:Controller, target:MovieClip, depth:Number, x:Number, y:Number) { // Invoke superconstructor, which sets up MVC relationships. super(m, c); // Create UI. makeTools(target, depth, x, y); } /** * Returns the default controller for this view. */ public function defaultController (model:Observable):Controller { return new ClockController(model); } /** * Creates a movie clip instance to hold the Start, Stop, * and Reset buttons and also creates those buttons. * * @param target The clip in which to create the tools_mc clip. * @param depth The depth at which to create the tools_mc clip. * @param x The tools clip's horizontal position in target . * @param y The tools clip's vertical position in target . */ public function makeTools (target:MovieClip, depth:Number, x:Number, y:Number):Void { // Create a container movie clip. var tools_mc:MovieClip = target.createEmptyMovieClip("tools", depth); tools_mc._x = x; tools_mc._y = y; // Create UI buttons in the container clip. startBtn = tools_mc.createClassObject(Button, "start", 0); startBtn.label = "Start"; startBtn.enabled = false; startBtn.addEventListener("click", getController( )); stopBtn = tools_mc.createClassObject(Button, "stop", 1); stopBtn.label = "Stop"; stopBtn.enabled = false; stopBtn.move(startBtn.width + 5, startBtn.y); stopBtn.addEventListener("click", getController( )); resetBtn = tools_mc.createClassObject(Button, "reset", 2); resetBtn.label = "Reset"; resetBtn.move(stopBtn.x + stopBtn.width + 5, startBtn.y); resetBtn.addEventListener("click", getController( )); } /** * Updates the state of the user interface. * Invoked automatically by ClockModel . * * @param o The ClockModel object that is broadcasting an update. * @param infoObj A ClockUpdate instance describing the changes that * have occurred in ClockModel . */ public function update (o:Observable, infoObj:Object):Void { // Cast the generic infoObj to the ClockUpdate datatype. var info:ClockUpdate = ClockUpdate(infoObj); // Enable the Start button if the clock is stopped, or // enable the Stop button if the clock is running. if (info.isRunning) { stopBtn.enabled = true; startBtn.enabled = false; } else { stopBtn.enabled = false; startBtn.enabled = true; } } } The ClockTools.makeTools( ) method creates three Button component instances: one that starts the clock, one that stops it, and one that resets it. The click event of each Button instance is handled by the ClockTools controller, ClockController . Let's examine one button, Start, to see how it is wired to the ClockController . First, we create an empty container movie clip, tools_mc , in which to store all three buttons. The tools_mc clip is attached to target , a movie clip instance specified when the ClockTools view is instantiated . var tools_mc:MovieClip = target.createEmptyMovieClip("tools", depth); Next, we create the Start button instance inside tools_mc , using createClassObject( ) (which we studied in Chapter 12). We store the Start button instance in the property startBtn so that we can access it later when it's time to update the interface. The instance name of the button, "start", will be used later in the ClockController class to uniquely identify the button: startBtn = tools_mc.createClassObject(Button, "start", 0); Now we add the text on the button (i.e., its label ) and disable the button. By default, the clock will be running, so the Start button should be disabled at the outset: startBtn.label = "Start"; startBtn.enabled = false; Finally, we make the crucial connection between the view and the controller by specifying the controller as the listener object for the Start button's click event. This implies (indeed, demands) that the controller defines a method named click( ) which will be invoked when the Start button is clicked. startBtn.addEventListener("click", getController( )); Notice that the makeTools( ) method does not refer to the ClockController class directly. It retrieves the controller instance via getController( ) . If a controller already exists, it is returned; if not, an instance of the default controller is created and returned. By specifying and accessing the controller indirectly via getController( ) , we maintain the loose coupling between the view and the controller, giving us the flexibility to change the controller at runtime (or to rewrite a new implementation in the future with little disturbance of existing code). For example, at any point in the program, we could use setController( SomeOtherController ) to completely replace the current controller, which in turn would change the interface's response to user input. If, on the other hand, we had hardcoded the controller reference, as follows: startBtn.addEventListener("click", new ClockController( )); we would not be able to change the controller at runtime. The ClockTools.update( ) method, unlike ClockAnalogView.update( ) and ClockDigitalView.update( ) , does not simply display the current time. Instead, it disables the Start or Stop button depending on whether the clock is running. If the clock is running, only the Stop and Reset buttons are enabled. If the clock is stopped, only the Start and Reset buttons are enabled: if (info.isRunning) { stopBtn.enabled = true; startBtn.enabled = false; } else { stopBtn.enabled = false; startBtn.enabled = true; } It's a common misconception that a view is always a literal representation of the model's data. While ClockAnalogView and ClockDigitalView create literal representations of the ClockModel , the ClockTools view does not. In general, then, a view depicts a user interface whose display depends on the state of the model but isn't necessarily a direct visualization of the model. Here, the button states depend on whether the clock is running, not on the current time. That is, this view depicts the model's isRunning property, which is equally as valid as the other views depicting the hour , minute , and second properties. Now let's move on to the ClockController class, which handles input for ClockTools . Again, the ClockAnalogView and ClockDigitalView views use the default controller created by AbstractView , but our ClockTools class creates its own controller. 18.3.5 The ClockController ClassThe ClockController class extends AbstractController . It provides event handling for the user interface created by the ClockTools view. To change the state of the ClockModel , the ClockController class defines the following methods:
Notice that many of the preceding methods are wrappers over methods in the ClockModel class. Some of them act as direct pass-through methods (e.g., startClock( ) and stopClock( ) ), whereas others add some convenience functionality (e.g., the ability to independently set a single aspect of the time, such as the hour, minute, or second). But the real duty of the ClockController class is fulfilled by its click( ) method, which handles events from the buttons created by the ClockTools class. Before we look at the full class listing for ClockController , let's take a detailed look at the click( ) method: public function click (e:Object):Void { switch (e.target._name) { case "start": startClock( ); break; case "stop": stopClock( ); break; case "reset": resetClock( ); break; } } The click( ) method is set up like any component-event-handling method. It accepts a single argument, e , which contains details about the event as well as a very important reference back to the component that generated the event. In the case of the click( ) method, the property e.target gives us a reference back to the Button component that generated the click( ) event. The property e.target._name tells us the instance name of that button ”either "start", "stop", or "reset". (Recall that we set each button's instance name when we created it in the ClockTools.makeTools( ) method.) Depending on that instance name, we invoke the appropriate method, either startClock( ) , stopClock( ) or resetClock( ) . Note that the click( ) handler is implemented in the controller rather than the view. Some alternative MVC variations implement event handlers in the view and then pass input to the controller, but in our implementation, we emphasize the separation between the view's "interface rendering" role and the controller's "input processing" role. Notice also that a single view and a single controller implement the event handling for all three buttons. That is, the click( ) handler distinguishes between buttons using the event object, e , passed to it. In this case, it would be overkill to implement separate views and controllers for each of the three buttons, but it wouldn't be insane to do so. MVC can be as nested and granular as the program needs it to be. For example, in a ComboBox component (i.e., a pull-down menu), each individual item in the ComboBox might implement MVC while the entire ComboBox also implements MVC. Finally, notice that the view is a listener in the model's list of registered listeners (subscribing to the update event) and the controller is a listener in the view's list of registered listeners (subscribing to the click event). In our example, the model doesn't subscribe to any events. Its methods are invoked manually by ClockController and internally by setInterval( ) . As an example, here's the event sequence for the Reset button:
The sequence would be similar for the Start and Stop buttons, except that the views would update differently according to the ClockUpdate object representing the model's state. Notice that none of the views updates its display until notified by the model. But it all happens so quickly that the analog and digital displays appear to reset instantly when the Reset button is clicked. Now let's look at the click( ) method in the context of the complete ClockController class, shown in Example 18-10. Example 18-10. The ClockController class import mvcclock.ClockModel; import mvc.*; import util.*; /** * Makes changes to ClockModel 's data based on user input. * Provides general services that any view might find handy. */ class mvcclock.ClockController extends AbstractController { /** * Constructor * * @param cm The model to modify. */ public function ClockController (cm:Observable) { super(cm); } /** * Starts the clock ticking. */ public function startClock ( ):Void { ClockModel(getModel( )).start( ); } /** * Stops the clock ticking. */ public function stopClock ( ):Void { ClockModel(getModel( )).stop( ); } /** * Resets the clock's time to 12 midnight (0 hours). */ public function resetClock ( ):Void { setTime(0, 0, 0); } /** * Changes the clock's time. * * @param h The new hour, from 0 to 23. * @param m The new minute, from o to 59. * @param s The new second, from 0 to 59. */ public function setTime (h:Number, m:Number, s:Number):Void { ClockModel(getModel( )).setTime(h, m, s); } // As these next three methods show, the controller can provide // convenience methods to change data in the model. /** * Sets just the clock's hour. * * @param h The new hour. */ public function setHour (h:Number):Void { ClockModel(getModel( )).setTime(h, null, null); } /** * Sets just the clock's minute. * * @param m The new minute. */ public function setMinute (m:Number):Void { ClockModel(getModel( )).setTime(null, m, null); } /** * Sets just the clock's second. * * @param s The new second. */ public function setSecond (s:Number):Void { ClockModel(getModel( )).setTime(null, null, s); } /** * Handles events from the Start, Stop, and Reset buttons * of the ClockTools view. */ public function click (e:Object):Void { switch (e.target._name) { case "start": startClock( ); break; case "stop": stopClock( ); break; case "reset": resetClock( ); break; } } } The ClockController class is fairly generic. It could, in theory, be extended to provide event handling for other clock- related classes as well. For example, if the ClockAnalogView class allowed its hands to be dragged, methods could be added to ClockController to handle the clock-hand drag events. In that case, each view would have its own instance of ClockController . Alternatively, separate controller classes could be created to handle the drag events. Or, the ClockTools class and the ClockAnalogView class could use different controllers that inherit from a single ClockController superclass, which would define a set of methods common to both classes. 18.3.6 Putting It All Together: The Clock ClassThe pieces of our MVC clock are now complete. All that's left to do is assemble them into a functional application. The final assembly of our application occurs in the Clock class, our primary class that performs the following tasks :
All the preceding tasks occur in the Clock class's constructor function. However, because the clock needs to run as a standalone application, the Clock class also defines a main( ) method that starts the clock application. For information on creating and using a main( ) method as an application entry point, see Chapter 11. Example 18-11 shows the code for the Clock class. Example 18-11. The Clock class import mvcclock.* /** * An example Model-View-Controller (MVC) clock application. */ class mvcclock.Clock { // The clock data (i.e., the model). private var clock_model:ClockModel; // Two different displays of the clock's data (i.e., views). private var clock_analogview:ClockAnalogView; private var clock_digitalview:ClockDigitalView; // A toolbar for controlling the clock (also a view). private var clock_tools:ClockTools; /** * Clock constructor * * @param target The movie clip to which the digital and * analog views will be attached. * @param h The initial hour, 0 to 23, at which to set the clock. * @param m The initial minute, 0 to 59, at which to set the clock. * @param s The initial second, 0 to 59, at which to set the clock. */ public function Clock (target:MovieClip, h:Number, m:Number, s:Number) { // Create the data model. clock_model = new ClockModel( ); // Create the digital clock view, which uses a default controller. clock_digitalview = new ClockDigitalView(clock_model, undefined, 24, ":", target, 0, 253, 265); clock_model.addObserver(clock_digitalview); // Create the analog clock view, which uses a default controller. clock_analogview = new ClockAnalogView(clock_model, undefined, target, 1, 275, 200); clock_model.addObserver(clock_analogview); // Create the clock tools view, which creates its own controller. clock_tools = new ClockTools(clock_model, undefined, target, 2, 120, 300); clock_model.addObserver(clock_tools); // Set the time. clock_model.setTime(h, m, s); // Start the clock ticking. clock_model.start( ); } /** * System entry point. Starts the clock application running. */ public static function main (target:MovieClip, h:Number, m:Number, s:Number) { var clock:Clock = new Clock(target, h, m, s); } } To start our clock application in motion, we invoke Clock.main( ) on a frame of a .fla file (presumably the frame following any preloader). For example: // Import the package containing the Clock class. import mvcclock.Clock; // Attach the clock to someClip . The time defaults to the system time. Clock.main(someClip); As mentioned earlier, the .fla file's Library must contain a movie clip symbol named ClockAnalogViewSymbol , and it must contain the Button UI component. (To add the Button component to the Library, drag an instance of it from the Components panel to the Stage, and then delete the instance from the Stage.) In the preceding example, if we had chosen to set the time of the clock to 3:40:25 a.m., we'd have used: Clock.main(someClip, 3, 40, 25); In either case, a clip referenced by the variable or instance name "someClip" must exist on the timeline. To create a clock set to 3:40:25 p.m. and attach it to the current timeline, we can use: Clock.main(this, 15, 40, 25); Alternatively, we could create an instance of the Clock class directly (skipping the main( ) method) like this: var c:Clock = new Clock(this, 15, 40, 25); We'd need to use that approach when creating a clock as part of a larger application. The main( ) method approach simply lets us use the clock as a standalone application. |
| < Day Day Up > |
EAN: 2147483647
Pages: 177