Configuring a WebLogic Server Domain
Determining the best configuration for a particular set of applications requires careful analysis of the applications resource requirements, service-level agreements, corporate policies, network policies, security policies, and so on. Some of the best practices for choosing production system deployment architectures are covered in Chapter 14 and therefore will not be covered here. This section will focus on configuring a typical deployment architecture for a Web-based application that also has some Java application and Web Services clients . Where appropriate, we will discuss the available deployment architectures and the things to consider when choosing among the alternatives. The primary purpose of this section, though, is to discuss WebLogic Server domain configuration.
The first thing to do when preparing to configure a WebLogic Server domain is to determine what applications we will need to deploy in the domain. Although there are many things to consider when making this decision, probably one of the most important criteria is whether the same person or group within the organization will be administering all of the applications. The reality is that a WebLogic Server domain is just a logical grouping of WebLogic Server instances, clusters, or both that are controlled through a single administration server. While it is certainly possible to share a WebLogic Server domain among different sets of administrators, it is typically better for corporate harmony not to do so. Other questions to consider are these:
-
Do the applications need to interact with one another?
-
Do the applications share a common security model?
-
Do the applications need to share critical, but limited resources (for example, connections to legacy system)?
In this section, the example will focus on deploying a single application that has multiple client interfaces. Because there are no other applications to consider, we will create a new domain. The example uses our bigrez.com hotel reservation system that supports Internet bookings via a Web browser-based interface, customer service agent bookings using a Java client application, and Web services-based bookings from global reservation systems bookings via a virtual private network (VPN). While this example certainly won t cover every possible configuration issue, it does attempt to provide a broad overview of common issues you might encounter while configuring a WebLogic Server domain.
Figure 11.6 shows the deployment architecture we chose for this example. The Web browser-based Internet requests come in through a firewall to a hardware load-balancing device that distributes the requests across the Apache Web servers. Using the WebLogic Server Apache plug-in, the Apache Web servers proxy requests through a network address-translating firewall to the cluster of WebLogic Server instances. Global reservation systems come into the network through a VPN server. From there, we route the requests through a hardware load balancer and a network address translating firewall before they finally arrive at our cluster. Because customer service agents use computers connected to the company s internal network, their EJB-based application accesses the servers directly through a network address-translating firewall. The WebLogic Server administrator can also use the WebLogic Console from inside the data center or from any computer connected to the company s internal network through that same network address-translating firewall.
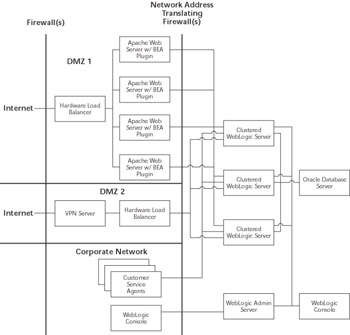
Figure 11.6: bigrez.com deployment architecture.
Our configuration assumes that all of the Apache Web server and WebLogic Server instances are running on separate machines. The machines running WebLogic Server have (at least) three separate NICs, one for customers coming in through Apache, one for the global reservation systems coming in through the VPN server, and one for corporate users. For the purposes of our example, we really do not care which network the database server is on as long as there is connectivity to that network from the application servers.
In Figure 11.6, the admin server and the cluster of managed servers are all communicating with each other on the same network as the end users. At the time of writing, limitations in the WebLogic Server network channel support require this design. We will go into the details of why we chose this configuration later, but we suspect that these limitations may be addressed by the time you read this book. We will use the administrative channel for server administration. We will configure an additional admin network channel that our WebLogic Server administrators can use to access the admin server from the corporate network. Having an administration port accessible from the corporate network may or may not be acceptable in your environment. We believe that this is an acceptable risk given that the administrators may need access to the system at all hours of the night and they already have secure remote access to the corporate network but not to the data center. Now, let s start walking through the process of setting up this configuration and deploying our application.
Setting Up a New Domain
The first step in creating a new domain is to set up and configure the admin server. After installing the WebLogic Server software on the machine where the admin server will reside, you need to create the files that define the admin server. WebLogic Server provides a Configuration Wizard to help create the initial directory structure and configuration files.
On Windows platforms, the WebLogic Configuration Wizard is available through the Windows Start Menu; the $WL_HOME/common/bin directory contains the config scripts for Windows and Unix. Table 11.1 shows the Configuration Wizard parameter values used to create the example admin server configuration files. Note that these values are in the WebLogic Server 8.1 Configuration Wizard s order of presentation at the time of writing; the order, names , and pages may change depending on the version of WebLogic Server you are using.
| NAME | VALUE |
|---|---|
| Create a Configuration or Add to an Existing Configuration | Create a new WebLogic Configuration |
| Configuration Template | Basic WebLogic Server Domain |
| Choose Express or Custom Configuration | Custom |
| Administration Server Configuration: | |
| Name Listen Address Listen Port SSL Listen Port SSL Enabled | AdminServer 192.168.1.20 7001 7002 No (unchecked) |
| Multiple Servers, Clusters, Machine Options | Yes |
| Managed Server(s) Configuration: | |
| Name Listen Address Listen Port SSL Listen Port SSL Enabled | Server1 192.168.1.21 7001 7002 No (unchecked) |
| Name Listen Address Listen Port SSL Listen Port SSL Enabled | Server2 192.168.1.22 7001 7002 No (unchecked) |
| Name Listen Address Listen Port SSL Listen Port SSL Enabled | Server3 192.168.1.23 7001 7002 No (unchecked) |
| Cluster Configuration: | |
| Cluster Name Cluster Multicast Address Cluster Multicast Port Cluster Address | BigRezCluster 237.168.1.20 7777 |
| Servers to Cluster Assignments | Server1, Server2, and Server3 to BigRezCluster |
| Machine Configuration: Name Post Bind GID Enabled Post Bind GID Post Bind UID Enabled Post Bind UID Node Manager Listen Address Node Manager Listen Port | Unix Machine Machine1 No (unchecked) No (unchecked) 192.168.1.21 5555 |
| Name Post Bind GID Enabled Post Bind GID Post Bind UID Enabled Post Bind UID Node Manager Listen Address Node Manager Listen Port | Machine2 No (unchecked) No (unchecked) 192.168.1.22 5555 |
| Name Post Bind GID Enabled Post Bind GID Post Bind UID Enabled Post Bind UID Node Manager Listen Address Node Manager Listen Port | Machine3 No (unchecked) No (unchecked) 192.168.1.23 5555 |
| Servers to Machine Assignments: | |
| Server1 Server2 Server3 | Machine1 Machine2 Machine3 |
| Database (JDBC) Options | Skip |
| Messaging (JMS) Options | Skip |
| Advanced Security Options | Yes |
| User : | |
| Name Password Description | system insecure WLS admin user |
| Name Password Description | BIGREZADMIN password bigrez.com admin user |
| Name Password Description | BIGREZMPLS password BigRez Inn MPLS administrator |
| Name Password Description | BIGREZDUL password BigRez Inn Duluth administrator |
| Name Password Description | DEWDROP1 password DewDrop Inn Downtown administrator |
| Group: | |
| Name | BigRezAdministrators |
| Description | Can use bigrez.com admin app to administer all hotels |
| Name | HotelAdministrators |
| Description | Can use bigrez.com admin app to administer their hotel |
| Assign Users to Groups | |
| system BIGREZADMIN BIGREZMPLS BIGREZDUL DEWDROP1 | Administrators BigRezAdministrators HotelAdministrators HotelAdministrators HotelAdministrators |
| Assign Groups to Groups | No action required |
| Assign Users and Groups to Global Roles | No action required |
| Windows Options: | |
| Create Start Menu Install Administrative Server as Service | Yes No (you can add this later, if desired) |
| Build Start Menu Entries: | |
| Shortcut Link Name Program Argument Working Directory | Start bigrez.com Admin Server startWebLogic.cmd |
| WebLogic Configuration Environment: | |
| WebLogic Configuration Startup Mode Java SDK Selection | Production Mode JRockit SDK |
| Create WebLogic Configuration: | |
| Configuration Location Configuration Name | C:\mastering\ch11_examples\deploy\AdminServer\user_projects bigrezdomain |
Now that the admin server setup is complete, it is time to install the WebLogic Server software and create the configuration files for the managed servers. At the time of writing, the WebLogic Server 8.1 Configuration Wizard did not support an option for creating new directory structures for managed servers. While it is possible to use the Configuration Wizard to create a new domain directory and modify the files manually, it is easier to copy the files needed from the bigrezdomain directory from the admin server to the managed servers. The primary files of importance for the managed servers are the SerializedSystemIni.dat file and the setEnv and startManaged WebLogic scripts. If you are using a different platform for the managed servers and the admin server, you may need to edit the scripts. For example, we chose to use the JRockit JVM for the admin server so if the managed servers ran on a platform that does not support JRockit, you would need to edit the scripts to refer to the correct JVM for that platform. Once this process is complete, the next step involves starting the admin server and configuring the domain to match our desired deployment environment.
To make it easy to start the admin server, the Configuration Wizard creates startWebLogic shell script files in the admin servers root directory (for example, C:\mastering\ch11_examples\deploy\AdminServer\user_projects\bigrezdomain ). Because our admin server will run on a machine using a version of the Microsoft Windows operating system, the relevant shell script file is start WebLogic.cmd . Before starting the admin server, we want to configure the script so that you don t have to type in the username and password of the administrative users every time the script is run. The start script provides the WLS_USER and WLS_PW variables for specifying the administrative username and password so that the server doesn t prompt for them at boot time. This is handy, but now there is a better solution that does not leave the administrative username and password stored in clear text on the file system. Recent versions of WebLogic Server now support specifying the administrator s username and password in a boot identity file that the server will read on startup. To create the boot identity file, use a text editor to create a two-line boot.properties file like the one shown here in the server s root directory:
# Initial contents of the boot.properties file username=system password=insecure
The next time you start the server it will find the boot.properties file and encrypt the username and password property values.
Now, start the admin server and bring up the WebLogic Console using your favorite browser. At this stage, we are not ready to go through the network address translating firewall to the admin server s administration port (because it has not yet been configured). Therefore, we need to run the console from a machine inside the data center firewalls that can point directly at the admin server s plain-text listen port (for example, http://192.168.1.20:7001/console). The first thing to do is to enable the domain-wide administration port (that is, the admin channel). Because the administration port requires SSL, the admin server s SSL settings need to be configured properly (actually, all of the managed servers SSL settings can be configured at this point as well). Rather than our covering SSL configuration again here, refer to Chapter 10 for more information on how to do this. Once the SSL configuration is complete, configure the admin channel settings using the domain s General Configuration tab. Once you restart the admin server, the WebLogic Console will need to use the administration port (for example, https ://192.168.1.20:9002/console).
Before moving on to configuring the individual servers, you should configure the domain logging characteristics. Use the domain s Logging Configuration tab to change the File Name attribute to .\logs\bigrezdomain.log , the Rotation Type attribute to By Time , and the Limit Number of Retained Log Files checkbox to checked. Don t forget to create the logs subdirectory in the admin server s root directory. These changes cause the admin server to place the domain log file in its logs subdirectory, rotate the domain log file every day at midnight, and retain only one week s worth of log files. While in practice the domain log file does not typically grow very quickly unless you configure server log message propagation, it is still a good idea to use log rotation to prevent having to stop the server to remove a large log file that is filling up the file system. In the next section, we will enable log rotation for other log files that are more likely to grow very large in a short period of time.
| Best Practice | Always enable log rotation for the domain log file to prevent having to restart the admin server should the log file grow too large. |
Configuring Servers
Configuring a WebLogic Server instance is an important part of any WebLogic Server administrator s job. Out of the box, the server comes with a default configuration that will allow you to start it without any additional configuration. While this default configuration is convenient and contributes much to the ease of use of the product, WebLogic Server has a large number of configuration parameters available to tune the server s behavior for almost any environment. Rather than attempting to cover all of the options, we will focus on those parameters that typically require changes from the default values to satisfy production environment requirements. Fortunately, the reservation system example provides us with enough complexity to be able to present these configuration changes in the context of a real-world example.
The first task is to make sure that we properly configure the default network channel. Because the admin server and the managed servers will not be using their default channel SSL listen port, we did not enable the SSL ports of any of the servers when creating the configuration. Check to make sure that the default SSL ports are disabled on the server s General Configuration tab. The Advanced Options portion of the General Configuration tab provides the Local Administration Port Override attribute that allows you to override the domain-wide administration port number for a server. We will not need to do this for our example.
The next item on our list is to configure some of the denial-of-service- related parameters that we discuss more in Chapter 14. Because our customer- facing Web application never posts more than a few kilobytes of data, we want to limit both the maximum amount of time to receive an entire request s data and the maximum allowable size of a request. Using the HTTP Protocols tab for each managed server, leave the Post Timeout set to the default of 30 seconds and set the Max Post Size to 100,000 bytes for all three managed servers. Because the application s Max Post Size is limited to 100,000 bytes, limiting the total HTTP message size to 200,000 bytes should provide more than enough space to allow all valid HTTP requests to reach the application. Set the HTTP Max Message Size for each managed server to 200,000 bytes. You should also set the HTTP Message Timeout to 60 seconds. You can find these attributes under the Advanced Options section of the HTTP Protocols tab.
Several parameters on the server s Tuning Connections tab are important. Accept Backlog controls the length of the underlying TCP/IP listen queue. See Chapter 12 for more information on tuning the length of the listen queue. For now, it is sufficient to understand that this parameter will limit the number of concurrent connection requests to the server. While the default value of 50 is sufficient for most purposes, you may need to increase this value for servers processing many concurrent HTTP requests to prevent clients from getting connection refused errors.
Login Timeout is the amount of time the server allows for a newly established connection to start sending request data. In high-volume Web sites, it may be necessary to increase this parameter to 10 seconds or so to prevent clients from receiving login timed-out errors. Do not set this parameter too high, though, as this could make the server more vulnerable to a denial-of-service attack. For our example, the SSL Login Timeout for the default channel is not important (because the SSL ports are disabled), but this parameter serves a similar purpose for SSL connections.
The Maximum Open Sockets parameter controls the number of sockets the server can have open at any time. As with the Accept Backlog parameter, this parameter provides a mechanism to set a limit that the operating system also controls. A typical use for this parameter would be to limit the number of connections to a server to a number lower than the limit imposed by the operating system. This is the recommended way of throttling requests into the server to prevent overloading the server with so many concurrent requests that the response time for processing a request cannot meet service-level agreements. For this example, we will increase the Accept Backlog to 100, the Login Timeout to 10,000 milliseconds (10 seconds), and the number of socket connections to 1,000.
Before moving on to configure logging, enable MSI File Replication for the managed servers using Advanced Options section of the Tuning Configuration tab. This will tell the admin server to periodically replicate the configuration files used by the managed servers to start up in stand-alone mode when the admin server is not available. To speed up the compilation of run-time-generated Java code (such as when we access a JSP page for the first time), we will configure the server to use the Jikes open source Java compiler (see www.ibm.com/developerworks/oss/ jikes /), which is many times faster than the default javac compiler supplied with the Java 2 Software Development Kit (J2SDK). To do this, use the servers General Configuration tab to set the Java Compiler attribute to the full path to Jikes (for example, /usr/local/bin/jikes ).
Because our customer-facing Web site is using Apache Web servers to proxy requests to our cluster through a NAT firewall, you need to configure the servers to know about their external addresses that the plug-in must use to reach them from outside the firewall. We do this by using the External Listen Address attribute available in the Advanced Options section of the server s General Configuration tab. In the example, the firewall maps all IP addresses in the 192.168.1.xxx subnet to the 10.168.1.xxx subnet in DMZ 1. Therefore, we will set the External Listen Address parameters for each managed server to the values shown in Table 11.2.
| Server Name | External Listen Address |
|---|---|
| Server1 | 10.168.1.21 |
| Server2 | 10.168.1.22 |
| Server3 | 10.168.1.23 |
Before leaving this area, you should set the WebLogic Plug-in Enabled attribute for each managed server. This causes WebLogic Server to return the value of the WL-Proxy-Client-IP HTTP header when the application calls the getRemoteAddr() method on an HttpServletRequest object. By doing this, the application is able to obtain the client information reliably for requests being routed through one of WebLogic Server s Web server plug-ins.
Our next task is to configure server logging. Using the servers Server Logging tabs, specify the location and name of each server s log file. This tab also controls how verbose the server output to the console window (that is, stdout) should be. For the example, the default log file names and stdout settings will suffice. We will use the servers Server Logging tabs to configure server log rotation. As with the domain log, we will set up server log rotation for all four servers to rotate once a day at midnight and to limit the number of old log files to keep only the log files for the past week. To do this, set the Rotation Type to By Time and check the Limit Number of Retained Log Files checkbox.
| Best Practice | Always configure the server and HTTP access logs to use rotation. This will prevent the need to stop the server to remove large log files. |
Now, we need to configure HTTP logging for all four of the servers. Using the HTTP Logging tab, you can control the format, location, buffering, and rotation of the HTTP access log. The first decision you need to make is whether to use common or extended logging format. Because we want to gather statistical information about site usage, we are going to choose extended logging for the managed servers. The HTTP access log files grow proportionally to the number of requests. This means that the log file sizes can vary greatly depending on the amount of traffic to our Web site. Because we hope that our Web site will be very popular, we will choose rotation by log file size rather than by time. While this decision will make it harder to pinpoint a particular day s entries, it will guarantee that you don t end up with a very large log file that could fill up the available disk space, leaving you with no other recourse than to stop and restart the server. Set the Format to extended and the Maximum Log File Size to 10,000 kilobytes.
| Warning | HTTP access log files grow proportionally to the number of requests. If you do not configure log rotation properly, the access log file can grow to a very large size and potentially fill up the disk, causing the application and the operating system to stop working. Once this condition is reached, the only way to remove the log file is to stop and restart the application server. |
By default, WebLogic Server buffers all writes to the HTTP access log to improve performance. The Log Buffer Size and Flush Every attributes control this behavior. Log Buffer Size controls the size at which WebLogic Server will flush its internal, in-memory buffer for HTTP access log entries and write them to disk. Flush Every controls the frequency with which the server checks the log buffer to see if it is larger than Log Buffer Size; if it is, the server will flush the buffer and write the buffered entries to the access log file. For high-volume Web sites, access log file buffering can improve performance dramatically at the risk of losing a few entries if the server were to crash. For most systems, this trade-off is acceptable.
At this point, we are ready to move on to configuring our system for clustering. We have not attempted to cover every possible server option. Some additional parameters will be covered in the upcoming sections, while others are covered elsewhere in the book. For a complete discussion of all possible configuration options, refer to the online documentation at http://edocs.bea.com/wls/docs81/admin.html .
Configuring the Cluster
The first thing you need to do when setting up a cluster is choose a multicast address and multicast port number. Older versions of WebLogic Server used the plain-text listen port number as the UDP port for sending multicast messages to a WebLogic Server cluster. This meant that in order for every server in the cluster to communicate via multicast, the plain-text listen port for every server in the cluster had to be the same. Because multiple processes cannot bind to the same IP address and TCP port number combination, every server in the cluster had to have its own unique IP address. Starting with WebLogic Server 7.0, each cluster has its own Multicast Port attribute to specify the UDP port to use for multicast traffic, rather than relying on all servers in the cluster having the same plain-text listen port. This gives you more flexibility when setting up clusters.
When choosing a multicast address and port, it is important to make sure that no other programs on your network are using the same multicast address and multicast port number combination. Although more recent versions of WebLogic Server allow different clusters to share the same multicast address and port number, it is much more efficient, from a server processing standpoint, if they do not. Every server in a cluster must use the same multicast address and multicast port number. Multicast addresses can range from 224.0.0.1 to 244.255.255.255. The general recommendation is to avoid the 224.0.0.x range of addresses as these are typically reserved for multicast routing. Because the WebLogic Configuration Wizard has already set this up using the parameters listed in Table 11.1, you don t need to do anything with the configuration.
| Warning | Do not try to add the admin server to the cluster. The admin server is not clusterable. We will discuss admin server failover later in this chapter. |
Next, we need to create definitions for the machines on which the managed servers are running. Telling WebLogic Server which servers run on which machines serves two important purposes. First, it lets WebLogic Server be smart about the location of in-memory replicated objects so that it tries to keep copies of the same object on different machines. Because our configuration is currently running only one WebLogic Server instance per machine, this particular aspect is not important in our example. Second, it lets the admin server know which node manager to talk to when starting or stopping a particular managed server. Because the Configuration Wizard already created the machines and associated the servers with the machines according to the parameters shown in Table 11.1, you don t need to do anything else.
If we were configuring our system for disaster recovery, we might decide to spread our cluster across two data centers, provided that both data centers were relatively close together and connected by one or more high-speed network links. This type of configuration can support both data centers actively processing requests and allow for failover between data centers. Of course, WebLogic Server clustering does not handle all of the issues involved with setting up this type of environment, such as data replication of back-end systems; however, it can support replicating objects between data centers. To accomplish transparent failover of in-memory replicated objects, you need some way to tell WebLogic Server to store the replicated objects primary and secondary copies in different data centers. Replication groups give you this type of control over how WebLogic Server selects the location of the secondary server.
In our example, we are not considering disaster recovery and do not have any need to control the secondary-server selection process. Therefore, we will not set up any replication groups. We discuss disaster recovery considerations and options in more detail in Chapter 14. At this point, we are ready to move on and discuss configuring network channels.
Configuring Network Channels
Our application uses three distinct networks to segment different types of user traffic. Using network channels, you can control the network resources, protocols, and tuning parameters of each network independently. The customer Web site is using the default channel that you have already configured. So, we need to configure two additional channels: the global reservation systems (GRS) channel and the internal customer service agents (CSA) channel. To create a network channel, you need to specify the name, default listen ports, cluster address, and protocol that the channel will support.
In this example, the GRS channel will support only the HTTP protocol because all requests on this channel should be Web service requests over HTTP. The internal network listen addresses used by each server will be in the 206.168.1.x subnet, so the GRS channel for Server1 , Server2 , and Server3 uses a Listen Address of 206.168.1.21, 206.168.1.22, and 206.168.1.23, respectively. Because we are using a NAT firewall, we need to set the External Listen Address attributes to 10.12.1.21, 10.12.1.22, and 10.12.1.23, respectively. We will use an External Listen Port value of 80.
Next, you will want to tune the settings of the GRS channel using the channel s Advanced Options section. You should make sure that the Accept Backlog , Login Timeout , Complete Message Timeout , and Idle Connection Timeout attributes are set to reasonable values. Because server-to-server communication may use network channels and multiple channels may be available, WebLogic Server uses the Channel Weight setting to define the preferred channel(s) between two servers. The Outgoing Enabled checkbox allows us to disable the initiation of server-to-server communication over a particular channel. Because bigrez.com will not use the GRS channel for server-to-server communication (all server-to-server communication will use the default channel), you should leave the Outgoing Enabled checkbox unchecked. Because the GRS channel is not used for EJB communication, the Cluster Address setting is not important. You should, however, adjust the Maximum Message Size to a reasonable value based on the application s needs. Because our GRS channel is transmitting Simple Object Access Protocol (SOAP) messages over HTTP, you will need to allow larger HTTP messages than we previously did in the default channel for the customer Web site. After consulting with our application architects , we know that no SOAP message from our GRS partners will ever be larger than 750 KB, so you should set the maximum message size to 1,000,000 bytes.
At this point, we are ready to set up the CSA channel that our internal customer service agents will use. Because the Java client application uses RMI to talk with the cluster, the CSA channel will need to support only the t3 protocol.
Now that we understand what needs to be done to support our CSA channel, go ahead and set up the network channel to support only the t3 protocol and deploy it to the cluster. Use the information in Table 11.3 to configure the CSA channel for each managed server. Use the default value for all other parameters.
| NAME | VALUE |
|---|---|
| Name | CSA Channel |
| Protocol | t3 |
| Listen Address | 209.168.1.21 for Server1 |
| 209.168.1.22 for Server2 | |
| 209.168.1.23 for Server3 | |
| Listen Port | 7001 |
| External Listen Address | 10.11.1.21 for Server1 |
| 10.11.1.22 for Server2 | |
| 10.11.1.23 for Server3 | |
| External Listen Port | 7001 |
| Cluster Address | 10.11.1.21,10.11.1.22,10.11.1.23 |
| HTTP Enabled for This Protocol | No (unchecked) |
| Maximum Message Size | 100,000 |
The last step is to set up an additional network channel for the admin server that only supports the admin protocol. This allows our administrators to access the WebLogic Console from anywhere inside the corporate network. To do this, simply create a network channel for the admin server by setting the Name to Internal Admin Channel , the Protocol to admin , the Listen Address to 192.168.1.20 , the Listen Port to 443 , the External Listen Address to 10.11.1.20 , and the External Listen Port to 443 .
At this point, our network channel configuration is complete and we are ready to move on to the node manager. The configuration of the node manager is relatively simple. Unfortunately, debugging problems with the node manager can be tricky. In the next section, we will try to point out all of the things to be aware of in order to avoid such problems as well as try to describe the debugging process.
Setting Up the Node Manager
The node manager is a daemon process that provides remote server start capabilities to the WebLogic Console, monitors the health of its servers, and allows for automatic restart of failed servers. As such, we recommend installing and configuring the node manager on all machines where managed servers will run. Typically, we recommend installing the node manager so that it starts up when the machine boots. On Windows, this means installing it as a Windows service. On Unix, it generally means writing a boot script to run the node manager start script as the correct user with the correct environment. Because the managed servers in our example all run in a Unix environment, we will focus primarily on installing and configuring the node manager on a Unix-based operating system. We will try to point out places where the process is significantly different under Windows. For more complete information, please refer to the WebLogic Server online documentation at http://edocs.bea.com/wls/docs81/adminguide/nodemgr.html .
The first thing you need to do is determine the location from which the node manager will run. Because the default location for the node manager is under the $WL_HOME/common/nodemanager directory, we recommend creating a separate directory outside the WebLogic Server software install directory to run the node manager. We will choose to create a directory called /mastering/ch11_examples/deploy/Machine#/NodeManager , where # is either 1, 2, or 3, on each of the three machines where managed servers will run. Now, copy the $WL_HOME/server/ bin/startNodeManager.sh file ( startNodeManager.cmd on Windows machines) to the newly created NodeManager directory. Edit your copy of the startNodeManager script to set the NODEMGR_HOME environment variable to the script s current directory.
The startNodeManager script takes two arguments: the listen address and the listen port. We could have created three scripts to invoke the startNodeManager script with proper arguments for each machine. The node manager also looks for a property file called nodemanager.properties in the NODEMGR_HOME directory for configuration information. If this file doesn t exist, the node manager creates it the first time it is started. By adding the following lines to each node manager s property file, you do not need to create three separate scripts. The nodemanager.properties file for Machine1 looks like this:
PropertiesVersion=8.1 ListenPort=5555 ListenAddress=192.168.1.21
The admin server uses two-way SSL to communicate with the node manager. In a real production environment, you should always configure SSL using real certificates tied to each machine and configure the node manager to use its machine s certificates and private keys. Rather than our repeating the discussion of SSL configuration here, please refer to Chapter 10. Once you have SSL configured, you can use the nodemanager.properties file to point the node manager to the identity and trust key stores. For our example, you simply add the following lines to specify the node manager s SSL configuration:
KeyStores=CustomIdentityAndCustomTrust CustomIdentityKeyStoreFileName=ServerKeyStore.jks CustomIdentityKeyStorePassPhrase=server_keystore_passwd CustomIdentityAlias=server_key CustomIdentityPrivateKeyPassPhrase=server_key_passwd CustomTrustKeyStoreFileName=ServerTrustStore.jks CustomTrustKeyStorePassPhrase=server_truststore_passwd
The first time you start the node manager it will replace the clear-text passwords in the property file with Triple DES encrypted versions.
| Best Practice | Always obtain, install, and configure server-specific SSL certificates and enable SSL hostname verification for node managers running in a production environment. Failing to do so can compromise the security of your applications. |
The node manager uses a trusted hosts file to determine the set of machines from which it is allowed to accept requests to start or stop servers. By default, the node manager uses the nodemanager.hosts file located in the NODEMGR_HOME directory. At a minimum, you need to add the admin server s Listen Address to the hosts file (192.168.1.20 in our example). Please note that if you choose to use a DNS name in the hosts file, you need to enable reverse DNS lookup on the node manager. To do this, set the ReverseDnsEnabled property to true by either defining it as a Java system property on the command line or by adding it to the nodemanager.properties file. Remember to account for any admin server migration support in your environment. We will discuss strategies for admin server migration in the Managing WebLogic Server Applications section.
| Best Practice | Unless DNS names play a critical role in your admin server migration strategy, use only IP addresses in the node manager s trusted host file and leave reverse DNS lookup disabled. By not using DNS names and reverse lookup, you eliminate the need for the node manager to talk with your DNS server and remove another potential point of failure. |
Next, you need to configure the node manager settings in the WebLogic Console. These settings are split between settings that apply to the node manager on a specific machine and those that contain information the node manager needs to start each individual server on the machine. Using the WebLogic Console, navigate to the machine settings for Machine1 and select the Node Manager Configuration tab. You should see that the Configuration Wizard already set the Listen Address to 192.168.1.21 and the Listen Port to 5555. If not, set these values appropriately for each of the three machines.
The next step is to set the server-specific settings. Using the Remote Start Configuration tab of each of the managed servers, you must tell the node manager enough information to start the server with the proper configuration. Although the managed servers will inherit the environment of the node manager, we find it is best to configure all of the managed server s remote start attributes explicitly. While most of the remote start attributes are self-explanatory, we will take a minute to review them because debugging problems with starting servers via the node manager can be frustrating. The server s remote start attributes are as follows :
Java Home . The full path to the JDK installation directory on the node manager s machine that will be used to start the server. This parameter must be set such that appending /bin to the value of this parameter will give the server the fully qualified directory path to the Java Virtual Machine executable. Typically, this would be set to something like c:\bea\jdk141_02 or /opt/bea/jdk141_02 depending on the operating system and where you installed the WebLogic Server software.
BEA Home . The full path to the BEA software installation directory on the node manager s machine. Typically, this would be set to something like c:\bea or /opt/bea depending on the operating system and where you installed the WebLogic Server software.
Root Directory . The full path to the domain s root directory on the node manager s machine. The value of this parameter will affect the location of all relative directory and file names. For example, if the root directory is set to /mastering/ch11_examples/deployment/Machine1/user_projects/bigrezdomain and the server s log file is set to ./Server1//Server1.log , the server s log file will be /mastering/ch11_examples/deployment/Machine1/user_projects/bigrezdomain/Server1/Server1.log . Typically, this would be set to something that includes the WebLogic Server domain name, such as /mastering/ch11_examples/deployment/Machine1/user_projects/bigrezdomain .
Classpath . The complete Java classpath that WebLogic Server requires to start your applications. In most cases, the only things that need to be in the classpath are the JRE s tools.jar , the WebLogic Server s weblogic.jar , and any JDBC driver s classes or .jar files. You should always question developers who require application classes in the server s classpath because this will prevent hot redeployment of these classes with the application.
Arguments . The JVM arguments to use to start the managed server on the node manager machine. Typical things to set here are the Java HotSpot Compiler options (for example, -server ), the JVM heap size (for example, -Xms32m -Xmx200m ), garbage collection tuning parameters, and any Java system properties required by WebLogic Server and/or your applications.
Security Policy File . The fully qualified name to the Java 2 security policy file to use to start the managed server on the node manager s machine. Typically, it is sufficient to use WebLogic Server s default policy file (for example, /opt/bea/weblogic81/server/lib/weblogic.policy ).
Username . The administrative user name to use to start and stop the server and perform other administrative operations. In our examples, we use the username system as the administrative user because historically this has been the WebLogic Server default.
Password . The password of the administrative user that corresponds to the supplied Username parameter s value. In our examples, we use the password insecure just to stress that the password you select for the administrative user(s) will directly affect the security of your WebLogic Server applications.
| Best Practice | Explicitly configure all remote start attributes for a managed server rather than relying on the node manager s environment for a managed server s configuration. |
After doing the configuration work just described for each of the three machine s node managers, you are ready to start the node managers on the three machines by running the startNodeManager scripts on each machine. When you first start the node manager on a particular machine, the node manager creates a directory structure for its log files; the top-level directory is called NodeManagerLogs , and it is created in the NODEMGR_HOME directory. If you look inside this directory, you will find a single directory (unless you have used this Node Manager before) called NodeManager Internal . This is where the node manager writes its log file and other information that it needs to persist. If you look inside this directory, there are three files: MonitoredProcessList , NodeManagerProperties , and a file whose name is of the form nm_ < machine_name > _ < date_started > - < time_started > .log , where < machine_name > is the hostname of the machine, < date_started > is the numeric date in MM_DD_YYYY format, and < time_started > is the 24- hour clock time in HH_MM_SS format. This last file is the node manager s log file. You should look through this file to make sure that the node manager started up properly and that there were no warnings or errors. This file becomes extremely important when running the node manager as a Unix daemon process (or a Windows service) where the stdout and stderr output streams are not visible.
Once the node managers start, you can use each server s Start/Stop Control tab to start the managed servers. Because the server runs in the background, you must use log files to troubleshoot any problems with the server configuration. Fortunately, the node manager captures the stdout and stderr output streams and writes them to disk. The node manager creates these files underneath the NodeManagerLogs directory. If you look inside this directory again, there will be a new directory with a name of the form < domain name > _ < server_name > (for example, bigrezdomain_Server1 ). Inside this directory will be four files: nodemanager.config , < server name > _error .log , < server name > _output.log , and < server name > _pid . The < server name > _output.log and < server name > _error.log files are the stdout and stderr output streams of the server, respectively. These files allow you to determine why the server failed to start, and they can be invaluable if the server fails before it begins writing to its own log file.
In addition, the admin server creates separate log files for logging any communication with a node manager. The admin server creates these log files under the Node ManagerClientLogs directory in the admin server s root directory. These client log files can help debug configuration errors related to communication between the admin server and the node manager, perhaps something as simple as accidentally specifying the wrong node manager listen address or port.
WebLogic Server currently requires that the node manager start all servers that it monitors. Currently, only the admin server can tell the node manager to start or stop a server. This creates a problem for managed servers using managed server independence (MSI) mode. MSI mode allows you to start a managed server with a cached copy of its configuration when the admin server is unavailable. Because there is no way to tell the node manager to start a managed server without the admin server, any managed servers started in MSI mode will not be monitored by the node manager. This means that, while WebLogic Server can automatically switch a server from MSI mode to normal mode when the admin server comes back up, any server started in MSI mode will eventually have to be restarted once the admin server becomes available if you want the node manager to monitor the server s health. We expect that this limitation will be addressed in a future release.
Operating System Configuration
Configuring the operating system is an important part of setting up any WebLogic Server deployment. RMI-based applications feature long-lived connections between the clients and the servers, while HTTP-based applications feature short-lived connections. Because operating systems represent each connection as a file descriptor, the number of available file descriptors effectively controls the number of client connections. To conserve resources, many operating systems have a default configuration that supports only a relatively small number of file descriptors per process. While this is fine for many types of applications, it can prove to be a limiting factor with large, server-based applications. Fortunately, most operating systems allow the system administrator to tune the maximum number of file descriptors per process.
In addition to the actual number of file descriptors a process can allocate, processes that open and close a lot of short-lived connections are vulnerable to another related operating system implementation detail. Without going into the details of the TCP/IP protocol, the problem is that the operating system must keep information about a closed TCP socket connection for some period of time. During this period of time, the operating system still considers the file descriptor for this connection to be active and therefore counts it in the process s total number of file descriptors. As you might imagine, applications that open and close a lot of connections in a relatively short period of time (for example, HTTP-based applications) can quickly consume many more file descriptors than you would normally expect given the number of concurrent connections. Fortunately, the period of time that the operating system holds on to these closed connection file descriptors is tunable in most operating systems. While the name of this parameter varies across operating systems, it is generically known as the TCP time wait interval .
From this short discussion of some fundamental operating system concepts and how they affect server-based applications, we hope that it is clear why it is critical to verify the operating system configuration before deploying a production application. While the details of all possible tuning parameters and operating systems are well beyond the scope of this book, we will talk more about operating system tuning in Chapter 12. We highly recommend consulting the WebLogic Server supported platforms documentation at http://edocs.bea.com/wls/certifications/certifications/index.html for more detailed recommendations on tuning any particular operating system.
Java Virtual Machine Configuration
Java Virtual Machine (JVM) tuning is another important configuration task for a WebLogic Server administrator. Choosing the right JVM, selecting the right JIT or HotSpot compiler options, selecting the appropriate heap size settings, and tuning the garbage collector are critical to the performance, scalability, and reliability of WebLogic Server-based applications. Although an in-depth discussion of the options is beyond the scope of this chapter, we recommend reading through the Java Virtual Machine Tuning section of Chapter 12, reviewing the recommendations on the BEA and JVM vendors Web sites, and talking with other experienced developers and administrators on the BEA public newsgroups (see http://www.bea.com/support/newsgroup.shtml for more information).
Web Server Plug-in Configuration
The final topic in this section is configuring the WebLogic Server Web server plug-ins to proxy requests to a WebLogic Server instance or cluster (see Figure 11.3). WebLogic Server supports Web server proxy configurations with several different third-party Web servers (that is, Netscape/iPlanet, Microsoft, and Apache) as well as from another instance of WebLogic Server itself. For the three third-party Web servers, the proxy support uses a Web server plug-in, written to the native extension API of the Web server (for example, ISAPI for Microsoft s Internet Information Server), to proxy requests to WebLogic Server. A built-in servlet class, weblogic.servlet.proxy .HttpClusterServlet , provides the functionality when using WebLogic Server as the proxy. While a full discussion of all of the configuration options across all of the different supported Web servers is beyond the scope of this book, we will cover some of the important points in the context of the Apache Web Server plug-in configuration. Although the configuration details for each plug-in vary, the general concepts are similar across all Web server plug-ins. We believe that the discussion will still be useful even when not using Apache. For more complete and detailed coverage of Web server plug-in configurations, please see the WebLogic Server documentation on the BEA Web site at http://edocs.bea.com/wls/docs81/plugins/index.html .
In this example, we use the Apache Web server, so we will focus on the details of configuring the Apache plug-in. Some knowledge of Apache is useful when configuring the plug-in, but we will try our best to cover the trickier aspects of plug-in configuration without assuming too much prerequisite knowledge. For more complete information about the Apache Web server, or to download a copy of the software, please see the Apache Web server Web site at http://httpd.apache.org .
The first step in configuring any plug-in is to install the WebLogic Server plug-in s native libraries and tell the Web server to load them. For Apache, this means copying the appropriate shared library to a directory that Apache can find and adding the LoadModule directive to the Apache configuration file. Before you do anything, you need to verify WebLogic Server plug-in support for your version of Apache and verify that your version of Apache includes support for Dynamic Shared Objects. Please refer to the WebLogic Server documentation at http://edocs.bea.com/wls/certifications/ certifications/overview.html for more information on the versions of Apache that WebLogic Server currently supports. To determine whether your version of Apache supports Dynamic Shared Objects, you need to run the server with the “l option. Change directories to the $APACHE_HOME/bin directory and run the Apache “l command (or the httpd “l command for Apache 1.3); the output should look similar to the following snippet and must include mod_so.c . If it does not, please refer to the WebLogic Server Apache plug-in documentation (http://edocs.bea.com/wls/docs81/plugins/apache.html) or the Apache Web server documentation (http://httpd.apache .org/docs-2.0/) for procedures for enabling this support.
> Apache -l Compiled in modules: core.c mod_win32.c mpm_winnt.c http_core.c mod_so.c
Next, you need to locate the plug-in shared library for the operating system on which Apache is running. The operating system specific subdirectories under the $WL_HOME/server/lib directory contain the different plug-in shared libraries (under Windows, the plug-in will be in $WL_HOME/server/bin ). The name of the plug-in varies depending on the version of Apache it supports and the operating system, but it always begins with mod_wl and ends with a shared library extension (for example, so , sl , or dll ). Please consult the WebLogic Server Apache plug-in documentation for the correct shared library name for a particular platform and version of Apache.
Our example will use Apache 2.0.44 running under Windows 2000. Copy the mod_wl_20.so file from the $WL_HOME/server/bin directory to the $APACHE_ HOME/modules directory, which, in our case, is c:\apache\Apache2\modules . Locate the httpd.conf file (in the $APACHE_HOME/conf directory) and add the following line at the end of the file:
LoadModule weblogic_module modules/mod_wl_20.so
At this point, it is a good idea to save these changes and try to restart the server. Run the following command to restart the server (replace restart with start if the server is not already running):
> Apache k restart
To proceed further, you need more information about the application. The example reservation system application will use the Apache Web server only for customer self-service bookings. Although we won t be exploring the details of the application until the next section, we will assume that you know from your development staff that you want to redirect all requests to your Web site to your WebLogic Server cluster. To do this, you use the Location directive in conjunction with the SetHandler directive to tell Apache that all requests whose URLs match a particular pattern should be handled by the WebLogic Server plug-in. Add the following lines to the end of the httpd .conf to accomplish this:
<Location /> SetHandler weblogic-handler </Location>
Of course, this means that Apache will delegate every request to the WebLogic Server plug-in. In many cases, you may not actually want this. The plug-in also supports proxying requests by MIME type through the use of the IfModule directive in conjunction with the MatchExpression directive. Because our use of Apache is simple, you won t need to do this, so we suggest reviewing the WebLogic Server Apache plug-in documentation for more information on how to set this up.
At this point, you have configured Apache to send all requests that begin with /user and /admin to the plug-in, but how does the plug-in know what to do with the requests once they arrive? You need to tell the plug-in where to send the requests that it receives. To do this, use either the WebLogicHost and WebLogicPort directives or the WebLogicCluster directive, depending on whether you are forwarding to a single server instance or a cluster. We are forwarding requests to the cluster, so you must use the WebLogicCluster directive. Before you do this, however, you need to remember that we are using a NAT firewall between Apache and the WebLogic cluster. Therefore, we need to use the external IP addresses of the firewall instead of the actual (internal) IP addresses so that the plug-in can reach the servers. Let s modify the Location directive to add the WebLogicCluster directive with the external IP addresses and port number of our cluster.
<Location /user> SetHandler weblogic-handler WebLogicCluster 10.168.1.21:7001,10.168.1.22:7001,10.168.1.23:7001 </Location> <Location /admin> SetHandler weblogic-handler WebLogicCluster 10.168.1.21:7001,10.168.1.22:7001,10.168.1.23:7001 </Location>
This completes the basic setup of the Apache plug-in for our simple application. The WebLogic Server plug-ins offer a wide variety of possible configurations and parameters to modify a plug-in s behavior. While the WebLogic Server documentation covers these in great detail, we will cover a few of the most commonly used parameters. The first set of parameters is as follows:
PathTrim . This parameter tells the plug-in to strip off a leading portion of the requested URL before forwarding the request to WebLogic Server.
PathPrepend . This parameter tells the plug-in to add to the leading portion of the requested URL before forwarding the request to WebLogic Server.
DefaultFileName . This parameter tells the plug-in what the default file name should be for URLs that end with / .
The parameters should be self-explanatory, but let s look at an example. Imagine that the request coming from the browser is for http://www.bea.com/wls/. If our PathTrim is set to /wls , our DefaultFileName is set to index.html , and our PathPrepend is set to /weblogic , the plug-in will apply the following steps, in order, to transform the URL before sending it on to WebLogic Server.
-
The plug-in applies the PathTrim value to convert the relative URL from /wls/ to / .
-
The plug-in applies the DefaultFileName value to convert the relative URL from / to /index.html .
-
The plug-in applies the PathPrepend value to convert the relative URL from /index.html to /weblogic/index.html .
Therefore, the plug-in transforms the original URL request of /wls/ to /weblogic/index.html before sending the request to WebLogic Server. While these parameters can be useful, they also can cause unexpected problems you need to watch out for.
The plug-in s PathTrim and PathPrepend operations are unidirectional. This means that while the plug-in will intercept all requests and remove or add the specified values, it will not parse the HTML responses created by WebLogic Server to fix up any of the embedded URLs by reversing the trimming or prepending process. The browser will therefore see URLs representing the values returned by WebLogic Server rather than the values expected by the plug-in. While these parameters are useful for making a set of pages appear available at a different URL, the application must modify any navigational links within the pages to fit the new URL scheme. This behavior catches many administrators (and programmers) by surprise because you might expect any URL changes at the plug-in level to be completely transparent to the application ”they are not.
The DefaultFileName value must match the Web application deployment descriptors welcome file values. The plug-in uses this parameter to append to any URLs that end with / . Therefore, the administrator needs to make sure that the value set for DefaultFileName is the same as the welcome file setting the web.xml deployment descriptor(s) to which the Location parameter is forwarding (because the Location directive value might imply forwarding to multiple Web applications).
| Warning | PathTrim and PathPrepend do not modify navigational URLs embedded in the HTML returned to the browser. As a result, the application must be able to modify these navigational URLs to match the values created by these two parameters. DefaultFileName must match the value of the welcome file for all Web applications to which it applies. |
The plug-in uses the next set of parameters to determine its behavior in the case of response time degradations or failures:
ConnectTimeoutSecs . The total amount of time the plug-in waits for a connection to be established with a server. If the plug-in is unsuccessful , it returns an HTTP 503 (Service Unavailable) response code to the browser. The default value is 10 seconds.
ConnectRetrySecs . The amount of time the plug-in sleeps between connection requests to a server (or other servers in a cluster). Although the plug-in will always try to connect at least twice, the result of dividing the ConnectTimeoutSecs by the ConnectRetrySecs will determine the total number of connection requests before the plug-in gives up. The default value is 2 seconds.
HungServerRecoverSecs . The amount of time the plug-in will wait for a response from WebLogic Server. If the plug-in submits a request and the server does not respond within a certain time period, the plug-in will declare the server as dead and fail over to another server, if appropriate (see the following Idempotent parameter). The default value is 300 seconds.
Idempotent . Whether the plug-in should try to resend a request for which it did not receive a response within HungServerRecoverSecs . The default value is ON (which means the plug-in will retry ).
ErrorPage . The absolute or relative URL to the page to display when the plug-in is unable to forward a request to WebLogic.
The plug-in s default values for ConnectTimeoutSecs and ConnectRetrySecs are usually sufficient for most situations. The appropriate value of Idempotent depends on the semantics of the application. When a request fails in such a way that the plug-in is unsure whether the server received the request, it is only safe for the plug-in to resend the request if the application is idempotent. Essentially, this means that the application state should be the same no matter if the server processes the request in question only once or multiple times. HungServerRecoverSecs controls the maximum amount of time for a server to process a request. If the time exceeds this, the plug-in will retry the request (if Idempotent is ON ) or return an error to the user (if Idempotent is OFF or there are no more servers to accept the request). The ErrorPage simply tells the plug-in what to send back to the browser if it is unable to forward a request to WebLogic Server.
The last set of parameters controls the debugging features of the plug-in.
Debug . The value of this parameter controls how much logging information about requests and response the plug-in writes to the log file. By default, Debug is set to OFF so that no logging occurs.
WLLogFile . This parameter specifies the name and location of the log file (see the Debug parameter). If logging is on, the default log file location is either c:\temp\wlproxy.log or /tmp/wlproxy.log , depending on the platform.
DebugConfigInfo . This parameter controls access to the plug-in s configuration information by supplying the __WebLogicBridgeConfig query parameter on any URL the plug-in receives. By default, this feature is set to OFF .
The WebLogic Server plug-ins support many levels of logging to help debug problems with proxied requests. The valid values for the Debug parameter are
OFF . The plug-in doesn t log any information.
ON . The plug-in logs only informational and error messages.
HFC . The plug-in logs HTTP headers sent from the client to the plug-in.
HTW . The plug-in logs HTTP headers sent from the plug-in to WebLogic Server.
HFW . The plug-in logs HTTP headers sent from WebLogic Server back to the plug-in.
HTC . The plug-in logs HTTP headers sent from the plug-in back to the client.
ALL . The plug-in logs all of the information listed in the other settings.
The Debug parameter also supports combining any of the four individual HTTP header logging values by using a comma-separated list. Of course, turning logging on in a production situation may result in huge log files, so you need to keep this in mind. The WLLogFile parameter simply controls the name and location of the plug-in s log file if logging is enabled.
The DebugConfigInfo parameter offers a quick way of determining the configuration of the plug-in via a browser. By setting the parameter to ON and sending a URL to the plug-in containing the __WebLogicBridgeConfig query parameter, the plug-in will send back its current configuration information. For example, turn DebugConfigInfo on for your configuration by modifying the Location directive entry to look like this one:
<Location /user> SetHandler weblogic-handler WebLogicCluster 10.168.1.21:7001,10.168.1.22:7001,10.168.1.23:7001 DebugConfigInfo ON </Location>
Now, restart the Apache server. Enter http://www.bigrez.com/user?__Web LogicBridgeConfig in the browser to ask the plug-in for the configuration information. The return page should look something like the screen shown in Figure 11.7.
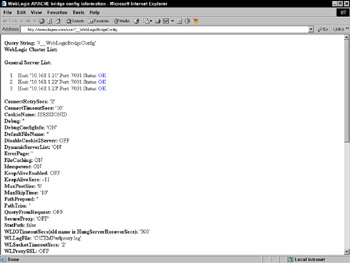
Figure 11.7: Viewing plug-in configuration data.
At this point, we have finished with the general configuration of the bigrez.com production environment. Even though the complexity of the example may seem a little overwhelming, rest assured that most production environments do not require this much configuration complexity. In fact, the simpler you can make the production environment, the better. The whole purpose of choosing such a complex environment was to demonstrate the flexibility of WebLogic Server for supporting almost any imaginable configuration requirement. Now, we are ready to move on to demonstrate how to take an application from your developers and deploy and manage it in a WebLogic Server environment.
Configuring Applications for WebLogic Server
Application developers typically set up their development environment to make it easy to go through the frequent compile, deploy, and test cycles of iterative development rapidly . This often means that when you are ready to promote an application into a more controlled environment, you may want to do some reorganizing and repackaging to make the production deployment environment simpler.
In Chapter 8, we discussed how to package the bigrez.com enterprise application into a self-contained enterprise application archive (EAR) file. While many administrators may not be responsible for application packaging, an understanding of J2EE application packaging will help you identify certain types of problems that may occur. Rather than covering application packaging again here, we suggest that you review the discussion in Chapter 8.
Configuring Database Resources
Most applications depend on databases to read and write pertinent application data. As a result, configuring database resources will be a common task of most WebLogic Server administrators. WebLogic Server provides a database connection pooling framework that provides applications with an efficient, standards-based mechanism for accessing databases without requiring them to optimize connection usage to improve performance. This framework also provides some critical, behind-the-scenes functionality to make sure that Java Transaction API (JTA) transactions have proper database transaction semantics. If your application uses JTA (as most EJB applications do), you must use this framework. Failure to do so can cause data consistency problems in event of rollbacks or failures. In this section, we will attempt to cover the important points of setting up a database connection pool and the associated DataSource objects that provide the application with standards-based access to the connection pooling facilities.
| Best Practice | Always use WebLogic Server s JDBC connection pooling rather than some other pooling mechanism. In addition to providing a robust pooling framework, JDBC connection pooling provides some critical, yet hidden transactional semantics to ensure that JTA transactions have the correct transactional semantics without any additional work on the part of the developer. Failure to use this may cause data integrity issues for applications that depend on JTA transactions involving database access. |
Configuring JDBC Connection Pools
WebLogic Server supports making connections to any database management system for which a JDBC 2.0-compliant driver is available. JDBC drivers are available from a number of sources, including the database vendors, application server vendors, and other third-party companies. Unfortunately, the quality, features, and performance characteristics of JDBC drivers vary from driver to driver, and sometimes from release to release of the same driver. All other things being equal (which, in our experience, is usually not the case), we recommend using Type 4 drivers over Type 2 JDBC drivers because they do not depend on loading native libraries into the application server ( bugs or improper use of native libraries can cause the JVM to crash). Typically, you will want to work with your development team to determine which JDBC driver works best for your application.
Once you know which JDBC driver to use, you will need to know a few things about the driver and a few things about the database to which you are connecting. Because the purpose of this discussion is to demonstrate how to configure WebLogic Server JDBC connection pools, we are going to choose a database and a JDBC driver and show the details of how to create a database connection pool. For more specific information on a particular JDBC driver configuration, please refer to the JDBC driver documentation and the WebLogic Server documentation.
For our example, we will use an Oracle database and the Oracle Thin JDBC Driver, a Type 4 driver available directly from Oracle. WebLogic Server includes a copy of the driver in the $WL_HOME/server/lib directory that it automatically loads with the server. If you were to choose the Oracle OCI (Type 2) Driver or the WebLogic jDriver for Oracle, you would have to install and configure the Oracle Client libraries and include them in the shared library path of the WebLogic Server.
The first thing we want to do is to get the right version of the driver available to the server. As mentioned earlier, WebLogic Server ships with a version of the Oracle Thin Driver ojdbc14.jar jar file. Although WebLogic Server tries to include the newest version of the driver, bug fixes and enhancements for this driver may mean that you may want to download a newer version from Oracle. Access to the drivers is currently available from http://technet.oracle.com/software/tech/java/sqlj_jdbc/content.html, though access to the drivers requires that you register with the Oracle Technology Network.
Once the required files exist on each machine where WebLogic Server instances will connect to the database, you need to make sure that each server s classpath is set to include references to these files before the reference to the WebLogic Server classes (for example, weblogic.jar ). Because WebLogic Server 8.1 includes the latest Oracle 9.2 Thin Driver, we will use the included driver. If you want to use a different driver, you must modify the servers Classpath attributes in their Remote Start Configuration tab (and restart the server if it is already running).
If you use a Type 2 driver, you either have to modify the node manager start scripts to put the shared libraries in its shared library search path or add an argument to the Arguments entry in the server s Remote Start Configuration tab to define the java.library.path system property with the correct shared library search path. Unfortunately, both of these mechanisms are problematic. The node manager start script modification works fine, but it assumes that all servers started by the node manager on a particular machine have the same shared library search path. In many situations, this might be okay, but it can be problematic if different servers are using different software versions of these native libraries (for example, different versions of the Oracle Client or different versions of WebLogic Server, in the case of the WebLogic jDriver). We prefer to use the java.library.path system property instead because it is server-specific rather than machine-specific. The only real issue with this mechanism is that you must remember to list all of the directories that need to be in the search path, including the ones that WebLogic Server scripts tend to set for you behind the scenes (for example, the platform-specific directories under the $WL_HOME/server/ lib subdirectory on Unix or $WL_HOME/server/bin on Windows).
Now that the server has the necessary class files in the correct place in the classpath, we are ready to move on to setting up the connection pool. In previous versions of WebLogic Server, you needed to gather the following information before creating a connection pool:
Driver Class Name. The fully qualified name of the class that implements the java.sql.Driver interface. Your JDBC driver documentation should provide this information.
Driver URL Format. The format for the URL that tells the driver how to locate the correct database. Your JDBC driver documentation should provide information on the expected format. Depending on the information required, you may need some additional information from your database administrator (DBA).
Driver Properties. Properties that allow you to pass in driver-specific information. Every driver has a core set of information that it needs to connect to the database. Some of this information may be contained in the URL, while other information may have to be passed via properties. Please refer to the JDBC driver documentation for more specific information on what is required.
Database username/password. Required for connection pools. Connection pools are a set of connections that are functionally equivalent and shared by the application to process requests from all users. Therefore, you will need a database username and password with sufficient permissions to execute all the database work an application requires.
WebLogic Server 8.1 provides a JDBC Configuration Wizard in the WebLogic Console that allows you to pick from a list of known drivers and fill in the appropriate information. For our example, we just need to know the following information:
-
Database Type: Oracle.
-
Database Driver : Oracle s Driver (Thin) Versions: 8.1.7, 9.0.1, 9.2.0.
-
Database Name : The Oracle SID (for example, ORCL ).
-
Host Name : The hostname or IP address of the server where the database is running (for example, 192.168.1.24 ).
-
Port : The port where the Oracle Server is listening (for example, 1521 ).
-
Database User Name : The database user to connect as (for example, bigrez ).
-
Database Password : The database user s password (for example, password ).
-
Properties : Any extra database-specific properties you need to set (none for this example).
Using this information, the WebLogic Console will guide you through the process of creating, testing, and deploying the JDBC connection pool to the cluster.
Once the pool is deployed, use the pool s Connections Configuration tab to set information about the connections in the pool. On this tab, three main param- eters control the number of database connections in the pool: Initial Capacity , Maximum Capacity , and Capacity Increment . As you might expect, Initial Capacity defines the initial number of connections, Maximum Capacity defines the maximum number of connections, and Capacity Increment defines the number of connections by which to grow the pool when WebLogic Server determines it needs to increase the size of the pool.
| Best Practice | Whenever possible, try to size database connection pools properly so that they never need to grow the number of connections. Trying to grow the number of connections during a peak load situation can aggravate the situation because database connection creation is expensive. |
If the application makes use of JDBC PreparedStatement objects, WebLogic Server can transparently cache these objects and dramatically improve the performance of the queries whose PreparedStatement object is in the cache. The Statement Cache Size parameter controls the size of the cache for each connection in the pool (because JDBC prepared statements are scoped to an individual connection). By default, WebLogic Server 8.1 uses a least-recently-used (LRU) caching algorithm to make room for new statements. Previous versions of WebLogic Server supported only the FIXED cache that simply fills each connection s cache with the first n prepared statements it encounters while using that connection, where n is the size of the cache. There may be memory, database resource, or other issues associated with the use of this feature. See the Usage Restrictions for the Statement Cache section of the WebLogic Console help page at http://edocs.bea.com/wls/docs81/ConsoleHelp/ jdbc_connection_pools.html for more details on the potential issues with this feature.
| Best Practice | Make use of Prepared Statement caching if the application can tolerate the restrictions. |
Under the Advanced Options section of the Connections Configuration tab, there are quite a few options that allow you to tailor the way the pool behaves. While we will not attempt to cover every option, we will discuss several of the more important options. For more complete information, see the WebLogic Server documentation at http://edocs.bea.com/wls/docs81/ConsoleHelp/jdbc_connection_pools.html.
The Allow Shrinking attribute will cause WebLogic Server to reclaim any dynamically created connections that are no longer in use after a certain amount of time. It will never try to shrink the pool below the value in Initial Capacity , however. The Shrink Frequency parameter defines the frequency (in seconds) with which WebLogic Server will scan the pool looking for unused connections to reclaim.
WebLogic Server also provides a mechanism to have the server periodically test unused connections from the pool to make sure that they are still valid. The Test Frequency attribute defines the frequency (in seconds) with which the server tests the unused connections. To determine the validity of a connection, WebLogic Server issues a query on the connection. The Test Table Name parameter allows the administrator to control the validation query. By default, the query is SELECT count(*) FROM < Test Table Name >. Most database systems can optimize this query to avoid a table scan, but it is still a good idea to use a table with no rows just in case. For Oracle, we recommend using the DUAL table for maximum performance. WebLogic Server also allows you to use the Test Table Name attribute to specify a different validation query. If Test Table Name begins with the characters SQL , WebLogic Server interprets everything that follows these characters as the literal query to execute.
The Test Reserved Connections checkbox enables validating connections as they are requested from the pool by the application. In the same way, Test Released Connections validates connections being released before they are placed back into the pool. Because the tests are done synchronously as part of the application s request to get a connection or to release it (by calling the Connection.close() method), using either of these two options will add some overhead to the application. Using Test Reserved Connections makes your application more resilient to network glitches that may close existing database connections. We do not see any reason to ever use Test Released Connections because, even if you make sure that the connection is good before returning it to the pool, there is no guarantee that it will still be good the next time it is needed.
| Best Practice | If you can afford the overhead of testing connections as part of normal request processing, always use Test Reserved Connections to make the application more resilient. Make sure to use an empty table (or DUAL if using Oracle) as the Test Table Name . |
Connection Reserve Timeout specifies the maximum amount of time an application request to get a connection from the pool is allowed to block. By default, WebLogic Server 8.1 sets this to 10 seconds. The Maximum Waiting for Connection attribute limits the number of threads that can block waiting for a connection from the pool; by default, this is set to java.lang.Integer.MAX_VALUE . While this functionality helps applications deal with unexpected loads, never use this as a substitute for properly sizing connection pools. Any threads that have to block to get a connection are slowing down your application request processing.
Set the BigRezPool values according to those shown in Table 11.4. Any values not specified should be left at the default values.
| NAME | VALUE |
|---|---|
| Database Type | Oracle |
| Database Driver | Oracle Driver (Thin) Versions: 8.1.7, 9.0.1, 9.2.0 |
| Name | BigRezPool |
| Database Name | ORCL |
| Host Name | 192.168.1.24 |
| Port | 1521 |
| Database User Name | bigrez |
| Password | password |
| Targets | BigRezCluster (All servers in the cluster) |
| Initial Capacity | 60 |
| Maximum Capacity | 60 |
| Capacity Increment |
|
| Statement Cache Type | LRU |
| Statement Cache Size | 100 |
| Allow Shrinking | No (unchecked) |
| Test Frequency | 300 |
| Test Reserved Connections | Yes (checked) |
Configuring JDBC DataSources
Now that you have a connection pool, you need to define one (or more) DataSource objects that allow your application developers to access the connection pool using standard J2EE mechanisms. WebLogic Server supports configuring DataSource objects through the WebLogic Console. These DataSource objects can either honor global transactions or not. In previous versions of WebLogic Server, a DataSource that honors global transactions was known as a TxDataSource . Unfortunately, many people do not understand the differences between the two.
The primary difference is that DataSource s that honor global transactions are JTA transaction-aware. Realize that JTA transactions do not necessarily mean XA transactions and two-phase commits (2PC). JTA transactions also allow two independently written components that modify the same database to participate in a transaction without having to know about each other. Non-XA database transactions require the use of a single database connection to provide the proper transactional semantics. If you choose not to use the Honor Global Transactions option, you need to write your application components in such a way that they get a database connection from the pool at the start of every transaction and pass that connection around to every component that participates in the transaction. This is clearly not desirable and not even possible with certain types of components (for example, container-managed entity beans).
A DataSource that honors global transactions will make sure that your components participating in a JTA transaction get the proper transactional semantics whether they are using JTA transactions or not. When not using XA transactions, the DataSource accomplishes this by associating a database connection with a JTA transaction context. Every time a component asks for a database connection using the DataSource that honors global transactions, WebLogic Server will check to see if the current transaction already has a database connection, and if so, it will always hand back the same underlying database connection. This allows non-XA transactions to maintain the proper database semantic guarantees without having to worry about what database connection to use and what the transactional boundaries are for the application.
What this means is that every application that uses JTA transactions, which includes most EJB applications and many JMS applications, must use DataSource objects that honor global transactions to access their respective database connection pools. Failure to do so will expose the application to database consistency problems during JTA transaction rollback or failures. DataSource objects that do not honor global transactions will ignore any JTA transaction context. Therefore, unless your application is intentionally trying to do database work outside the scope of a transaction, you must use the Honors Global Transactions option. When in doubt, always use the Honors Global Transactions option.
| Best Practice | When defining DataSource objects for a connection pool, you almost always want to use the Honors Global Transactions option even if you are not using XA transactions. By honoring global transactions, WebLogic Server keeps any JTA transactional semantics in sync with the underlying database transaction semantics. When in doubt, always use the Honors Global Transactions option. |
Let s define the DataSource for the BigRezPool . Using the WebLogic Console, you simply specify the Name , JNDI Name , and Pool Name for the DataSource . Make sure to leave the Honors Global Transactions checkbox enabled. Before selecting the JNDI name, you should check with the developers to determine what JNDI name they are using to look up the DataSource object in the application.
Typically, the code will use a logical name specific to the J2EE component (for example, a session EJB might use the logical name java:comp/env/jdbc/BigRezDataSource ), and the component s deployment descriptor will map this logical name to the actual name that you should specify in the WebLogic Console. For example, the ejb-jar.xml deployment descriptor for one of our session EJBs declares the logical name the code is using by the following entry:
<resource-ref> <res-ref-name>jdbc/BigRezDataSource</res-ref-name> <res-type>javax.sql.DataSource</res-type> <res-auth>Container</res-auth> </resource-ref>
Notice that the java:comp/env/ prefix in the code tells WebLogic Server that the name is logical, so you don t see it here.
Then, this logical name is mapped to the actual name with the following entry in the session EJB s weblogic-ejb-jar.xml deployment descriptor:
<reference-descriptor> <resource-description> <res-ref-name>jdbc/BigRezDataSource</res-ref-name> <jndi-name>BigRezDataSource</jndi-name> </resource-description> </reference-descriptor>
This means that our application is expecting to find the DataSource it needs by using the JNDI name of BigRezDataSource . The nice part about this is that you can easily change the JNDI name of the DataSource objects without having to change the actual application code. Unfortunately, not all J2EE application developers take advantage of this feature, so your application may be using the actual JNDI names in the code.
So, this means that the application is expecting the JNDI Name for our BigRezDataSource to be BigRezDataSource . Set this value in the WebLogic Console window used to create the DataSource .
| Best Practice | Encourage developers to use logical JNDI names in their code and leverage the EJB or Web application deployment descriptors to map these logical names to the actual names configured in WebLogic Server. |
Configuring XA Support
Although we haven t talked about configuring JMS yet, our developers have just informed us that they are adding a persistent JMS queue to the application and need to use XA transactions for operations that involve both the JMS queue and our Oracle database. This means that we need to change our database resources to support using Oracle s XA interface. Fortunately, making these changes to an existing configuration is easy.
To support true XA transactions, we need to use an XA-enabled JDBC driver. Because the Oracle Thin Driver supports XA, we simply change the Driver Classname attribute from oracle.jdbc.driver.OracleDriver to oracle.jdbc.xa .client.OracleXADataSource . When you restart the managed servers, the log file will now have an entry like the one shown here that lets you know that the pool is now using XA connections:
####<Apr 11, 2003 12:21:12 PM CDT> <Info> <JDBC> <machine1> <Server1> <main> <<WLS Kernel>> <> <BEA-001072> <Connection for XA pool BigRezPool created.>
Before we move on, we should mention a couple of additional features surrounding XA and JDBC. The first is the Supports Local Transaction option in the Advanced Options section of the connection pool s Connections Configuration tab. This option lets the administrator tell WebLogic Server whether the XA Driver supports updates without a global transaction context. The proper setting for this will vary by database vendor (for example, Oracle does not support local transactions, but Sybase does). Because the Oracle Thin Driver does not support this, no configuration changes are necessary.
WebLogic Server also allows non-XA resources to participate in XA transactions. Before we go any further, this does not mean that WebLogic Server can turn a non-XA resource into an XA resource. What this means is that WebLogic Server will fake a two-phase commit with a non-XA resource in a manner that attempts to maintain the transactional integrity. To enable this option, use the Emulate Two-Phase Commit for non-XA Driver option in the Advanced Options section of the DataSource object s Configuration tab.
WebLogic Server allows only one such non-XA resource per transaction. WebLogic Server 8.1 uses a last commit algorithm that minimizes the exposure to heuristic failures introduced by using the non-XA resource. This algorithm starts by preparing the XA resources. If the XA resources all prepare successfully, the transaction coordinator then tries to commit the non-XA resource. If the commit succeeds, the coordinator tells the XA resources to commit; if the non-XA resource fails to commit, the coordinator tells the XA resources to roll back.
Configuring JMS Resources
Many applications use some sort of messaging. Common uses for messaging involve asynchronous communication with other applications, store-and-forward situations where the external system may not always be available, and even situations where you want to avoid the overhead of performing a particular operation synchronously as part of processing a user request (for example, sending an email confirmation). The Java Message Service (JMS) is the J2EE standard API for interacting with messaging systems. WebLogic Server provides a robust, high-performance messaging system that fully supports the JMS specification. In addition, WebLogic JMS also supports plugging in external, third-party messaging systems via their JMS APIs to support things like message-driven beans (MDBs) listening directly to externally provided destinations for messages. For more information about WebLogic JMS, please see Chapter 9 and the WebLogic Server documentation at http://edocs.bea.com/wls/docs81/jms/index.html .
Our example application uses three JMS queues. The global reservation systems Web services interface uses two queues ”an incoming queue to buffer requests from the external system and an outgoing queue to buffer responses to the external system. Internet customer bookings use a queue to buffer email confirmations of interactions with the bigrez.com site. In this section, we will walk through the steps for configuring the JMS services needed for a production deployment of the bigrez.com application. We assume that you have read Chapter 9, and therefore we do not spend much time describing particular JMS objects or features here.
Creating JMS Servers and Stores
The first thing we need to do is set up the JMS servers. A JMS server is an administrative grouping of JMS destinations that run on the same WebLogic Server instance and share a set of common characteristics. One WebLogic Server instance can support multiple JMS servers. In the event of failure or maintenance, we can migrate JMS servers from one WebLogic Server instance to another. As part of this migration, we may need to migrate the JTA service to recover any incomplete transactions involving the JMS server s persistent store, depending on whether we are using JTA transactions with persistent messages for any of the JMS server s underlying destinations.
Before we create our JMS Servers, we need to determine if we need a JMS persistent store and, if so, what type of store to use. WebLogic JMS supports two types of JMS Stores: file-based and JDBC-based. For the file-based store, JMS messages are persisted to disk. The JDBC-based store writes the messages to a database using a WebLogic Server connection pool. In general, the file-based store is much faster than JDBC-based stores. WebLogic JMS provides an XA Resource interface to allow the file store to participate in XA transactions. Because the file store is disk-based, migration support for a JMS Server using a file store depends on the file store being accessible from another machine.
Applications that choose to use persistent messages generally do so because they cannot afford to lose any messages. Both the file- and JDBC-based stores give the application the persistence that they need. If a WebLogic Server (or the machine on which it is running) goes down, the messages will remain in the JMS store until either the server is restarted or the JMS server is migrated to another machine. The need for migration varies with the application. For some applications, it may be sufficient to wait until the failed server restarts to process the messages in the failed server s JMS store; other applications may be time-sensitive and require the ability to process the messages in the failed server s store.
| Best Practice | Don t automatically assume that your JMS-based applications require support for JMS server migration. Migration is typically important for persistent messages sent to a queue where the processing of those messages is time-critical. |
If you need to migrate JMS servers that are using file-based message stores, you need to invest in multi-ported disks, a SAN, or other highly available disk-sharing technology. Never use NFS for this purpose because NFS generally cannot provide the transactional guarantees that JMS requires for disk writes. For simplicity, we will use a JDBC-based store to demonstrate JMS migration capabilities without requiring costly disk-sharing technology. Realize that we are making a trade-off here because a JDBC-based store is generally slower than a file store.
| Best Practice | High-volume, performance-critical applications should use the JMS file store rather than the JDBC-based store. If migration is required, use a multi-ported disk array or SAN-based solution for making the file store available across servers. Never use NFS to share a file store in a production system. |
Before creating the JDBC-based store, you need to set up a JDBC connection pool for the store. Because WebLogic JMS implements the XA Resource interface to allow the file store to participate in XA transactions, the JDBC-based store must use a non-XA connection to the underlying database. So, let s go back and create a non-XA connection pool for our JDBC store using the properties shown in Table 11.5.
| NAME | VALUE |
|---|---|
| Database Type | Oracle |
| Database Driver | Oracle Driver (Thin) Versions: 8.1.7, 9.0.1, 9.2.0 |
| Name | JMS Store Pool |
| Database Name | ORCL |
| Host Name | 192.168.1.24 |
| Port | 1521 |
| Database User Name | bigrez |
| Password | password |
| Targets | BigRezCluster (All servers in the cluster) |
| Initial Capacity | 1 |
| Maximum Capacity | 3 |
| Capacity Increment | 1 |
| Statement Cache Type | LRU |
| Statement Cache Size | 10 |
Use the WebLogic Console to create the JDBC-based stores. You need a separate store for each server in the cluster. Table 11.6 shows the values to use for creating the store for Server1 . Create similar stores for Server2 and Server3 .
| NAME | VALUE |
|---|---|
| Name | JMS JDBC Store1 |
| Connection Pool | JMS Store Pool |
| Prefix Name | JMS_Store1_ |
Finally, you are ready to create the JMS servers. Create three JMS servers with the names JMS Server1 , JMS Server2 , and JMS Server3 using the persistent stores JMS JDBC Store1 , JMS JDBC Store2 , and JMS JDBC Store3 , and target them to Server1 , Server2 , and Server3 , respectively. Notice that each JMS server can be targeted only to one server instance.
Creating Distributed JMS Destinations
Each JMS server will contain one or more JMS destinations and will live on a particular server instance. Because our application uses three distributed JMS destinations and does not need to refer to the individual member destinations explicitly, you can move directly to creating the distributed destinations. WebLogic Server can create the individual member destinations for you automatically.
We will use GRS Request Queue , GRS Response Queue , and BigRez Email Queue as the names of our distributed queues. We also need to specify their JNDI names. Like the JDBC DataSource earlier, we want to decouple the JNDI names that our application uses to look up the JMS queues from their actual JNDI names. This is just as easy to accomplish using similar deployment descriptor mechanisms. For example, our ejb-jar.xml deployment descriptor should have a reference like the one shown here to declare that the application is using the logical JNDI name java:comp/env/jms/BigRezEmailQueue to look up the queue:
<resource-ref> <res-ref-name>jms/BigRezEmailQueue</res-ref-name> <res-type>javax.jms.Queue</res-type> <res-auth>Container</res-auth> </resource-ref>
A corresponding entry in the weblogic-ejb-jar.xml deployment descriptor will map this logical JNDI name to the actual JNDI name.
<reference-descriptor> <resource-description> <res-ref-name>jms/BigRezEmailQueue</res-ref-name> <jndi-name>BigRezEmailQueue</jndi-name> </resource-description> </reference-descriptor>
This means that the application is expecting us to use the JNDI name BigRezEmailQueue when registering this queue. The other two queues use similarly constructed JNDI names.
Distributed queues must also specify a Load Balancing Policy and a Forward Delay . The Load Balancing Policy describes the way in which WebLogic JMS distributes incoming messages across the distributed queue s member queues, all other things being equal. Remember that WebLogic JMS uses sophisticated algorithms to optimize processing of messages so that the load balancing policy applies only when every queue has similar run-time characteristics. Forward Delay specifies the number of seconds WebLogic JMS will wait before attempting to forward messages from one member queue to another if the queue in question has no active consumers. For our example, we will use round- robin load balancing and a Forward Delay of “1, which disables forwarding of messages. Because all of our queues are using MDBs as consumers, we do not expect ever to have a member queue available without any consumers for any extended period of time.
Once the distributed queue exists, you need to configure it and have WebLogic Server automatically deploy the underlying member queues to the cluster. Using the Thresholds & Quotas Configuration tab, you can set limits on the size of the queue as well as thresholds at which WebLogic JMS will begin paging or controlling the producer s message flow rates.
In the bigrez.com application, external clients never send messages directly to any of the JMS queues. For these queues, the application produces the messages that go into the queues so under no circumstances do we want to slow down the message producers (our application) by enabling flow control. So, what does this all mean to you as the WebLogic Server administrator trying to configure the JMS destinations?
It means that the primary goal of setting the thresholds and quotas is to limit the amount of memory consumed rather than controlling the flow. To control the flow of messages into the system through the GRS Request Queue , you should use connection throttling to limit the number of concurrent connections to a particular server rather than trying to throttle requests once they have reached the server. Unfortunately, there is currently no way to limit the number of connections through a particular network channel so you would have to try to limit the number of connections at the server level, or maybe use network hardware in front of the server. We expect BEA will add this type of support in a future release.
Because all we want to do is prevent the JMS messages from filling up the server s memory, you need to determine how many messages of each type you will permit in memory before you want WebLogic JMS to start paging the messages out of memory. Remember, even persistent messages stay in memory for speed so paging is important even for persistent messages. You don t need to create a separate paging store for persistent messages, though, because the messages are already written to the message store.
After thorough analysis of our message sizes, JVM heap sizes, and application characteristics, we have decided to limit the maximum number of each type of message in a single server to 50,000 before paging starts. We can support many more messages when using message paging but we want to avoid message paging because it adds significant overhead and will hurt performance. We will also limit the maximum number of bytes of memory consumed by each type of message to 50 MBs before paging starts. As a result, we use the values shown in Table 11.7 for setting the thresholds and quotas.
| Name | Value |
|---|---|
| Bytes Maximum | 500,000,000 |
| Bytes Threshold High | 50,000,000 |
| Bytes Threshold Low | 25,000,000 |
| Bytes Paging Enabled | Yes (checked) |
| Messages Maximum | 500,000 |
| Messages Threshold High | 50,000 |
| Messages Threshold Low | 25,000 |
| Maximum Message Size | 1,000,000 |
| Message Paging Enabled | Yes (checked) |
Now, you need to assign member queues to each distributed queue. If the member queues already exist, you need to use the distributed queue s Members Configuration tab to add member queues from one or more JMS servers. Because we chose not to create the individual queues manually, you will use the Auto Deploy tab s wizard to step you through the process of automatically creating the member queues. Simply tell the wizard that you want to target the BigRezCluster , create members on Server1 , Server2 , and Server3 , and use JMS Server1 , JMS Server2 , and JMS Server3; the wizard does the rest. Once you complete this process, the Members Configuration tab will show you the results of this process.
Configuring Member Destinations
While the Auto Deploy Wizard saves a lot of tedious configuration, distributed destinations do not expose all of the underlying options for configuring a JMS destination. For a production system, you may want to tweak the settings on your individual member destinations a bit. JMS queues have many different configuration options that are important in different situations. We are not going to attempt to cover all of them here; Chapter 9 covers these options in great detail. For any additional information, please refer to the WebLogic Server documentation at http://edocs.bea.com/wls/docs81/ConsoleHelp/jms_config.html.
The first thing you should do is to set the Enable Store parameter on each member queue s General Configuration tab. Because we want to make sure that all of the messages are persistent, which requires each JMS server to have a persistent store, you should set Enable Store to true so that the WebLogic JMS server will fail to boot if the persistent store does not exist. This is simply a way to double-check that the system configuration is correct and prevent starting the application if it is not.
One important thing to note is that if you look at a particular member queue s Thresholds & Quotas Configuration tab, you will not see the values entered in the distributed destination used to create this queue. The reason is that the distributed destination s auto-deploy process created a JMS template that the member queues automatically inherit the values from if not overridden on the destination itself.
Next, you want to override the delivery mode by setting the Delivery Mode Override to persistent. While you could use the member queues Overrides Configuration tab, it is easier to set the override on the JMS templates Override Configuration tab. Again, this is simply a sanity check to make sure that our application is not trying to send non-persistent messages to these destinations. On this same tab, you should set the Time To Live Override for the two GRS-related templates. Given that we know that the client time-out for receiving a particular request is 15 seconds, there is no point to store a message in these queues for longer than 15 seconds. Set the value to 15000 because the value is set in milliseconds. By specifying this here rather than in the application, it is simpler to change should the clients decide to change their time-out value.
Finally, we need to set the redelivery characteristics of our member queues. For the email-related member queues, the only reason the application should fail to deliver the message is if the email server is down (because other conditions like invalid email addresses are handled in the business logic). From past experience, we know that it normally takes 3 minutes for us to detect that the email server is down and restart it. Because the timeliness of these email messages is not critical, we will set the Redelivery Delay Override to 180000 milliseconds (3 minutes) and the Redelivery Limit to 80 using the BigRez Email Queue template.
For the GRS-related queues, the application cannot afford any significant delay in redelivery, and there is no reason to retry for too long because the client times out in 15 seconds. Therefore, we set the Redelivery Delay Override to 1000 milliseconds and the Redelivery Limit to 15 using the GRS-related templates. By specifying a Redelivery Limit but not specifying the Error Destination , you are telling WebLogic JMS to discard the message after the set number of failed redelivery attempts. If you set the Error Destination , WebLogic JMS will move the message onto the Error Destination .
| Best Practice | Tune thresholds and quotas, overrides, and redelivery to explicitly control the behavior of JMS destinations. Leaving the behavior up to the clients can make it difficult to change configurations as requirements change and can expose the application s behavior to configuration mistakes. |
Creating JMS Connection Factories
At this point, we are ready to set up the JMS connection factories. A JMS connection factory is the object through which JMS applications obtain a JMS connection. Configuring a JMS connection factory allows the administrator to customize the behavior of all JMS clients that use the connection factory without requiring code changes. We will configure three JMS connection factory objects, one for each distributed destination. As with JMS destinations, the JNDI names required during configuration should be entirely dependent on the EJB or Web application deployment descriptors.
Creating a JMS connection factory requires specifying a large number of configuration parameters. For many of these parameters, you will simply use the default values and skip over detailed explanations of what they do. Refer to Chapter 9 or the WebLogic JMS documentation at http://edocs.bea.com/wls/docs81/messaging.html for more information. The parameters of interest in this discussion are Default Time To Live , Default Delivery Mode , and Default Redelivery Delay . For each distributed queue, create a connection factory for use with each queue, and set the values according to those shown in Table 11.8.
| CONNECTION FACTORY NAME | DEFAULT TIME TO LIVE | DEFAULT DELIVERY MODE | DEFAULT REDELIVERY DELAY |
|---|---|---|---|
| BigRez Email Connection Factory |
| Persistent | 180000 |
| GRS Request Connection Factory | 15000 | Persistent | 1000 |
| GRS Response Connection Factory | 15000 | Persistent | 1000 |
Next, you need to configure the transactional semantics of the JMS Connection Factories. Using the Transactions Configuration tab, you should set the Transaction Timeout to 60 seconds for the email-related connection factory and 15 seconds for the GRS-related connection factories. Unlike the time-out values on the previous tab, which were specified in milliseconds, the Transaction Timeout is specified in seconds. This tab also lets you enable the use of XA connection factories. Because we are using XA transactions with all three queues, you must check the XA Connection Factory Enabled checkbox for all three connection factories.
Configuring JMS Migration Support
The last step of configuring JMS is to configure the ability to migrate our JMS Servers from one WebLogic Server instance to another. This means we have to go back and configure migration in several places. Because we are using XA transactions with our JMS destinations, we will also need to make sure that the JTA transaction logs are available via a highly available, shared disk. It might seem odd that we have waited until now to talk about migration, but the reality is that many WebLogic Server-based applications do not require migration. JMS applications that use persistent queuing may need to be able to migrate the JMS Server (and JTA service, if applicable ) to another server so as to be able to process the persistent messages in a timely fashion.
To configure WebLogic Server to support migration, you start by configuring the backup servers for each WebLogic Server instance. For our example, we are going to allow each server to use any other server in the cluster as a potential migration target. Use each server s JMS Migration Config. Control tab to add all servers to the Chosen list of possible migration destinations. Do the same thing for each server s JTA service using the JTA Migration Config. Control tab. Now, go back to each JMS server and use the Target And Deploy tab to retarget each JMS server to the migratable version of each WebLogic Server instance. For example, JMS Server1 should now be targeted at Server1 (migratable) .
At this point, the configuration of our application s JMS resources is complete. We only have to configure our JavaMail session for our email confirmation service, set up and tune our application-specific execute queues, and deploy our application.
Configuring JavaMail Sessions
The bigrez.com application uses the JavaMail API to send email confirmations to our customers via a mail server. To make that process more transparent to the application, WebLogic Server provides the ability to define JavaMail sessions that applications can look up from JNDI and use without having to understand where the mail server lives, how to authenticate, what protocols to use, and so on. For our example, we will use a mail server on our network, mail.bigrez.com . Go to the Services- > Mail folder in the WebLogic Console s left-hand navigation bar and create a new mail session with the name BigRez Email Session . As with our other resources, the JNDI name that applications use to locate this session will be a logical name. The EJB or Web application deployment descriptor will map the logical name to the actual name that the session will use. Use the JNDI name BigRezEmailSession to create the mail session. The Properties attribute is simply the JavaMail properties to use when creating the session:
mail.transport.protocol=smtp mail.smtp.host=mail.bigrez.com mail.smtp.user=bigrez mail.smtp.password=password
After creating the Mail Session, don t forget to target it to all servers in the BigRezCluster .
Configuring Execute Queues and Threads
For our application, you are going to use one application-specific execute queue to guarantee a certain number of resources (that is, threads) are always available to process requests from our internal reservation agents. To accomplish this, you need to define another execute queue on each server in the cluster. Create an execute queue named CSA Execute Queue with 10 threads in each server. To make use of this execute queue, you need to use the dispatch-policy element of the weblogic-ejb-jar.xml deployment descriptor to specify that the EJB requests should use the CSA Execute Queue .
In addition, you should adjust the number of execute threads in the default queue to 50. Notice that the total number of execute threads in each server is the same as the number of database connections in the JDBC connection pool, BigRezPool . This is not just a coincidence . Because the application spends most of its time in the database, you want to make sure that every execute thread can get a database connection from the pool without having to wait. We will talk more about optimizing the number of database connections and execute threads later. Now, let s deploy the application.
Deploying Applications
Deploying the application is easy. As long as the EAR file is accessible from either the admin server machine or the machine from which you are running the WebLogic Console, you can do everything from the browser. Using the WebLogic Console, open the Deployments- > Applications folder in the left-hand navigation bar. After selecting the Deploy a new Application link, select the upload your file(s) link embedded in the help text, upload the bigrez.ear file, and deploy it to all servers in the BigRezCluster . Don t forget to start the cluster before trying to deploy the application.
In addition to the WebLogic Console, WebLogic Server provides a rich set of command-line accessible administrative functionality. The first tool we will look at is the command-line deployment tool, weblogic.Deployer . The weblogic.Deployer program allows an administrator to deploy, undeploy , and get the status of deployed applications. While we will not attempt to cover all of the possible options with weblogic.Deployer , we will cover some basic features. For more information, please see the WebLogic Server documentation at http://edocs.bea.com/wls/docs81/deployment/tools.html .
The first task we want to accomplish is making the deployment tool talk to the administration port of the admin server. Remember that by enabling this administration port, the plain-text port can no longer be used to perform administrative functions, and all communication with the admin server requires SSL communication. To accomplish this, you must define the Java system property weblogic.security .SSL.trustedCAKeyStore to tell the deployer tool where to find your trusted CA key store (see Chapter 10 for more information). If you are using the demo certificates that came with WebLogic Server, you also need to set the Java system property weblogic.security.SSL.ignoreHostnameVerification to true to tell the deployer tool to ignore the hostname in the server s certificate. In our example, the first portion of every command you invoke using the deployer tool will look like the following line:
java -Dweblogic.security.SSL.trustedCAKeyStore=ClientTrustStore.jks
When using the deployer tool, we also need to specify the URL to use to contact the admin server, a username with sufficient privileges to invoke the command, and the user s password. If you use the system account, that means that every time you invoke the deployer tool, the command line will always begin with the following contents:
java -Dweblogic.security.SSL.trustedCAKeyStore=ClientTrustStore.jks weblogic.Deployer -adminurl https://192.168.1.20:9002 -username system -password insecure
Of course, you also need to make sure that the PATH and CLASSPATH environment variables are set properly so that you find the JVM and the weblogic.Deployer class. To make this simpler, let s create the following script file called weblogicDeployer.cmd in the Chapter 11 example directory (for example, c:\mastering\ ch11_examples ):
@SETLOCAL @call setEnv.cmd java -Dweblogic.security.SSL.trustedCAKeyStore=ClientTrustStore.jks weblogic.Deployer -adminurl https://192.168.1.20:9002 -username system -password insecure %* @ENDLOCAL
This script will allow us to run the deployer tool with a command of the form weblogicDeployer < args > * . For example, let s run the new script using the Deployer s list command to see what applications are deployed in our cluster:
> weblogicDeployer targets BigRezCluster -list #TaskID Action Status Target Type Application Source 0 Activate Success BigRezCluster Cluster bigrez ...
Using the deployer, you can also deploy new applications and undeploy running applications. For example, let s say that you just received a new copy of the bigrez.ear file from your developers and want to deploy the new version into the BigRezCluster that is already running an older version. You need to run the following commands to undeploy the old version.
> weblogicDeployer -targets BigRezCluster -name bigrez -unprepare bigrez.ear Operation started, waiting for notifications... ............... #TaskID Action Status Target Type Application Source 1 Unprepare Success BigRezCluster Cluster bigrez null
Now, run the following command to deploy the new version.
> weblogicDeployer -source c:\temp\bigrez.ear -targets BigRezCluster -name bigrez -activate Operation started, waiting for notifications... ........................ #TaskID Action Status Target Type Application Source 0 Activate Success BigRezCluster Cluster bigrez ...
You now have at least two ways to deploy an application: the WebLogic Console and the weblogic.Deployer program. We favor the deployer program because it lends itself to scripting common actions and provides a rich set of deployment options.
During our discussions of WebLogic Server configuration issues and options, we have covered a lot of ground. We hit many of the high points that we feel are likely to be relevant to the largest percentage of applications. However, we haven t covered everything. Our hope is that we provided enough information to give you a good head start on what you need to become an effective WebLogic Server administrator. From this point on, we will turn our focus to discussing how to monitor and manage WebLogic Server applications to keep them running optimally and how to handle different types of failure conditions.
EAN: 2147483647
Pages: 125