Hardening VPN Connectivity
VPN connectivity is commonplace on most corporate networks today. The reason for this is simple. In many cases, the remote client or office already has an Internet connection, and this connection is often at broadband speeds or faster. As a result, instead of putting in an additional and more costly packet switched or dedicated point-to-point connection to provide access to the remote location, the company can establish a VPN connection across the Internet connection that they are already paying for and enjoy many of the same benefits that a packet switched or dedicated connection would provide. Sure, a downside exists in that there is no guaranteed service level for Internet- based connections, but in many cases the cost saving justifies the risk of downtime due to Internet- related outages.
At the same time, providing connections across the Internet introduces a huge security risk ”namely that you are now passing private corporate data across the very public Internet. This allows an eavesdropper to potentially view or change your private data.
The technologies that define how VPNs operate address many of these risks through the use of authentication, encryption, and data integrity protocols; however, you can do certain things to ensure your data is as hardened as it possibly can be when traveling across a VPN. At the same time, you also have the risk associated with the need to place the device accepting the VPN connections in a position where it is exposed to the Internet. As with firewalls, this means that you must not only harden the VPN traffic itself from compromise, you also have to harden the VPN devices themselves . In our effort to harden our VPN connectivity, we are going to examine the following topics:
-
Different VPN connection types and technologies
-
VPN device-hardening methods
-
Hardening IPsec-based VPNs
-
Hardening VPN clients
Different VPN Connection Types and Technologies
Before we can explore how to harden VPNs, we must first take a look at the types of VPN connections and the VPN technologies that exist. Doing so will allow you to understand not only how you should implement your VPN connections from a design perspective, but will show you which VPN technologies provide you the most security.
Different VPN Connection Types
The two predominant VPN connection types are remote access VPNs and site-to-site VPNs. Remote access VPNs refer to connections that provide individual remote users access to the corporate network via their PC. For example, a user at a hotel using the hotel Internet connection may establish a tunnel over that Internet connection to the corporate network, allowing that user to access corporate resources. Another example, as shown in Figure 5-1, is a user at home telecommuting to the local office via a VPN connection through their dial-up or broadband Internet service provider.
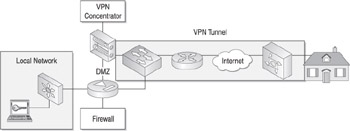
Figure 5-1: Basic remote access VPN
Site-to-site VPNs refer to connections that provide access from an entire remote network, such as a small office or remote branch, to the corporate network through the use of gateway devices. Figure 5-2 shows a network diagram of a site-to-site VPN connection between a local and remote office.
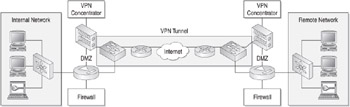
Figure 5-2: Basic site-to-site VPN
Site-to-site VPN connections can be further broken down into intranet and extranet VPN connections. Intranet VPN connections refer to connections that are part of the same company (for example, a remote branch office). Extranet VPN connections refer to connections between a company and its business partners (for example, between a manufacturing company and their supplier). Extranet VPN connections are generally much more restrictive than intranet VPN connections, and they should only provide remote access to the specific resource or resources that the remote location requires.
Different VPN Technologies
Most devices today support four primary VPN technologies: Point-to-Point Tunneling Protocol (PPTP), Layer 2 Tunneling Protocol (L2TP), IPsec, and Secure Socket Layer (SSL) VPNs.
PPTP is considered a Layer 2 tunneling protocol because it operates at the Data Link layer of the OSI model. The benefit this provides is the ability to tunnel multiple protocols within the VPN tunnel. This allows you to tunnel IPX/SPX and TCP/IP within the same tunnel, for example. PPTP has some drawbacks, however. First, it is not based on an open standard but rather is a proprietary system developed in large part by Microsoft. Second, and more important, PPTP does not provide data encryption by itself, although later versions of PPTP provide some rudimentary data-encryption methods through the use of Microsoft Point-to-Point Encryption (MPPE). Third, PPTP has historically had security problems and has been exposed to significant security vulnerabilities. PPTPv1 was cracked in 1998 and, as a result, should not be used in any circumstances. PPTPv2, although it s much more secure than PPTPv1 and addresses many of the security flaws of PPTPv1, is still susceptible to password crackers such as L0phtcrack because key values in PPTP are a function of the user password. This allows a malicious user to gain access to the key values used to protect the data, and thus the data itself, by simply monitoring the network and then executing a dictionary hack using L0phtcrack against the challenge and response data. As a result, although PPTP is generally easier to deploy than other technologies due to being built into many Microsoft operating systems, I do not recommend implementing PPTP-based VPNs. Instead, to harden PPTP, you should use L2TP or IPsec for reasons I will explain in a moment.
L2TP is also considered a Layer 2 tunneling protocol and, in fact, is based on Microsoft s PPTP and Cisco s Layer 2 Forwarding (L2F) protocol, combining the best of both. L2TP provides for multiprotocol VPN tunnels, much like PPTP does, and is based on IETF open standards. Where L2TP differs , and is thus a better solution than PPTP, is the fact that it uses IPsec ESP for data encryption as well as supports more robust authentication methods. If you have to provide a multiprotocol VPN solution, you should use L2TP instead of PPTP.
IPsec is the de facto standard for providing purely IP-based VPN connections. IPsec is a Layer 3 protocol and, as a result, can only be used to tunnel TCP/IP-based traffic in a VPN. IPsec supports a couple of different methods of providing for data encryption, either using Authentication Header (AH) or Encapsulating Security Payload (ESP). IPsec supports multiple authentication and key protocols, although the most commonly used key protocol is the ISAKMP/Oakley protocol. IPsec also supports much more secure encryption methods, including 160-bit 3DES and 256-bit Advanced Encryption Standard (AES) encryption. In environments that do not require multiprotocol VPN support, you should only use IPsec for your VPN connections due to the increased security, better encryption, more robust authentication, and better scalability over PPTP and L2TP. The rest of this chapter will focus on IPsec because it provides the greatest security for our environments and is being used to harden L2TP.
The use of SSL VPNs is an emerging method of providing secure remote access to applications without deploying client VPN software. Most SSL VPNs use a web browser s built-in SSL functionality and Java or ActiveX controls to provide the remote application access. The obvious benefit to this is that you generally do not need to install any kind of client VPN software on the remote system. Your users can connect to your network from public kiosks or wireless hotspots and access the application while still enjoying data security and privacy. A drawback of this type of VPN is that most SSL VPNs require web-based applications in order to be used effectively. Although many companies are working at utilizing proxy servers to provide expanded access to legacy or client/server-based applications, this technology is still in its relative infancy.
Now, you might be reading this and thinking, OK, but this sounds like what we do to provide secure e-mail access via a web-based e-mail interface, and in many ways you are correct. Some of the hype surrounding SSL VPNs is simply a new marketing spin of an old concept. However, as these application proxies as well as web-based remote access applications, such as Citrix and Microsoft Terminal Server, gain maturity, SSL VPNs will continue to expand beyond the traditional definitions and implementations .
VPN Device-Hardening Methods
Before we can look to harden the VPN tunnels themselves, we must first look at how to harden our VPN devices. The areas to focus on include the following:
-
Hardening remote administration
-
Implementing authentication and authorization
-
Restricting services and protocols
-
Providing redundancy and fault tolerance
-
Hardening routing protocols
Hardening Remote Administration
Like firewalls, many VPN devices support multiple management protocols, including Telnet, SSH, HTTP, and HTTPS. As was demonstrated with firewalls, you should not use insecure protocols such as Telnet and HTTP to manage your devices. This is also true for your VPN devices. Only use SSH, HTTPS, or a similar encrypted protocol to manage your equipment. For example, with your Cisco VPN 3005, you can disable any management protocol via the web GUI by selecting the appropriate protocol from the Configuration System Management Protocols HTTP/HTTPS screen and unchecking the Enable button.
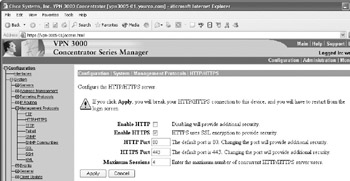
In this case, we have disabled HTTP access, only allowing HTTPS management access. You should enable only the secure management protocols you will use.
Your Nortel Contivity has similar functionality. A Nortel Contivity extranet switch supports HTTP, HTTPS, SNMP, FTP, and Telnet as management protocols. One notable protocol that it does not support is SSH. As a result, if you want to access the device via a CLI, you must use Telnet. Although this may sound like a drawback, the Contivity was designed around a web GUI, so most if not all the functionality you will need is in the GUI. Consequently, you should only manage your Contivity device via the secure web-based administration methods. On your Nortel Contivity VPN, you can configure your remote management protocols at the Services Available Services screen, as shown here:
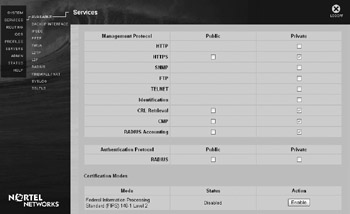
You can configure which protocols to support by checking or unchecking the appropriate check box. Because the public interface is inherently insecure, you cannot enable an insecure management protocol, which is a nice feature.
Configuring HTTPS support on your Nortel Contivity is a little bit more complex a process than on the Cisco VPN 3005 due to the fact that Cisco uses an internally generated certificate by default to allow HTTPS access. For the Nortel Contivity, you will need to configure certificates on the device before HTTPS access is allowed. The following steps detail this process:
-
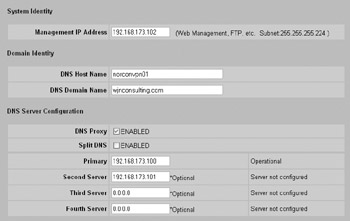
In addition to checking HTTPS, as previously detailed, you must first ensure that the device name and DNS servers are configured properly at the System Identity System Identity screen, as shown here:
-
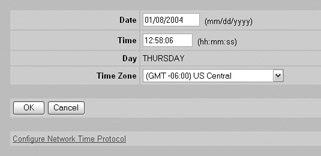
Next , make sure your Contivity is configured with the appropriate date and time. You can do this at the System Date & Time Date and Time screen, as shown here:
-
I also recommend that you configure the Network Time Protocol (NTP) to allow the Contivity to automatically update its time. You can do this by clicking Configure Network Time Protocol at the System Date & Time Date and Time screen. At the System Date & Time Network Time Protocol screen, check the Enable box and add the appropriate NTP servers for your environment, as shown next:
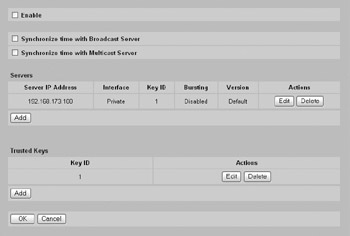
Ensure that you enable NTP authentication by configuring the appropriate key ID for increased security.
-
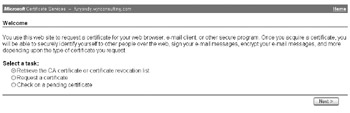
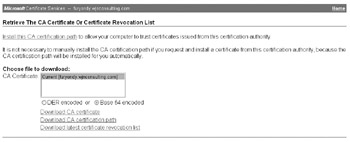
The next step is to configure the Contivity with a certificate authority trusted CA certificate. Using Microsoft Certificate Services, you can obtain the trusted CA certificate by selecting the Retrieve the CA Certificate or Certificate Revocation List radio button, as shown here:
-
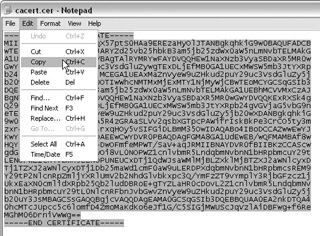
Then select Base 64 Encoded and click the Download CA Certificate button. You will be prompted to save the certificate to your local hard disk. After that, open the file using a text editor such as Microsoft Notepad and copy the contents of the file, as shown here:
-
Next, go to the System Certificates Certificate Configuration screen and click Import Tunnel or Transport Certificate, as shown here:
-
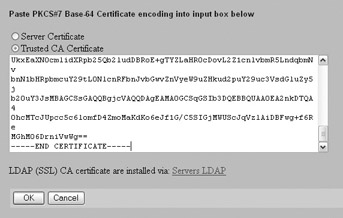
At the System Certificates Import Tunnel or Transport Certificate screen, paste the contents of the certificate file into the dialog box, select Trusted CA Certificate, and then click OK, as shown here:
Make sure that the Trusted and Enabled check boxes are selected for your CA certificate.
-
The next step is to generate a certificate for the Contivity using the CA you added. You can do this by clicking PKCS#10 Certificate Request at the System Certificates Certificate Configuration screen. This will take you to the System Certificates Certification Request “ PKCS#10 screen, as shown here:
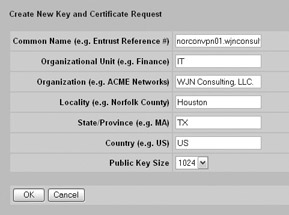
Fill in the request with the appropriate information. Make sure that you use the correct system name and use a public key size of at least 1024 for security purposes. When this screen is complete, click OK.
-
You will be presented with the System Certificates Certification Request screen, as shown here:
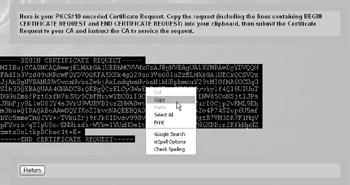
Highlight the certificate request data and copy it. Click the Return button to return to the System Certificates Certificate Configuration screen.
-
The next step is to request a new certificate from your CA. For Microsoft Certificate Services, you can do this by selecting Request a Certificate, as shown here:

-
At the Choose Request Type screen, select the Advanced Request radio button and click next.

-
At the Advanced Certificate Requests screen, select the option Submit a Certificate Request Using a Base 64 Encoded PKCS #10 File or a Renewal Request Using a Base 64 Encoded PKCS #7 File. Then click Next.
-
At the Submit a Saved Request screen, paste the certificate data into the Saved Request section, select Web Server from the Certificate Template drop-down list, and click Submit, as shown here:

-
At the Certificate Issued screen, select Base 64 Encoded and click the Download CA Certificate button. When prompted, save the certificate to an appropriate location. After that, open the file using a text editor such as Microsoft Notepad and copy the contents of the file.
-
Return to the Contivity and, at the System Certificates Certificate Configuration screen, click Import Tunnel or Transport Certificate. At the System Certificates Import Tunnel or Transport Certificate screen, paste the contents of the certificate request file into the text field, select Server Certificate, and click OK, as shown here:
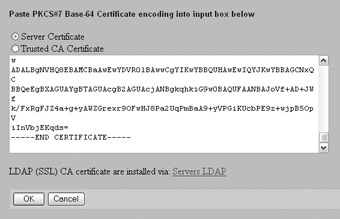
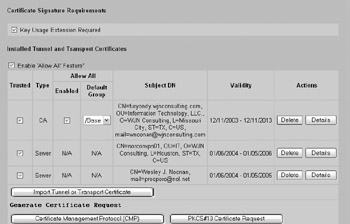
At this point, your certificate configuration should appear as follows :
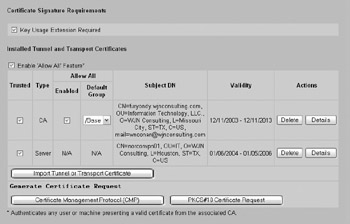
Make sure your CA certificate has the Trusted and Enabled boxes checked. Make sure that your server certificate has the Trusted box checked.
-
The final step is to configure SSL/TLS to use the certificate for authentication. This is performed at the Services SSLTLS SSL screen, as shown here:
Simply select the server certificate from the drop-down list, enable your ciphers, and click OK. You should be able to connect to the Contivity using HTTPS at this time.
In addition to restricting the management protocols allowed, you should also restrict what systems can connect to and manage the VPN device by permitting only designated management workstations to connect to the VPN device. This can be done on your Cisco VPN 3005 by specifying a manager workstation in the Administration Access Rights Access Control List screen of the web GUI, as demonstrated here:
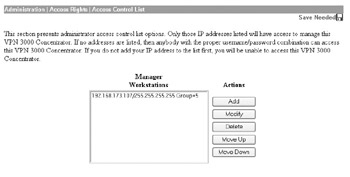
The Nortel Contivity lacks the ability to restrict management workstations in this manner.
Another aspect of hardening remote administration is to specify a session timeout value as well as the maximum number of sessions allowed. You can configure these on the Cisco VPN 3005 at the Administration Access Rights Access Settings screen, as demonstrated here:
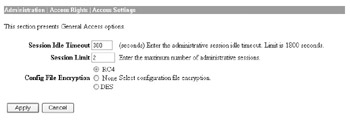
In this case, I have specified a Session Idle Timeout value of 300 seconds (5 minutes). I also specified two administrative sessions so that if, for some reason, an administrative session locks up, I can connect via a different session. I recommend that you allow only two administrative sessions to reduce the likelihood of multiple administrators interfering with each other. Finally, I have specified that the config file should be encrypted for an additional measure of security.
For the Nortel Contivity, you can specify idle timeout configuration at the Admin Administrator Administrator screen, as shown here:
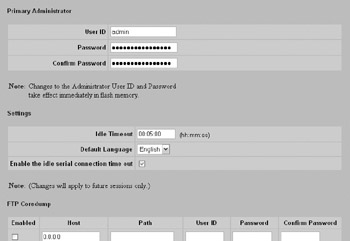
The default is 15 minutes. In this example, I have configured a 5-minute timeout value and applied that timeout to the serial (hard console) connection as well as the remote administrative connections.
Implementing Authentication and Authorization
Another aspect of hardening your VPN devices is to only allow authenticated users to manage each device and to ensure that they are only authorized to run the appropriate commands. Avoid using common usernames and passwords and instead implement individual usernames. For example, Cisco and Nortel both ship with a default username of admin. You should change this username for the same reasons you change the administrator account name on Microsoft Windows. If someone is trying to hack your VPN device, they are always going to start by using default usernames. In addition, your passwords should conform to your environment s password security policy, requiring at a minimum the use of alphanumeric characters, special characters, and upper- and lowercase characters .
For additional scalability and security, you can implement an AAA server to authenticate your users and authorize the commands they can run. We will discuss AAA mechanisms in more detail in Chapter 9.
For a Cisco VPN 3005 concentrator, this is a two-step process that requires you to first specify what the AAA access level is for a user at the Administration Access Rights Administrators Modify Properties screen, as demonstrated here:

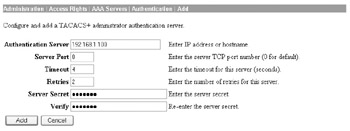
In this case, we have granted the user full command authorization by specifying access level 15. The next step is to specify the appropriate TACACS+ server to use for administrative user authentication at the Administration Access Rights AAA Servers Authentication Add screen, as demonstrated here:
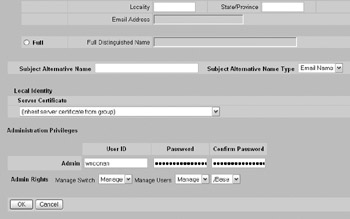
The Nortel Contivity does not support using any kind of external authentication for administrative users. Instead, you can define additional administrators as a function of the user properties at the Profiles Users User Management --> Edit User screen, as shown here:
A note of caution when configuring external AAA for your device: Where possible, you should have at least one emergency local account with some impossibly difficult password that only a few select people know in case the AAA server is unavailable (failure, DoS, network problems, and so on). This is to be used only as a last resort, not for day-to-day activities. This will prevent a situation where a network problem is keeping you from getting to the AAA server and being able to get into your own routers to fix the problem because you can t authenticate.
Restricting Services and Protocols
Restricting the services and protocols running on your VPN device is one of the best methods for hardening it, especially if you have a dedicated VPN device. Your VPN device should only run the minimum protocols required for it to be able to accept and terminate VPN connections, especially on the external interfaces.
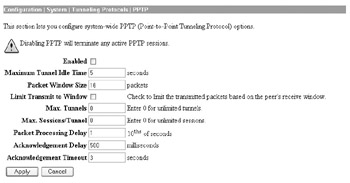
Removing Unnecessary Tunneling Protocols Many VPN devices are configured to accept all three connection methods ”PPTP, L2TP, and IPsec ”by default. If you only require IPsec, you should disable the other connection types. To disable PPTP on your Cisco VPN 3005, you can uncheck Enabled at the Configuration System Tunneling Protocols PPTP screen, as shown here:
Repeat this step for L2TP if you want to disable it as well.
The Nortel Contivity uses a central screen for enabling and disabling many protocols and services. You can remove a tunneling protocol from being supported on an interface by unchecking the relevant protocol at the Services Available Services screen, as shown here:
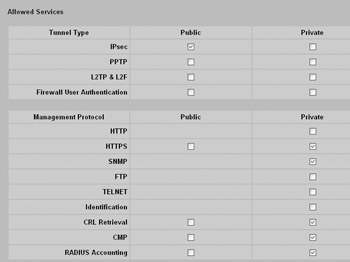
In this case, I am allowing only IPsec, and only on the external interface.
Removing Unnecessary Security Associations and IKE Proposals In addition to disabling unnecessary tunneling protocols, you should also disable or remove any security associations (SAs) and IKE proposals you are not actively using. This allows you to limit your connections to the more secure connection options, such as using 3DES and SHA-1, as well as to prevent someone from inadvertently connecting using a protocol that you do not want to permit. You can remove unnecessary SAs on your Cisco VPN 3005 at the Configuration Policy Management Traffic Management Security Associations screen, as shown here:
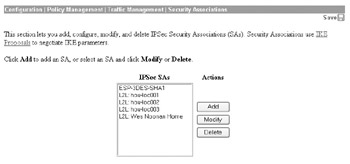
In this example, I am only allowing the SAs associated with active VPN connections that are in use or will be in use. You can add or remove SAs by clicking the appropriate button.
To remove unnecessary IKE proposals on your Cisco VPN 3005, go to the Configuration System Tunneling Protocols IPSec IKE Proposals screen and deactivate any unnecessary proposals, as demonstrated next.
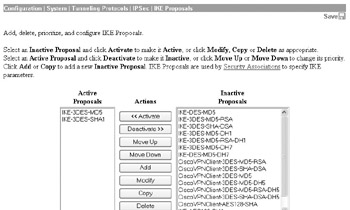
In this example, I am only allowing two IKE proposals that support MD5 for legacy interoperability purposes only because MD5 is not as secure as SHA-1.
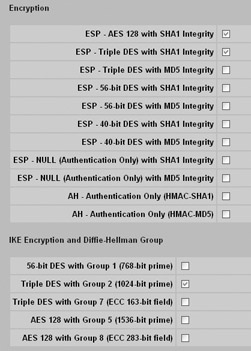
The Nortel Contivity refers to security associations as encryption and IKE proposals as IKE encryption and Diffie-Hellman group . Both can be configured at the Services IPSec IPSec Settings screen shown next. Simply uncheck the values you do not want to use. In this case, I amonly allowing AES 128 and 3DES with SHA-1 for my encryption protocol and 3DES with Diffie-Hellman group 2 for my IKE proposal.
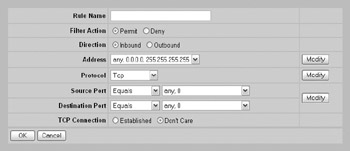
Assigning Filtering Rules to Interfaces Among the most important hardening steps you can perform with your VPN devices is to filter the traffic that is permitted on any given interface. Your VPN devices exist for one purpose ”to accept and terminate VPN tunnels using only the protocols you have defined. As a result, you should permit only the traffic directly related to tunnel establishment and termination and deny every other protocol and port number. Many VPN devices ship with HTTP, ICMP, and every VPN tunnel protocol enabled by default on the external interface. This is a security oversight on the part of the vendors. It is what I like to call lowest common denominator development. The vendors have no idea what protocols you require, so they permit anywhere from a few protocols to all protocols to make it easy to connect. You should review what protocols your vendor has enabled by default and filter out all unnecessary protocols. You can do this for your Cisco VPN 3005 at the Configuration Policy Management Traffic Management Assign Rules to Filter screen, as demonstrated next.
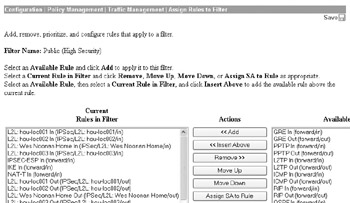
In this example, I am permitting only the traffic from my remote LAN-to-LAN VPN sites as well as IPsec, IKE, and NAT-T (to support IPsec NAT traversal) to support my remote access VPN connections. If any other protocol is used to connect to the external interface, it will be dropped by the VPN device. You can add or remove the permitted protocols by selecting each protocol and using the appropriate button.
The Nortel Contivity uses a slightly different filtering methodology than the Cisco VPN 3005. The Cisco VPN 3005 filters based on protocol rules for all protocols. The Nortel Contivity, however, only supports basic port filtering rules using TCP, UDP, ICMP, and IP by default.
The Nortel Contivity also supports two types of filters: a tunnel filter and an interface filter. You can configure your filters in either location, as you deem appropriate, and can copy a filter between the two filtering types with the click of a button. You can configure additional ports and protocols to be supported for filtering at the Profiles Filters Interface Filters --> Rules --> Create screen by selecting to modify the protocol or port, as shown here:
By default, the Nortel Contivity will accept all protocols. Because of the way the Nortel Contivity is designed, you would need to add individual permit and deny rules for all protocols other than TCP, UDP, ICMP, and IP that you want to control. For example, if you only wanted to allow ESP (protocol 50) and IKE (UDP port 500), you would need to create a permit rule allowing ESP and IKE, then a deny protocol rule for all the other (254) protocols, with the exception of TCP, UDP, ICMP, and IP, which are created by default. It is impractical to demonstrate the adding of all the protocols that would need to be denied , but a high-security filter that allows only ESP and IKE might be configured to only permit ESP and IKE and deny every other protocol that you added, including the default protocols of IP, TCP, UDP, and ICMP.
Providing Redundancy and Fault Tolerance
As with many devices, you can harden your VPN devices against failure by implementing a redundant and fault-tolerant configuration. The benefit of this type of implementation is the ability to continue to accept incoming VPN tunnels in the event of a device failure. This is done by implementing multiple VPN devices in a pool on your network, as shown in Figure 5-3.
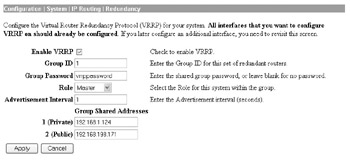

Figure 5-3: Simple VPN redundancy
Cisco utilizes Virtual Router Redundancy Protocol (VRRP) to provide VPN redundancy. VRRP can be configured at the Configuration System IP Routing Redundancy screen of your VPN device, as shown here:
In this case, I have defined this system as the master role in the VRRP group. I would configure the remaining systems as backup roles, ensuring that the rest of the settings are the same on all systems. Although the password is displayed in clear text in the management console ”which is not a very secure implementation on Cisco s part ”you should use a password to ensure that only VPN devices that share a common password will join the VRRP pool.
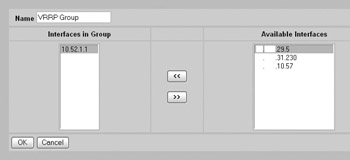
The Nortel Contivity also supports VRRP for redundancy. The first step is to create an interface group at the Routing Interface GRP Interface Group --> Add, screen as shown here:
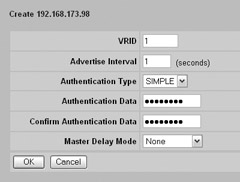
The next step is to enable and configure VRRP at the Routing VRRP VRRP screen by checking to enable VRRP and adding the relevant address. When you click Create for the IP address, you will be taken to the Routing VRRP VRRP --> Create VRRP IP Address screen, as shown next. Select the appropriate VRID, select to use simple authentication, and enter the authentication data. Notice how Nortel, unlike Cisco, masks this data onscreen.
The final step is configure VRRP on the interface by going to the Routing Interfaces Routing Interfaces screen and clicking Configure. This will take you to the Routing Interfaces Routing Interfaces --> Configure VRRP screen, as shown next. Configure your system to enable VRRP, and with the appropriate master status. If this is the master device, make sure you have selected the appropriate group, selected to serve as the master, and enabled the administrative state.

Hardening Routing Protocols
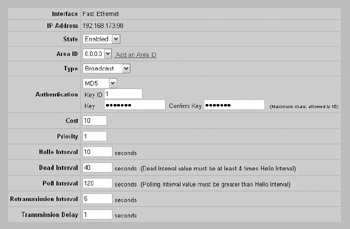
Like your routers, it may be necessary for your VPN device to be able to route data. As we previously discussed with firewalls, static routing is the most secure method to provide routing information due to the fact that the device is not susceptible to invalid route statements. If you do require the use of a routing protocol, however, you should only use routing protocols that support authentication, such as RIP version 2, OSPF, and BGP, to ensure that they only accept route updates from authorized partners. The Cisco VPN 3005 only supports OSPF as an authenticated routing protocol; therefore, I recommend that you only use OSPF. You can configure OSPF for the interface at the Configuration Interfaces Interface screen (in this case, the Ethernet 1 interface), as demonstrated here:

In this case, I have selected to use an MD5 hash with the key value ospfkey to authenticate with my other OSPF-enabled devices. The next step is to enable OSPF at the Configuration System IP Routing OSPF screen, as demonstrated here:
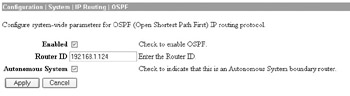
In this case, I have configured the VPN device as an autonomous system boundary router so that it will update the OSPF routing tables with the remote LAN-to-LAN subnets. Note that Cisco displays the password in clear text in the console, so you should ensure that no one is looking over your shoulder while you configure this.
The Nortel Contivity supports RIP and OSPF as routing protocols. Configuring RIP is a two-step process. First, you need to enable RIP. This can be done at the Routing RIP RIP screen, as shown next.
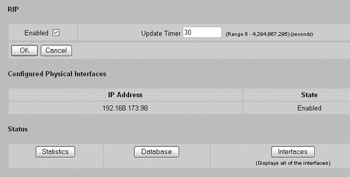
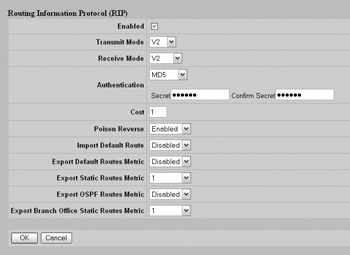
The next step is to configure RIP on the interface at the Routing Interfaces Routing Interfaces screen. Click Configure and you will be taken to the Configure RIP screen. You should make sure that you only use RIP version 2 and that you select to use MD5 authentication and specify the appropriate secret, as shown here:
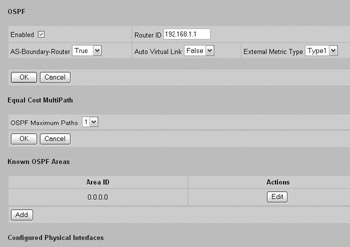
Configuring OSPF on your Nortel Contivity is very similar to configuring RIP. First you want to enable OSPF at the Routing OSPF OSPF screen, as shown next.
Make sure that you add the necessary OSPF areas, configure the appropriate router ID, and set the AS-Boundary-Router value as appropriate for your environment.
The next step is to configure OSPF on the interface at the Routing Interface Routing Interfaces screen. Click Configure and you will be taken to the Configure OSPF screen. Configure OSPF, as shown next, making sure that you select MD5 authentication and enter the appropriate key ID and key value as well as any other configuration requirements for your environment.
Hardening IPsec-Based VPNs
As previously mentioned, you should not implement PPTP-based VPNs because they are not as secure as the alternatives. If you need to support multiple protocols across your VPN, you should use L2TP. Although L2TP is more secure than PPTP, it is less secure than an IPsec-based VPN can be configured, as shown previously. The nice thing about this, however, is that L2TP supports IPsec ESP encapsulation, thereby providing all the functionality of L2TP with all the encryption and security of IPsec. L2TP is encapsulated with an IPsec ESP session/tunnel. You can enable this on your Cisco VPN 3005 concentrator at the Configuration User Management Groups Modify <Group or Username> screen on the General tab in the Tunneling Protocols section, as shown next:

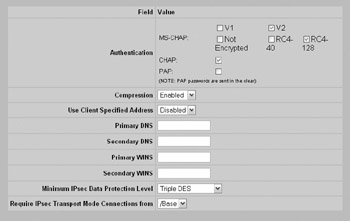
On your Nortel Contivity, you can enable L2TP over IPsec as a part of your group configuration settings. The first step is to configure IPsec to provide transport mode connections. This is enabled by default, but it can be configured at the Profiles Groups Groups --> Edit --> IPSec screen, as shown here:

The next step is to configure your L2TP settings to use IPsec. This can be done at the user or group configuration screen. The benefit of configuring these settings at the group level is the ability to effectively modify the functionality of multiple users. This can be done at the Profiles Groups Groups --> Edit --> L2TP screen, as shown next. Select the appropriate IPsec data protection level (I recommend Triple DES due to the increased security) and make sure that the appropriate group is selected for the Require IPsec Transport Mode Connections From data field.
Because L2TP supports being tunneled within IPsec, we will now focus on hardening IPsec-based VPNs to protect your environment.
Traffic Security Protocols
IPsec uses two traffic security protocols to provide data security: Authentication Header (AH) and Encapsulating Security Payload (ESP). AH is defined in RFCs 1826 and 2402 and provides authentication, integrity, and anti- replaying functionality. Figure 5-4 shows the format of an AH-formatted packet. Notice that AH simply splits the original IP header and transport header and inserts the AH information between them. A major drawback of AH, however, is that it does not encrypt the data contents and therefore provides no data confidentiality. AH also does not support functioning in a NAT environment because when NAT changes the IP header, it invalidates the AH signature checksum. You should not use AH because it does not encrypt the original data.
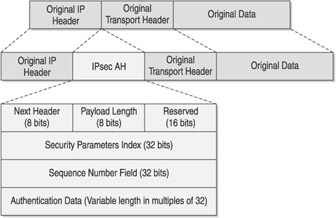
Figure 5-4: IPsec AH-formatted packet
ESP, on the other hand, provides for authentication, integrity, and anti-replaying functionality as well as for data confidentiality by encrypting the original packet s data contents. As you can see in Figure 5-5, ESP actually encapsulates the original transport header and data between an ESP header and trailer. This causes the original data to be encrypted as an encapsulated payload within the ESP header and trailer. ESP also functions within a NAT environment through the use of NAT Transparency (sometimes referred to as NAT Traversal) .
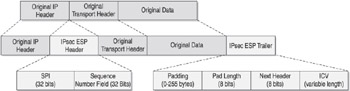
Figure 5-5: IPsec ESP-formatted packet
You can enable NAT Traversal functionality on your Cisco VPN 3005 at the Configuration System Tunneling Protocols IPSec NAT Transparency screen, as shown here:
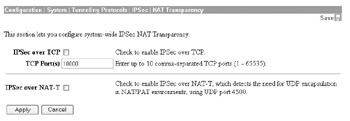
| |
Cisco has an excellent whitepaper on NAT Traversal and how it works located at http://www.cisco.com/univercd/cc/td/doc/product/software/ios122/122newft/122t/122t13/ftipsnat.htm .
Specifically, it is important to understand that although NAT Traversal can help you tremendously in dealing with IPsec traffic, there are some items you need to be aware of. If an IP address is used as a search key to find a pre-shared key, you will not be able to use NAT Traversal because the NAT function will result in a mismatch between the IP address and pre-shared key. In addition, any protocols that use embedded IP addresses will not function with NAT Traversal. These protocols include File Transfer Protocol (FTP), Internet Relay Chat (IRC), Simple Network Management Protocol (SNMP), Lightweight Directory Access Protocol (LDAP), H.323, and Session Initiation Protocol (SIP).
| |
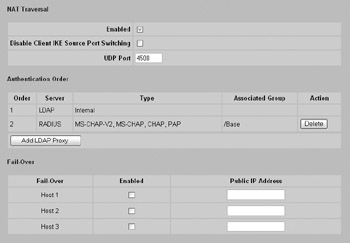
For the Nortel Contivity, NAT Traversal is configured as a property of IPsec at the Services IPSec IPSec Settings screen, as shown next.
You should use ESP for your IPsec-based VPNs due to the increased security that the data encryption provides; in fact, the Cisco VPN 3000 concentrator does not even support AH.
AH and ESP both use two modes of operation that define how they function: transport mode and tunnel mode. In transport mode, the original packet header and data are separated, and the original IP header is used for the new packet, followed by the AH and the original data (unencrypted) or the ESP header and encrypted data, as shown in Figures 5-6 and 5-7.
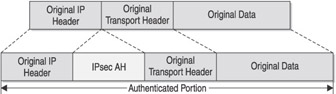
Figure 5-6: AH transport mode
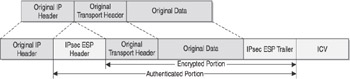
Figure 5-7: ESP transport mode
In tunnel mode, the original packet is completely encapsulated in a new IP header, including the AH or ESP header information, as shown in Figures 5-8 and 5-9. Transport mode is typically used for end-to-end connections between hosts , whereas tunnel mode is used for pretty much everything else. In most cases, you will use tunnel mode.
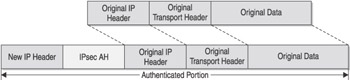
Figure 5-8: AH tunnel mode

Figure 5-9: ESP tunnel mode
Security Associations
Security associations are simply a combination of the protocols, rules, and policies that two hosts use to negotiate their security service relationship. These security associations define the encryption protocols, the message integrity methods, and the authentication methods to be used by the hosts. The IETF has established a standard method of security association and key exchange resolution combining the Internet Security Association and Key Management Protocol (ISAKMP) and the Oakley key-generation protocol. ISAKMP centralizes security association management, thus reducing connection time. Oakley generates and manages the authenticated keys used to secure the information.
A benefit of this process is that not only are the computer-to-computer communications protected, but remote computers that are requesting secure access to a corporate network or any situations in which the negotiation for the final destination computer (or endpoint) is actually performed by a security router or other proxy server are also protected. This latter situation is known as ISAKMP client mode , and the identities of the endpoints are hidden to further protect the communication and provide transparency to the client.
Encryption Protocols
You can use many different encryption protocols to encrypt your data and ensure confidentiality. Although they all fundamentally function in the same manner, the difference between them is the strength of the encryption. Some of the more common encryption protocols are listed here:
-
DES Data Encryption Standard (DES) uses a 56-bit key that it applies to every 64 bits of data to provide encryption. This provides 72 quadrillion possible encryption keys, which sounds really good until you realize that DES was cracked in a mere 22 hours and 15 minutes in 1999. Since then, DES has been cracked within similar times using relatively inexpensive equipment. If one is willing to invest a million dollars in equipment, DES can be cracked in under an hour . As a result, you should not use DES encryption.
-
3DES 3DES is a more robust method of DES, performing three 56-bit encryption operations on the data (hence the name 3DES). This provides an aggregate 168-bit key providing much stronger data encryption, although in actuality it is a 112-bit key. 3DES has not been cracked . . .yet. Some estimates say that it would take trillions of years using today s technology to crack it. At the same time, people made similar claims about DES cracking, and we know what the results were. Keep this in mind any time someone tells you that something is impossible to crack. You should use 3DES at a minimum for your data encryption.
-
AES-128, AES-192, and AES-256 Advanced Encryption Standard is an encryption method developed by the National Institute of Standard and Technology (NIST). The three key sizes ”128, 192, and 256 ”provide the following key possibilities:
3.4 — 10 38 possible 128-bit keys
6.2 — 10 57 possible 192-bit keys
1.1 — 10 77 possible 256-bit keys
AES was developed to replace DES encryption and is not very easy to crack. To put this in perspective, according to the NIST website (http://www.nist.gov/public_affairs/releases/aesq&a.htm ), assuming that one could build a machine that could recover a DES key in a second (i.e., try 2 55 keys per second), then it would take that machine approximately 149 thousand-billion (149 trillion) years to crack a 128-bit AES key. To put that into perspective, the universe is believed to be less than 20 billion years old.
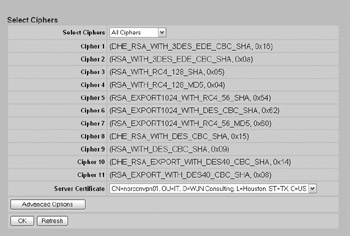
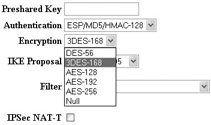
3DES and any of the AES encryption protocols should be adequate for most environments. A benefit that 3DES has is very widespread support through all vendors, whereas AES is relatively new and not as widely supported. You can specify the encryption method to use at numerous screens for your Cisco VPN 3005 concentrator. For example, if you were adding a LAN-to-LAN VPN connection, you would specify the encryption from the Encryption drop-down list at the Configuration System Tunneling Protocols IPSec LAN-to-LAN Add screen, as shown at right.
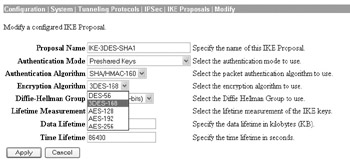
You can specify the encryption method for your IKE proposals at the Configuration System Tunneling Protocols IPSec IKE Proposals Modify screen, as shown here:
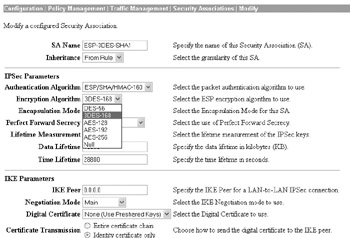
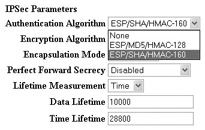
You can specify the encryption method for your security associations at the Configuration Policy Management Traffic Management Security Associations Modify screen, as shown here:
Message Integrity
Hashing algorithms are used to provide message integrity of the transmitted data. This works by the source system generating a fixed-length message digest that is a condensed representation of the message or data file. This message digest is transmitted with the data to the destination host, which runs the same hashing algorithm on the data to generate its own message digest. The source and destination message digests are then compared, and any deviation means that the data has been altered since the original message digest was created. Most vendors support two primary message digest algorithms: Message Digest 5 (MD5) and Secure Hash Algorithm 1 (SHA-1). Both use hash-keyed message authentication code (HMAC) as their keyed hashing mechanism. HMAC is defined in RFC 2104.
MD5 was developed by Ronald Rivest of MIT and RSA Data Security Corporation. It creates a 128-bit message digest of the data by using a 128-bit secret key. SHA-1 was developed by the NIST and produces a 160-bit message digest using a 160-bit secret key. Because SHA-1 uses a larger secret key, it is considered more secure than MD5. However, this comes at the expense of performance. You should use SHA-1 unless you have a performance issue that precludes its use.
You can configure the message integrity method for your LAN-to-LAN VPN connection at the Configuration System Tunneling Protocols IPSec LAN-to-LAN Add screen by selecting the Authentication drop-down list, as shown here:
You can configure the message integrity method for your IKE proposals at the Configuration System Tunneling Protocols IPSec IKE Proposals Modify screen by selecting the Authentication Algorithm drop-down list, as shown here:
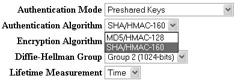
You can configure the message integrity method for your security associations at the Configuration Policy Management Traffic Management Security Associations Modify screen by selecting the Authentication Algorithm drop-down list, as shown here:
The Nortel Contivity takes a much simpler approach to configuring your encryption protocols and message integrity by using a single global-configuration setting for both. Nortel combines the encryption protocol and message integrity method into a single configuration setting (for example, by specifying 3DES and SHA-1 in a single encryption setting). You can define the supported encryption protocols and message integrity to use at the Services IPSec IPSec Settings screen, as shown next.
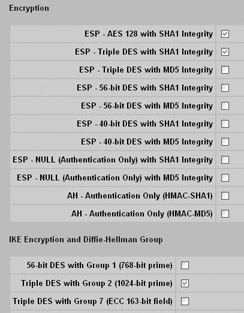
You can configure your IKE proposals at the same screen by scrolling down to the IKE Encryption and Diffie-Hellman Group section, as shown here:

Authentication
IKE provides for the authentication of peers during IKE phase 1 by using one of three possible key types:
-
Preshared keys
-
RSA digital signatures
-
RSA encrypted nonces (This key type is rarely used and will not be covered in this book.)
The use of pre-shared keys is the most common method of authenticating users. This is due to the fact that it is a relatively simple and straightforward process, even though it is not as secure as the other methods. Pre-shared keys use an authentication mechanism based on both nodes sharing a common key value (the pre-shared key). This key value must be manually entered and, for all intents and purposes, should be treated in the same manner you would treat a password. Because both nodes must be configured with the same key, the same administrator should configure both systems. Alternatively, if the key must be provided to another user to implement, it should be delivered using a secure out-of- band method. For example, you should send the key via certified mail to the remote administrator as opposed to sending it via clear-text e-mail. Once both peers have been configured with a common key value, they use this key to generate authentication hashes that are transmitted to authenticate that both peers are who they claim to be.
Using pre-shared keys does have some drawbacks. As previously mentioned, preshared keys are more insecure than digital signatures or nonces. The use of pre-shared keys also does not scale to large environments because the key updates and changes must be manually performed on all equipment. Another drawback is the fact that because pre-shared keys are human generated, they tend to use a much smaller set of bits for the key generation, as compared to a computer-generated method, which might use in excess of 100 bits for the key-generation process. In addition, because the more people who know a secret, the less secret something is, it can be very difficult to update all your systems if one of the trusted users who knows your key values leaves . Finally, Microsoft stores pre-shared keys in an unencrypted format in the Registry, which is a horrible method of key storage quite frankly.
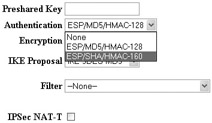
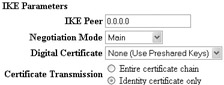
You can specify to use a pre-shared key for your LAN-to-LAN VPN connections on your Cisco VPN 3005 at the Configuration System Tunneling Protocols IPSec LAN-to-LAN Add screen by selecting None (Use Preshared Key) in the Digital Certificate drop-down list and then entering the key value in the Preshared Key box, as shown next.
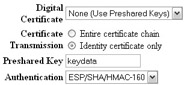
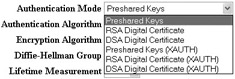
You can specify to use a pre-shared key with your IKE proposals at the Configuration System Tunneling Protocols IPSec IKE Proposals Modify screen by selecting Preshared Keys in the Authentication Mode drop-down box, as shown here:
You can specify to use a pre-shared key with your security associations at the Configuration Policy Management Traffic Management Security Associations Modify screen by selecting None (Use Preshared Keys) in the Digital Certificates drop-down box, as shown here:
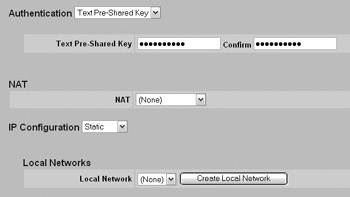
For your Nortel Contivity, you can specify to use pre-shared keys for your branch office profile configuration. You can specify the pre-shared key at the Profiles Branch Office Connection Configuration screen in the Authentication section by selecting Text or Hex Pre-Shared Key from the drop-down box and entering the key value, as shown here:
RSA digital signatures are more complex to initially set up and configure because they require the use of a certificate authority to provide digital certificates for hosts that register with that CA. They are much more secure than pre-shared keys, however, because they use a greater number of bits to generate the hash that is used, and they generally remove the human element from the validation, configuration, and distribution of the signatures by using certificate authorities to validate and distribute certificates.
A certificate authority (CA) is a server or host that has been authorized to issue and manage security credentials and public keys for encryption. Certificate authorities can be either external (for example, VeriSign) or internal (for example, Microsoft Certificate Services). The only requirement to use a certificate authority is for all the hosts to trust the certificate authority. For external certificate authorities, the list of trusted certificate authorities is generally handled by the OS vendor and is installed and updated periodically through Windows Update or similar functions. For internal certificate authorities, you will need to manually configure your hosts to recognize the CAs. For more information on how to configure a host operating system to recognize certificate authorities, see the counterpart publications in this series, Hardening Windows Systems by Roberta Bragg and Hardening Linux by John Terpstra.
Obtaining a certificate is a relatively straightforward process. First, you need to ensure that your VPN device trusts the certificate authority from which you want to obtain a certificate. Next, you will need to generate a certificate request, typically making a manual certificate request using the Public Key Cryptography Standards (PKCS) 10 message format. This typically generates output that looks like the following:
-----BEGIN NEW CERTIFICATE REQUEST--------- MIIBKTCB1AIBADB0MSYwJAYDVQQDEx1pZGxlLXZwbjMwMDUtMDEuNGlkbGV0aW1l LmNvbTELMAkGA1UECxMCSVQxETAPBgNVBAoTCElkbGVUaW1lMRAwDgYDVQQHEwdI b3VzdG9uMQswCQYDVQQIEwJUWDELMAkGA1UEBhMCVVMwWTANBgkqhkiG9w0BAQEF AANIADBFAkBRnk0aLy6Nl681wsSvCnPd63u/N30PYZ6jxNexWIwqUoFwzfBnF3V+ 8Jsl63SEmjfuMUdfLiG+NkHCHcw8KPPpAgEFMA0GCSqGSIb3DQEBBAUAA0EAQRxG R/Oirun8nKrv/gS0wgNqLCje7frfR7RsBp7pW5gGA59b8+OBgmikdGZOqClxMg7c xPShKUGAqJbnoelvYw== -----END NEW CERTIFICATE REQUEST-------
You can either copy and paste this information into your certificate request form or save the output into a text file and upload the text file for your certificate request. The next step is actually to request the certificate using the certificate request information you previously generated. The exact method of doing this depends on whether you are using an external certificate authority such as VeriSign or are using an internal certificate server such as Microsoft Certificate Services. Typically, however, your certificate authority will request that you either upload or paste the certificate request into an online form of some sort . Once your certificate request has been acted upon, you will be provided with a certificate file. The last step is then to install the certificate on your device. This can typically be done by either copying and pasting the certificate data or uploading the certificate to your device. A certificate will typically looks like this:
-----BEGIN CERTIFICATE---- MIIGRTCCBe+gAwIBAgIKIxBNWgAAAAAAETANBgkqhkiG9w0BAQUFADCBwTEoMCYG CSqGSIb3DQEJARYZd25vb25hbkB3am5jb25zdWx0aW5nLmNvbTELMAkGA1UEBhMC VVMxCzAJBgNVBAgTAlRYMRYwFAYDVQQHEw1NaXNzb3VyaSBDaXR5MR0wGwYDVQQK ExRXSk4gQ29uc3VsdGluZywgTExDLjEfMB0GA1UECxMWSW5mb3JtYXRpb24gVGVj aG5vbG9neTEjMCEGA1UEAxMaZnVyeW9uZHkud2puY29uc3VsdGluZy5jb20wHhcN MDMxMjIxMjAzNTE2WhcNMDQxMjIwMjAzNTE2WjA8MR8wHQYJKoZIhvcNAQkBFhBw cm9zcGVyb0Bub2wubmV0MRkwFwYDVQQDExBXZXNsZXkgSi4gTm9vbmFuMFkwDQYJ KoZIhvcNAQEBBQADSAAwRQJAUZ5NGi8ujZevNcLErwpz3et7vzd9D2Geo8TXsViM KlKBcM3wZxd1fvCbJet0hJo37jFHXy4hvjZBwh3MPCjz6QIBBaOCBE4wggRKMB0G A1UdDgQWBBTVb+a9lue8520gKltcQ+SAPuZZYTCB/QYDVR0jBIH1MIHygBSphpyM Pg8DhZn3jD1k/0mlfmqiUaGBx6SBxDCBwTEoMCYGCSqGSIb3DQEJARYZd25vb25h bkB3am5jb25zdWx0aW5nLmNvbTELMAkGA1UEBhMCVVMxCzAJBgNVBAgTAlRYMRYw FAYDVQQHEw1NaXNzb3VyaSBDaXR5MR0wGwYDVQQKExRXSk4gQ29uc3VsdGluZywg TExDLjEfMB0GA1UECxMWSW5mb3JtYXRpb24gVGVjaG5vbG9neTEjMCEGA1UEAxMa ZnVyeW9uZHkud2puY29uc3VsdGluZy5jb22CEF+e6bUtBwGvRERM2h8jpSUwggE0 BgNVHR8EggErMIIBJzCB0aCBzqCBy4aByGxkYXA6Ly8vQ049ZnVyeW9uZHkud2pu Y29uc3VsdGluZy5jb20sQ049ZnVyeW9uZHksQ049Q0RQLENOPVB1YmxpYyUyMEtl eSUyMFNlcnZpY2VzLENOPVNlcnZpY2VzLENOPUNvbmZpZ3VyYXRpb24sREM9d2pu Y29uc3VsdGluZyxEQz1jb20/Y2VydGlmaWNhdGVSZXZvY2F0aW9uTGlzdD9iYXNl P29iamVjdGNsYXNzPWNSTERpc3RyaWJ1dGlvblBvaW50MFGgT6BNhktodHRwOi8v ZnVyeW9uZHkud2puY29uc3VsdGluZy5jb20vQ2VydEVucm9sbC9mdXJ5b25keS53 am5jb25zdWx0aW5nLmNvbS5jcmwwggFIBggrBgEFBQcBAQSCATowggE2MIG/Bggr BgEFBQcwAoaBsmxkYXA6Ly8vQ049ZnVyeW9uZHkud2puY29uc3VsdGluZy5jb20s Q049QUlBLENOPVB1YmxpYyUyMEtleSUyMFNlcnZpY2VzLENOPVNlcnZpY2VzLENO PUNvbmZpZ3VyYXRpb24sREM9d2puY29uc3VsdGluZyxEQz1jb20/Y0FDZXJ0aWZp Y2F0ZT9iYXNlP29iamVjdGNsYXNzPWNlcnRpZmljYXRpb25BdXRob3JpdHkwcgYI KwYBBQUHMAKGZmh0dHA6Ly9mdXJ5b25keS53am5jb25zdWx0aW5nLmNvbS9DZXJ0 RW5yb2xsL2Z1cnlvbmR5LndqbmNvbnN1bHRpbmcuY29tX2Z1cnlvbmR5LndqbmNv bnN1bHRpbmcuY29tLmNydDAMBgNVHRMBAf8EAjAAMAsGA1UdDwQEAwIFoDApBgNV HSUEIjAgBgorBgEEAYI3CgMEBggrBgEFBQcDBAYIKwYBBQUHAwIwFwYJKwYBBAGC NxQCBAoeCABVAHMAZQByMEYGA1UdEQQ/MD2gKQYKKwYBBAGCNxQCA6AbDBl3bm9v bmFuQHdqbmNvbnN1bHRpbmcuY29tgRBwcm9zcGVyb0Bub2wubmV0MA0GCSqGSIb3 DQEBBQUAA0EAHgrIiOJiDNjhBudDXWJ5McTq/3ZT9zpPfb2abzsVldtpxVRvvVvA dVVl8EptaAu7d5BAKf5RZDbH9TYEZ7a02Q== -----END CERTIFICATE-----
Once this initial effort of configuring an internal certificate authority or using an external certificate authority, updating your systems to trust the chosen certificate authority, and obtaining a certificate has been made, however, peers using RSA digital certificates can authenticate with one another without user intervention. This allows digital certificates to scale much better in large environments due to the reduced user intervention. Because the infrastructure has been previously implemented, you simply generate a new certificate for the system in question and configure the system to use the certificate.
Configuring your devices to use a digital certificate is generally no different from configuring them to use a pre-shared key. Simply select the certificate from the dropdown list that you want to use instead of selecting None (Use Preshared Key) for your Cisco VPN 3005.
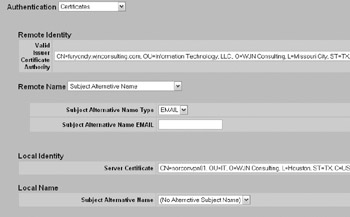
For your Nortel Contivity, you would simply select Certificates for the branch office authentication method and specify the appropriate identity information, as shown here:
Hardening VPN Clients
One area that is often overlooked in hardening VPNs is the need to harden the client that is accessing your network. A client accessing your network over a VPN is for all intents and purposes on your network. That means that any security problems that client may have just become a security problem on your network.
One simple thing you can do to harden the VPN client is to ensure that all VPN clients are running virus protection per corporate standards. In addition, your remote clients should all run personal firewall software that prevents unauthorized access to these remote clients without the users granting explicit permission to connect. In some cases, you will need to use third-party personal firewall software such as ZoneAlarm to protect the client. However, many vendors are building basic stateful firewall functionality into the VPN client software itself that you can enable.
In addition, many VPN vendors are building enforcement technologies into their VPN client software, or as add-ons to the VPN client software. These technologies will detect whether the client is running the required software (for example, a certain version and signature file for virus protection) and will update the client if it is out of compliance before allowing it to connect to your production network. For example, Nortel has an add-on for their VPN client software called TunnelGuard that can be used to ensure that the client is running the required software. Otherwise, the tunnel is placed in a restricted mode that prevents all traffic other than the TunnelGuard traffic from passing.
Another method of hardening your VPN clients is to restrict the kinds of access the clients will have to other networks while connected to the corporate network. For example, can the clients access the Internet or the local network at the same time they are connected to the corporate network? This is commonly known as split tunneling . Although this is certainly convenient for the user, it introduces a security hole in that a client could potentially be used to provide access to your network to other systems by functioning as a router. As a result, you should disable local LAN access while the VPN is connected to your corporate network and require that the VPN client use the VPN and, by extension, your Internet gateway for Internet access.
Some VPN devices support specifying a client policy that can be used to control the types of applications a system connected to the VPN concentrator can run. For your Nortel Contivity, this is known as the Client Policy feature. Client Policy acts in a fashion similar to a personal firewall by shutting down a VPN tunnel if a nonpermitted application is launched. It does this by monitoring the protocols and ports that are active while the tunnel is running.
Finally, your VPN client operating system should be hardened according to your security policy ”for example, removing or disabling unnecessary services (Internet Information Services and the Microsoft Server service are two I can think of that should probably be disabled). For more information on hardening Windows and Linux-based clients, see Hardening Windows Systems by Roberta Bragg and Hardening Linux by John Terpstra.
EAN: N/A
Pages: 125