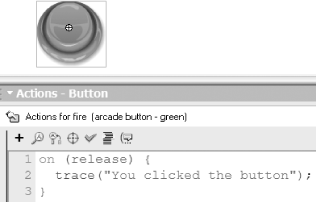
10.7 Flash 5's on( ) and onClipEvent( ) Handlers Earlier in this chapter, we discussed how to assign callback functions to the event handler properties MovieClip.onEnterFrame( ) and TextField.onSetFocus( ). In Flash 5, these kinds of event handler properties were available on XML and XMLSocket only. Movie clips and buttons used idiosyncratic event handler syntax attached directly to physical clips or buttons in the Flash authoring tool. Button event handlers were defined using on(eventName), and movie clip event handlers were defined using onClipEvent(eventName), where eventName specified the event to be handled. As of Flash MX, use of these older forms is generally discouraged. Event handler properties and event listeners are preferred because they promote the separation of code from the visual elements of a movie. However, the older syntax is still supported, and there are a few special cases where it is actually required (for examples, see MovieClip.onLoad( ) and Button keyPress in the Language Reference). Flash 5-style button on( ) event handlers take the form: on (eventName) { statements } The eventName is the name of the corresponding Flash MX event handler property, without the word "on" and with the first letter lowercase. For example, the onRelease( ) property in Flash MX was implemented as follows in Flash 5: on (release) { statements } When exporting to Flash 5 format, you must use the Flash 5-style event syntax. A single button handler can respond to multiple events, separated by commas. For example: on (rollOver, rollOut) { // Invoke a custom function in response to both the rollOver and rollOut events playRandomSound( ); } To upgrade such code to Flash MX's preferred syntax, using the same callback handler to respond to both events, you'd use: theButton.onRollOver = playRandomSound; theButton.onRollOut = playRandomSound; or, even more tersely: theButton.onRollOver = theButton.onRollOut = playRandomSound; Flash 5-style movie clip onClipEvent( ) handlers take the form: onClipEvent (eventName) { statements } Again, the eventName is the name of the corresponding Flash MX event handler property, with the word "on" removed. For example, the Flash MX MovieClip.onEnterFrame( ) event handler was implemented as follows in Flash 5: onClipEvent (enterFrame) { statements } Unlike button handlers, clip handlers can respond to a single event only.  | Events introduced after Flash 5 are not available in on( ) or onClipEvent( ) form. For example, there is no such thing as onClipEvent(setFocus), because the onSetFocus( ) event was introduced in Flash MX and first supported by Flash Player 6. | | As of Flash MX, movie clip instances can take both onClipEvent( ) and button-style on( ) event handlers. For details, see Section 13.9 in Chapter 13. 10.7.1 Attaching Event Handlers to Buttons and Movie Clips To attach a Flash 5-style on( ) or onClipEvent( ) event handler to a button or a movie clip, we must physically place the code of the handler onto the desired button or clip. We can do so in the Flash authoring tool only, by selecting the object on stage and entering the appropriate code in the Actions panel, as shown in Figure 10-1.  Let's try making two simple event handler functions, one for a button and another for a movie clip. To create a button event handler, follow these instructions: -
Create a new, blank Flash movie. -
Create a button and drag an instance of it onto the main Stage. -
With the button selected, type the following code in the Actions panel: on (release) { trace("You clicked the button"); } -
Select Control  Test Movie. Test Movie. -
Click the button. The message, "You clicked the button", appears in the Output window. When the movie plays and we click and release the mouse over the button, the release event is detected by the interpreter, which executes the on(release) event handler. Each time we press and release the mouse, the message, "You clicked the button", appears in the Output window. Now let's try making a slightly more interesting event handler on a movie clip. -
Create a new, blank Flash movie. -
On the main movie Stage, draw a rectangle. -
Select Insert  Convert to Symbol. Convert to Symbol. -
In the Convert to Symbol dialog box, name the new symbol rectangle, and select Movie Clip as the Behavior. -
Click OK to finish creating the rectangle movie clip. -
Select the rectangle clip on stage, and then type the following in the Actions panel: onClipEvent (keyDown) { this._visible = false; } onClipEvent (keyUp) { this._visible = true; } -
Select Control  Test Movie. Test Movie. -
Click the movie to make sure it has keyboard focus, then press and hold any key. Each time you depress a key, the rectangle movie clip disappears. Each time you release the depressed key, rectangle reappears. Unlike Flash 6's event handler properties and event listeners, Flash 5's on( ) and onClipEvent( ) handlers cannot be attached and removed via ActionScript while the movie is playing. Therefore, in Flash 5 the following event handler property assignment is illegal: theClip.onKeyDown = function ( ) { _visible = 0; }; We'll see how to work around this shortcoming later in this chapter under Section 10.15. |