Using XACT
XACT used to be a tool just for Xbox 360 developers and you could not get it easily. You would have to be a certified Xbox 360 developer and have access to the XDK (Xbox Development Kit). Not an easy thing even if you are a professional game developer and have worked many years in the industry, if you ask me.
But all that has changed. Microsoft decided to include XACT in the DirectX SDK a year ago and though not many have used it for PC-only games, XACT becomes important now for XNA game development. It is the only way to get any sound files for XNA on the Xbox 360. You don’t have to install the DirectX SDK to get access to the XACT tool; it is also included in the XNA Game Studio Express Installation. You can find it under Start All Programs
Microsoft XNA Game Studio Express
![]() Tools
Tools XACT Auditioning Utility. If you use another version of XACT please make sure that it is supported by XNA; for example, the August 2006 DirectX SDK has XACT 2.0 too, but it saves content files in version 40. The October 2006 DirectX SDK and the XNA Framework use version 41 content files, which are not compatible with previous versions. If you load older XACT sound projects you might get very strange errors like files are missing or just get an InvalidOperationException. Future versions might also behave differently. To make sure your XACT project is supported, check the content version in the .xap file (which is just a simple text file; you can open it with any text editor you want).
The .xap file is structured in a simple way and looks similar to xml files. The version numbers are a little bit confusing, but you just have to check for version 13 (which is content version 41 of the XACT tool and can be checked in its About dialog box; see Figure 9-4). Older versions like 11 or 12 (of older DirectX SDKs) are not supported. This issue can also happen to you if you open up an early XNA project from the XNA beta times (August till October 2006), which still used the old XACT tool.
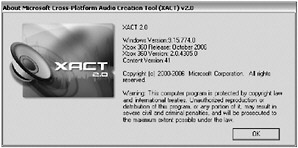
Figure 9-4
Signature = XACT2; Version = 13; Options { } Global Settings { [...] If you just want to make a simple change to some sound volume of a sound file inside your XACT project inside Visual Studio, you can just open the .xap file in the text editor of Visual Studio and edit the value yourself instead of minimizing Visual Studio, searching for the .xap file, opening it, searching for the correct location where the volume is stored, and then changing the value with the XACT tool.
The best thing that can happen to you as a game developer for sounds is when you have someone that does the sound effects and music for you. Try to explain the XACT tool to this person and you won’t have to worry much about sound, volumes, and formats anymore. That’s business for the sound guy. Unfortunately, most small teams don’t have a dedicated person for sound and if you program on your own, make your own graphics and other game content files, you will also have to make your own sound effects. Try to use existing sound effects or freely available sounds at first and exchange them later. For music it often makes sense to choose similar music, maybe even music from your MP3 library, just for testing and presenting your game. For the final version you will need your own music, of course; you can’t just use someone else’s music and put it in your game. Some music files are free to use, but most music you hear every day is not free to use. Getting sound effect files is a little bit easier. For some simple sound effects you are also allowed to use the sound effect files of the example games from this book. I also suggest that you search for free sound effect sites on the Internet if you don’t have any of your own sound effect files or know anyone that can help you out.
To make things a little bit more interesting here you are going to create the sound project for the game at the end of Part III in this book: XNA Shooter, which is a simple shoot-’em-up style game with cool 3D graphics, sound effects, and keyboard, mouse, and Xbox 360 controller support (which is discussed in detail in the next chapter).
Creating Projects
After you open the XACT tool you will see a new empty project (see Figure 9-5). It does not contain any sound files, wave or sound banks yet, but certain variables and settings are already created for you in each new project:
-
The project tree, which always contains the same root elements. You cannot change it.
-
Two default categories: Default and Music, which you can use to mark your sound files as sound effects or music files to make your sound files behave differently.
-
One global variable, SpeedOfSound, which is always 343.5 and 4 cue instance variables for the Distance, Doppler Shift, Number of Cue Instances, and Orientation Angle. All these variables are only important for 3D sounds, which are sadly not possible in XNA yet. More about this issue will be discussed when you write the code to play back sound effects.
-
A global effect path preset with nothing in it.
-
All the other root elements are empty. You have to create the child elements for each of them yourself by either clicking on the toolbar or just right-clicking on the element and selecting New. For example, “New Wave Bank” creates a new wave bank.
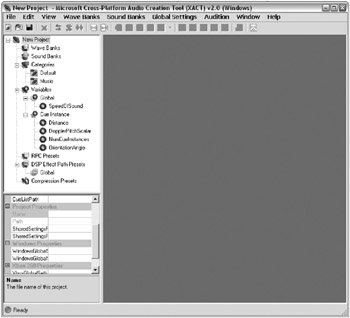
Figure 9-5
To get any wav files into your new XACT project you have to create a wave bank first, which stores all the wav files into a wave bank, and is then loaded and used by your game. This is more work than just loading wav files yourself, but the idea behind XACT is to give the sound artist more flexibility in setting all kinds of sound parameters himself instead of nagging the programmer every time he wants to tweak some sound effect. This will not help you much when you have to do the XACT work and the programming yourself anyway, but XACT gives your project at least a little bit of organization for your sound files and you always know where you can change any sound parameters without having to go into your game code. The disadvantage of using XACT is that you can no longer dynamically load sound files; all content files (like compiled models) have to be created and loaded when you start your game, and nothing can be added while the game is running. This inflexibility was very annoying to me at first because I always add stuff dynamically while writing and debugging my unit tests, but once I got used to it, it was fine. I now create all sound files and the XACT project early in the project and use only existing sounds in the unit tests. Later the sound project is changed from time to time.
Creating Your Wave Bank
To create a wave bank for your project you can either right-click Wave Banks and select “New Wave Bank,” use the menu, or you can use the toolbar icon for creating a wave bank (eighth entry, the orange-white rectangle with the wave effect; see Figure 9-5). The wave bank is just the storage for all the sound files you want to use. You can even have different wave banks; for example, if you have multiple levels in your game and you only want to load the wave files for the current level, you could separate the wave files and optimize your game this way. All projects of this book and all other projects I ever made only contain one wave bank, and other than separating the music files and sound files to support streaming the music files, I really don’t think it is important to have multiple wave banks, and you will probably never need them either.
After you have created your wave bank you can drag and drop wav files into it or alternatively use the “Insert Wave Files” entry from the context menu. Figure 9-6 shows all the sound files you are going to use for the XNA Shooter game imported into your newly created XACT project.
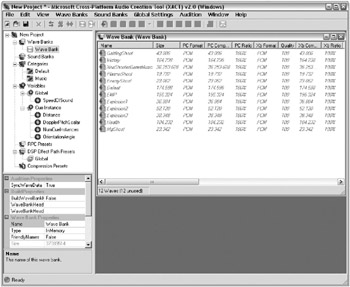
Figure 9-6
As you can see all sound files are still unused, which is indicated by the italic red font. As soon as you add these wave files to a sound bank, they become green. But before you do that you should make sure all of the files have the correct settings. By default no compression is chosen and most of the sound files are pretty small; except for the music file, all sound effects are below 1 MB data. The music file, which takes a whopping 36 MB of disk space, is 3 1/2 minutes long and in the format discussed previously (16-bit 44KHz Stereo PCM).
If you want to compress the music sound file, click it and select your desired compression preset in the wave properties panel. It currently shows <none>, but if you click the drop-down list, it has no other options for you. You have to create a compression preset first and then you can use it for any wave file you want (or just assign it to the whole wave bank). XACT works similarly with other presets too. For example, if you want to create a custom variable for a sound effect, you have to create it first in the variables section and then you can select and use it in the sound bank.
Compressing Music Data
To create a new compression preset click Compression Presets and select “New Compression Preset” (see Figure 9-7). Now enter a name for your compression; in this case you just want to create a music compression schema. The notes field is just for you and is never used anywhere outside the XACT tool. Lots of other panels also have note fields and optional parameters you will not need. You will probably find XACT very confusing when using it for the first time. I didn’t like it at first either, but after a while you get used to it and you have to remember that this is the only way to get any sound files onto the Xbox 360 with XNA. If you create a Windows-only game, you can still use DirectSound or other sound engines, which might be simpler to use or have other advantages. Finally, set Windows compression (only ADPCM is available) with 128 samples per block (the default). Higher values will make the file smaller, but you can lose a little quality. Thirty-two samples per block is the highest ADPCM quality, but the file is about 30% bigger.
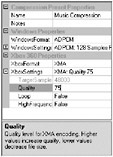
Figure 9-7
For the Xbox 360 you can only select XMA, but the compression is much better here. You might wonder why there are so many options when you can only choose one compression anyway. Well, that’s XACT and we all can just hope that we get more compression formats in the future. XMA is fine for the Xbox 360; sometimes it produces file sizes that are a little too big, but it sounds good and works great. But ADPCM for the Windows platform is just unusable. It sounds worse than MP3 files and it is 4–5 times bigger. WMA or MP3 support would be great here.
Unfortunately, XACT does not show the resulting file size for XMA right away. You have to compile the project first, and then it shows you how compressed each wave is in the XMA format for the Xbox 360. To compile the project you can click the last toolbar button or just press F7. By default the project will compile to the Windows platform and you will still not see the XMA compression results. To finally get there you have to switch to the Xbox 360 output in the View menu, then compile the XACT project, and your wave bank will show the file sizes for the Xbox 360 too (the PC Compression rates are always shown and they are always in the same ratio; 27% for the default ADPCM setting).
The following table shows the compression ratios for the XnaShooterGameMusic.wav file (36 MB uncompressed).
| Compression | File Size | Compression Rate |
|---|---|---|
| Uncompressed | 36 MB | 100% |
| MP3 with 192kbit | 4.8 MB | 13% |
| MP3 with 128kbit | 3.1 MB | 8.5% |
| AccPlus with 48kbit, similar to MP3 192kbit | 1.2 MB | 3% |
| AccPlus with 24kbit, similar to MP3 96kbit | 0.6 MB | 1.6% |
| OGG with 160kbit | 3.8 MB | 11% |
| XACT ADPCM 32 samples per block | 12.5 MB | 34% |
| XACT ADPCM 128 samples per block (default) | 9.9 MB | 27% |
| XACT ADPCM 512 samples per block | 9.3 MB | 26% |
| XACT XMA 100% Quality | 14.3 MB | 40% |
| XACT XMA 90% Quality | 8.9 MB | 25% |
| XACT XMA 75% Quality | 5.5 MB | 15% |
| XACT XMA 60% Quality (default) | 4.7 MB | 13% |
| XACT XMA 30% Quality | 3.5 MB | 10% |
| XACT XMA 10% Quality | 2.9 MB | 8% |
The lower-quality XMA files look very similar to the MP3 in size, but the quality is much worse. I would not recommend using any XMA file with very low compression settings. Use 50% or higher; the file size is still very similar with 60% (the default setting) and 75% is one of my favorite settings because for very good quality settings the file stays very small (below 15%, similar to MP3 with 192kbit, and also sounds similar). If you just have a game without music or with just one track this all will not matter to you, but if you have 10+ music tracks in your game you want to think twice about the compression settings and explore all possibilities.
After setting the new compression for the music file you should now get file sizes of around 5–6 MB for the Xbox directory and 10 MB for the Win directory (see Figure 9-8). For the Rocket Commander XNA project these file sizes are almost twice as much because you use two music files there. In later games of this book more music is used and the file sizes go up even more.
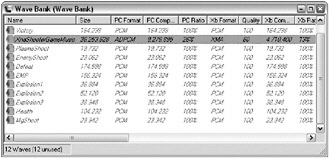
Figure 9-8
Sound Banks
Although you can compile the project and even load it in your XNA game, you can’t use any sound yet because the XACT project just contains wave files right now. But for playback you need sound cues, which have to be created in a sound bank first. Again you have the opportunity to create multiple sound banks here, but you probably will never need to do that.
The simplest way to get all the wav files working is to drag them over to your sound bank. But wait, where is the sound bank? You don’t have one yet. Similarly to the wave bank you have to create it first. You can do this by clicking the Sound Banks entry or clicking the second orange icon in the toolbar (the one with the orange wave going over the orange-white box on the right side). The new sound bank is just named “Sound Bank”; if you just have one wave bank and one sound bank, just leave the default names. If you have multiple wave or sound banks you should name them properly so you can find them more easily.
To drag all wave files from the wave bank over to your sound bank you should position the windows in a way that allows you to see both of them completely. The sound bank window consists of two parts: the sound names on the top and the cue names on the bottom. Select all files from the wave bank and drag them over to the sound names section of the sound bank now (see Figure 9-9). Each sound here can get additional settings like changing the volume, frequency (pitch), or applying other variations or effects. You can add the same wave file multiple times and give it different sound names. For more complex games you can even mix several wave files in multiple tracks and blend them on top of each other, then for playback this “mix” is used instead of a wave file. To add more than one track to a sound name just drag another file on top of it and XACT will automatically create a second track for it. However, you will not use this feature in this chapter.
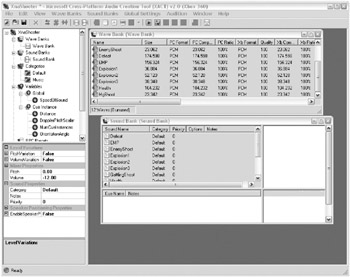
Figure 9-9
While you are editing the sounds in the sound bank you should make sure that the music (XnaShooterGameMusic) uses the category Music instead of Default (you can edit that in the sound properties panel on the left side). I usually also tell the music category to play sounds softer than the default sounds because I want the music to be more in the background. In your game you can use the music category to control the volume of the music if you like. Additionally, you probably want to make sure only one music file is played at a time (maybe you call a StartMusic method several times or you just have multiple music files and you don’t want to stop and restart them yourself).
For optimal music playback you should put all music files you want to play at a certain part of your game randomly into one sound bank entry (for example, MenuMusic and GameMusic; see Rocket Commander XNA as an example). Then click “Play Wave” on the right side of the sound bank window when the music sound entry is selected. Here you can force to loop this sound; some sounds are already looped, but for music it is always best to force it to make sure all music files work fine.
Finally you have to make sure only one music file is played at a time, and if another music file is selected a nice fade-over effect would also be nice. Luckily, XACT provides all that for you. You could now set instance limiting and fade in/out durations for each single music file or you could be cleverer and just set it once for the Music category (see Figure 9-10). By default LimitInstances is set to false; once you set it to true the properties below it become active. If you try to play another music item now after one music item is already started, an exception is thrown because BehaviorAtMax is set to FailToPlay. Change it to Replace for the correct behavior for music playback. For the rest of the settings see Figure 9-10.
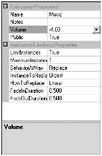
Figure 9-10
Cue Variables
If you want to you can compile the project again now, but in your XNA code you still have no access to any sound effects. XNA allows you to access only sound cues, which have to be created first. This step is quite easy - just select all sound names and drag them down to the cue section of the sound bank window. The names are automatically taken from the filenames, but you can rename any entry if you like. I usually rename the music files to make access in XNA a little easier.
Another cool feature you can use for your XNA Shooter game is to assign multiple sound effects to one single sound cue. You’ll use this feature for the explosion sound effect. You have three explosion wave files, but for simplicity you just want to tell XACT to play an explosion and it should randomly choose between one of the explosions for you. To do that remove the Explosion2 and Explosion3 sound cues from the cue list again by selecting them and pressing the Del key. Now rename the Explosion1 cue to just Explosion. Finally, drag both the Explosion2 sound name and the Explosion3 sound name onto the Explosion sound cue. You should now see what’s shown in Figure 9-11. Tip: To make editing a little easier, make the sound bank window bigger or maximize it. XACT sometimes messes with you and when scrollbars appear and disappear all the time you might drop entries to the wrong location or duplicate items unwillingly (happens to me all the time).
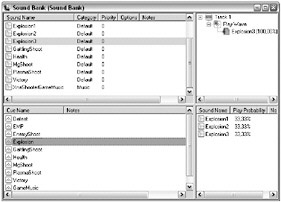
Figure 9-11
You might also notice that I renamed the game music sound cue to just GameMusic to make it easier to enter the name in your XNA code. Also make sure all the other sound cue names are named in an easy to remember way.
After compiling the project again you can use the XACT project in XNA now and access all the sound cues. Please note that you don’t have to compile the XACT project yourself all the time in XACT; XNA will automatically do that for you if you add the .xap project file to your XNA Game Studio project. Alternatively you can also just add the compiled files and load them yourself in XNA. It does not matter how you do it, but the .xap file in your XNA project is certainly the most comfortable solution. When using XACT, however, I recommend pressing F7 to compile the project a lot in a similar way you would test a newly written unit test all the time until it works fine.
Other Effects
XACT allows you to set other effects and sound parameters, which is especially useful for 3D sound effects, where you can set all kinds of parameters for your sound effects. Combined with a little custom programming you can do very powerful things like changing sound effects depending on the location they are played at, and automatically detecting halls from 3D geometry or open space. Your engine might also distort effects if they are played under water or after the player has been hit by a grenade. The possibilities are endless.
For this little game you won’t need any special effects, but as an example I will show you how to create a custom variable that allows you to change the frequency (pitch) of a sound effect during runtime. Changing it directly in XACT is easy, but you don’t have direct access to these settings in XNA. You have to expose a public cue variable first, and you must make sure the sound uses this custom variable.
This is not just for fun. For both the Rocket Commander XNA and the game in the last part of this book you need this effect to distort the motor sound of the rocket or the car you are currently driving with depending on the current speed.
To create your new cue instance variable click “Cue Instance” and select “New Cue Instance Variable” from the popup menu. You can type in anything you want here and use whatever values you like; they are not bound to anything yet. In this case you call the new variable Pitch and allow a range of –100 to +100; the rest of the properties can stay as they are (see Figure 9-12).
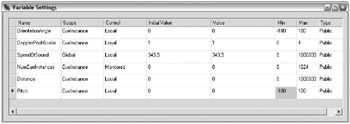
Figure 9-12
Next you have to make sure XACT does something useful with this variable. You can set it now and assign it to any sound effect, but it will do nothing but store the value yet. In this case you can use the existing parameters of the RPC Presets (Runtime Parameter Control), but the selections are very limited right now (you can only change the Volume, Pitch, and Reverb Send Level, whatever that is). Maybe more options will come in the future. For example, it is not possible to set the panning for Rocket Commander XNA, which was used in the Managed DirectX version to fake 3D sound effects. If XACT would support 3D sounds, this would not matter because you could easily do real 3D sound calculations, but sadly the 3D listener was dropped after the first XNA beta. It is possible to set 3D sound parameters in XACT and you could use them in native XACT projects, but XNA does not support it yet (not funny if you had implemented it before like I did and then everything stops working).
Anyway, for changing the pitch of a sound effect, you can easily use a new RPC Preset. Just click RPC Presets and add a new RPC Preset; call it RPC Pitch or just leave the default name. Select Sound::Pitch as the parameter and use the newly created Pitch variable. Now you can drag the left and right points in the graph below to let –12 equal –100 of your Pitch variable and +12 equal +100 (see Figure 9-13).
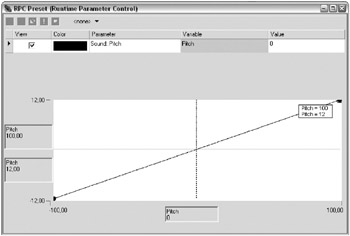
Figure 9-13
The final thing you have to do before this preset can be used is to assign all sounds to the preset that should be able to use this new variable. To do that just drag a sound file from the sound bank (don’t use a wave or cue, they won’t work) onto the PRC Preset.
The following code can be used to start a sound cue and change the pitch cue variable dynamically. If you just want to set a static pitch value don’t go through this trouble; just create a new cue in XACT and set different pitch values. But for motor sounds you have to change the pitch dynamically and therefore you have to go through all this trouble.
rocketCue = soundBank.GetCue("RocketMotor"); rocketCue.Play(); // Set the global volume for this category motorsCategory.SetVolume(MathHelper.Clamp(volume, 0, 1)); // Set pitch from -55 to +55 (little more than half the max values) rocketCue.SetVariable("Pitch", 55 * MathHelper.Clamp(pitch, -1, 1)); As you will see in a second the rest of the Sound class is even easier and you will probably spend most of the time in XACT and then code your Sound class in a matter of minutes.
In the preceding example you can also see a way to change the volume for a category. Changing the volume of a cue directly is not supported by default, but you could create a volume cue variable the same way you just created the pitch variable to set custom volume values to your sound cues.
EAN: 2147483647
Pages: 138