Adding Detail to Objects
For your next couple of games in this book you just want to use Normal Mapping shaders, which also greatly improve the realism of many 3D objects, especially if they have a lot of structure on the surface and many little details, riffs, tubes, cables, and so on that would normally cost many million of polygons to display all those details correctly (see Figure 7-1). You will often see Normal Mapping examples on Internet sites that compare totally ridiculous looking objects and bad textures with a super high resolution Normal Mapped object. I tried to use a real object from a real game here (it is used in the racer game later in this book) and you can see that the version without Normal Mapping looks ok too because the diffuse texture is already shaded a little bit. This way you can render without using the Normal Map and the object still looks ok. With Normal Mapping enabled the object looks even better and even though it only has 1000 polygons, it looks very smooth (see right side of Figure 7-1).
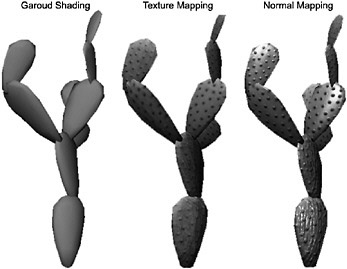
Figure 7-1
Even better effects can be achieved through Parallax Mapping (faking the height), Offset Mapping (multiple layers to fake the height even better), or Displacement Mapping (really moving vertices around, possible with Shader Model 4, but very expensive and slow computation). These techniques are a bit more complex and they also require a height map in addition to the diffuse and Normal Map textures. But just using Normal Mapping looks fine too.
The good thing about Normal Mapping is that it is not that hard to implement it if you have a shader-enabled graphics card. It even works with the very old GeForce 3 (Pixel Shader version 1.1), but can also be improved for Pixel Shader 2.0 support to enable better specular lighting effects on today’s hardware. With the knowledge from the previous chapter you already have the basic foundation for creating shaders and you know how the vertices are transformed and the pixel finally is displayed on the screen.
Normal Mapping uses an additional texture. The diffuse texture is used to display the basic material structure, color, and so on. The Normal Map then adds additional 3D detail by supplying an additional normal vector for every single pixel you are going to render in the Pixel Shader (see Figure 7-2).
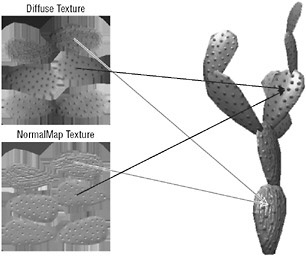
Figure 7-2
Please note that if you open up the KaktusSeg.dds and KaktusSegNormal.dds textures of the cactus 3D model, the Normal Map bitmap will look different. The Normal Map is compressed and has the alpha and red channels reversed. This trick is used to allow compressing the normal texture by a factor of 1:4 without losing much detail, and the result still looks great. More details about this technique in a second - just remember that internally the Normal Map texture looks like the texture in Figure 7-2; the compressed version just stores the data differently.
To compute the light for every pixel in the Pixel Shader of your Normal Mapping shader the Normal Map texture data is used. Every pixel in the Normal Map texture represents a normal vector for the surface of the polygon. This data is stored in tangent space, which is discussed in Figure 7-4 in a bit. To get a normal vector from the color data in the texture the formula (each r, g and b value-0.5)/0.5 is used (see Figure 7-3). The RGB data in the Normal Map viewed as floats lets you use this formula. To convert from RGB to floats just divide by the floating value 255. This is done automatically in your pixel shader. It is always easier to work with these floating-point values instead of the byte data stored in the bitmap file.
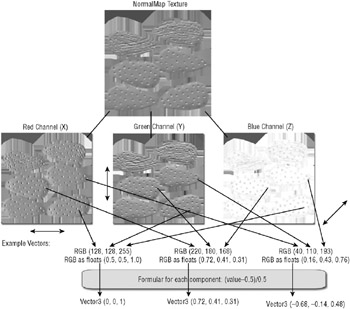
Figure 7-3
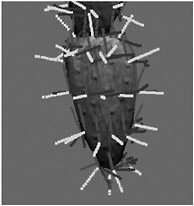
Figure 7-4
Most pixels in the Normal Map are light blue (RGB 128, 128, 255) and this means that most resulting vectors just point up like Vector3 (0, 0, 1). If the complete texture is just light blue it means every vectoris (0, 0, 1) and the Normal Map will have no effect because this is the behavior you got anyway with normal diffuse lighting calculations.
These Normal Mapping pixels are usually stored in the tangent space, which means that each normal is stored relative to the polygon surface. It is called tangent space because you can construct the tangent matrix with the help of the tangent and binormal vectors of each vertex point. If you don’t have a binormal it can easily be created with the help of the cross product of the normal and tangent vectors (see Figure 7-4). In the previous chapter you only had the position, normal, and texture coordinate for each point. This data is not sufficient for Normal Mapping; you need at least the tangent vector for each vertex to build this very important tangent matrix. Without it Normal Mapping will not look correct and you should not even bother to implement it if you don’t have these tangents.
You can think of the tangent and binormal vectors as being the vectors that point to the next vertex in the x and y direction, but they are still octagonal (in a 90 degree angle) to the normal vector. This means even if your 3D geometry does not have any tangent data, you can construct it yourself by going through all vertices (not easy, but possible).
Problems
The problem with that is that often vertices are used for more than one polygon and sometimes the texture coordinates do not merge well. For just diffuse mapping this does not matter because you only use the normal vectors for lighting calculations, but if you rely on the tangent space to transform your normals for each pixel, the data must fit. This means it is much better to have the tangent data generated in the 3D program, which was used to create the 3D geometry. It knows which tangents are used and the exported normals are much better for the Normal Mapping shader. Inside the vertex shader you only have access to the current vertex you are processing; you can’t just get the next vertex or build a new vector pointing to the next vertex. This means it is very important to pass valid tangent data to the vertex shader. If you just define the vertex input structure to support tangents in the shader, it does not mean the application is able to pass valid tangent data. By default if you have an .x or .fbx file in your content pipeline, it does not have any tangent data (see Figure 7-5).
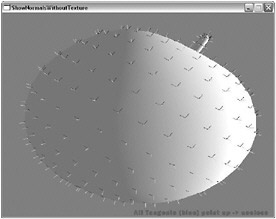
Figure 7-5
This means that you only have the valid normals, but the missing tangents will not allow you to construct the tangent space for the Normal Mapping. For simple objects like this apple it does not mater so much, but the more curves and texture coordinates you have in a model that do not fit together, the worse this problem gets. Figure 7-6 shows the tangent errors of the apple model; you can check it out by starting the demo application from the previous chapter.
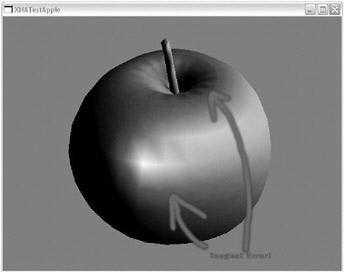
Figure 7-6
After having knowledge about all these issues you can get to the 3D models and shaders now.
Asteroids! Wrong Game or What?
It is hard to create good looking 3D objects like the ones you saw in Figure 7-1; your modeler usually will spend most of the time creating the high-poly version, which can have several million polygons. You will probably spend a lot of time fine-tuning shaders and optimize them to allow your engine to display many objects at the same time with high frame rates. To keeps things simple you will just use some cool looking asteroid objects, which have several million polygons in the high-poly versions, but they were not that hard to create and the low-poly version has just around 1000 polygons. These models will be used in the next chapter for the Rocket Commander XNA game.
To optimize the performance even further, more versions with 500, 200, and even 50 polygons were created of the same asteroids, which was not very hard because the same high-poly object could be used and even the Normal Maps from the higher polygon objects look ok with the low-poly versions. In performance tests the 200 polygon version was the most efficient. It renders almost as fast as the 50 polygon version, but it looks much nicer. The 500 polygon version did not look much better, but took longer to render, especially on low-end computers. Thus the final game ended up with just the 1000 polygon and 200 polygon versions of all asteroids (see Figure 7-7).
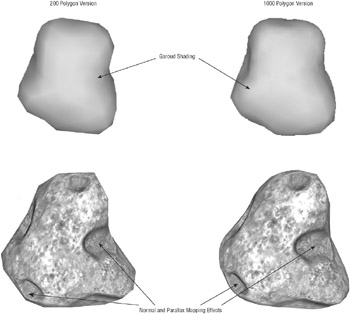
Figure 7-7
Figure 7-8 shows the three textures used for this asteroid. Because all asteroid models of Rocket Commander use a parallax mapping shader, you need a diffuse, normal, and height map for each object. As mentioned before the Normal Maps are compressed and this means they will look reddish instead of the default bluish look of Normal Maps. The compressed Normal Map is red because the red color channel is completely white and the alpha channel, which stores the original red channel, is not visible. For more details check out the ParallaxMapping.fx shader in the next chapter and open up the Normal Mapping textures.
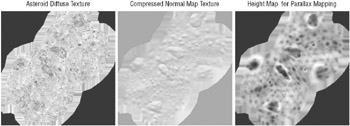
Figure 7-8
I wrote a little tool in 2005 named NormalMapCompressor (see Figure 7-9), which is available from my blog at http://abi.exdream.com. It can be used to convert Normal Maps to compressed Normal Maps and you will save 75% of the disk and texture space these textures use without losing much quality. That is really cool because if you think about texture sizes for a second, you can get into a lot of video memory problems just by using Normal Mapping or parallax mapping. In the past you had only a diffuse texture and small resolutions like 128×128, 256×256, and sometimes 512×512 were common.
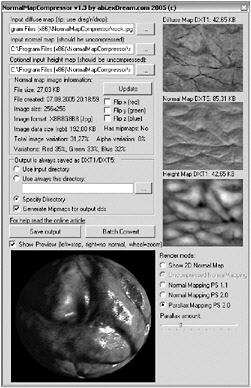
Figure 7-9
The 128×128 textures stored as uncompressed bitmaps with 32 bits per channel (RGBA) take 128*128*4 bytes = 64 KB. Compressed as a DXT1 dds file it is only 8 KB in size. As a jpg file it is only around 5–10 KB. For 256×256 these sizes are four times as big (256 KB uncompressed, 32 KB for DXT1, around 20 KB for Jpeg), and for 512×512 it is again four times bigger. Even here you only have 1 MB even if you use no compression at all.
But today texture sizes of 1024×1024, 2048×2048, and even 4096×4096 are more common. Even if you just take 1024×1024 textures, you already have 4 MB of texture space for the diffuse map if you don’t use compression. Because you also need the Normal Map and the height map now for cool shader effects, you have suddenly up to 12 MB just for one single texture. If your game uses a few hundred different textures, this is completely impractical. You just have to use compression and think about loading only the data you really need. This is why console games often reload level data and generally don’t use very high texture resolution; it just costs too much memory, especially on the Xbox 360 and older consoles.
Diffuse textures can be compressed quite easily with DXT1, which uses eight times less space than RGBA or six times less for RGB. If you still need alpha data for transparent objects, you can use DXT5, which still is four times smaller than uncompressed RGBA data. You might say “Why not use .jpg or .png files?” Well, you could save disk space by using .jpg files, but in video memory you would still need to uncompress the files and store them in video memory. The great thing about dds files is that the DXT format is compatible with today’s graphics hardware and saves video memory too.
For Normal Maps the major problem here is that the DXT compression algorithms were designed for color data; the green channel eats up most of the compression because green colors are more visible. The blue channel is not that important in Normal Maps because it is usually very bright anyway (see Figure 7-3), but the red channel will look like crap after the DXT1 compression. Especially in Pixel Shader 1.1 you can’t normalize the normals again, and the vector length will be completely wrong in many cases and the Normal Map lighting will look very wrong and weak (see Figure 7-10).
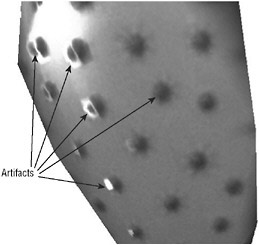
Figure 7-10
It is really hard to explain without switching the compression on and off. On the screen the visual difference is clearly visible. The NormalMapCompressor solves this problem by using the DXT5 compression format and storing the red channel in the alpha channel, which gets compressed separately in DXT5. This gives the green and blue a little better compression ratio because the red channel is all white now. In the shader you just have to switch the red and alpha channel and you are good to go. If you look closely at the NormalMapCompressor (Figure 7-9) you can see that the red channel has the highest variation (information panel on the left side), which means that the red channel has the most different color values and variations. The blue channel is usually very low. Try out several Normal Maps to see the different variance values.
For the diffuse and height map you can use DXT1. If you just use Normal Mapping, you don’t need a height map and can save even more video memory. Now a 1024x1024 texture only takes 512 KB for the diffuse map, 1 MB for the Normal Map (DXT5 takes twice as much space), and another 512 KB for the optional height map, if needed. If you use mip-mapping you can add another 25% to that. With 2–2.5 MB you are good to go and it looks almost as good as the uncompressed 12 MB of textures for 1024×1024. I should also mention that through the cool looking Normal Mapping or parallax mapping effects textures often look a lot sharper and you can get away with 512×512 textures instead of using 1024×1024 textures like I did in Rocket Commander. The amazing thing is that the complete Rocket Commander game is under 10 MB including two sound tracks, many sound effects, five asteroid types, five item models, the rocket model and many more models, textures, and effects and four cool-looking levels. On the Xbox 360 it takes a little bit more because playing .mp3s is not possible, but it is amazing to display a 3D game with less than 15 MB to a screen with a resolution of 1920×1080 pixels (HDTV), which looks sharper than most commercial games for the Xbox 360.
The later chapters of this book also discuss the option of how to use Normal Mapping for your own custom 3D data like the track and other vertex buffer generated 3D data, which looks great with Normal Maps and does not take much texture space thanks to the compression technique discussed here.
EAN: 2147483647
Pages: 138