Getting Started
You have everything set up now and it is time to finally do some coding and get your hands dirty. In this chapter you will just create a simple project with the help of the XNA Studio templates. Then you will change the code a little and add a little functionality to the Update and Draw methods. In the next chapter you will create your first game after you learn about the SpriteBatch class.
Your First Project
Create a new XNA project in XNA Studio by clicking File ![]() New Project. Now select Windows Game and enter a name for your first project - for example, “Hello World” - or just leave it as “WindowsGame1” (see Figure 1-10). As you can see you can also create games based on the starter kits quite easily from here too.
New Project. Now select Windows Game and enter a name for your first project - for example, “Hello World” - or just leave it as “WindowsGame1” (see Figure 1-10). As you can see you can also create games based on the starter kits quite easily from here too.
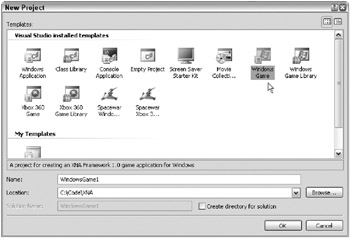
Figure 1-10
You can see now that a new project was created and it contains two source files: Game1.cs and Program.cs. The Program file basically just contains the following three lines of code:
using (Game1 game = new Game1()) { ..game.Run(); } // using The Game1 class contains the Initialize, Update, and Draw methods mentioned a little bit earlier. Initialize does nothing for now and Update just checks if the back button on the first connected gamepad was pressed.
For now you are just interested in the Draw method, which basically just executes the following line to clear the background to a specific color:
graphics.GraphicsDevice.Clear(Color.CornflowerBlue);
F5 and Go
If you press F5, the project starts (same as Debug ![]() Start Debugging) and you see the screen shown in Figure 1-11, which shows the blue color that is specified in the Draw method.
Start Debugging) and you see the screen shown in Figure 1-11, which shows the blue color that is specified in the Draw method.
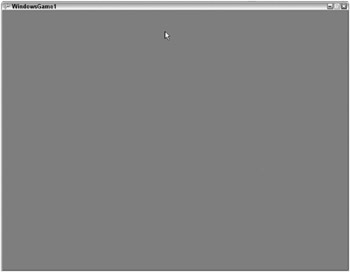
Figure 1-11
To feel like you are actually doing something, change the Color to Color.Green and press F5 again. The window now has a green background. The Clear method of the graphics device has other overloads that can be used to clear the depth and stencil buffers, which will be done automatically if you just set the color. For example, later in this book you will just need to clear the depth buffer, but not the color of the background. To do that you just write the following line:
graphics.GraphicsDevice.Clear(ClearOptions.DepthBuffer, Color.Green, 1, 0); By default the ClearOptions are set to ClearOptions.Target | ClearOptions.DepthBuffer, which means both the background color and the depth buffer are cleared. By the way, if you don’t know it already the | operator between the ClearOptions flags will combine both settings.
Changing the Code
Ok, instead of giving up here, think about some ways you can modify the code in a useful manner. First of all you should be able to quit your program by pressing Escape. By default XNA just adds the following lines to the Update method, which quits the program when the Xbox 360 controller’s back button is being pressed:
// Allows the default game to exit on Xbox 360 and Windows if (GamePad.GetState(PlayerIndex.One).Buttons.Back == ButtonState.Pressed) this.Exit(); To learn more about the Input classes go to Chapter 3, “Helper Classes.” For now you will just use a quick and dirty way to access the keyboard. If you modify the code in the following way you can also press Escape now to quit the application:
// Get current gamepad and keyboard states GamePadState gamePad = GamePad.GetState(PlayerIndex.One); KeyboardState keyboard = Keyboard.GetState(); // Back or Escape exits our game on Xbox 360 and Windows if (gamePad.Buttons.Back == ButtonState.Pressed || keyboard.IsKeyDown(Keys.Escape)) this.Exit(); As you can see you put the gamepad and keyboard states in extra variables to have easier access. If you press F5 again, you can quit the game with Escape now.
Next you are going to jump a little bit ahead and load a graphic into your game. More details about sprites are discussed in Chapter 2. The idea is to display a small background texture and tile it over the whole screen. Then you implement some simple keyboard and gamepad controls to move the background like in a top-down racing game or a tile engine, which is often used in 2D role playing games. For a more complex tile engine you would need more textures like stones, grass, water, mud, and so on, and then even transition textures you can put between grass and water, for example. This would require a little bit more textures and custom code, but overall this is not a very hard topic. You can also find a lot of information about this topic on the Internet if you are really interested in tile engines.
For your simple first project you just add the texture shown in Figure 1-12.
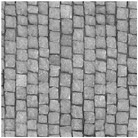
Figure 1-12
To load this texture (CityGroundSmall.jpg) into your game, just drag it into your project on the Solution Explorer. Then click the file in the project and select Properties. You should now see the screen shown in Figure 1-13.
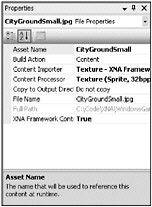
Figure 1-13
Normally you would just see the build action and some options for copying the content file to the output directory (e.g. if you want to include a .dll or .xml file). But if XNA Studio detects one of the supported content file formats, you will see the advanced XNA properties. There are three important new settings: Asset Name, Content Importer, and Content Processor. The Asset Name is used to load the content later; each content file must have a unique Asset Name. For the Content Importer you can select a Texture as in this case or a Model Importer for .x files or an Effect Importer for .fx files.
The Content Processor contains more options; for example, you could select DXT, DXT mip-mapped, or Sprite 32bpp for your texture here. DXT is a compression format, which is also used in dds files and it is very good for textures in games because they get compressed down in a 1:6 ratio (or 1:4 if they contain transparent pixels). This means you can have up to six times as many textures for the same space on the hard disk and graphic memory. For 2D sprites it is usually better not to compress them because you see them in their full size, and using 32bpp (bits per pixel) guarantees the best possible sprite quality. For more information about the content pipeline read the next part of this chapter.
If you press F5 or build the project (F6) the content is processed and a new file, CityGroundSmall.xnb, will be created in your output directory. The build output window also shows the following new line:
Building CityGroundSmall.jpg -> bin\x86\Debug\CityGroundSmall.xnb The final thing you have to do now is to load the imported texture. You will do that in the Initialize method and use a new variable backgroundTexture in your class. To load the texture you use the asset name you specified earlier (it was actually generated automatically from the filename of the file you dragged into your project). To render the texture on the screen you need a SpriteBatch, which is discussed in the next chapter. Basically it sets up the alpha blending, then draws textures into the sprite and finally draws everything on the screen:
Texture2D backgroundTexture; SpriteBatch sprites; protected override void Initialize() { backgroundTexture = content.Load<Texture2D>("CityGroundSmall"); sprites = new SpriteBatch(graphics.GraphicsDevice); base.Initialize(); } // Initialize() To display the background texture you have to start the sprite batch and render the texture to your sprites in the Draw method:
protected override void Draw(GameTime gameTime) { graphics.GraphicsDevice.Clear(Color.Green); sprites.Begin(); sprites.Draw(backgroundTexture, Vector2.Zero, Color.White); sprites.End(); base.Draw(gameTime); } // Draw(gameTime) This renders the background texture at the location (0, 0) on top of your green background. With the color parameter you can also recolor a sprite, but for now this is not important.
If you press F5 you will now see the result shown in Figure 1-14.
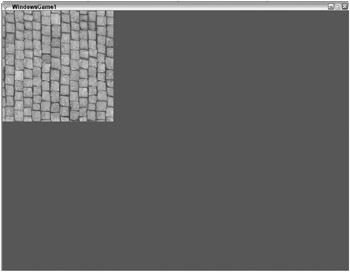
Figure 1-14
One final thing you are going to add for this first project is the ability to scroll the background with the cursor keys or a gamepad and then you render the scrollable tiles to the whole background. To capture the gamepad and keyboard input you modify the Update method a little:
float scrollPosition = 0; protected override void Update(GameTime gameTime) { // Get current gamepad and keyboard states GamePadState gamePad = GamePad.GetState(PlayerIndex.One); KeyboardState keyboard = Keyboard.GetState(); // Back or Escape exits our game on Xbox 360 and Windows if (gamePad.Buttons.Back == ButtonState.Pressed || keyboard.IsKeyDown(Keys.Escape)) this.Exit(); // Move 400 pixels each second float moveFactorPerSecond = 400 * (float)gameTime.ElapsedRealTime.TotalMilliseconds / 1000.0f; // Move up and down if we press the cursor or gamepad keys. if (gamePad.DPad.Up == ButtonState.Pressed || keyboard.IsKeyDown(Keys.Up)) scrollPosition += moveFactorPerSecond; if (gamePad.DPad.Down == ButtonState.Pressed || keyboard.IsKeyDown(Keys.Down)) scrollPosition -= moveFactorPerSecond; base.Update(gameTime); } // Update(gameTime) The first few lines are the same as before. Then you calculate how many pixels you would move this frame. If a frame would take 1 second, moveFactorPerSecond would be 400; for 60 frames it would be 400/60. Because you use floats here instead of just integers you can have a couple of thousand frames and the movement is still 400 pixels per frame if you press up or down.
The variable scrollPosition is changed if the user presses up or down. In your draw method you can now render each tile and add the scrollPosition to the y position to move the background up and down:
protected override void Draw(GameTime gameTime) { graphics.GraphicsDevice.Clear(Color.Green); sprites.Begin(); int resolutionWidth = graphics.GraphicsDevice.Viewport.Width; int resolutionHeight = graphics.GraphicsDevice.Viewport.Height; for (int x = 0; x <= resolutionWidth / backgroundTexture.Width; x++) for (int y = -1; y <= resolutionHeight / backgroundTexture.Height; y++) { Vector2 position = new Vector2( x * backgroundTexture.Width, y * backgroundTexture.Height + ((int)scrollPosition) % backgroundTexture.Height); sprites.Draw(backgroundTexture, position, Color.White); } // for for sprites.End(); base.Draw(gameTime); } // Draw(gameTime) Now you can start your project and move around with up and down. This is pretty good for your first little application, isn’t it?
EAN: 2147483647
Pages: 138