IDS Sensor Device and Sensor Groups
| [ LiB ] |
The IDS MC allows you to manage configurations for individual sensor devices and for sensor groups . Before you can manage sensor devices or sensor groups, you need to add them to the IDS MC.
| | After you add sensor devices and groups to the IDS MC, you can import them into Security Monitor, the monitoring component of VMS. |
Sensor Device
You add sensor devices and groups on the first tab sheet of the IDS MC, the Devices tab sheet. To add a sensor device to the IDS MC, follow these steps:
- Navigate to Devices, Sensor, Add to display the Select Sensor Group page.
- Select the group that you want the new sensor to join and click Next to display the Enter Sensor Information page (see Figure 14.5).
Figure 14.5. The IDS MC Enter Sensor Information page at Devices, Sensor, Add.
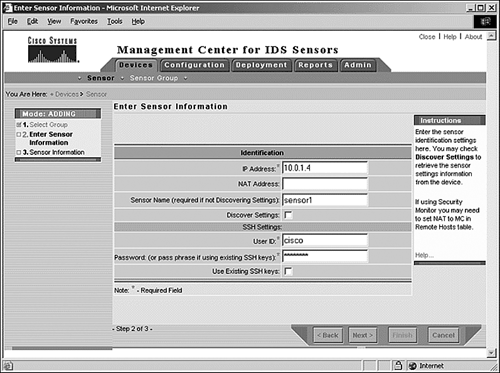
- Enter values for the settings, as listed in Table 14.4.
Table 14.4. IDS MC Add Sensor and Sensor Group Information Settings
Setting
Description
IP address
The IP address of the sensor you want to add and manage.
NAT address
The network address translation (NAT) address of the sensor device; required if NAT is being used. This is the IP address that IDS MC server would see for the sensor.
Sensor name
Name of the sensor.
Discover settings
(Optional) Select this check box to retrieve information about the sensor settings from the sensor device. Note that this process might take up to several minutes, depending on the size, complexity, and traffic of your network.
User ID
Enter the correct username for the sensor
For sensors using IDS versions previous to 4.0: netrangr
For IDS version 4.0 and later: cisco
For IDSM: ciscoids
Password
Enter the password or the pass phrase if you are using existing SSH keys. The passwords vary according to the passwords that you assigned to the devices during the initial configuration.
Use existing SSH keys
(Optional) Select this check box if you are using existing SSH keys.

You should be prepared to answer questions about specific settings in the Enter Sensor Information page. Focus on user IDs for different versions of IDS, the Discover settings, and the Use Existing SSH Keys settings.
- Click Next to display the Sensor Information page. Select the sensor's software version from the Version drop-down menu and enter a comment in the Comment field. If you selected the Discover Settings check box from the previous step, the Sensor Information page displays with an Import Status message displaying the sensor's name and software version. If the sensor software version doesn't appear in the Version drop-down menu, you have to update the IDS MC with the latest version of IDS signatures.
You should know how to continue with adding a sensor device if the sensor's software version doesn't appear in the Version drop-down menu; you need to update the IDS MC with the latest version of IDS signatures.
- Click Finish to display the Sensor page, which will be refreshed to show your new sensor.
Generating New SSH Keys
When you add an IDS sensor into the IDS MC, you see the options to use existing SSH keys or to generate new SSH keys. You learn more about the former option in the next subsection of this chapter. Here, we discuss the process for generating a new SSH key. Figure 14.6 illustrates the process of creating a new SSH key using PuTTYgen, copying the key to the sensor, and connecting to the sensor with a new SSH session using the PuTTY utility.
Figure 14.6. The steps to create a new SSH key, copy it to the sensor, and test the new SSH session.
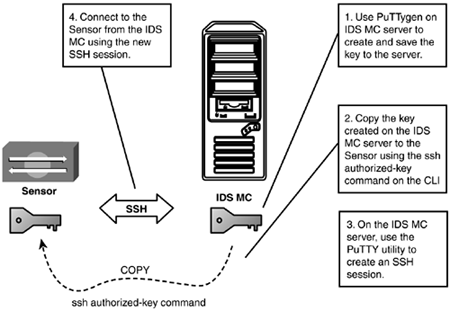
| | It is critical that you know the steps to create, copy, and test a new SSH key. Use PuTTYgen to create the new key; use the ssh authorized-key command to copy the key to the sensor; use the PuTTY utility to create a new session and to open the session between the IDS MC server and the sensor. |
To generate a new SSH key, follow these steps:
- Run the PuTTYgen utility from the IDS MC server to create the new SSH key. Drag your mouse over the box to create randomness for the new key. Save the new key as the hostname of the sensor, in the \bin\ids directory within the IDS MC home directory. Figure 14.7 shows the PuTTY Key Generator dialog box, which you use to generate a new SSH key.
Figure 14.7. The PuTTYgen dialog box to generate a new SSH key from the IDS MC server.
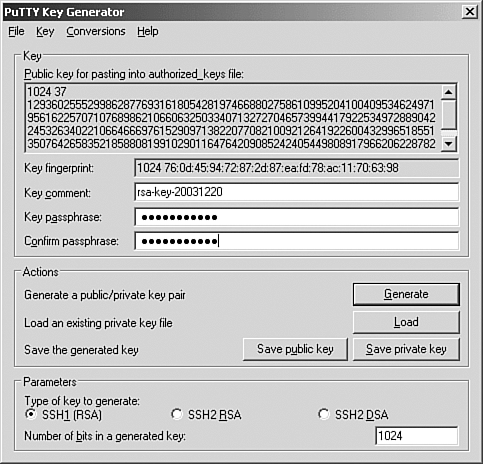
- Copy the newly generated key to the sensor using the command-line interface (CLI). You see in the grayed text area that the first number, 1024, is the public key length. The second number, 37, is the modulus , and the last very long number is the SSH key itself. You need to copy these values when you connect to the sensor's CLI and use the ssh authorized-key command. The following example shows this command:
sensor(config)# ssh authorized-key sensor 1024 37 124541735343742342961023853127 14580281116803212365787836092894678925768155825079340834939485521973762861308269 99375479332030375597026368348044342558319911443110130724096008567922039684480799 44302591127003846816188444662087339239588005032417360690428861730045602961734489 120008792352036088084824442956167187659
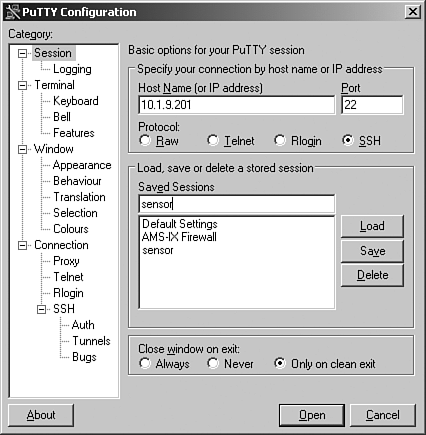
- Create a new session from the PuTTY utility on the IDS MC. Figure 14.8 shows the PuTTY utility for creating a new session.
Figure 14.8. The PuTTY utility used to create a new session between the IDS MC server and the sensor.
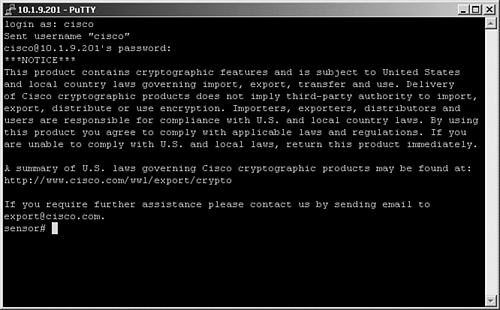
- Click the Open button to launch the new session. Figure 14.9 shows the SSH session between the IDS MC server and the sensor. You have now verified connectivity via SSH.
Figure 14.9. The established SSH session between the IDS MC server and the sensor.
Using Existing SSH Keys
You saw in the Enter Sensor Information page shown in Figure 14.5 a check box option to use existing SSH keys. You can use the option to use existing keys instead of generating a new one, as we did in the previous section. Follow these steps to use existing SSH keys:
- Navigate to Devices, Sensors, Add to display the Select Sensor Group page. Select the group that you will add the new sensor into and click Next to display the Enter Sensor Information page.
- Enter the values for the settings, as listed and described in Table 14.5.
Table 14.5. IDS MC Enter Sensor Information Settings Using Existing SSH Keys
Setting
Description
IP address
The IP address of the sensor you want to add and manage.
NAT address
The NAT address of the sensor device; required if NAT is being used. This is the IP address that IDS MC server would see for the sensor.
Sensor name
Name of the sensor.
Discover settings
(Optional) Select this check box to retrieve information about the sensor settings from the sensor device.
User ID
Enter the correct username for the sensor:
For sensors using IDS versions previous to 4.0: netrangr
For IDS version 4.0 and later: cisco
For IDSM: ciscoids
Password
The pass phrase that you saved to the private key.
Use existing SSH keys
Select this check box to use existing SSH keys.
- Click Next to display the Sensor Information page with the Import Status message showing your sensor name and its software version.
- Click Finish to display the Sensor page, which is now refreshed to include your new sensor.
Sensor Groups
Sensor groups, by providing a hierarchical structure, allow you to manage sensor configurations more efficiently . The group system is similar to a Windows Explorer folder and file structure, and Cisco IDS provides the flexibility to have groups that contain both subgroups and individual sensor devices. Subgroups and individual devices all inherit the settings of their parent group. In fact, if a parent group defines certain settings as mandatory, these settings cannot be overridden by the subgroup. You must have at least one active, defined group, the Global group. Follow these steps to create a subgroup within the Global group in IDS MC:
- Navigate to Devices, Sensor Group to display the Sensor Group page. Select the Global group and click on Create Subgroup to display the Enter Group Information page.
- Enter values for the IDS MC Enter Group Information settings, as listed and described in Table 14.6.
Table 14.6. IDS MC Enter Group Information Settings
Setting
Description
Group name
Enter a group name to use for the subgroup that you are about to create.
Description
(Optional) Enter an optional description.
Settings
Select the Defaults (Use Parent Values) radio button to use the parent group configuration settings or the Copy Settings from Group radio button to select a different group from which to copy the settings for your new group.
- Click OK to save and apply the settings. The Sensor Group page refreshes to display your new sensor group.
| [ LiB ] |