Working with the Trivial File Transfer Protocol
| PIX firewalls can save, restore, and install new images from Trivial File Transfer Protocol (TFTP) servers. TFTP servers enable clients such as the PIX firewall to save and read files, similar to the way in which normal FTP functionality allows clients to download and upload files on the Internet. Several TFTP programs are available on the market, and Cisco provides a simple TFTP server for free with the PIX firewall. Alternatively, the TFTP server can be downloaded from the Cisco Web site.
Upgrading OS ImagesThere are two methods of upgrading a new OS image to the PIX firewall. The first method uses the copy command or booting to monitor> mode. The copy CommandThis command is available on IOS versions 5.1 and 5.3 and above, and it is used to download images from a TFTP server to the firewall. The TFTP option of the command is for the location and path of the image, whereas the flash option determines whether it's an image or PDM software. The copy command's syntax is as follows : copy tftp[:[[//location] [/pathname]]] flash[:[image pdm]] Table 4.14. copy Command Options
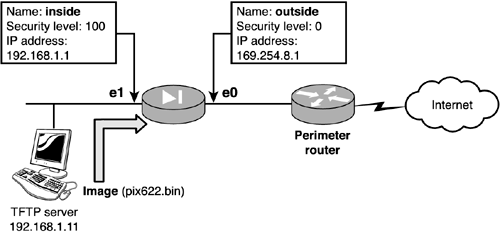
The following is the step-by-step process you would use to copy an image from a TFTP server to a PIX firewall. Figure 4.3 displays the networking layout, and Listing 4.11 shows the necessary commands. Follow these steps:
Figure 4.3. TFTP diagram. Listing 4.11 Copying from a TFTP ServerPixfirewall# copy tftp flash Address or name of remote host []? 192.168.1.11 Source file name []? pix622.bin copying tftp://192.168.1.11/pix622.bin to flash:image [yesnoagain]? yes !!!!!!!!!!!!!!!!!!!!!!!!!!!!!!!!!!!!!!!!!!!!!!!!!!! Received 1658880 bytes Erasing current image Writing 1540152 bytes of image !!!!!!!!!!!!!!!!!!!!!!!!!!!!!!!!!!!!!!!!!!!!!!!!!!! Image installed pixfirewall# Using Monitor Mode to Upgrade ImagesIn the past, using monitor mode was the only way you could upgrade your OS images. However, this process has now been replaced by the copy command. Follow these step-by-step instructions on how to upload an image in monitor mode:
Listing 4.12 displays the monitor mode and TFTP steps needed to upload an image to your PIX. Listing 4.12 Monitor Mode's tftp Commandmonitor> interface 1 monitor> address 192.168.1.1 address 192.168.1.1 monitor> ping 192.168.1.11 monitor> server 192.168.1.11 server 192.168.1.11 monitor> file pix622.bin file pix622.bin monitor> tftp ..................................................................... Received 1658880 bytes Cisco Secure PIX Firewall admin loader (3.0) #0: Fri Jun 7 17:35:02 PDT 2002 Flash=E28F640J3 @ 0x3000000 BIOS Flash=E28F640J3 @ 0xD8000 Flash version 6.2.2, Install version 6.2.2 Do you wish to copy the install image into flash? [n] y Installing to flash Serial Number: 807082785 (0x301b1b21) Activation Key: 2d284af1 d032aa26 38b7db1f 70cfa8ee Do you want to enter a new activation key? [n]n Writing 1540152 bytes image into flash... |
EAN: 2147483647
Pages: 218
- ERP System Acquisition: A Process Model and Results From an Austrian Survey
- Enterprise Application Integration: New Solutions for a Solved Problem or a Challenging Research Field?
- Context Management of ERP Processes in Virtual Communities
- Data Mining for Business Process Reengineering
- Development of Interactive Web Sites to Enhance Police/Community Relations