Configuring AAA Services
| Several steps are involved in configuring a system for AAA services. The next section walks you through some of the steps needed to configure a system for AAA services, but here is an overview of the basic steps:
Configuring AAA UsernamesThe first step when configuring AAA services is to create usernames and passwords. As stated previously, three main locations exist for usernames and passwordslocal, an AAA server, or an external database. However, in this chapter we discuss only local and CSACS. Local Username and Password CommandsThe PIX enables you to create a username and password list inside the configuration file. This list can be referenced by the AAA commands when users log in. The syntax used to accomplish this is shown here: pixfirewall(config)# username <username> {nopasswordpassword <password>}[privilege <level>] Table 10.1 displays the possible options for the username command. Table 10.1. username Command Options
Listing 10.1 clears all users from the PIX, creates four users, and shows all the users that exist inside the PIX configuration file. Listing 10.1 Configuring Username and Passwordspixfirewall(config)# clear user pixfirewall(config)# username daniel password 1234 privilege 15 pixfirewall(config)# username kristina password 1234 privilege 15 pixfirewall(config)# username jack password 1234 pixfirewall(config)# username peter password 1234 pixfirewall(config)# show user username daniel password fOpmsyD0svtnnlr/ encrypted privilege 15 username peter password GCbahPTC/hAylaFE encrypted privilege 2 username kristina password wTsW2QC6pRXaJrTT encrypted privilege 15 username jack password 5zVJhD5YUb6zO7VH encrypted privilege 2 Adding Users with CSACSTo add a user to the CSACS database, you must open the user Web interface. First, you turn on the TACACS+ advanced features so you can configure privileged exec access on your user accounts. The steps to enable these advanced features are as follows :
The following are the steps to create a user account in Cisco Secure ACS:
Now that the usernames have been created, you are ready to configure AAA services on the PIX firewall. Configuring the aaa-server CommandThe aaa-server command is used to configure group tags that define where the AAA server is located. If the AAA server is remote, either RADIUS or TACACS+ security protocols can be used to request the remotely located AAA services. However, if the AAA server is local, no security protocol is required to communicate with the internal PIX configuration file. Table 10.2 describes the three possible locations and protocol used to acquire AAA services. Table 10.2. aaa-server Locations
The following is the syntax of the aaa-server command: pixfirewall(config)# [no] aaa-server <group_tag> protocol tacacs+radius pixfirewall(config)# [no] aaa-server <group_tag> [<(if_name)>] host <ip_address> [<key>] Table 10.3 displays the possible options for the aaa-serve r command. Table 10.3. aaa-server Command Options
The following example displays the current aaa-server group tags and then creates a new group tag called PIXAuth . This new group tag configures TACACS+ as the security protocol and 192.168.1.10 as the AAA server: pixfirewall(config)# show aaa-server aaa-server TACACS+ protocol tacacs+ aaa-server RADIUS protocol radius aaa-server LOCAL protocol local pixfirewall(config)# aaa-server PIXAuth protocol tacacs+ pixfirewall(config)# aaa-server PIXAuth (inside) host 192.168.1.10 dog Configuring AuthenticationAAA authentication can be used to control access into the PIX console, privileged exec mode, and access through the PIX. This section covers console access and access technologies used to control traffic through the PIX. Authentication and Console AccessConsole access requires a username and password. Access methods for AAA authentication to the PIX can be via serial, Telnet, SSH, HTTP, and privileged exec mode. The aaa authentication command syntax is as follows: pixfirewall(config)# [no] aaa authentication serialtelnetsshhttpenable console <group_tag> Table 10.4 displays the possible options for the aaa-authentication command. Table 10.4. aaa authentication Options
The following example displays the commands needed to configure the PIX firewall to use a TACACS+ server (192.168.1.10) for console authentication. As users connect via Telnet or enter privileged exec mode, they will be prompted to enter a username and password before allowing them to proceed: pixfirewall(config)# aaa-server PIXAuth protocol tacacs+ pixfirewall(config)# aaa-server PIXAuth (inside) host 192.168.1.10 dog pixfirewall(config)# aaa authentication enable console PIXAuth pixfirewall(config)# aaa authentication telnet console PIXAuth Authorization and Console Access CommandsConsole access can be controlled by the AAA authentication, whereas console commands can be controlled by using AAA authorization. Controlling command access enables the PIX to contain several levels of users, some with full command access (level 15) and others with specifically allocated commands. The privilege command is used to associate a specific command with a level of access. The command syntax is shown here: pixfirewall(config)# [no] privilege [{show clear configure}] level <level> [mode {enableconfigure}] command <command> Table 10.5 displays the possible options for the privilege command . Table 10.5. privilege command Options
The privilege command shown in Listing 10.2 creates two users with different levels of access. Commands designated to access levels 11 and 12 are then assigned. Listing 10.2 Creating Users and Setting Privilege Mode Commandspixfirewall(config)# username jimmy password 123456 privilege 11 pixfirewall(config)# username richard password 123456 privilege 12 pixfirewall(config)# privilege show level 11 command access-list pixfirewall(config)# privilege show level 11 command running-config pixfirewall(config)# privilege show level 12 command interface pixfirewall(config)# aaa authorization command LOCAL In Listing 10.2, because Jimmy has privilege level 11, he will be able to execute any command assigned to level 11 and below. Richard, on the other hand, has a level that is higher and will therefore be able to execute any command associated with level 12 and below. The last aaa authorization command LOCAL designates the local username and password list for command authorization. Authorization for commands can also be set up using the CSACS Web interface by clicking the Group Setup button, selecting the group options, and setting the commands.
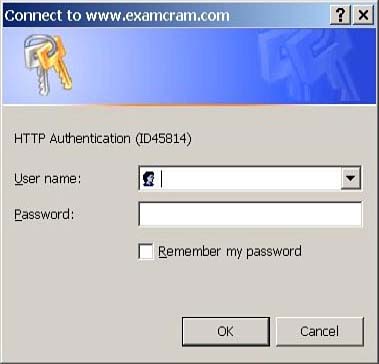
Authentication for Cut-through ProxyUsing cut-through proxy enables you to control HTTP, FTP, and Telnet services through the PIX firewall. Access lists provide general packet filtering, whereas cut-through proxy requires a username and password before allowing access. For example, if Jack wants to control which users can use HTTP through the PIX, he could implement cut-through proxy and prompt HTTP traffic with a username and password dialog box, as shown in Figure 10.4. This username and password would be forwarded to the AAA server for authentication and authorization using TACACS+ or RADIUS security protocols. Figure 10.4. The cut-through proxy HTTP dialog box.
The following shows two aaa authentication commands that can be used to implement cut-through proxy: pixfirewall(config)# [no] authentication includeexclude <service> inboundoutbound <if_name> <internal_ip> <internal_mask> [<external_ip> <external_mask>] <group_tag> pixfirewall(config)# [no] aaa authentication match <access_list_name> inboundoutbound <if_name> <if_name> <group_tag> Table 10.6 displays the possible options for the aaa authentication command. Table 10.6. Cut-through Proxy aaa authentication Command Options
The example shown here enables cut-through proxy authentication on the inside interface: pixfirewall(config)# aaa-server PIXAuth protocol tacacs+ pixfirewall(config)# aaa-server PIXAuth (inside) host 192.168.1.10 dog pixfirewall(config)# aaa authentication include http outbound 0 0 0 0 PIXAuth
Authorization for Cut-through ProxyAfter cut-through proxy authentication is configured, users are automatically allowed to pass through the firewall. However, authorization can be added to further control where your users are allowed to go. The commands used are similar to the authentication commands; the command syntax for authorization is as follows: pixfirewall(config)# [no] authorization includeexclude <service> inboundoutbound <if_name> <internal_ip> <internal_mask> [<external_ip> <external_mask>] <group_tag> pixfirewall(config)# [no] aaa authorization match <access_list_name> inboundoutbound <if_name> <if_name> <group_tag> Configuring AccountingAfter authentication and authorization have been configured, configuration of accounting is often the next step. Accounting information enables you to track users who have logged on and accessed the device and the amount of time they're logged on. These two commands enable the accounting process: pixfirewall(config)# [no] accounting includeexclude <service> inboundoutbound <if_name> <internal_ip> <internal_mask> [<external_ip> <external_mask>] <group_tag> pixfirewall(config)# [no] aaa accounting match <access_list_name> inboundoutbound <if_name> <if_name> <group_tag> The format of the commands is similar to the authorization and authentication commands. The includeexclude parameters define the connections that need accounting, whereas the match parameter uses an ACL to define who needs accounting. The service parameter specifies the connection, such as any , ftp , http , telnet , or a protocol/port number. The following is an example of enabling accounting for all internal traffic: pixfirewall(config)# aaa accounting include any inbound 0 0 0 0 PIXAuth pixfirewall(config)# aaa accounting include any outbound 0 0 0 0 PIXAuth You do not need to configure any settings on the CSACS server itself; accounting requests should automatically be accepted. However, you should verify that traffic is being accounted by clicking the Reports and Activity button and the TACACS+ Accounting link. |
EAN: 2147483647
Pages: 218