| In addition to the methods previously mentioned for storing your data, your Mac comes equipped with a piece of software that turns files into disk images that are read by computers as if they were CDs. This software, called Disk Copy, is located in the Utilities folder within the Applications folder of your hard drive. Disk Copy is a slick tool that is useful for creating an exact duplicate of software or large files you don't want to lose, or for making a master image to distribute files or applications over a network. It even has built-in CD-burning capabilities to make turning a disk image into a real CD a matter of a few clicks. To launch the Disk Copy application, double-click its application icon. The icon for Disk Copy appears in the Dock, but no windows open .  | Disk Copy is used to open disk images as well as create them. You can launch Disk Copy by double-clicking an image file (usually named with a .dmg extension); the image will be automatically mounted. The application checks the image's validity and the image appears as a white drive icon on your desktop or at the Computer level of the Finder. From this point, you can copy files from the disk to wherever you want, or use them directly from the mounted image. |
Task: Creating Disk Images  For each image you create, you must have enough free space on your hard drive. For example, to create a CD image, you need approximately 650MB free. Currently shipping Apple computers come with at least 10GB drives , so this really shouldn't be an issue. -
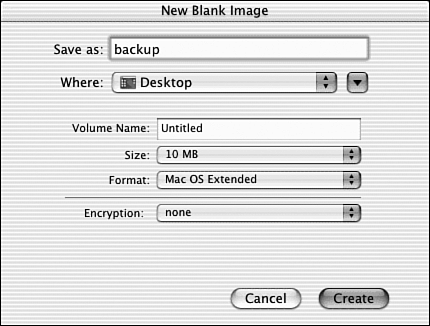
There are two ways to generate an image: by copying an existing item, or by creating an empty image file, mounting it, and then copying files to it. To create an empty image file, choose Blank Image (Command-N) from the File menu's New submenu. The dialog box shown in Figure 28.2 appears. Figure 28.2. Make a new image, and then copy to it.  -
Fill in the Save As field as you normally wouldthis is the name of the image file, not the volume that's going to be created. Set the name of the volume in the Volume Name field. Choose a size for the image from the Size pop-up menu. There are a variety of preset sizes for common media, such as Zip disks, CDs, DVDs, and a Custom setting for arbitrary sizes. -
Next, choose a volume format in the Format pop-up menu. In addition to the Mac OS Standard (HFS), Mac OS Extended (HFS+), and Unix File System (UFS) options supported as native Mac OS X file systems, you can also choose MS-DOS File System to create a Windows-compatible image. -
Finally, if you want to encrypt the disk image, choose AES-128 in the Encryption pop-up menu and click Create. The new disk image is created and can be used immediately. Creating an image from an existing folder or drive is even easier and is a great way to make quick backups that retain all the attributes of the originals . -
Choose Image from Folder or Volume (Command-I), or Image from Device (Option-Command-I) [to work with the entire hard drive]) from the New submenu of the File menu. Disk Copy opens the standard Open File window from which you can surf to the item you want to make an image of. If you choose New Image from Device, Disk Copy displays a list of all active devices. Click the disclosure triangle in front of each device to display the individual partitions. -
Select the item to image, and then click the Image button. You are prompted for the location to save the image. Using the Format pop-up menu, choose the type of image to create: read-only, read-write, compressed, or CD/DVD master. Apply encryption to the image file by choosing AES-128 in the Encryption pop-up menu. -
Finally, click Save to copy an image to your hard drive. Once you have a disk image of your data, you can move it over the internet or network to a safe storage place or burn an actual CD of it. To burn a CD from Disk Copy, follow these steps:  | To burn a CD from within Disk Copy with an external burner , you must have your CD writer connected and powered on. Check Apple's Web site for supported writers. |
-
Place a blank CD-R or CD-RW in your CD writer. -
Select Burn Image from the File menu, and choose a disk image file when prompted. If the image is suitable for CD burning, Disk Copy prepares to burn a CD-R or CD-RW. -
Expand the Burn Disk dialog box by clicking the disclosure button. You see settings for the speed you want to use during the burn process, along with whether you want to verify and eject the disk after it finishes. (A check box for Allow Additional Burns also appears because some burners enable you to continue adding data to a CD containing data until the disk is full.) -
When you're satisfied with your settings, click the Burn button, and Disk Copy begins writing the CD. |
