Removing and Replacing Objects
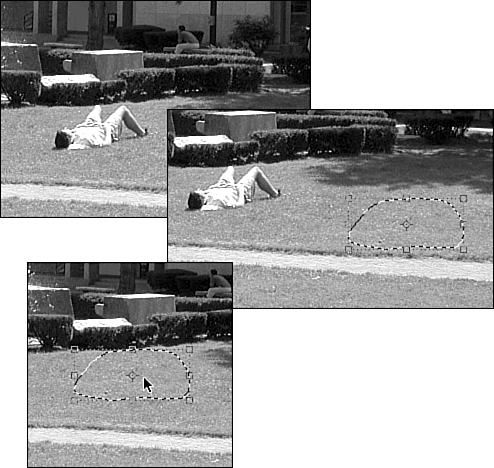
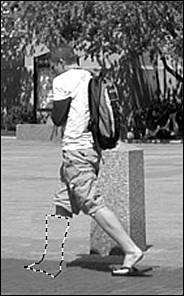
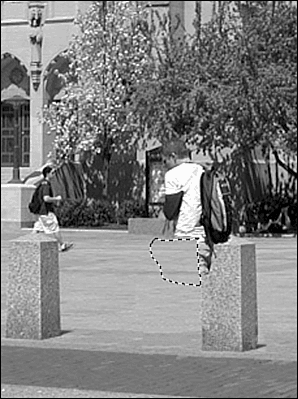
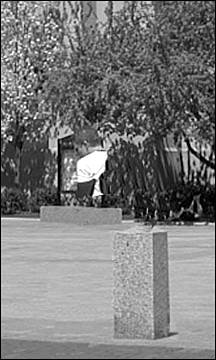
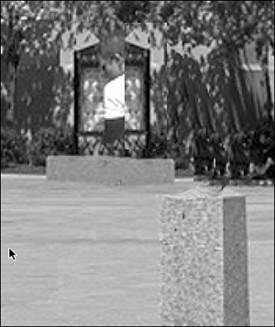
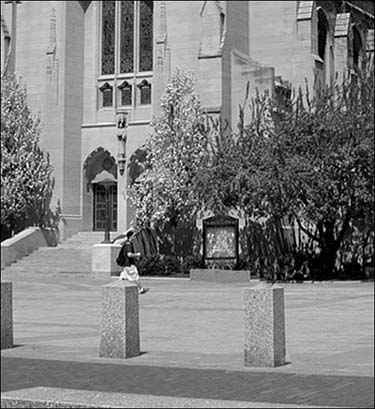
| It's easy enough to use the Clone Stamp to hide small objects in a picture, but what happens when the object is a large one? You can't use the same tools and techniques on something big. Fortunately, there are other ways to get rid of unwanted parts of the picture and replace them with something else, even when they're right in the middle of it. The simplest way to hide something is to cover it up. The trick I'm about to show you is an easier method of hiding something than the one we used to hide the small boats earlier in this chapter. I call this trick drag-and-drop copying. You simply select something that has the right color and shape to cover up what you want to hide. Then, you select the Move tool and press the Option-Alt key. This tells Elements that you want to copy and move the original selection instead of simply moving it. Thus, when you drag the selection with the Move tool you're actually dragging a copy of it, so the original stays where it was, and the copy fits nicely over the object, person, or whatever you wanted to hide. Figure 24.64 shows a simple example. If the edges of your copy are obvious, undo the dragging, and feather the edges of the selection (Selection, Feather) by a few pixels before you move it, to help hide them. Figure 24.64. I lassoed some grass and dragged it over the sleepy student. Maybe it's me, but I don't like the sloppy kids in Figure 24.65 either. Removing them will be a lot more difficult because there's a lot going on behind them that we'll have to patch up. Figure 24.65. The baggy shorts look may be "in" this year, but by next year it will be laughable. I'll start with the feet. Dragging a sort of boot-shaped piece of brick sidewalk and concrete background, I align it using the line between brick and concrete near the kid's leg, and get rid of one leg very quickly. Figure 24.66 shows a close-up of this move. Figure 24.66. A little more work, and he won't have a leg to stand on. Using pieces of the sidewalk and the next granite post, I can hide his other leg, and rebuild the post. Note the tiny shadow at the bottom right of the post in Figure 24.67. I copied that with a small Clone Stamp. I then copied some of the concrete pavement to cover his upper leg, as shown in the figure. Figure 24.67. The body is trickier. I don't know where the bench ends or what's on the sign. Now I'm going to have to improvise. I have one end of the bench behind our guy. This time I'll have to do something different, though. Instead of dragging a selection, I'll copy and paste it, and then flip the copy. Remember that when you copy and paste, the pasted object will appear on a new layer, directly over the old one. This sometimes causes confusion because it looks as if nothing has happened . Take the Move tool and drag it over the copied and pasted area. You should be able to drag the copy off the original. If not, check the Layers palette to make sure it actually copied. After flipping the bench and putting it back, so the sign legs line up with the right side of the sign, I can do a little Clone Stamping to cover some more of the student. Figure 24.68 shows the end of this step. Figure 24.68. I still have work to do. I can use the same copy-and-flip technique to replace most of the sign. Figure 24.69 shows a close-up of the photo. Figure 24.69. Not much more to go with this guy. Some final rubber stamping, and he's completely gone. Figure 24.70 shows the final version of this one. To remove the other figure from the photo, you would apply the same techniques. Figure 24.70. All gone, and good riddance. |

EAN: 2147483647
Pages: 349