Applying Vignetting
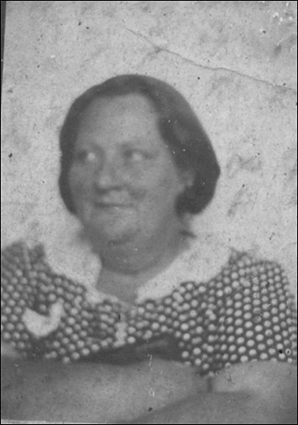
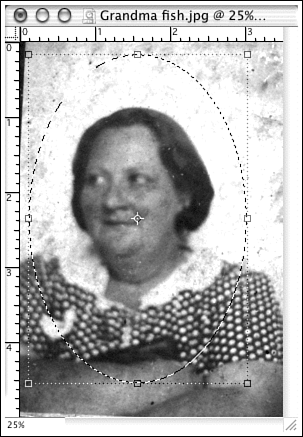
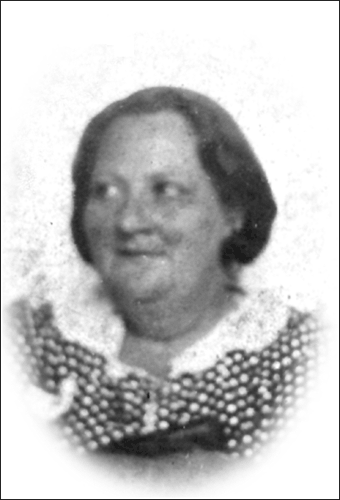
| Vignetting was a technique frequently used in the early days of photography to make up for deficiencies in both the camera lens and the glass plates used for negatives . Not much was understood about the art and science of lens grinding, except that the lens tended to be sharpest in the middle and the focus would fall off rapidly as you moved from the center to the edges of the resulting photo. Photo plates were prepared by brushing plain glass with a solution of gum Arabic or some other colloidal (sticky stuff) and silver nitrate. (Chemists, don't come after me. I'm sure there was more in the mix, but those were the important elements.) The gunk seldom went on evenly, especially near the edges of the plate, so the edges of the photo would be correspondingly messy. Today, that messy edge look is considered a special effect, and is frequently seen in black-and-white digital photography. Anyway, both of these factors resulted in pictures that were okay in the middle and both fuzzy and messy at the edges. Soon, the better photographers figured out a way to disguise the bad parts , while making it look like an extra fancy effect. They invented the vignette. It's simply a mask that fades from the edges of the picture toward the middle, so that the photo appears to be fading out at the edges. I have an old photo of a friend's grandmother that's a perfect candidate for a vignette. Grandma Fish appears in Figure 24.49. Figure 24.49. This picture needs some help. (Photo courtesy of Peggy Ogan.) Old vignettes were typically oval, so that's what we'll apply here. But with Elements, you can use this technique with any shape. Ordinarily, we'd start by cropping, but we'll be vignetting this one and we'll want the extra space for the vignette mask. Thus, we'll ignore that step, and just remove the yellow color (with the Replace Color command) and the dust and spots (with the Clone Stamp). Correcting the levels and adding some contrast (Enhance, Adjust Brightness/Contrast, Levels) helps, too. In Figure 24.50, I've started the vignette process by placing an oval marquee where I want the frame to start. To make marquee placement easier, click the Elliptical Marquee tool, select Fixed Aspect Ratio in the Style pop-up menu on the tool Options bar, and designate a ratio. I prefer W = 2, H = 3 for a tall oval frame. To make a vignette marquee, I find that it's often easier to drag outward from the middle, rather than from the edges in. So, press Command/Ctrl and click on the center of her face (the location of the cross in Figure 24.50) and drag the oval outwards until you've selected the area you wish to feature with the vignette. Then, invert the selection (Select, Inverse, or Command/Ctrl-Shift-I). That means that the edges are selected instead of the area in the middle. Figure 24.50. It's easier to drag the marquee from the center outward. We also need to feather the selection by about 25 pixels. (I could have done this when I dragged the marquee, but I wasn't sure at the time how much edge I would need.) We want a soft edge on the vignette, but not too soft. To create such an edge, choose Select, Feather, type 25 as the amount, and click OK. Next simply double-check to make sure that the background color is set to white; then press the Delete key and the background disappears. Figure 24.51 shows the finished portrait. Figure 24.51. Here it is, a less cluttered, more interesting portrait. |
EAN: 2147483647
Pages: 349
- Linking the IT Balanced Scorecard to the Business Objectives at a Major Canadian Financial Group
- A View on Knowledge Management: Utilizing a Balanced Scorecard Methodology for Analyzing Knowledge Metrics
- Governing Information Technology Through COBIT
- Governance in IT Outsourcing Partnerships
- Governance Structures for IT in the Health Care Industry