Stroking and Filling Selections
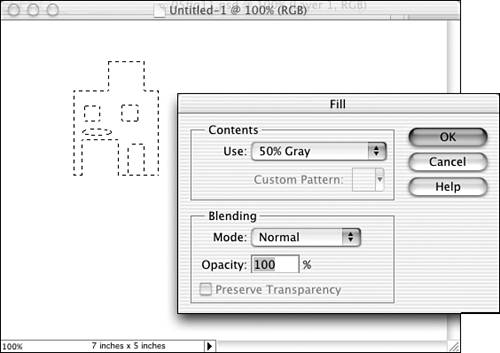
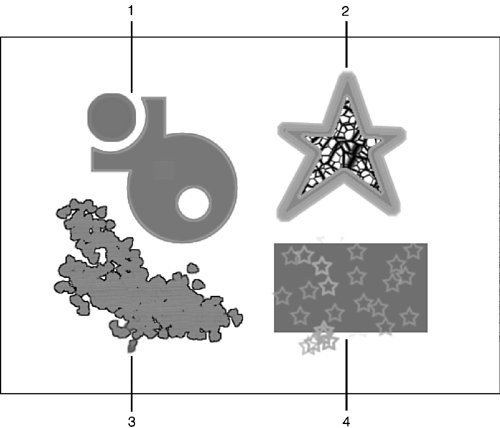
| No matter how you've made your selections, you have the option of filling or stroking them to make them objects in their own right. Let's say I need to draw some abstract shapes to use as part of a logo. I can use any of the selection tools to select a shape, and then Elements can turn the selection into an object by filling it with color or a pattern, or stroking it with a colored line. The Stroke and Fill commands are both found under the Edit menu. Filling places your choice of color, gray, or a pattern into the selected shape. Stroking places a line, of whatever color and thickness you determine, over the selection marquee. In Figure 23.14, I'm preparing to fill a complex shape with gray. Create a selection using your tools of choice. If you want to fill the selection with a particular color, click the Foreground or Background icon at the bottom of the toolbox, and select a color from the Color Picker. Then choose Edit, Fill. Figure 23.14. Create a shape with a selection tool, and fill it with a color or pattern. Select the color (foreground, background, white, black, or 50% gray) or pattern you want from the Use list. If you choose Pattern, you can select the exact pattern you want from the Custom Pattern palette. When you open this palette, it displays a small selection of patterns. To display a different selection, click the right arrow and choose a set of patterns from the list. Choose a blending mode and a level of opacity if you like. Because blending is a pretty advanced concept, I'll spend more time on it in Chapter 26, "Creating Digital Art from Scratch." As for opacity, it's pretty easy to grasp. Basically, it's the strength of the fill ”with a low percentage of opacity, the color or pattern already within the selection (if any) will show through the fill color or pattern you're applying. A higher percentage of opacity creates a more solid fill, with less of the original color/pattern within the selection still apparent. If you choose 100% opacity, you'll completely replace any color/pattern in the selection with your new choice. You can use the Paint Bucket instead of the Edit, Fill command to fill a selection ”I'll discuss this tool in a moment. To stroke the outline of your selection, choose Edit, Stroke instead. Select the width of the border you want. To choose a color, click the Color box and select one from the Color Picker. Next, choose the location for the line ”on the inside, outside, or centered over the selection marquee. Once again, you can change the blending mode and opacity. Stroking a line isn't necessarily a one-time event. You can build some very interesting designs by using different colored strokes, and placing narrow ones over wider ones. Figure 23.15 shows a few of the possibilities. These were all drawn with the selection tools, and then stroked and filled. To create the first object, I used the Rectangular and Elliptical Marquee selection tools, and filled and stroked the resulting compound selection. To create the second object, I used the Polygonal Lasso selection tool to create a star, then filled it with a pattern and stroked it several times with lines of varying widths, positions , and colors. To create the third object, I used the Selection Brush tool with the Dry Brush pattern, then filled and stroked the resulting compound selection. For the fourth object, I created a rectangle with the Rectangular Marquee selection tool and filled it with a dark color. Then I created a series of stars with the Selection Brush tool, star pattern, and stroked them with a medium color. I created more stars and stroked them with a lighter color. How many of these can you re-create? Figure 23.15. It's easy to get carried away. |
EAN: 2147483647
Pages: 349