Selecting with the Lasso Tools
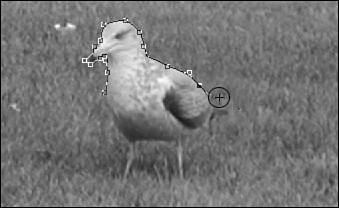
| Marquees are great when you have to select something with nice neat edges, or if you want to draw and fill a shape. For selecting small bits of a picture or pulling one flower out of a bunch, they're not the best tools for the job. That's when you need a Lasso. Use the Lasso to draw a selection line that is a single pixel wide around any object. As long as you're dragging the mouse while holding down its button, the Lasso tool will draw a line where you want it. As soon as you release the mouse button, the two ends of the line automatically connect, giving you a selection box in the shape you've drawn. In addition to the "regular" lasso, you have two others, the Polygonal Lasso and the Magnetic Lasso. The Polygonal Lasso tool Options bar is shown in Figure 23.4. Figure 23.4. I've selected the Polygonal Lasso. The Polygonal Lasso is useful both for selecting objects and for drawing shapes to be filled or stroked . To use it, first select it from the tool Options bar. Place the cursor where you want to start drawing, and click once. Move it and click again. You've drawn a straight line between the two points where you clicked. Each time you move and click you add another line to the shape. When you're ready to place the last point to join the ends of the shape, the cursor changes to the one shown in Figure 23.5, adding a small circle to the right of the lasso. You can close the shape yourself, or double-click to draw a line between the point where you double-click and the beginning of the shape. Figure 23.5. The next click will join the ends of the selection together. The Magnetic Lasso is one of the tools I use most often. It's very useful when you need to make a specific or detailed selection of something that's not all one color . The tool detects the edge of an image near the spot where you click or drag, based on the degree of sensitivity you select. If the area you're trying to select contrasts well with its surroundings, you can set a large Width (click/drag area) and a high Edge Contrast value and drag quickly and quite roughly around the image, and Elements will select it. If the area does not contrast well with its surroundings, set a smaller Width and a lower Edge Contrast value, and click or drag more carefully around the selection. In Figure 23.6, I'm using the Magnetic Lasso to trace around the seagull. Each time I click, Elements places a square box to anchor the line in place. After the entire object is selected, the line will change to the familiar marching ant marquee. Figure 23.6. This tool works by looking for differences in pixels. Contrasting objects are easiest to select. |

EAN: 2147483647
Pages: 349