Adding Photos to iMovie
| As mentioned previously, there are two ways to add photos to iMovie, either from files on your desktop, or via iPhoto integration. Since iPhoto is the preferred method, we'll start there. iPhoto IntegrationTo add a photograph that you've previously stored within your iPhoto library, click the "Photos" button in the icon bar in the lower right portion of the iMovie window. The Photo palette should appear, as seen in Figure 16.3. Figure 16.3. The "Photos" pane provides direct access to iPhoto images. At the top of the pane are the controls for the Ken Burns effect, followed by the library of iPhoto images that are available. The popup menu at the top of the image catalog can be used to limit the images being displayed to any of the iPhoto albums you've created, or two special categories:
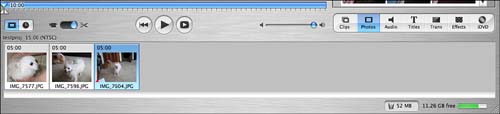
Choose the album or category that contains the image you wish to use, then scroll through the image catalog to find the exact picture you want to add. Finally, drag the image to the Timeline or Clip View at the bottom of the iMovie window. iMovie will behave exactly as if you are adding a video clip with a five second duration. Figure 16.4 shows a collection of three images that have been added to the Clip View in iMovie. Figure 16.4. Just think of still images as video clips without much video. Unfortunately, this is the point where some of Apple's user friendliness gets in the way. The software will immediately try to render the "Ken Burns" effect within your image. Since we don't even know what the Ken Burns effect is yet, we probably aren't that anxious to use it! To cancel the rendering simply add the image to the Timeline, select it within either the Timeline or the Clip View and press the escape (Esc) key. iMovie will stop trying to add the special effect and we'll get exactly what we wanta five second still clip of the photograph.
The Ken Burns EffectSo, what is the Ken Burns effect that Apple so desperately seems to want us to use? It is a method of bringing life to still images that was pioneered by the filmmaker Ken Burns, who has created many award winning documentaries, and whose work has even been nominated for an academy award.
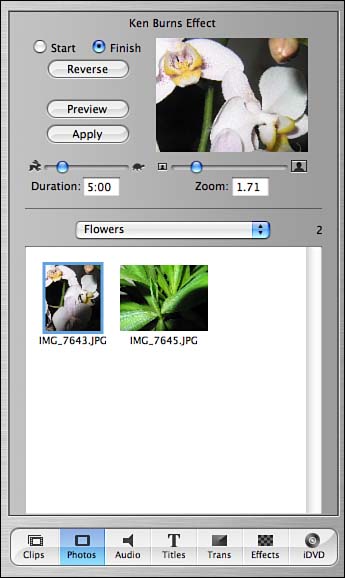
The effect is really quite simplerather than just putting a photograph onscreen while someone narrates, a virtual "camera" pans over the image, zooming in or out as it goes. A photograph of a bouquet of flowers, for example, could start zoomed in on one particular flower, then zoom out, centering the bouquet on the screen as it goes. When the effect is used properly, the end result is stunning and can make the viewer forget that he or she is not watching live video. To use the Ken Burns effect in iMovie, first make sure that you are in the Photo panethen select the image that you wish to apply the effect to. At the top of the photo pane are the controls that you will use to determine the path that the virtual camera will take, how long the resulting video clip will be, and how far in or out the virtual camera is zoomed. For example, I've chosen a picture of an orchid that I wish to apply the effect to. I've decided that I want to start out zoomed in on one of the flowers, then zoom out to show several. To do this, I click the "start" button, then click and drag the image within the Ken Burns effect image well. This will allow me to center where the camera will be starting when the effect is applied. Next, I adjust the Zoom level either using the slider control or by directly typing in the Zoom field. The start settings of my Ken Burns effect are shown in Figure 16.5. Figure 16.5. Choose the starting location and zoom for the image. To complete the effect, I need to repeat the same process for the "Finish" point of the effect. This time, I click the "Finish" button, click and drag the image so that it appears as I want it in the image well, then adjust the zoom so that I can see several of the orchid's flowers, as seen in Figure 16.6. Figure 16.6. Set the finish point and zoom level to complete the transition. To preview the Ken Burns effect before you actually apply it to an image, click the "Preview" button. To reverse the path that the virtual camera takes (effectively switching the Start and Finish points), click the Reverse button. If you want the total time the transition takes to last longer (or shorter) than five seconds, adjust the duration slider, or type directly into the Duration time field. Finally, to add the image with the Ken Burns effect to the timeline or clip view, click the Apply button. The effect make take several minutes to apply (watch the little progress bar that appears above the image in the Clip View or Timeline).
Adding Photos DirectlyYou can easily add photos directly to iMovie by dragging the image files from your desktop into either the Clip Shelf, the Clip View, or the Timeline. In all of these cases, iMovie will add the image, just like a video clip, but, again, will automatically try to apply the Ken Burns effect using the current settings within the Photo pane. As mentioned previously, you can cancel the Ken Burns effect and just use the image as a still by pressing Escape (Esc) or Command-. immediately after adding it to iMovie.
So, what if you want to add photos directly, AND use the Ken Burns effect? If the settings for the Ken Burns effect are already configured the way you want before you add your picture, then you literally don't have to do anything . Just add your image and allow the Ken Burns effect to automatically be applied. If, however, you'd like to customize the effect for the image you're adding, you must follow these steps:
As you can see, working with the iPhoto integration is a much more straightforward means to managing images and applying the Ken Burns effect. Hopefully Apple will clean this process up in the future, and add a preference for the automatic application of the Ken Burns effect. For now, however, you've got to make sure that iMovie doesn't start adding effects where you don't want them. Still Images from VideoOne final source for still images is a video clip itself. iMovie makes it easy to create a still image from any frame in a video file. To do this, switch to the Timeline viewer and drag the Playhead until the image that you want to use as a still appears within the main viewer. Next, choose Create Still Frame from the Edit menu. iMovie will add a still image with a five second duration to the available iMovie Clips.
|


EAN: 2147483647
Pages: 349