Safeback
|
| < Day Day Up > |
|
Walk into just about any law enforcement computer forensics shop, and you’ll probably find that investigators are using Safeback to perform forensic duplication. Safeback is a DOS-based utility for backing up, verifying, and restoring hard disks. Safeback was written by Chuck Guzis at Sydex around 1991 and was designed from scratch as an evidence-processing tool. It has now become a law enforcement standard. New Technologies acquired Safeback in March 2000, and the tool is now available at http://www.forensics-intl.com.
Implementation
We will use Safeback to obtain a forensic image of the suspect’s laptop drive. To start, we removed the 2.5-inch hard drive from the suspect’s laptop to perform the forensic duplication. In this particular case, the drive was designed to be user removable. If it hadn’t been, we could have used the printer port option that Safeback offers and used a specialized printer port data transfer cable to obtain the image, although this method would cause the transfer rate to suffer greatly as it would be equivalent to sucking an ocean through a straw.
Then we attached the laptop drive to our forensic workstation IDE chain with a 2.5-inch IDE adapter, which converts a 2.5-inch IDE drive to a 3.5-inch IDE interface. These adapters are readily available at computer parts stores, trade shows, and so on. The adapter we used was from Corporate Systems Center, at http://www.corpsys.com.
With the appropriate drives connected to our forensic workstation, we double-checked the BIOS to ensure that the system would boot from our controlled DOS boot floppy. Then we booted from the floppy disk. We first wanted to see which hard drives were recognized so we entered the following command:
A:\>fdisk /STATUS
DOS numbers the disks starting with 1, and the write-block utility starts with zero. In this case, disk 1 is our storage drive, and disk 2 is the suspect’s 3.9GB laptop drive. The suspect’s drive has two logical drives with file systems that the boot disk recognizes; in this instance, disk 2 has logical drives D: and E:.
Now we need to write block the suspect’s hard disk, which fdisk saw as disk 2 (which in reality is drive 1).
A:\pdblock 1 ******************************************************************************* PDBlock Version 2.00: (P)hysical (D)isk Write (BLOCK)er Copyright 1999, 2000 DIGITAL INTELLIGENCE, INC - http://www.digitalintel.com ******************************************************************************* Usage: "PDBLOCK {drives} {/nomsg} {/nobell} {/fail}" to (re)configure Where: drives: NONE, ALL, or list of hard drives to protect (0-3) i.e. "PDBLOCK 0", "PDBLOCK 013", "PDBLOCK 123", etc (Default is ALL if not specified) /nomsg: Do not display message when write is blocked /nobell: Do not ring bell when write is blocked /fail: Return write failure code to calling program (Default is to fake successful write to calling program) "PDBLOCK" with no options (once loaded) will display help and current config Drives Protected: 1 Return Code: SUCCESS Bell: ON Message: ON We’ve now write blocked the suspect’s drive. While you probably wouldn’t want to do this in a real case, here we’ve executed a command that attempted to write data to the suspect’s drive. Notice that the attempt was blocked by PDBLOCK.
We have attached a large storage drive to the forensic workstation to save the forensic image we will create with Safeback. This drive has a FAT32 file system and shows up as logical drive C:. Since the first evidence image was saved in C:\EVID, we will store this in a new directory called C:\EVID2.
A:\>mkdir c:\EVID2
| Tip | You can always restore the original hard drive once you have created an evidence file. Therefore, we recommend saving the evidence to a file instead of duplicating it to another hard drive. |
Safeback consists of several files, but for this particular example, we will use the primary program, master.exe, to obtain and store a local forensic image. By default, Safeback saves the image to a single file. Instead of saving the image to a single large file, the filesize option allows us to define the size in megabytes. Setting the file size to 640MB makes storage of the forensic image on CD-ROMs much easier.
A:\master filesize=640
A critical component of any forensic duplication software is logging. Safeback keeps a detailed log with date and timestamps in a user-defined logfile. Here we saved the file in C:\EVID2\SB_AUDIT.LOG, as shown next.
Safeback provides the user with four basic functions:
-
Backup creates a forensic duplicate image of an entire drive or partition.
-
Restore takes the content of a file created by the backup function and reproduces it on a user-selected drive.
-
Copy transfers the contents of a drive to another drive.
-
Verify validates the contents of a backup image.
For our initial imaging purposes, we want to select Backup.
Safeback supports imaging through the printer port; however, since the suspect’s drive is now in our local forensic workstation, we will select Local for the Remote Connection option.
The Direct Access option bypasses the system BIOS and interacts with the hard disk controller directly. The manual recommends selecting this option only if you’re not sure whether the entire physical hard disk is being accessed. We will use the default setting of No.
The Use XBIOS option is intended for drives larger than approximately 8GB, which use interrupt 13 extensions when supported by the system BIOS. We will use the default setting of Auto, which automatically selects BIOS or XBIOS depending on which results in the largest capacity.
The Adjust Partitions option addresses the fact that some operating systems assume that partitions start at cylinder boundaries. When a restore operation is performed, the drive geometry of the source drive may not match that of the destination drive, and so some shifting of data may be required. We will use the default setting of Auto.
During a restore operation, Backfill On Restore overwrites the destination drive with binary zeroes if the destination drive is larger than the source drive.
The Compress Sector Data option compresses sector data consisting of a single value into a single byte. Safeback supports no other compression methods.
Now select Backup and press ENTER. If Safeback detects a tape drive, it will ask whether we want to use it for the backup operation. In this case, we press N, for No, since we want to use disk backup files.
We next see a screen to select the source drive. Drive 0 is our storage drive, and drive 1 is the suspect’s drive we want to image. We press the SPACEBAR to select drive 1 and press ENTER to continue.
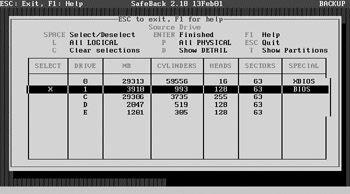
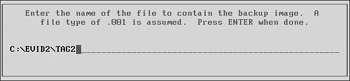
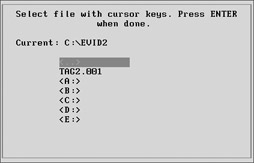
Now we have to select where we want to store the evidence files. We already created the C:\EVID2 directory. In the EnCase example, we saved the first piece of evidence as Tag1. We’ll save this piece of evidence as Tag2.
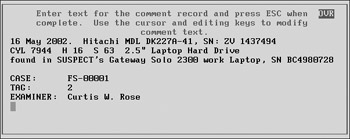
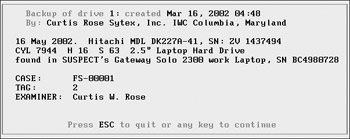
Safeback allows us to enter comments. Generally, it is a good idea to add information about the system, case, and examiner here. We recommend that you at least enter the date, case and evidence number, examiner’s name, serial number, and drive geometry in this field. This information is stored as part of the Safeback file header and is also included in the audit log. Press ESC when you are finished entering data in the comment field to continue.
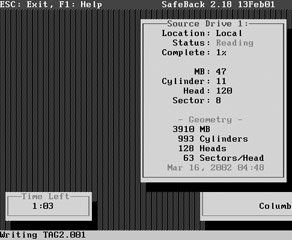
After you enter the comments, the duplication process begins. The status window provides drive geometry information, a percent complete indicator, and an estimate of how long the duplication process will take.
When the duplication is complete, a dialog box appears telling you so. In the status bar on the bottom, you will see that Safeback has split the forensic image into six separate pieces (TAG2.001–TAG2.006).
You should always immediately verify the image. To do this, select Verify from the main menu.
You will be asked for the forensic image to verify. If you don’t remember the name, simply enter the directory, and a list will be displayed. We will select Tag2.001 and press ENTER, as shown next.
The verify process starts by displaying the comment field.
Now, pressing ENTER starts the actual verify process, which is much faster than the acquire process.
| Caution | If you burn the Safeback image files to a CD-ROM, be sure to use the Safeback Verify option on the actual CD-ROM images before you delete the originals. Sometimes the CD-ROM images can have errors without your explicitly knowing it. |
A dialog box indicates that the verify process completed successfully. If errors were detected, they will be indicated here.
A directory listing shows the files that were created:
A:\>dir c:\evid2 Volume in drive C is STORAGE Volume Serial Number is 07E8-1D17 Directory of C:\EVID2 . <DIR> 03-16-02 4:33p .. <DIR> 03-16-02 4:33p SB_AUDIT LOG 4,904 03-16-02 6:24p TAG2 001 671,065,820 03-16-02 4:59p TAG2 002 671,063,451 03-16-02 5:10p TAG2 003 671,068,375 03-16-02 5:21p TAG2 004 671,038,188 03-16-02 5:32p TAG2 005 671,068,532 03-16-02 5:43p TAG2 006 498,573,117 03-16-02 5:51p 7 file(s) 3,853,882,387 bytes 2 dir(s) 2,126.92 MB free
The SB_AUDIT.LOG file we created contains more than date and timestamps. It shows which options we selected and provides important information about the drive geometry and partition table.
A:\>type C:\evid2\sb_audit.log SafeBack 2.18 13Feb01 execution started on Mar 16, 2002 16:34. Command line options: "filesize=640 " 77191-01 Curtis Rose Sytex, Inc. IWC Columbia, Maryland 16:36:36 Menu selections: Function: Backup Remote connection: Local Direct access: No Use XBIOS: Auto Adjust partitions: Auto Backfill on restore: Yes Compress sector data: Yes 16:37:03 Backup file C:\EVID2\TAG2.001 created. Backup file comment record: ---------------------------------------------------------------------- 16 May 2002. Hitachi MDL DK227A-41, SN: ZV 1437494 CYL 7944 H 16 S 63 2.5" Laptop Hard Drive found in SUSPECT's Gateway Solo 2300 work Laptop, SN BC4980728 CASE: FS-00001 TAG: 2 EXAMINER: Curtis W. Rose ---------------------------------------------------------------------- 16:48:43 Backing up drive 1: to C:\EVID2\TAG2.001 on Mar 16, 2002 16:48 16:48:43 Local SafeBack is running on DOS 7.10 Source drive 1: Capacity........3910 MB Cylinders.......993 Heads...........128 Sectors/Head....63 Sector size.....512 16:48:43 Partition table for drive 1: Act Cyl Hd Sct Rel Sector MB Type --- --- -- --- ---------- -- ---- N 985 0 1 7943040 32 Linux Swap N 825 0 1 6652800 630 Linux native N 520 0 1 4193280 1201 FAT-16 > 32MB Y 0 1 1 63 2047 FAT-16 > 32MB 16:59:39 Backup file C:\EVID2\TAG2.002 created. 17:10:33 Backup file C:\EVID2\TAG2.003 created. 17:21:22 Backup file C:\EVID2\TAG2.004 created. 17:32:13 Backup file C:\EVID2\TAG2.005 created. 17:43:09 Backup file C:\EVID2\TAG2.006 created. 17:51:31 Backup file CRC: c2164a8b. 17:51:31 Backup of drive 1: completed on Mar 16, 2002 17:51. 17:52:06 Menu selections: Function: Verify Remote connection: Local Direct access: No Use XBIOS: Auto Adjust partitions: Auto Backfill on restore: Yes Compress sector data: Yes 17:52:32 Backup file created on Mar 16, 2002 16:48 by Curtis Rose Sytex, Inc. IWC Columbia, Maryland Backup file comment record: ---------------------------------------------------------------------- 16 May 2002. Hitachi MDL DK227A-41, SN: ZV 1437494 CYL 7944 H 16 S 63 2.5" Laptop Hard Drive found in SUSPECT's Gateway Solo 2300 work Laptop, SN BC4980728 CASE: FS-00001 TAG: 2 EXAMINER: Curtis W. Rose ---------------------------------------------------------------------- 17:52:42 Backup file C:\EVID2\TAG2.001 opened for access. 17:52:42 Verify of drive 1: from C:\EVID2\TAG2.001 started on Mar 16, 2002 17:52. 17:52:42 Local SafeBack is running on DOS 7.10 Source drive 1: Capacity........3910 MB Cylinders.......993 Heads...........128 Sectors/Head....63 Sector size.....512 17:57:41 Backup file C:\EVID2\TAG2.002 opened for access. 18:02:41 Backup file C:\EVID2\TAG2.003 opened for access. 18:07:40 Backup file C:\EVID2\TAG2.004 opened for access. 18:12:39 Backup file C:\EVID2\TAG2.005 opened for access. 18:17:39 Backup file C:\EVID2\TAG2.006 opened for access. 18:21:21 The whole-file CRC verifies: c2164a8b 18:21:21 Verify of backup data for drive 1: completed on Mar 16, 2002 18:21. 18:24:12 Menu selections: Function: Verify Remote connection: Local Direct access: No Use XBIOS: Auto Adjust partitions: Auto Backfill on restore: Yes Compress sector data: Yes SafeBack execution ended on Mar 16, 2002 18:24.
You now have validated Safeback forensic image files of Tag2 for processing.
|
| < Day Day Up > |
|
EAN: 2147483647
Pages: 189
- ERP Systems Impact on Organizations
- The Effects of an Enterprise Resource Planning System (ERP) Implementation on Job Characteristics – A Study using the Hackman and Oldham Job Characteristics Model
- Context Management of ERP Processes in Virtual Communities
- Data Mining for Business Process Reengineering
- A Hybrid Clustering Technique to Improve Patient Data Quality