Bounding Circles
| [ LiB ] |
Now that we know how to check single pixels for collision, we need to learn how to check for collision of objects. Objects are shapes, images, and the like. There are a few ways to check shapes for collisions.
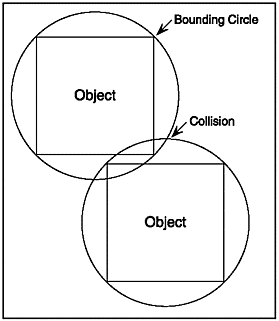
Bounding circles is the first method that we will discuss. Basically, this means we put invisible circles around the objects we are testing. If the circles overlap, a collision has occurred. See Figure 9.3 for an example.
Figure 9.3. Overlapping circles.

If you look carefully at Figure 9.3, you will notice that the objects didn't actually collide only their bounding circles did. This usually isn't a big deal; since the objects are so close to one another, it appears as if there was a collision.
Before I can show you how this works, you need to know two things: one about distance between points, and one about the radius of a circle.
Distance between Points
When we use bounding circles, we will have to compare the distances between points. To find the distance between two points, we can use a mathematical equation. Following is the equation.
NOTE
^ means "to the power of." In this case, ^2 means you raise the number by a power of two, or square it.
distance = sqrt((x2-x1)^2 + (y2-y1)^2))
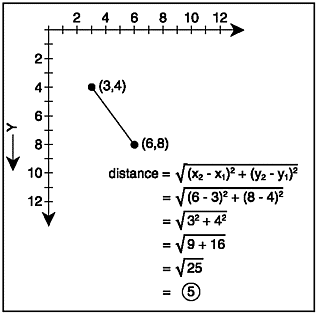
How do you read this? To find the distance between two points, you take the second x coordinate minus the first x coordinate and the second y coordinate minus the first y coordinate. You then square (multiply each of the values by itself) each number and add their results together. Finally, you take the square root of the final number. Figure 9.4 shows how you might compare the distance between two different points.
Figure 9.4. Testing distance.

NOTE
Remember in Chapter 7, "Basic Image Programming," when we were talking about the change in values? If you do, you might also remember that we referred to the change in numbers as delta. That is what the "d" in the dx and dy variables stands for in the Distance() function. Delta means "the change in"here, it is the change in x and y.
Difficult to understand, huh? Well, don't worry about it. I wrote the following function,
Distance(), just for you. Function Distance(x1,y1,x2,y2) dx = x2 - x1 dy = y2 - y1 Return sqr((dx*dx) + (dy*dy)) End Function
There's a new concept or two introduced here. Let's go over them.
First, notice that I computed what x2-x1 and y2-y1 was equal to before actually finding the distance. This makes reading the code much easier. If I had neglected to pre-compute those numbers, the function's return statement would look something like this.
Return sqr(((x2-x1)*(x2-x1)) + ((y2-y1)*(y2-y1)))
Much uglier, huh? Finding out the values made my code much easier to read and comprehend.
Also, notice the function sqr() . This function returns the square root of the number that it is provided. The square root is a number that when multiplied by itself gives the given number. Huh? Basically, if you multiply the square root of a number by itself, you achieve the number. For example, the square root of 4 is 2. You can prove this by multiplying 2 by itself. Because 2 x 2 = 4, 2 is the square root of 4 (so is -2, but that is a different matter altogether).
Finding the square root by hand is an incredibly complex procedure. That is why Blitz Basic provides the sqr() function for you. Following is the declaration for sqr() .
Sqr (value#)
Okay, now we move on to finding the radius of a circle.
Radii
Is your brain hurting from the distance section? Well don't worry, this part is much easier. First off, the radius (plural radii, a very cool word) of a circle is equal to 1/2 of the diameter of the circle.
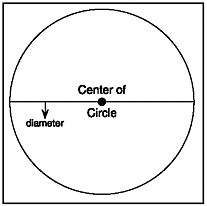
In a circle, there is one point directly in the center. From here on, I will call this point the "center of the circle." Well, anyway, the diameter of a circle is the distance from any point on a circle to another point on a circle, provided it crosses through the "center of the cir-cle." What do I mean? Check out Figure 9.5.
Figure 9.5. The diameter of a circle.

Notice that the diameter shown in Figure 9.5 is just one of many. There are infinite diameters in a circle. However, all of them must extend from side to side and through the center of the circle, thus their lengths are all the same.
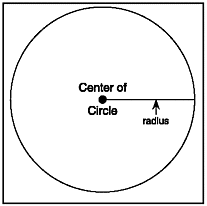
Anyway, getting back to radii, the radius of a circle is 1/2 the diameter. You may be thinking, isn't that the same as the distance from the "center of the circle" to the actual circle? You are absolutely correct! Figure 9.6 shows the radius of a circle.
Figure 9.6. The radius of a circle.

Make sure you understand that any point on the circle is exactly the same distance from the "center of the circle" as any other point on the circle.
Okay, we are now good to go. How can we find the radius of an object? It's a big problem, but it isn't that hard to find. We are going to use code to figure this out. First we load an objectsay, an image.
imagehandle = LoadImage("image.bmp") Now we have to find the radius. Before we can do that, we need to go over two very basic functions. These functions are ImageWidth() and ImageHeight() .
These two functions return the width and height in pixels of the image whose handle you provide. Following are their declarations.
ImageWidth(imagehandle) ImageHeight(imagehandle)
Anyway, getting back to the actual coding, we now need to find the radius of our image. We are going to define the radius of the image as the distance from the center of the image to the outer parts of the image. Make sure you understand that every bitmap is rectangular and not circular in nature. Therefore, the radius collision test will not be perfectly accurate.
You might be thinking that we can just take the result of either ImageHeight() or ImageWidth() and divide it by two to give us a radius. However, this isn't a good idea. Since the images are not square, but rather rectangular, taking only the width or only the height into account can give you a very inaccurate radius. What we are going to do is take the average of one-half of the height and width of the image. Let's write our function,
FindRadius(). Function FindRadius(imagehandle) Return ((ImageWidth(imagehandle)/2) + (ImageHeight(imagehandle)/2) / 2) End Function
This function returns the approximate radius of the image it is given. Okay, now we need to know how to test the image from FindRadius() with another object for collision. All that we do is test the point to see if its distance from the image is less than the distance of the radius. The following program, demo09-02.bb, demonstrates how to do this. It's a long one, so I don't want to list it all out in the book. Let me show you some cool parts, though.
We haven't gone over using the Each keyword in for loops lately. Let's review how they work.
First of all, we have to create a type. In this program, we use a type for every point. The type is defined like this.
;the point type defines each object that can be hit by the ship Type point Field x,y ;the x and y coordinate of the ship End Type
Now, we want to create a lot of these points. This is accomplished through the For Each loop.
;Create NUMBEROFOBJECTS new points with random x and y coords For counter = 0 To NUMBEROFOBJECTS point.point = New point point\x = Rand (0,800) point\y = Rand (0,600) Next
This loop creates NUMBEROFOBJECTS points and gives them all random x and y values.
If you are wondering what the constant NUMBEROFOBJECTS means, check out Table 9.1.
Table 9.1. demo09-02.bb's Constants
| Constant | Value | Description |
|---|---|---|
| NUMBEROFOBJECTS | 50 | The number of points that can be hit by the player's ship. |
| LEFTKEY | 203 | The key code for Left. |
| UPKEY | 200 | The key code for Up. |
| RIGHTKEY | 205 | The key code for Right. |
| DOWNKEY | 208 | The key code for Down. |
| MOVEX | 5 | The number of pixels the player can move left or right per frame. |
| MOVEY | 5 | The number of pixels the player can move up or down per frame. |
Sound good? Good. Now that we have created each of the objects, we also need to know how to delete all of the objects. We delete the objects when the level is reset.
;Delete every point on screen
For point.point = Each point
Delete point
Next
This deletes all of the points that have been created previously.
Okay, the next thing I want to go over is TestCollisions() . This function tests all of the objects on the screen to see if they were hit by the ship.
;FUNCTION TestCollisions() - Tests the objects and the ship for collisions ;No input parameters ;Returns 1 if there was a collision, 0 if there was none Function TestCollisions() ;Check every object to see if it is within player's radius. If it is, return that there was a collision. For point.point = Each point If Distance(player\x,player\y,point\x,point\y) < player\radius Return 1 EndIf Next ;If there was no collision, return 0 Return 0 ;There was no collision End Function
Not too bad, huh? It checks each point to see if it is within the radius of the ship. If so, 1 is returned. In the main loop, if there was a collision, the level is reset and the number of collisions is incremented by 1.
There are quite a few functions defined in this program, so Table 9.2 lists them all.
Table 9.2. demo09-02.bb's Functions
| Function | Description |
|---|---|
| ResetLevel() | Deletes and renews all the objects; resets the player's starting coordinates. |
| TestCollisions() | Tests all objects to see if they have collided with the spaceship, and returns 1 if a collision took place. |
| TestKeys() | Tests the keyboard to see if any keys have been pressed. |
| Distance() | Finds the distance between two points. |
| FindRadius() | Finds the radius of an image. |
Alright, that's just about it for this section of the code. Next, we move on to bounding boxes.
| [ LiB ] |
EAN: 2147483647
Pages: 94
If you may any questions please contact us: flylib@qtcs.net