The Pen Tool
| You might say, "What, the Pen tool again?" I know what you mean; all of this emphasis on the same tool can be trying. But in this section, you will not only practice what you've learned so far with the Pen tool, but also take it even further by using it with just about every type of path you can think of. Remember: No Pen tool, no Illustrator! I consider the Pen tool the most powerful tool in the whole Illustrator kingdom. In time and with practice, you can use it to draw anything you imagine! Figure 5.23. Designer Todd Macadangdang uses the Pen tool in this illustration to create the contours of this woman's face, later filling them with gradient meshes for realistic shading.
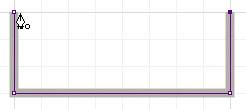
As we explore the Pen tool, I recommend you turn on the drawing grid (View > Show Grid) and its snap-to feature (View > Snap To Grid). This will constrain the tool to the grid lines and help you learn how the tool behaves. When you are more confident, you can get rid of the drawing grid and draw freely. CREATING A CLOSED-PATH OBJECTWe will start our study with a closed-path object, so select your Pen tool now. You'll see an X next to the Pen tool pointer Place the pointer above the first anchor point we drew. Now there is a circle next to the pointer Figure 5.24. One more click and you'll have a closed path.
ADDING AND SUBTRACTING ANCHOR POINTSLet's try another quick study. Draw two separate path segments beside each other but not touching. To end a path and start a new one, press Enter before you draw the second path. Select the first path segment with the Selection tool and position the Pen tool near the center of it. The Pen tool now has a plus sign pointer Figure 5.25. Try it outadd a point to a segment, then subtract it, watching your Pen tool pointers.
You can also add and delete points using the Add Anchor Point tool and Delete Anchor Point tool in the toolbox. So many options! CONTINUING AND JOINING EXISTING PATHSNext, move the Pen tool over one of the anchor points on the end of either path segment. The pointer has a forward slash, which means you can continue a previously drawn path Figure 5.26. Clicking now will join the two paths.
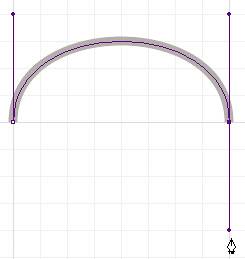
Creating CurvesYou can also use the Pen tool to create curved lines (also called Bézier curves) similar to the way you create straight lines. CURVED LINESHow is it done? Instead of clicking, you click and drag. When you drag, direction lines and handles appear. The direction lines show the path a curve will follow when you click to create another anchor point. Let's make a curve. Click and drag with the Pen tool to create an anchor point with direction handles. Click and drag somewhere else to complete the curve. As you drag, you can change the rotation and length of the direction lines. Longer direction lines create steep curves, shorter lines create soft curves. Figure 5.27. I made a symmetrical curve using vertical direction lines of the same length on both sides.
If you click a previously drawn curve with the Direct Selection tool, you'll see its direction lines. You can move the direction lines with the Direct Selection tool too. Practice drawing lots of curves. Select the segments, and study the angles and lengths of the direction lines to see how they change the path as you see in Figure 5.29. A tip to keep in mind is that the fewer the anchor points, the smoother the curve. Figure 5.29. Your hinged curve should be pretty close to mine.
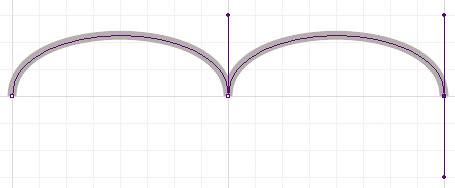
HINGED CURVESIn a hinged curve, two curved lines meet to form a cusp point. It may sound weird, but it's actually very handy. There are three types of anchor points in Illustrator: corner points, smooth points, and cusp points. Straight lines use corner points (which we drew earlier with our straight, closed path); curved lines use smooth points; and hinged curves use cusp points. Follow along, and we'll make a hinged curve. Click and drag upward to drag out direction lines. For the next point, click and drag downward to pull out direction linesbut do not release the mouse, OK? Hold the Alt/Option key to drag the bottom direction line and align it with the top direction handle, and then release. Create a third point by clicking and dragging down to pull out the direction handles. Does your path look like the letter M? Great! The two points on the outside are smooth points, and in the middle is a cusp point. Figure 5.28. Just practice!
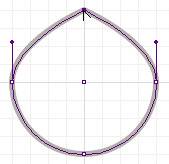
IDENTIFYING AND CHANGING ANCHOR POINTSSelect any anchor point with the Direct Selection tool to see what kind of point it is. Corner points do not contain direction lines; smooth points always have two direction lines (in a straight line above and below the anchor point); and cusp points have either one or two direction lines at different angles. Are you wondering whether you can change one type of anchor point to another? I hope soyou can do it with the Convert Anchor Point tool To convert a smooth point or cusp point to a corner point, just click the anchor point with the Convert Anchor Point tool. Try it out on a curved path segment or on a circle. The smooth and cusp points lose their direction lines, and the path segments lose any curve information. Figure 5.30. This was a circle until I converted an anchor point.
To convert a corner point or cusp point to a smooth point, click and drag the anchor point with the Convert Anchor Point tool. As you drag, direction lines appear and the path segments leading into the point begin to curve on either side of the anchor point. What about converting a smooth point to a cusp point? That's a little trickier. First, draw a circle to practice on. Select the bottom anchor point on the circle with the Direct Selection tool to see the direction lines. Hold the Alt/Option key, and click and drag a direction point. Notice that the other direction line stays put. Wow, this a lot of information to digest! But lots of practice with the Pen tool will make you a master of it soon. |


EAN: 2147483647
Pages: 103