Executing the Plan
Chapter 4, “Planning a Project,” covered the activities associated with planning a project and showed us how to utilize Visual Studio Team System in the planning process. This chapter focuses on the next step: executing the plan.
The PMI Project Management Body of Knowledge describes two process groups to cover this stage in a project: the Executing Process Group and the Monitoring and Control Process Group. The Executing Process Group consists of the processes that implement the project management plan. This process group is where the actual work gets done. In addition to directing and managing project execution, this process group includes acquisition and development of the project team and performance of quality assurance, vendor selection, and distribution of information to all interested stakeholders.
The Monitoring and Controlling Process Group consists of the processes used to observe project execution, measure progress, identify potential problems, and take corrective actions when necessary. In addition to monitoring and controlling project work, this process group includes integrated change control, scope verification, scope control, schedule control, cost control, quality control, team management, performance reporting, stakeholder management, risk monitoring and control, and contract administration.
| Note | Many people look at the PMBOK and see a monolithic waterfall process full of procedures and documentation-the antithesis of Agile development. It’s unfortunate that the PMBOK gives this impression to so many people because that’s simply not true. In fact, the PMBOK 3rd Edition states, “The application of the [PMBOK] project management processes to a project is iterative and many processes are repeated and revised during the project. The project manager and the project team are responsible for determining what processes from the [PMBOK] Process Groups will be employed, by whom, and the degree of rigor that will be applied to the execution of those processes to achieve the desired project objective.” |
The Microsoft Solution Framework (MSF) offers a different yet complementary perspective on project execution. MSF organizes project execution into three tracks: Build, Stabilize, and Deploy. These MSF tracks can overlap and span multiple iterations. Each MSF track includes a governance checkpoint that serves as a go-no-go gate for the project. For instance, the Build track checkpoint relates to completing the envisioned scope, the Stabilize checkpoint relates to release readiness, and the Deploy checkpoint relates to deployment completion. The specific criteria used for each checkpoint is determined during project planning and is updated as needed during iteration planning.
Each MSF track is also associated with activities grouped into workstreams. For more information about MSF tracks, refer to the MSF guidance in Visual Studio Team System. To view the MSF tracks in the MSF process guidance, do the following:
-
Launch Microsoft Visual Studio 2005.
-
In Team Explorer, right-click the name of the Team Project created by using an MSF template and then select Show Project Portal. The project portal appears in a Web browser window, as shown in Figure 5-1.
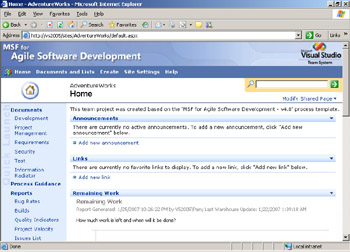
Figure 5-1: Home page for a Team Project based on MSF for Agile Software DevelopmentTip Add the project portal to the Favorites list in your Web browser so you can easily access the portal in the future.
-
Click the Process Guidance hyperlink from the Quick Launch area of the project portal to show the MSF process guidance home page.
-
On the MSF process guidance home page, click the Views tab to show the About Views page.
-
On the Views menu, click the Tracks link to show the About Tracks page.
-
Click the name of a track to view related information including workstreams and activities, work items, work product examples and templates, and report examples. Figure 5-2 shows the process guidance for the Build track.
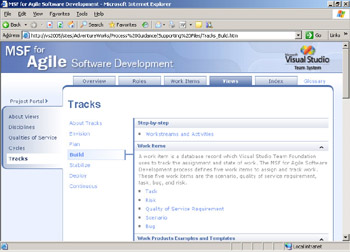
Figure 5-2: MSF process guidance for the Build track
Now let’s take a closer look at how Visual Studio Team System and MSF contribute to specific PMBOK processes associated with monitoring and controlling project execution.
Directing and Managing Project Execution
Directing and managing project execution is the process in which the actual work is performed. This process consists of the actions taken by you and the project team specified in the project management plan. In the context of an Agile methodology such as MSF, the project management plan is primarily the detailed work plan that the project team produces at the start of each iteration. This iteration plan consists of work items added to the Team Project in Visual Studio Team System. Typically, these work items represent tasks. However, other types of work items can be included, such as risks to be considered and bugs that might be included from the previous iteration. As work progresses, other types of work items are added to the iteration plan: new bugs to be fixed and newly discovered risks to be addressed.
In the Team Foundation Client, you can use the work item queries to produce a list of work items that you can view and update. To produce a list of all the active tasks for a Team Project, do the following:
-
Launch Visual Studio 2005.
-
In Team Explorer, expand your Team Project, expand the Work Items folder, and then expand the Team Queries folder.
-
Double-click the All Tasks query. A query results window (shown in Figure 5-3) appears showing a list of all the active tasks for the Team Project.
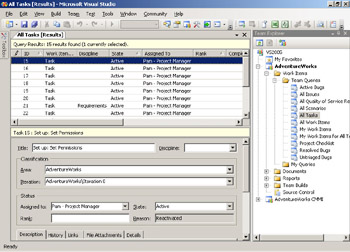
Figure 5-3: Results of the All Tasks work item query
You can click any work item in the query results list to view the details in the work item form below the list. To work with the results in Microsoft Office Excel instead, simply right-click the work item query in Team Explorer and then click Open In Microsoft Excel. Office Excel will launch automatically, and then the results of the query will load directly into the spreadsheet, as shown in Figure 5-4.
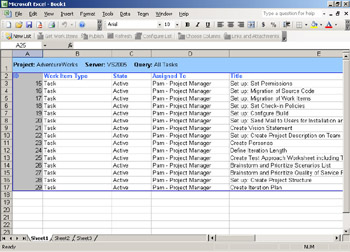
Figure 5-4: Results of a work item query in Office Excel
In addition to tasks, the PMBOK refers to three types of actions taken while a project is in progress: defect repairs, preventive actions, and corrective actions. Defect repairs are more commonly referred to as bug fixes. When a defect is found in the software being produced, it is documented as a bug. The act of fixing the bug is the defect repair. Preventive actions are taken as a result of risk planning and monitoring. These actions are intended to avoid a problem by either reducing the probability that the problem will occur, minimizing its impact on the project, or both. A preventive action can occur as a planned task, or it can be triggered by an event. When an unanticipated problem causes the project to deviate from the plan, the team takes corrective action to get the project back on track. Rather than simply reacting to a situation, the project team should apply corrective actions that are deliberate, agreed-upon, and documented in some way.
You can employ Visual Studio Team System to manage preventive actions, corrective actions, and defect repairs in much the same way that you manage tasks-through work items. Both MSF process templates include a Bug work item type for logging and tracking defect repairs. In addition, both MSF process templates include a Risk work item type for documenting and managing preventive actions in addition to corrective actions. MSF calls the preventive actions associated with a risk the Mitigation Plan and corrective actions associated with a risk the Contingency Plan. In addition, all the work items in MSF for Agile Software Development include a drop-down list to flag the work item as an issue that is impeding progress. The Issue dropdown list is located on the Details tab of the work item data entry form. MSF for CMMI Process Improvement handles issues as a separate work item type that includes additional fields such as Analysis, Corrective Action, Target Resolve Date, and Actual Resolve Date.
| Tip | If you created a Team Project by using the MSF for Agile Software Development process template but wish it had an Issues work item type, you’re in luck! You can import new work item types into existing Team Projects by using the Process Template Editor. You will learn how to perform this customization and others in Chapter 7, “Tailoring Visual Studio Team System.” |
By managing their work items in Visual Studio Team System during project execution, the project team generates work performance information that can be used to produce performance reports. Visual Studio Team System automatically generates additional work performance information through Team Foundation Version Control and Team Build.
Team Foundation Version Control allows the project team to maintain proper version control over the work products it produces. As the project administrator, you can easily configure Team Foundation Version Control to require all source code revisions to be associated with one or more work items when checked in. We highly recommend that you enable this checkin policy because it provides valuable work performance information by linking activities to the resulting work products. To enable this check-in policy for a Team Project, do the following:
-
Launch Visual Studio 2005.
-
In Team Explorer, right-click the name of the Team Project, point to Team Project Settings, and then click Source Control to show the Source Control Settings window.
-
On the Check-in Policy tab, click Add to show the Add Check-in Policy dialog box.
-
Select the Work Items check-in policy, and then click OK to save the setting and close the Add Check-in Policy dialog box. Figure 5-5 shows the Source Control Settings window with the newly added check-in policy.
-
Click OK to save the setting and close the Source Control Settings window.
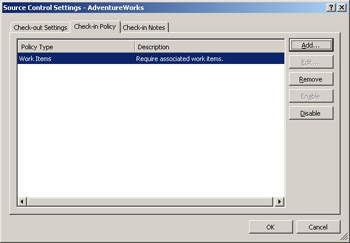
Figure 5-5: Adding a Work Items check-in policy to a Team Project
Team Build is an automated build system integrated directly into every Visual Studio Team System Team Project. By using the New Team Build Type Creation Wizard, the project team can easily configure Team Build to build one or more Visual Studio software projects automatically, run a suite of automated tests against the new build, deploy the resulting executables to a predetermined drop location, and open a Bug type work item if the build fails for any reason. A team member can manually start a build from Team Explorer. With a bit more setup, though, the build can be scheduled to automatically run periodically. The most typical setup is to run the build nightly. Some shops take an even more aggressive approach to automated builds by configuring Team Foundation Server to run a build every time a check-in event occurs.
Each build automatically saves a complete build report to the Team Foundation Server data warehouse. The build report includes a step-by-step log of the build process, a list of source control changesets containing the source code used by the build, a list of work items associated with those changesets, and detailed results of all tests run. When the build is run regularly, these build reports offer a wealth of work performance information related to the health of the product, including current status and historical trends.
Monitoring and Controlling Project Work
Whereas directing and managing project execution consists of performing work as specified in the project management plan, monitoring and controlling project work involves observing project execution and measuring project performance to identify issues in a timely manner and take corrective action as needed.
| Note | Four dimensions of a project need to be monitored and controlled: scope, time, cost, and quality. Historically, the software industry has done a poor job in all four dimensions. The good news is that there is plenty of room for improvement, and we’re getting better at applying best practices. The PMBOK provides in-depth guidance for managing each of these dimensions. This guidance is somewhat generalized, designed to apply to a wide range of projects. We’ll provide more specific guidance here, based on MSF and other Agile development methods. |
When monitoring project work, there are two types of variation to consider: common cause variation and special cause variation. This phenomenon was first described in the 1930s by Dr. Walter Shewart of Bell Labs and was later popularized as a statistical process control method by W. Edwards Deming in the 1980s ( Out of the Crisis, MIT Press, 1986). Common cause variation is predictable based on historical experience. It’s the day-to-day variation that occurs on every software project. For instance, the duration of an individual task in an iteration plan almost never matches the estimate-some tasks take longer than expected, whereas other tasks are finished early. This is normal variation that can be anticipated. As long as this variation stays within an acceptable range, it’s considered a normal part of executing the project plan, so it requires no corrective action.
Special cause variation, on the other hand, is inherently unpredictable because it is new and unanticipated. Special cause variation signals that something about the project has fundamentally changed and that corrective action is required. One example of special cause variation would be the reassignment of a key project team member to another project halfway through an iteration. Another example would be the discovery of a serious flaw in the software product that requires major rework. Clearly these are unanticipated situations that must be addressed because of their impact on the project plan.
Monitoring and controlling project work is all about detecting special cause variation and taking the appropriate corrective actions. Sam Guckenheimer ( Software Engineering with Microsoft Visual Studio Team System, Addison-Wesley, 2006) points out the importance of making the distinction between common cause variation and special cause variation. He warns that tampering with a process that’s exhibiting common cause variation is counterproductive because it only increases variances, sending the project out of control. On the other hand, ignoring special cause variances can be just as hazardous by allowing the project to remain out of control. For this reason, it is important that you understand the two types of variation and respond to them appropriately.
You can use work item queries to monitor project execution. The MSF process templates include a query called All Work Items, which includes all the work items for a Team Project that are not in a Closed State. This work item query is a good choice to see the current status of the project because it lists all the active work items regardless of type. To better analyze the project status, you can sort the query results by clicking the column headings shown in Figure 5-3.
Opening the All Work Items query in Office Excel allows you to further analyze capabilities. You can use the Pivot Table feature of Office Excel to group and summarize work items by any of the fields such as State, Discipline, Work Item Type, or Assigned To. You can also display the pivot table information as a chart. For more information, see the section titled “Work Item Pivot Tables and Graphs” in Chapter 4.
In addition to work item queries, you can use the Team Foundation Server reports to access work performance information. Team Foundation Server utilizes SQL Server Reporting Services to create sophisticated reports from its data warehouse. The two MSF process templates include a variety of reports that provide many different perspectives on project performance. You can access these reports in several ways. To view a Team Project report directly in the Team Foundation Client, do the following:
-
Launch Visual Studio 2005.
-
In Team Explorer, double-click a Team Project name to expand its folder.
-
Double-click the Reports folder to view a list of available reports, as shown in Figure 5-6.
-
Double-click a report name to view the report.
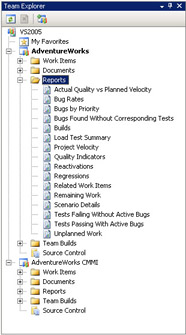
Figure 5-6: Selecting a report in Team Explorer
To view the reports in a Web browser by using the SQL Server Reporting Services Web site, do the following:
-
Launch Visual Studio 2005.
-
In Team Explorer, double-click a Team Project name to expand its folder.
-
Right-click the Reports folder and then click Show Report Site to open the Microsoft SQL Server Reporting Service Web site for the Team Project in a browser window, as shown in Figure 5-7.
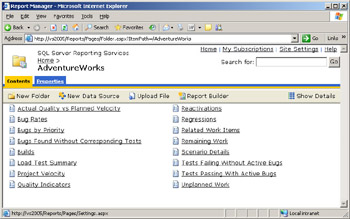
Figure 5-7: SQL Server Reporting Services Web site for a Team ProjectNote The Work Remaining report has its roots in Lean Production, which is a management philosophy focused on the reduction of waste to improve the flow of value to the customer. This philosophy was first articulated by James P. Womack and Daniel T. Jones ( The Machine that Changed the World: The Story of Lean Production, Harper Perennial, 1991) in their description of the Toyota Production System (TPS). It turns out that the TPS introduced the Cumulative Flow Diagram as a simple and effective way to visualize the flow of work through a production line. The MSF architects saw the value in the Cumulative Flow Diagram and adapted it to visualize the flow of work in a software development project, renaming it the Work Remaining report.
By looking at the Remaining Work report, you can quickly assess project performance. First, the slope of the line between Resolved Scenarios and Closed Scenarios indicates the rate at which Scenarios are being closed. By projecting this line to the end of the iteration, you can clearly see whether the rate is sufficient to close all of the Scenarios before the iteration is finished. This provides an early warning that allows the team to take corrective actions if necessary.
Measuring the vertical height of a queue on a given day tells you the size of the queue on that day. Measuring the horizontal width of a queue on a given day tells you the lead time of the queue on that day, that is, how many days it will take for a work item to move to the next queue. If the size or lead time increases for all but the Closed queue, a bottleneck impeding progress. The team should determine the cause of the bottleneck and take corrective action to remove it.
Whereas the Remaining Work report provides at-a-glance information about the status of the project, the Quality Indicators report provides at-a-glance information about the status of the product. Shown in Figure 1-3 in Chapter 1 (page 13), the Quality Indicators report is actually four diagrams superimposed on one another: test results, percentage code coverage, code churn, and active bug count.
The test results show the number of tests that passed and failed. It also shows inconclusive tests, which are unit test stubs that have been created but not fully implemented. The percentage code coverage shows the number of lines of code that were tested, as a percentage of the total lines of code in the application. Code coverage is a crude measure in that that unit tests might not test all the logic in a block of code even though the block of code was executed at least once. Just the same, code coverage is a good indication of code quality, and most organizations set a minimum threshold for this metric. Both test results and code coverage come from the build history in the Team Foundation Server data warehouse.
Code churn measures the volume of change in the code base. Whenever source code is checked into Team Foundation Version Control, Team Foundation Server automatically measures the lines of code that were added, deleted, and modified, and then it records this information in the Team Foundation Server data warehouse. Code churn is the sum of these changes: lines added + lines deleted + lines modified. Measured over time, code churn is a relative measure of stability in the code base. Code churn is typically high at the beginning of an iteration, when features and being added or changed and unit tests are being added or modified. However, as the code base begins to stabilize, the code churn should taper off, with a corresponding increase in the number of passing tests. If the code churn remains high late into an iteration, that indicates that the software is not stabilizing.
The active bug count comes from the work item tracking system. It shows the number of bugs that have been reported but not fixed. The active bug count should decrease at the end of an iteration. Ideally, it should reach zero, but in practice it rarely does because some bug fixes are either deferred or deemed not worth fixing.
Although the Quality Indicators report is very busy, it’s actually easy to interpret, as we see in Table 5.1.
| Quality Indicator | Healthy Trend |
|---|---|
| Number of Tests Passed | ì |
| Percentage Code Coverage | ì |
| Number of Inconclusive Tests | î |
| Number of Failed Tests | î |
| Code Churn | î |
| Active Bugs | î |
| ì = High and increasing over time, î = Low and decreasing over time | |
These two reports give you complete, at-a-glance work performance information for monitoring and controlling project work: the Remaining Work report charts the health of the process, and the Quality Indicators report charts the health of the product. With these reports, you can quickly assess project performance, spot unhealthy trends, and identify the need for corrective actions. The MSF process templates contain additional reports that serve a variety of other purposes including planning and estimating, root cause analysis, process improvement, and capability appraisal. For more information about each of the reports, refer to the MSF Process Guidance. To access report descriptions and examples in the MSF Process Guidance, do the following:
-
Launch Visual Studio 2005.
-
In Team Explorer, double-click a Team Project name to expand its folder.
-
Right-click the Work Items folder and then click Team Project Process Guidance to show the process guidance home page.
-
On the Index tab, click the Reports link in the left pane to show an index of available reports.
-
Click the name of a report in the index to view a description and example of the report.
Managing Project Scope
As mentioned earlier, most software projects begin with a significant degree of ambiguity. Users often don’t know exactly what they want, or they cannot articulate their needs in enough detail to clearly specify the requirements. The project team may not fully understand the problem domain, or maybe they are using an unfamiliar new technology. Whatever the reason, there is a good possibility that requirements will change over the course of a software development project.
Iterative and incremental development methodologies address the problem of ambiguity by allowing requirements to be refined and elaborated on as the project progresses, based on knowledge gained in previous iterations. Iterative and incremental development also supports changing business conditions by allowing requirements to be added, removed, modified, and reprioritized on iteration boundaries. This approach is very effective, but it has an insidious downside: scope creep. As users see working software and more fully understand the possibilities, they naturally begin to ask for more features. Developers are sometimes guilty of a form of scope creep called gold plating-embellishing the product with features that were not requested in the hopes that they might prove useful or sometimes just because they are intellectually stimulating to create.
Clearly there is a need to allow changes to the scope of a project while it’s in progress, but these changes must occur in a controlled manner. The PMBOK describes a process for managing project scope through an integrated change control process. In a nutshell, the PMBOK scope control process starts with a detailed project scope statement and work breakdown structure and then it manages project scope changes through a formal change control system consisting of a tracking system and documented procedures that include levels of approval for authorizing changes.
MSF for Agile Software Development does not specify a change control process per se. Rather, change control is built into the iteration planning process and is managed cooperatively by the Business Analyst and Project Manager. During project planning, the Business Analyst specifies the scope of the project in terms of Scenarios and Quality of Service Requirements, and the Project Manager specifies the project scope in terms of estimated cost and schedule. During an iteration, the Business Analyst updates and reprioritizes the Scenarios and Quality of Service Requirements, adding and changing requirement-related work items and updating their rank values as needed to reflect the current priorities based on customer feedback and changing business conditions. The Project Manager then schedules Scenarios, Quality of Service Requirements, and a bug-fixing allotment for the upcoming iteration, based on the project team’s velocity in the previous iteration. After the iteration has started, nobody outside the project team is permitted to make changes until the start of the next iteration. This nochange rule might seem a bit harsh, and some may even perceive its inflexibility as going against the Agile philosophy. This rule is critical, though, because changing the scope of an iteration is very disruptive, causing the team to lose momentum, productivity, and morale.
Even so, there are times when a new opportunity is so compelling that it warrants interrupting an iteration. In his book Agile Project Management with Scrum, 1st Edition (Microsoft Press, 2004), Ken Schwaber describes an effective technique for dealing with this situation. If an opportunity comes up that is significantly more important than the work being done on the iteration, management can cancel the iteration completely. This abnormal termination triggers a new iteration planning meeting at which the priorities are re-evaluated and the new opportunity is selected if it becomes the new top priority. Cancelling an iteration is a highly disruptive, highly visible action that management is not likely to take without good reason. What’s more, management is not likely to invoke this drastic measure because the opportunity can be addressed at the start of the next iteration, which is no more than a few weeks away.
This approach simplifies the process of controlling and verifying scope. The overall scope of the project is specified by the Product Manager during initial project planning through the vision statement, requirements work items, and other requirements documentation. The scope for each iteration is well defined, based on an elaboration of the high-priority requirements selected during iteration planning. This elaboration involves a collaborative effort between the product manager and the rest of the project team and can be expressed in a variety of ways including additional narrative, flowcharts, models, prototypes, and acceptance tests. At the end of each iteration, the scope is verified, usually through acceptance test results and a formal review with the product manager.
The reason this approach works so well is that the scope is managed in small, incremental chunks that do not change once work is underway. Short iterations of fixed duration not only keep the scope of an iteration small, they also offer the opportunity to frequently re-evaluate priorities and respond to new opportunities. In this way, integrated change control is a highly adaptive process that harmonizes with the overall rhythm of the project.
Another source of scope change is imperfect planning. Even at the iteration level, at which planning is done for a short period in the immediate future, there will be tasks that nobody anticipated. It’s not that these tasks are added after the fact; they were there all along but simply didn’t make it into the plan. In his book Agile Management for Software Engineering: Applying the Theory of Constraints for Business Results (Prentice Hall PTR, 2003), David Anderson calls these unanticipated activities dark matter. Project dark matter is an inevitable fact of life that cannot be avoided completely. However, it can be monitored. The Unplanned Work report in Figure 5-8 shows how much work was added to an iteration after it started.
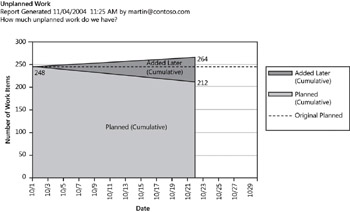
Figure 5-8: Unplanned Work report
Project dark matter can also be seen in the Work Remaining report. Notice how the top line of the Work Remaining report in Figure 1-2 (page 12) rises over time. This increase in the total amount of work is an indication of project dark matter. Both the Unplanned Work report and the Work Remaining report can be used to monitor project dark matter and take corrective actions if necessary. These reports are also very useful during iteration retrospective meetings to review the magnitude of project dark matter and discuss ways to reduce it in future iterations.
Managing Cost and Schedule
The same technique that works so well for managing scope works equally well for controlling cost and schedule, too. One approach that is gaining popularity is to fix the cost and schedule of a project at the outset and then manage the project scope to match the velocity of the project team. Remember, there are four dimensions of a project that you can control: scope, time, cost, and quality. In effect, you hold the time, cost, and quality constant but allow the scope to vary as needed to bring the project in on time and on budget. This approach makes management happy because they know up front when the project will be completed and how much it’s going to cost.
But you might be thinking that this approach runs the risk of delivering an incomplete product or a product that does not meet the original specifications. The secret to making this approach work lies in prioritizing the requirements in terms of customer value and then delivering that value incrementally throughout the duration of the project. This is exactly the approach prescribed in Agile methodologies such as MSF and Scrum. The backlog of requirements to be implemented is ranked in descending order based on customer value, and then the requirements to be implemented for an iteration are selected from the top of that list.
To make this work, though, you must make sure that your customer fully understands the advantages and tradeoffs of this approach. The customer should understand that the project will deliver maximum customer value while simultaneously controlling cost and schedule. Further, the project will deliver this value incrementally, which is to say that the customer will realize value from the project early and often. The customer must also understand that building software is an evolutionary process and that the requirements specified at the outset of a project are a vision of the final product that will likely change over the course of the project. Some customers might find this reality difficult to accept. The sweetener that closes this deal is the fact that the customer is in control of that change because the customer controls the priority of the requirements and is allowed to change the priorities for each iteration. This in effect allows the customer to continuously refine and adjust the definition of value throughout the duration of the project. Now who could resist that proposition?
Reprioritizing may cause some requirements to fall out of scope. In other words, there may be features that were originally envisioned but that don’t make it into the final product. The good news is that these unimplemented features offer the least value to the customer, as determined by the customer. In some cases, the customer may also have the option of adjusting the project cost or schedule to either increase the number of requirements implemented or decrease them if necessary.
Managing Software Quality
Software quality continues to be an area of particular concern. As stated in Chapter 1, “ Managing Software Engineering Projects,” our industry’s poor track record regarding software quality cannot continue indefinitely-we simply have to get better at building good software. Couple that with the fact that software continues to increase in complexity, and you have a compelling need to build quality into the software and maintain that quality as the software evolves throughout its life cycle. Simply put, complex software of low quality will be hopelessly difficult to maintain, and the cost will be too high. Fortunately, we’re seeing a great deal of emphasis put on software quality these days, with unit testing gaining popularity and testdriven development building momentum.
There are two aspects to software quality that need to be managed: quality assurance and quality control. Quality assurance and quality control are closely related but different in an important way. Quality assurance involves a systematic approach to software quality. It means building the software from the ground up to be easier to test, easier to maintain, and easier to modify as requirements change. To that end, quality assurance involves using proven design patterns and best practices when designing and building software. Quality assurance also involves validating software design and implementation through frequent peer reviews. In an ideal world, quality assurance is a proactive form of defect avoidance. But in the real world, defects happen despite your best efforts. As a result, quality assurance also involves defect repair and taking the appropriate corrective actions when quality become an issue.
Quality control, on the other hand, involves monitoring the quality of the software being produced. Unit tests are a good example of quality control. A good suite of unit tests can quickly verify that an application under development continues to work correctly even as changes are made to it. The Quality Indicators report is another good example of a quality control. It uses a variety of key quality metrics to provide important feedback on the health of the software.
| Note | It is interesting to that test-driven development (TDD) incorporates both quality assurance and quality control. With TDD, the requirements are translated into a list of unit tests that must be satisfied. This test list then becomes the specification for the software implementation. A unit test is implemented first, and then just enough of the application is implemented to satisfy the unit test-but no more. Then the next unit test is implemented, and the application is then modified to satisfy that unit test in addition to the first. This cycle continues until all the unit tests have been implemented and the application is passing all the tests. This approach incorporates quality assurance in several ways. First, requirements expressed in terms of unit tests are clear and unambiguous. Second, building the application to satisfy one unit test at a time avoids defects by ensuring complete code coverage. Third, unnecessary features are avoided by building the application to satisfy the unit tests and no more. Quality control is achieved automatically because TDD produces a unit test suite that can be run at any time to verify that the application is working correctly and meets all of the requirements. |
As a project manager, you need to manage quality by making sure the appropriate quality assurance methods are being utilized and the necessary quality control mechanisms are in place. You need to ensure that quality control is monitored and that corrective actions are taken in a timely manner.
Visual Studio Team System provides several important quality control mechanisms. For starters, Visual Studio Team Edition for Software Developers provides a variety of test tools for developers, including an extensive unit test framework complete with code coverage analysis, a rule-based static code analyzer that warns of potential problems, and a performance profiler that identifies the source of performance issues. Visual Studio Team Edition for Software Testers also includes unit testing and code coverage. But in addition to a Web test framework, a distributed load test framework, and test case management, Visual Studio Team Edition also offers an innovative unit testing framework that automatically creates a test database at the start of each test run, populates the database with test data, and then runs any number of unit tests against the database.
Team Build takes the test suite one step further, making it possible to automatically build and test the application frequently, save the results for reporting and analysis, and send alerts if the build or test fails. Finally, the Quality Indicators report gives the project team unprecedented ability to monitor key aspects of software quality.
Other Things To Consider
In addition to managing the four dimensions of a project, there are other aspects of a software development project that you need to monitor and control. In this section we’ll consider three of these: monitoring and controlling risk, managing a virtual team, and managing vendors.
Monitoring and Controlling Risk
A risk identifies only a potential problem that could impact schedule, cost, or the quality of your team, software, or project. When a risk becomes reality, it is said to be triggered and at this point becomes an issue. MSF Agile uses an issue flag on work items to track issues on a project. Risks are one of the work item types that have a field called Issue that you can use to flag that a risk has been triggered and some contingency action should take place. When you mark a risk or any work item type as an issue, the work item will appear when you execute the All Issues work item query from Team Explorer. Every work item in MSF Agile can be marked as an issue by any member of your team who encounters problems with any aspect of the work item. You should run the All Issues query every morning before your team meeting to ensure that the issues get discussed as a team and to plan action to resolve the issues. This is when your project workbook comes in very handy because before your team meetings every morning, all you would need to do is open your project workbook and refresh all of your work item lists to get a fresh perspective on all work, risks, issues, and requirement status on your project.
MSF for CMMI tracks issues very differently by providing an Issues work item type for your team to record any concerns that must get resolved. Like MSF Agile, MSF for CMMI provides a handy query, called Issues, that will display all issues on your project, allowing you to keep track of problems that require special attention before they get out of control or are missed.
Deriving Work from a Risk Similar to scenarios and quality of service requirements, risks generate work, in fact, two types of work: work that mitigates the risk and attempts to prevent it from becoming an issue and work that must occur if a risk becomes reality. Just as with work derived from requirements, it is important to trace work derived from risks back to its source. Creating tasks from risks is identical to the job of creating tasks from requirements. In Team Explorer, simply right-click the task you want to decompose into mitigation or contingency tasks, point to Add Related Work Item, and then click Task.
You should try to ensure that your team adheres to establishing traceability in this manner all the time-it doesn’t take much effort, just discipline to remain consistent. If you establish good traceability between your risks and work that is derived from them, the Related Work Items report becomes a valuable project management instrument, as shown in Figure 5-9.
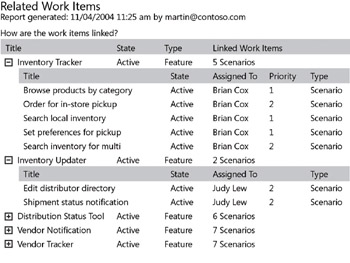
Figure 5-9: Related Work Items report
Managing a Virtual Team
An ever-increasing number of software development projects involve geographically distributed project teams, also known as virtual teams. Although this approach offers a great deal of staffing flexibility, it also introduces significant communication challenges. Team members are not only separated physically, they may also be in different time zones, making it difficult to schedule conference calls and live meetings.
Visual Studio Team System helps you get a handle on managing a virtual team. It doesn’t replace conference calls and live meetings, but it does significantly increase the bandwidth of communication between team members in different locations. In effect, the Visual Studio Team System Team Project becomes the communication hub for the team. Work items coordinate team activities; the team portal keeps everyone informed; document libraries provide a repository for various work products; and the reports give all involved visibility into many aspects of the project.
Visual Studio Team System was created with virtual teams in mind. The product team realized that Team Foundation Server had to work well through enterprise firewalls and virtual private networks. To that end, they implemented Team Foundation Server as a set of Web services designed to work efficiently over the Internet. In this way, team members across the globe can access their Visual Studio Team System Team Projects with minimal setup and good performance.
| Note | Team members do not need to log onto Team Foundation Server because it utilizes Integrated Windows Authentication. This means that the credentials a team member uses to log on to the Microsoft Windows workstation are transmitted automatically and securely to the Team Foundation Server Web services. In other words, the user accesses Team Foundation Server through the same Windows account that was used to log on to the workstation. This feature makes accessing Team Foundation Server convenient because the user need not supply a user name and password. However, it does require that the user log on to the Windows workstation with a Windows account that is either in the same Active Directory domain as the Team Foundation Server or in an Active Directory domain that is trusted by the domain containing the Team Foundation Server. In most cases this is not a problem. |
However, a virtual team might include a member from an outside organization who logs on to a Windows workstation in a non-trusted domain. Unfortunately, this team member cannot access the Visual Studio Team System Team Project from this workstation. One option for resolving this problem is to have IT set up a trust between the domain containing the Team Foundation Server and the domain that the team member logs on to. However, setting up such a trust may not be a good idea from a security standpoint. A simpler option would be to have the team member use the Remote Desktop Client through a Virtual Private Network to log on to a Windows workstation using a Windows account on the same domain as the Team Foundation Server. This allows the remote team member to access a Visual Studio Team System Team Project as if working locally, and it has the added benefit of keeping all the work products on the local domain where they can be properly secured.
Managing Vendors
If your project utilizes external vendors, you can use Visual Studio Team System to facilitate vendor management. First, you can utilize work items to manage all the vendor-related activities, from vendor selection to work assignments to vendor ratings. Next, you can utilize the document libraries in the project portal to organize vendor-related documents including the request for proposal, vendor responses, vendor selection criteria and worksheets, and contracts. After work has begun, you can use the security features in Visual Studio Team System to provide vendors controlled access to Team Projects and source control. Better yet, you can set up a separate Team Project for each vendor and then use the branch and merge capability of Team Foundation Version Control to move work in and out of the vendor Team Project. This approach provides maximum isolation while allowing the vendor unhindered use of the features in Team Foundation Server. You can also use the reporting features of Visual Studio Team System to monitor vendor performance.
EAN: N/A
Pages: 93