Real-World Data-Bound UIs
| You can pull together the fundamental elements of data binding in many ways to enable a variety of common, real-world data presentation and editing scenarios. To do this, you can use additional controls in a variety of layouts to simplify the listing and editing of data in specific situations. Master-details UIs are one well-known technique for doing so, but alternatives like list-edit and hierarchical UIs are equally useful, depending on the situation. Master-Details UIsEarlier, we used filtering to display only a subset of list data source items, rather than all items, based on certain filter criteria. Another way to filter list data source items is to use values from one data source to determine which values are available from another data source. The type of UI designed to support this is known as a master-details UI, and it is the most common model for presenting parent-child (one-to-many) relationships between data sources.[12] Figure 17.34 shows the fundamental breakdown of master and item UI controls on a master-details UI, which shows product data being filtered by suppliers.
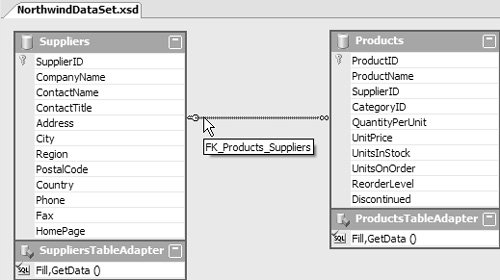
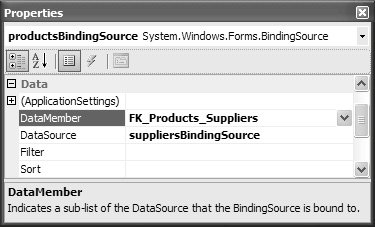
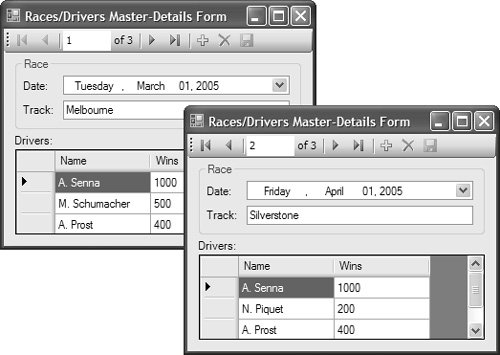
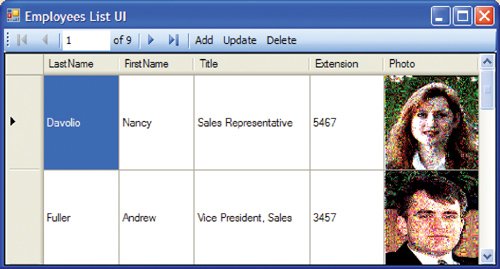
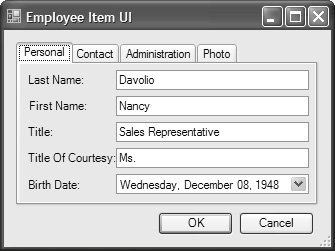
Figure 17.34. A Master-Details UI Because the master component of a master-details UI focuses on one item at a time, the UI can be either item-style or list-style. If the master is an item UI, you must give users a way to navigate the list of items. The details component, however, is typically a list UI because it's the "many" part of the one-to-many relationship. Figure 17.35 illustrates how navigating between the master data UI filters the data that's displayed on the details data UI on a per-supplier basis. Figure 17.35. Filtering One Set of Data Based on Another Set of Data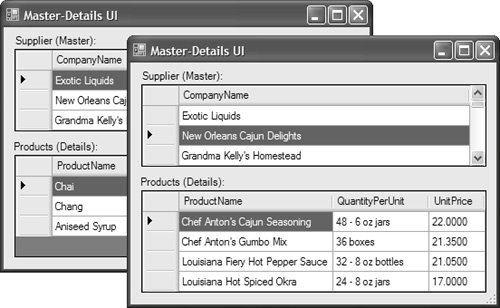 To establish a master-details UI, we use data binding to bind to a relation so that as master item selection changes, the details UI is automatically populated with only the related details rows. For example, the typed data set that contains both the Suppliers and the Products data tables also establishes a one-to-many relationship between the two, as shown in Figure 17.36. Figure 17.36. Relationship Between the Suppliers Table, the Products Table, and FK_Products_Suppliers To build a master-details form based on this relationship, you first add controls to display the master Suppliers data. The easiest technique is to create the Suppliers data source and drag it from the Data Sources window onto the form. This action creates the usual data binding suspects, including a BindingSource that is bound to the Northwind data source's Suppliers data member. Next, you add the controls to display the child Products data. This requires you to create a new BindingSource component that provides the child items as determined by the relationship, and this means binding to the relationship itself. In Windows Forms data binding, a typed data set relationship is a bindable member of the parent table (in this case, Suppliers). Therefore, we set the details BindingSource component's DataSource and DataMember properties to the Suppliers BindingSource and the Suppliers FK_Products_Suppliers members, respectively, as shown in Figure 17.37. Figure 17.37. Creating the Details BindingSource, Bound to the Master BindingSource Binding the details BindingSource directly to the master BindingSource in this way ensures that the same binding manager is used, thus correctly synchronizing master-details data. Consequently, when you bind your item UI controls to the new details BindingSource, the child items are updated as the parent items are navigated by the master UI controls, as you saw in Figure 17.35. The Data Sources window happens to provide a shortcut technique that automatically allows you to add a complete item UI, complete with data binding bits. Whenever it sees a relationship between two data sources, it adds a relationship property to the parent data source, as shown in Figure 17.38. Figure 17.38. Data Sources Window Automatically Displaying Data Source Relationships When you drag the relationship onto a form, the Windows Forms Designer automatically hooks up all the pieces that we just did manually. Also, when you drag a parent data source that contains a relationship onto a form, the relationship is not dropped; that's left for you to do using the techniques just described. Master-Details UIs for Object ModelsMaster-details data binding also works for another popular way to represent one-to-many data: object models. For example, consider the following type: // Races.cs class Races : BindingList<Race> { } // Race.cs class Race { ... RaceCarDrivers drivers = new RaceCarDrivers(); public RaceCarDrivers Drivers { get {...} set {...} } ... } // RaceCarDrivers.cs class RaceCarDrivers : BindingList<RaceCarDriver>, ... { } // RaceCarDriver.cs class RaceCarDriver : INotifyPropertyChanged, ... { ... public int Wins { get {...} set {...} } public string Name { get {...} set {...} } ... }If you were to create a data source for the Races type, you would also see the Drivers property as a relationship, as shown in Figure 17.39. Figure 17.39. Object List DataSource Relationships To build the UI, you first drag and drop the Races data source onto the form as an item UI. The Windows Forms Designer then generates the appropriate master bindings: // MasterDetailsRacesDriversForm.Designer.cs partial class MasterDetailsRacesDriversForm { void InitializeComponent() { ... this.racesBindingSource = new BindingSource(this.components); this.racesBindingNavigator = new BindingNavigator(this.components); this.dateDateTimePicker = new DateTimePicker(); this.trackTextBox = new System.Windows.Forms.TextBox(); ... // racesBindingSource this.racesBindingSource.DataSource = typeof(Race); // racesBindingNavigator this.racesBindingNavigator.BindingSource = this.racesBindingSource; // dateDateTimePicker this.dateDateTimePicker.DataBindings.Add( new Binding("Value", this.racesBindingSource, "Date", true)); // trackTextBox this.trackTextBox.DataBindings.Add(new Binding("Text", this.racesBindingSource, "Track", true)); ... } BindingSource racesBindingSource; BindingNavigator racesBindingNavigator; DateTimePicker dateDateTimePicker; TextBox trackTextBox; }Second, you drag the Drivers data source as a list UI, and that nicely establishes the necessary binding pieces to enable the details side of the relationship: // MasterDetailsRacesDriversForm.Designer.cs partial class MasterDetailsRacesDriversForm { ... void InitializeComponent() { ... this.driversBindingSource = new BindingSource(this.components); this.driversDataGridView = new DataGridView(); ... // driversBindingSource this.driversBindingSource.DataMember = "Drivers"; this.driversBindingSource.DataSource = this.racesBindingSource; ... // driversDataGridView this.driversDataGridView.DataSource = this.driversBindingSource; ... } ... BindingSource driversBindingSource; DataGridView driversDataGridView; }Figure 17.40 shows the object data source master-details form at run time. Figure 17.40. Master-Details UI for an Object Model Master-details UIs provide a good way to present data from related data sources in an easy-to-view layout, and the Windows Forms Designer makes it easy to create them. List-Item UIsWhereas master-details UIs employ both item and list UI elements visually to concatenate data from two data sources, list-item UIs use both item and list UI elements to enhance the display of a large amount of data for a single data source. For example, consider the Employees table, which has 18 columns; this is simply too much data to display because some users will quickly get lost. One technique for creating a more usable experience in this situation is to spread the listing and editing of data across two forms. This technique takes advantage of controls like DataGridView to provide a sortable, filterable UI to simplify both general browsing and targeted searching for specific data, giving users a separate details view UI for adding and editing data items. To help users find an item, you create a list UI that allows them to view all the data and easily find the specific record they want to edit. A sample form is shown in Figure 17.41. Figure 17.41. Employees (Sporting 1980s Hairstyles) List Form (See Plate 4) This employees list UI uses a DataGridView to optimize data presentation for browsing by displaying only key, relevant data fields from DataGridView. Users can sort, search, and filter these fields as long as the list data source supports such functionality. To let users edit an item, you create a details-style UI, like the one shown in Figure 17.42, providing a rich editing experience. Figure 17.42. Employees Edit Form This employee item details-view UI is optimized for adding and updating data by using Windows Forms controls and layout to achieve maximum visual benefit. Because of data binding, it's easy to build both view and edit forms. However, we still need to add the code that integrates the two, allowing users to add new items and update or delete existing items. Adding a New ItemTo let users add a new employee item, we open the edit form to collect the new employee data and pass it back to the list form, where it can be added to the employees list data source. We don't want to shuttle around a bunch of individual employee properties. Instead, we use a class that captures the entire set of employee information at once. This class, DataRowView, is the item over which the employees list data source operates. To create one, we add a new row to the BindingSource: // EmployeesListForm.cs partial class EmployeesListForm : Form { ... void addToolStripButton_Click(object sender, EventArgs e) { // Create new item object item = this.NorthwindDataSet.Employees.DefaultView.AddNew(); // Pass new item to edit form ... } }Rather than try to extract the current item as a DataRowView specificallysomething that would require extra codewe simply extract it as an object. We then send this to the add form, where its values are filled and returned to the employees list form and incorporated into the newly added row: // EmployeesListForm.cs partial class EmployeesListForm : Form { ... void addToolStripButton_Click(object sender, EventArgs e) { // Create new item object item = this.NorthwindDataSet.Employees.DefaultView.AddNew(); // Pass new item to edit form EmployeeItemForm dlg = new EmployeeItemForm(item); if( dlg.ShowDialog() == DialogResult.OK ) { // Reset to reflect changes automatically this.employeesBindingSource.ResetCurrentItem(); } } } // EmployeeItemForm.cs partial class EmployeeItemForm : Form { ... public EmployeesEditForm(object item) : {...} ... }The trick is to populate the edit form's controls with the data from the passed list data source item. With data binding, this is no problem. We simply shape the form at design time by dropping the employees data source on the form, configured as "Details." Then, at run time, we set the BindingSource component's DataSource property with the item instance: // EmployeesEditForm.cs partial class EmployeesEditForm : Form { ... public EmployeeItemForm(object item) { // Check that item is a DataRowView for an EmployeesRow if( (item is DataRowView) && (((DataRowView)item).Row is NorthwindDataSet.EmployeesRow) ) { InitializeComponent(); // Acquire employee list data source item this.employeesBindingSource.DataSource = item; } else throw new ArgumentException("Incorrect type"); } ... }This code ensures that the new item that was passed is a DataRowView for an EmployeesRow, which is what the employees BindingSource of the employees list UI operates over. If the new item proves to be valid, it is fed into the BindingSource, effectively turning it into an item data source. One benefit of this technique is that it frees you from worrying about currency, leaving you to simply refer to the data source and streamlining the code. Now users can provide the details and press either OK or Cancel to commit or cancel the new item. By default, each time a control's bound property value is validated, it is automatically copied back to the data source. This is why we don't need to manually commit those changes when the OK button is clicked. However, we need to roll back the changes when users click Cancel or close the form by clicking the close box or from the system menu. To roll back the changes, we invoke the BindingSource component's CancelEdit method from the FormClosing event handler: // EmployeesEditForm.cs partial class EmployeesEditForm : Form { ... void EmployeeItemForm_FormClosing( object sender, FormClosingEventArgs e) { // Cancel edit if Cancel button is pressed or form is closed from // either the system menu or close box if( (e.CloseReason == CloseReason.UserClosing) || (this.DialogResult == DialogResult.Cancel) ) { this.employeesBindingSource.CancelEdit(); } } }BindingSource.EndEdit ensures that all changes are committed to the current data item, which, in this case, is the only data item. And, as you would expect, BindingSource.CancelEdit rolls back any changes.[13]
Updating an ItemUpdating an item turns out to be quite similar to adding an item because both actions pass a reference to the current item, although adding creates a new item as well. The code on the edit form doesn't need to change, and the changes on the view form are minimal: // EmployeesViewForm.cs class EmployeesViewForm : Form { ... void addToolStripButton_Click(object sender, EventArgs e) { this.EditEmployee(this.employeesBindingSource.AddNew()); } void updateToolStripButton_Click(object sender, EventArgs e) { this.EditEmployee((DataRowView)this.employeesBindingSource.Current); } void EditEmployee(DataRowView item) { // Pass to child employee details form EmployeesEditForm dlg = new EmployeesEditForm(item); if( dlg.ShowDialog() == DialogResult.OK ) { // Reset to reflect changes automatically this.employeesBindingSource.ResetCurrentItem(); } } ... }Notice that we reset the current item when the edit form returns, thus making sure that the changes are picked up; changes to the current item were made while under the control of the employee item UI BindingSource and consequently are not picked up by the employees list UI BindingSource, so we give the latter a helping hand. Deleting an ItemTo support updating, we don't need to make any changes to the child form. The same thing is true when we're supporting deletion, because this activity occurs on the list form in a list-view UI. Instead, we operate directly against the parent form's BindingSource, asking the standard warning question before deleting: // EmployeesViewForm.cs class EmployeesViewForm : Form { ... void deleteToolStripButton_Click(object sender, EventArgs e) { DialogResult result = MessageBox.Show( "Delete current row?", Application.ProductName, MessageBoxButtons.YesNo, MessageBoxIcon.Warning); if( result == DialogResult.Yes ) { this.employeesBindingSource.RemoveCurrent(); } } }Data binding plays a key role in simplifying the creation of the basic infrastructure to support a UI that allows viewing and editing of data. Although you can add all manner of visual accoutrements to support the standard Add, Update, and Delete operations, the core logic is relatively simple. Hierarchical UIsSome data can be stored in hierarchies that are often more than two levels deep. In the Northwind database, one such hierarchy is Customers to Orders to Order Details. Users might need to quickly navigate between all three levels of data, and that is certainly easier than opening multiple forms. However, you can't readily use the master-details technique to present three or more levels of data; there's no limit to the number of BindingSource components you can link through Binding, but form space is finite. Instead, you want a control that has built-in support for tree-style navigation. Believe it or not, this is a good reason to use the DataGrid control instead of DataGridView. DataGrid supports multilevel list data source navigation, whereas DataGridView does not.[14]
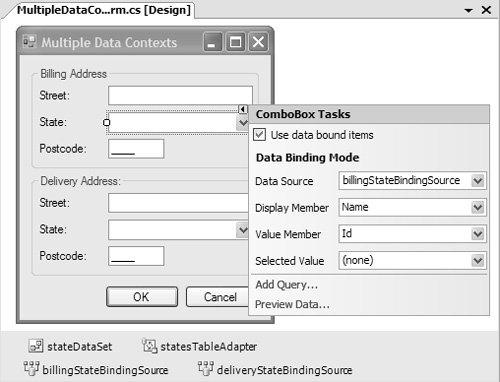
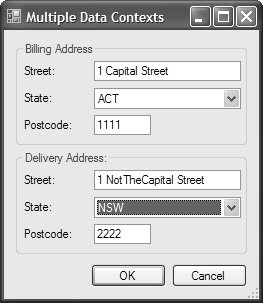
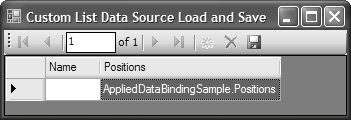
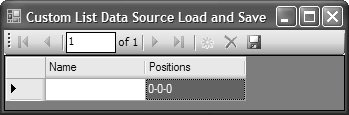
To use DataGrid hierarchically, you do three things. First, you create the data source that contains the multilevel hierarchy you want. Second, you configure the Data Sources window to create a DataGrid UI, rather than a DataGridView UI, when it's dragged and dropped, as shown in Figure 17.43. Figure 17.43. Specifying a List Data Source to Create a DataGrid Third, you add the code to load the child list data sources (in this case, tables) with data, because dragging and dropping from the Data Sources window creates only enough data binding and Designer-generated code to load the topmost parent object in the hierarchy. So even though the typed data set provides all the tables you need, you must fill them. To do that, you drag additional table adapters for each child table from the topmost tab in the Toolbox onto the form and write the appropriate client code to fill the tables: // HierarchicalDataForm.cs partial class HierarchicalDataForm : Form { ... void HierarchicalDataForm_Load(object sender, EventArgs e) { // TODO: This line of code loads data into the // 'NorthwindDataSet.Customers' table. You can move // or remove it, as needed. this.customersTableAdapter.Fill(this.NorthwindDataSet.Customers); // Load child table data this.ordersTableAdapter.Fill( this.NorthwindDataSet.Orders); this.order_DetailsTableAdapter.Fill( this.NorthwindDataSet.Order_Details); } }Then, at run time, the DataGrid allows users to navigate the hierarchical data, as shown in Figure 17.44. Figure 17.44. Navigating a Hierarchical Data Source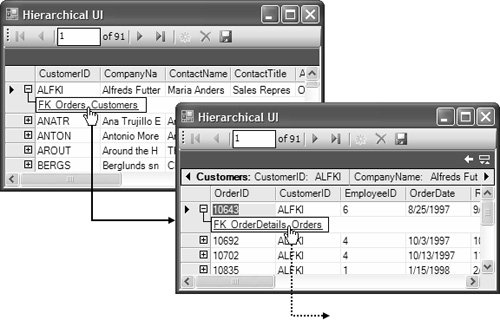 In Figure 17.44, you can see that DataGrid displays a hyperlink that, when clicked, navigates to the next level down in the hierarchy. Because the data source is a typed data set, these links are sourced from the foreign keys that enable the one-to-many relationships between the data tables. As you navigate down through successive child rows, a row for each parent is added to only the title bar, giving quick access to its data without the need to navigate back to it. DataGrid also provides navigation support, in the form of two buttons at the top right of the DataGrid's UI. The back arrow allows users to navigate back to the parent rows, and the other button allows them to hide or show the parent rows (showing is the default). DataGrid has effectively been superceded by DataGridView as a general-purpose grid control, but DataGrid still offers excellent support for navigating hierarchical data sources, a feature you may not be interested in writing yourself. Multiple Data ContextsOften, UIs contain two or more fields that capture the same type of data. For example, in credit card billing, it is common to collect both billing address and delivery address details. Each address requires a State value, which could be selected from a combo box lookup. Even better, you could load your list of States onceperhaps by filling a typed data set via a typed table adapterand then share the data among both lookups. With that in mind, you might be tempted to bind both lookups to a single State BindingSource (bound to a typed data set), as shown in Figure 17.45. Figure 17.45. Binding Multiple Lookups to a Single BindingSource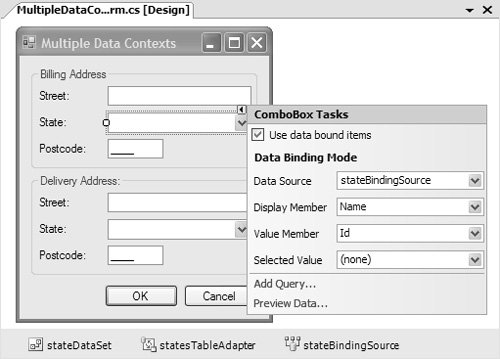 The problem with this design is that it ensures that the values in both lookups remain synchronized, because they are looking at the same binding; as you may recall from Chapter 16, a BindingSource component is also a currency manager, a special type of binding manager for list data sources, and is why both lookups point to the same current BindingSource item. If you need to provide two or more independent views of the same data, however, you need only provide two or more BindingSources exposing the same list of data, as shown in Figure 17.46. Figure 17.46. Binding Multiple Lookups to Multiple BindingSources In this design, each BindingSource is bound to the same typed data set and subsequently to the same, single set of State data. However, each BindingSource provides its own currency management for that data, including determining which item is current, independently of any other BindingSource. Consequently, although each lookup is basically filled from the same data, the values are never synchronized with each other at the binding level, as shown in Figure 17.47. Figure 17.47. Multiple Lookups for a Single Data Source via Multiple BindingSources Note that even though the values chosen by a user might be the same, the lookups aren't synchronized. Type ConvertersWhen a custom list data source class uses simple types, it is easy to convert them to and from strings. This isn't an issue when the bound property of a control is a string type, such as TextBox.Text. However, binding simple types to string properties isn't always what you want to do. For example, you may need to bind a control's property to a custom data typerather than a simple data type like integer or stringon the data source. For that to work, not only must the data be converted to a string, but also it must be converted back from a string to the custom data type; otherwise, any user changes made to the bound control will be lost. Consider updating the RaceCarDriver class to store first, second, and third positions as a property of the custom Positions type: // RaceCarDriver.cs class RaceCarDriver : INotifyPropertyChanged, ... { ... Positions positions; ... public Positions Positions { get {...} set {...} } } // Positions.cs class Positions { int firsts; int seconds; int thirds; public Positions() { } public Positions(int firsts, int seconds, int thirds) { this.firsts = firsts; this.seconds = seconds; this.thirds = thirds; } public int Firsts { get {...} set {...} } public int Seconds { get {...} set {...} } public int Thirds { get {...} set {...} } }By default, this binding shows the name of the type instead of a meaningful value, as shown in Figure 17.48. Figure 17.48. Binding to a Custom Item Data Source with No Conversion to String To get the string value to set as the Text property, the binding falls back on the ToString method of the custom Positions class, which defaults in the Object base class's implementation to returning the name of the type. Overriding the ToString method of the Positions class solves the display problem, as shown in Figure 17.49: Figure 17.49. Binding to a Custom Item Data Source with a Conversion to String // Positions.cs class Positions { ... public override string ToString() { return string.Format( "{0}-{1}-{2}", this.firsts, this.seconds, this.thirds); } }However, implementing ToString fixes only half of the conversion problem: The Positions column is read-only. This is because data binding and the DataGridView can't find an implementation that allows them to convert a value from the user's input to the Positions type. Instead, you need a custom type converter, as discussed in Chapter 11: Design-Time Integration: The Properties Window. To support conversion between a string (to display the DataGridView) and a Position object (the item in the data source), we derive a class from TypeConverter and implement the following virtual methods: CanConvertFrom, CanConvertTo, ConvertFrom, and ConvertTo. First, we implement CanConvertTo and ConvertTo to enable conversion from a Positions type to a string: // PositionsConverter.cs class PositionsConverter : ExpandableObjectConverter { public override bool CanConvertTo( ITypeDescriptorContext context, Type destinationType) { // We can convert from a Positions type to a string return( destinationType == typeof(string) ); } ... public override object ConvertTo( ITypeDescriptorContext context, CultureInfo culture, object value, Type destinationType) { // If source value is a Positions type if( value is Positions ) { // Convert to string if( (destinationType == typeof(string)) ) { Positions Positions = (Positions)value; return string.Format( "{0}-{1}-{2}", Positions.Firsts, Positions.Seconds, Positions.Thirds); } } // Base ConvertTo if neither string nor InstanceDescriptor required return base.ConvertTo(context, culture, value, destinationType); } }Second, we convert a string back to a Positions type: // PositionsConverter.cs class PositionsConverter : ExpandableObjectConverter { ... public override bool CanConvertFrom( ITypeDescriptorContext context, Type sourceType) { // We can convert from a string to a Positions type if( sourceType == typeof(string) ) { return true; } return base.CanConvertFrom(context, sourceType); } public override object ConvertFrom( ITypeDescriptorContext context, CultureInfo info, object value) { // If converting from a string if( value is string ) { // Build a Positions type try { // Get Positions properties string propertyList = (string)value; string[] properties = propertyList.Split('-'); return new Positions( int.Parse(properties[0]), int.Parse(properties[1]), int.Parse(properties[2])); } catch { } throw new ArgumentException("The arguments were not valid."); } return base.ConvertFrom(context, info, value); } }Associating the type converter with the type is a matter of applying the TypeConverter attribute: // Positions.cs [TypeConverter(typeof(PositionsConverter))] class Positions {...} Now, instead of using the ToString method to get the Positions string to display in the bound control, the binding uses the PositionsConverter class's CanConvertTo and ConvertTo methods. Similarly, when new data is available, the binding uses the CanConvertFrom and ConvertFrom methods. Note that if you don't control the data source, you can't use this technique to provide automatic type conversion between bound control property and data source property. However, you can fall back on the Binding object's Format and Parse events, or DataGridView's CellFormatting and CellParsing events, all of which you saw earlier in this chapter. Alternatively, you can use a custom type converter from these events and thus support at least a modicum of conversion reusability. |


EAN: 2147483647
Pages: 216