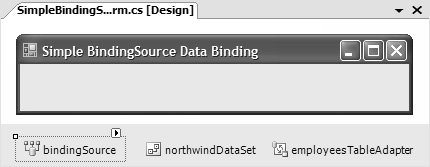
Binding UI Elements in the Designer
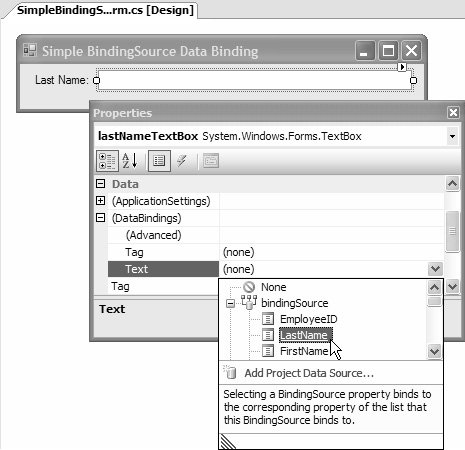
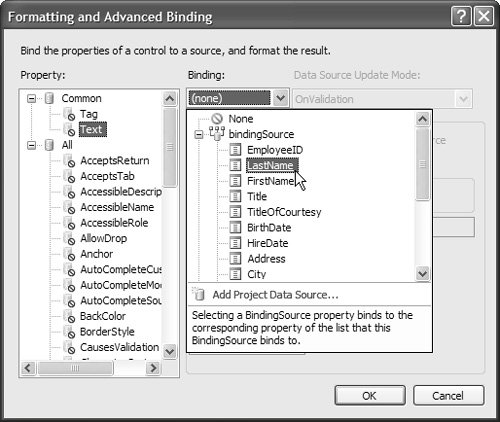
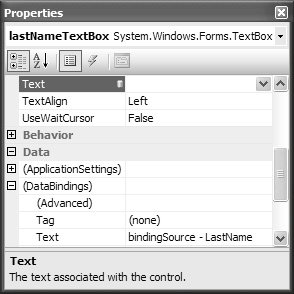
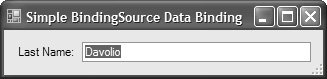
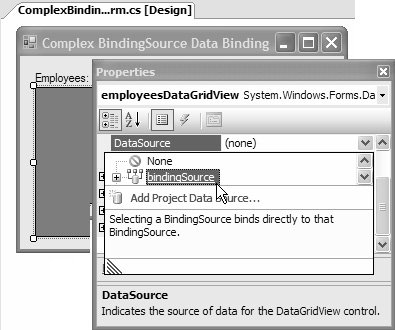
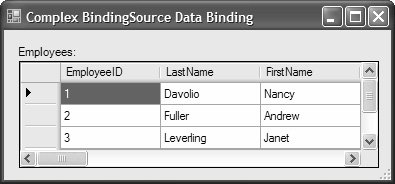
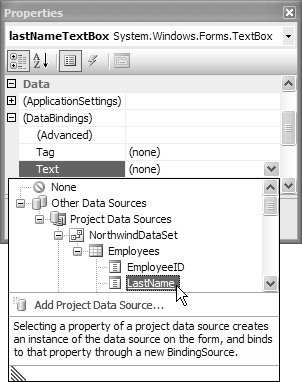
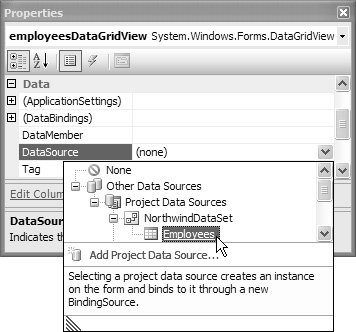
| A BindingSource that is bound to an underlying data source can do wonderful things; part of BindingSource's magic lies in its ability to use reflection to inspect its data source for data members and data properties that controls will want to bind to. The BindingSource then makes those available in such a way that controls that attempt to bind to it have access to both data members and data properties as if the BindingSource were the data source to which the BindingSource is bound. This trick makes it easy to declaratively construct bound UIs in the Windows Forms Designer. BindingSource as a Bindable List Data SourceConsider a form with a BindingSource component whose data source and data member properties refer to the Northwind Employees data source, as shown in Figure 16.35. Figure 16.35. Form with BindingSource Hooked Up to a Typed Data Set and a Typed Table Adapter A BindingSource that's bound to a data source is in a perfect position to allow you to build your bound UI. Simple Binding to a List Data Source Exposed by a BindingSourceTo simple-bind controls to a BindingSource visually, you use the Properties window and its Data | (DataBindings) category, shown in Figure 16.36, which are designed to facilitate this endeavor. Figure 16.36. Binding a Control to a BindingSource Figure 16.36 shows the use of the Properties window to bind the last name text box control's Text property to the LastName property that's exposed by the BindingSource on behalf of the Northwind.Employees list data source. For text box controls, Tag and Text properties are considered the two most likely to be bound, and thus they appear as subproperties beneath Data | (DataBindings). To bind them to the desired data source property, you open the drop-down list, expand the BindingSource entry to reveal the list of properties that can be bound to, and select the desired propertyin this case, LastName. For properties on controls that don't have simple binding shortcuts, never fear, because you can configure them via the Formatting and Advanced Binding dialog, shown in Figure 16.37, which is opened from Data | (DataBindings) | (Advanced). Figure 16.37. Configuring a Simple Binding Using the Formatting and Advanced Binding Dialog When this dialog opens, you use the same technique to simple-bind a control property by opening the Binding drop-down list and selecting the required property from the BindingSource. Whether by shortcut or by dialog, the Properties window provides two visual clues as to which property is bound and to which data source property it is bound, as illustrated in Figure 16.38. Figure 16.38. The Text Property of the Name Text Box Bound to the BindingSource's Name Property The shortcut Text subproperty shows itself as bound by displaying the BindingSource and the property to which it's bound. Additionally, the actual Text property now contains a small icon to reveal its bound status. The Windows Forms Designer generates the following code to InitializeComponent to create this binding: // SimpleBindingSourceDataBindingForm.Designer.cs partial class SimpleBindingSourceDataBindingForm { ... void InitializeComponent() { this.employeesBindingSource = new BindingSource(this.components); this.lastNameTextBox = new TextBox(); ... // bindingSource this.employeesBindingSource.DataMember = "Employees"; this.employeesBindingSource.DataSource = this.northwindDataSet; ... // lastNameTextBox this.lastNameTextBox.DataBindings.Add( new Binding( "Text", this.employeesBindingSource, "LastName", true)); ... } BindingSource employeesBindingSource; TextBox lastNameTextBox; ... }If all the controls on a form are simple-bound to a BindingSource like this and if you've loaded the data source, then all you need to do is run it. Everything just works, as demonstrated in Figure 16.39. Figure 16.39. Declarative Simple Binding in Action To this point, we've written zero code to add a BindingSource to a form, configure it to reference a typed data set list data source, load it with data, simple-bind a control's property to it, and run it. Complex binding with a BindingSource component to a typed data set is an equally code-free experience. Complex Binding to a List Data Source Exposed by a BindingSourceTo complex-bind a control like DataGridView to a BindingSource, we again use the Properties window, although this time we set the DataGridView's DataSource property, as shown in Figure 16.40.[17]
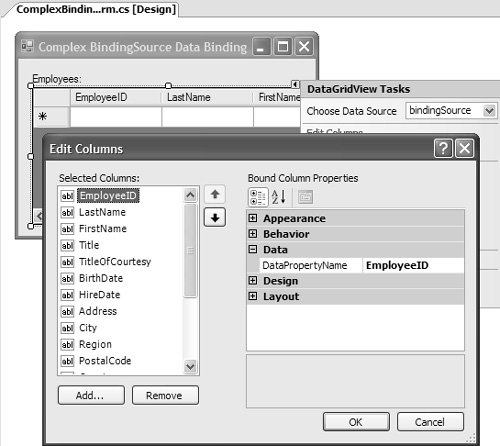
Figure 16.40. Binding a DataGridView to a BindingSource The result of making this selection is generated to InitializeComponent by the Windows Forms Designer: // ComplexBindingSourceDataBindingForm.Designer.cs partial class ComplexBindingSourceDataBindingForm { void InitializeComponent() { ... this.employeesBindingSource = new BindingSource(this.components); this.employeesDataGridView = new DataGridView(); this.employeeIDDataGridViewTextBoxColumn = new DataGridViewTextBoxColumn(); this.lastNameDataGridViewTextBoxColumn = new DataGridViewTextBoxColumn(); ... // bindingSource this.employeesBindingSource.DataMember = "Employees"; this.employeesBindingSource.DataSource = this.northwindDataSet; ... // employeesDataGridView this.employeesDataGridView.Columns.AddRange( new DataGridViewColumn[] { this.employeeIDDataGridViewTextBoxColumn, this.lastNameDataGridViewTextBoxColumn, ... }); this.employeesDataGridView.DataSource = this.employeesBindingSource; ... // employeeIDDataGridViewTextBoxColumn this.employeeIDDataGridViewTextBoxColumn.DataPropertyName = "EmployeeID"; ... // lastNameDataGridViewTextBoxColumn this.lastNameDataGridViewTextBoxColumn.DataPropertyName = "LastName"; ... } ... BindingSource employeesBindingSource; DataGridView employeesDataGridView; DataGridViewTextBoxColumn employeeIDDataGridViewTextBoxColumn; DataGridViewTextBoxColumn lastNameDataGridViewTextBoxColumn; ... }When the BindingSource is set with both a data source and a data member, it exposes the data member as a data source in its own right. Consequently, only the DataGridView control's DataSource property needs to be set to the BindingSource. When the DataGridView control's DataSource property is set, it uses reflection to inspect the BindingSource for the list of properties on the data member that it can be bound to. For each property it finds, a DataGridViewColumn is created and bound to it; just as a BindingSource shapes itself to the data source to which it's bound, the DataGridView shapes its UI to the BindingSource to which it's bound. Additionally, each DataGridViewColumn is given a name that reflects the property to which it's bound, saving you the effort. If you need to reconfigure the DataGridView's default column ordering from the BindingSource, you can use DataGridView's Edit Columns command via the Properties window or smart tag, as shown in Figure 16.41. Figure 16.41. Declarative Complex Binding in Action Without using any of the DataGridView's configuration supportthe same as if you bind a DataGridView to a BindingSource at run timeyou end up with something like Figure 16.42. Figure 16.42. Declarative Complex Binding in Action As with simple binding against a BindingSource component, you can rely completely on the Windows Forms Designer to drop a BindingSource component onto a form, bind it to a typed data set list data source, load it with data, bind a complex-bound control like a DataGridView to it, configure the control around it, and run the application. Creating a BindingSource Component ImplicitlyTo this point, we've established simple-bound and complex-bound UIs by explicitly dropping a BindingSource onto a form and binding it to a data source before binding the controls to the BindingSource. To save you time, the Windows Forms Designer offers a mechanism by which you can achieve the same results by implicitly creating a BindingSource component that's bound to the required data source. All you do is shortcut the BindingSource step by dropping a control onto a form and binding it directly to one of the data sources listed in the Properties window under Data | DataSource | Other Data Sources | Project Data Sources. This list contains the same data sources as the Data Sources window. Figure 16.43 illustrates this for simple binding, and Figure 16.44 does the same for complex binding. Figure 16.43. Implicitly Creating a Binding Source Component for Simple Binding Figure 16.44. Implicitly Creating a Binding Source Component for Complex Binding In either case, the Windows Forms Designer creates a BindingSource that's bound to the selected data source and adds it to the form before establishing the specified simple or complex binding for you. When the BindingSource is added to the form, you can explicitly bind against it as before. In general, the Windows Forms Designer prevents you from declaratively binding a control to a data source directly; the Windows Forms Designer always makes sure that a BindingSource component is in place between bound controls and a data source.[18] One good reason to do this is to simplify currency management.
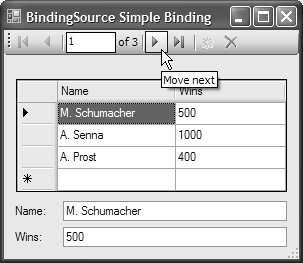
Simple Currency ManagementRecall from earlier in this chapter that we had to acquire a data source's binding manager before writing the code to change the current item in a list data source. As it turns out, the BindingSource is also a currency manager for the data source that it's bound to.[1] As you would expect, all simple and complex bound controls stay in sync, as shown in Figure 16.45.
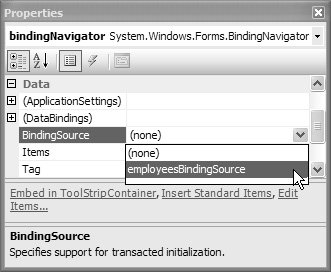
Figure 16.45. Declarative Simple and Complex Binding with Currency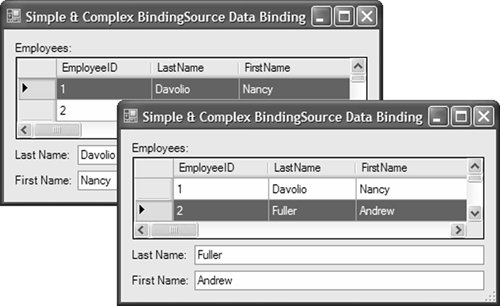 On top of that, if you need to implement a VCR-type control to navigate the items in a data source, you don't have to acquire a BindingManager and you don't have to manually create your own navigation methods. Instead, you simply rely on the BindingSource to manage currency and use its currency-oriented methods as required: // SimpleComplexBindingSourceDataBindingForm.cs SimpleComplexBindingSourceDataBindingForm : Form { ... void SimpleComplexBindingSourceDataBindingForm_Load( object sender, EventArgs e) { ... RefreshItems(); } void moveFirstButton_Click(object sender, EventArgs e) { this.employeesBindingSource.MoveFirst(); RefreshItems(); } void movePreviousButton_Click(object sender, EventArgs e) { this.employeesBindingSource.MovePrevious(); RefreshItems(); } void moveNextButton_Click(object sender, EventArgs e) { this.employeesBindingSource.MoveNext(); RefreshItems(); } void moveLastButton_Click(object sender, EventArgs e) { this.employeesBindingSource.MoveLast(); RefreshItems(); } void RefreshItems() { int count = this.employeesBindingSource.Count; int position = this.employeesBindingSource.Position + 1; // Update count and position text this.countLabel.Text = count.ToString(); this.positionLabel.Text = position.ToString(); // Enable or disable move buttons this.moveFirstButton.Enabled = (position > 1); this.movePreviousButton.Enabled = (position > 1); this.moveNextButton.Enabled = (position < count); this.moveLastButton.Enabled = (position < count); } }However, you can avoid writing this code by using the BindingNavigator component. The BindingNavigator .NET provides the BindingNavigator component to visually encapsulate navigation for you. BindingNavigator is a VCR-style tool strip control that binds to the same binding source to which your other simple-bound (and complex-bound) controls bind to provide navigation, as shown in Figure 16.46. Figure 16.46. BindingNavigator in Action To use a BindingNavigator, you drop one onto the form from the Toolbox's Data tab. BindingNavigator is automatically configured to dock to the top of the form and contain all the tool strip items you see in Figure 16.46. You also specify BindingNavigator's data source by setting its DataSource property, most easily from the Properties window, as shown in Figure 16.47. Figure 16.47. BindingNavigator in Action Selecting the BindingSource for a BindingNavigator from the Properties window generates the following code: // SimpleComplexBindingSourceDataBindingForm.cs partial class SimpleComplexBindingSourceDataBindingForm { ... void InitializeComponent() { ... this.employeesBindingSource = new BindingSource(this.components); this.bindingNavigator = new BindingNavigator(this.components); // BindingNavigator tool strip button items for // navigation, position, and count ... // employeesBindingSource this.employeesBindingSource.DataMember = "Employees"; this.employeesBindingSource.DataSource = this.northwindDataSet; ... // bindingNavigator this.bindingNavigator.BindingSource = this.employeesBindingSource; ... } ... BindingSource employeesBindingSource; BindingNavigator bindingNavigator; ... }By default, the tool strip items that appear on the BindingNavigator implement the code that calls the necessary methods on the BindingSource to perform the appropriate actions. For navigation, this includes calling MoveFirst, MovePrevious, MoveNext, and MoveLast. To add and remove items to and from the BindingSource, this includes calling AddNew and RemoveCurrent. To display the position and total item count, this includes handling whenever the current item or list in general changes, and inspecting and displaying the Position and Count properties each time. All tool strip items on the BindingNavigator enable or disable as appropriate. |
EAN: 2147483647
Pages: 216