Designer Settings
| To this point, we've used the Settings Designer to manage settings configuration. However, VS05, the Settings Designer, and the Windows Forms Designer offer several other designer features to simplify settings development.[15]
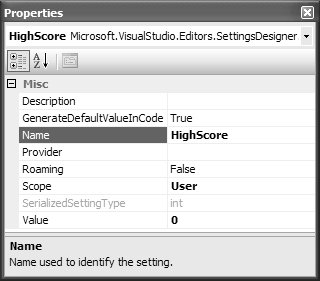
Properties Window ConfigurationIn addition to allowing configuration of the four basic setting elementsname, type, scope, and valuethe Settings Editor offers four additional configurations through the Properties window (shown in Figure 15.18 for the HighScore setting) that you can use to edit individual settings, including Description, GenerateDefaultValueInCode, Provider, and Roaming. Figure 15.18. Editing a Setting in the Properties Window Description allows you to provide expressive text for your setting, which is then displayed via IntelliSense as you code against the generated settings class's property. GenerateDefaultValueInCode is a Boolean (true by default) that specifies whether the associated setting has a default value that is used in lieu of one being provided by developers or users; this property comes in handy in certain versioning scenarios described earlier in this chapter. As already mentioned, settings providers can be associated with your settings, and you set the Provider property to make that association. Finally, you use the Roaming property to specify whether a user setting supports roaming users. Because users, rather than applications, roam, the Roaming property is disabled for application settings. These configurations are applied to each setting as attributes adorning the strongly typed properties in the generated settings class: // Properties/Settings.Designer.cs using System.Configuration; ... namespace AppSettingsProvider.Properties { ... internal sealed partial class Settings : global::ApplicationSettingsBase { ... [global::SettingsDescription("HighScore description.")] [global::DefaultSettingValue("0")] [global::SettingsProvider("WebServiceProvider")] [global::SettingsManageability( global::SettingsManageability.Roaming)] [global::UserScopedSetting()] public int HighScore { get { return ((int)(this["HighScore"])); } set { this["HighScore"] = value; } } ... } }Note that if GenerateDefaultValueInCode is false, then the DefaultSettingValue attribute isn't applied. However, as you may recall from the discussion of settings rollback, you should really keep GenerateDefaultValueInCode set to its default of true to ensure that users can recover if all the .config files for an application go missing. Property BindingSettings are also integrated into the Properties window of the Windows Forms Designer, allowing you to use data binding to bind form, control, and component properties directly to settings. Data binding is a technology by which the property of some control has a synchronization relationship with the property of some data object.[16] For example, if your application supports user themes, you might like to give users the option of choosing their own background color for a form. Data binding allows the form's background color to be stored in a setting that is automatically retrieved and applied to the BackColor property of the form the next time it is opened, as well as automatically synchronizing its value back to the setting whenever the user changes it. For this reason, Form.BackColor makes a perfect candidate for property binding.
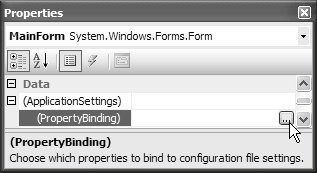
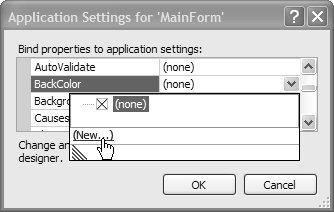
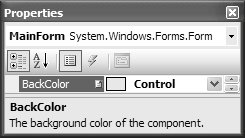
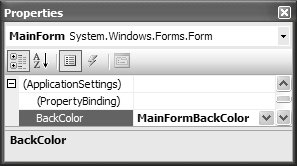
To bind the BackColor property of a form to a setting exposed as a property from the Settings class, you bring up the form's Properties window and press the ellipses ("...") button under (ApplicationSettings) | (PropertyBinding), as shown in Figure 15.19. Figure 15.19. Property Binding in the Properties Window In the Application Settings dialog, click the drop-down list of the BackColor property, shown in Figure 15.20. Figure 15.20. Creating a New Setting to Bind To The list shown in Figure 15.20 allows you to select a setting to bind to. If none is present, you can click the New link to create a new setting to bind to. This action opens the New Application Setting dialog, shown in Figure 15.21. Figure 15.21. New Application Setting Dialog Figure 15.21 shows the configuration of the new setting to capture BackgroundColor, and, like all bound properties, it requires a default value, a name, and a scope. In this case, the MainFormBackColor setting should be user-scoped because it can change from one application session to the next. Note that you don't have a choice as to which settings file the new setting is added to; you can bind properties only to settings stored in the project default Settings.settings file. When you click OK, several things happen. First, a new setting is added to the project's default Settings.settings file, shown in Figure 15.22 in the Settings Designer. Figure 15.22. New Setting Created Second, the Settings class is updated to implement a new, strongly typed property: // Properties/Settings.Designer.cs using System.Configuration; ... namespace ApplicationSettingsSample.Properties { ... sealed partial class Settings : ApplicationSettingsBase { ... [global::UserScopedSetting()] [global::DefaultSettingValue("Control")] public global::Color MainFormBackColor { get {...} set {...} } } ... }Third, it's to this strongly typed property that the form's BackColor property is now bound, as configured in InitializeComponent: // MainForm.Designer.cs partial class MainForm { ... void InitializeComponent() { ... // MainForm this.DataBindings.Add( new Binding( "BackColor", Properties.settings.Default, "MainFormBackColor", true, DataSourceUpdateMode.OnPropertyChanged)); ... } }The Binding object binds the form's BackColor property to Properties.Settings' MainFormBackColor property, ensuring that both property values are kept in sync. Finally, the Properties window displays a cute icon in the BackColor property item for the form, a visual cue that it is now bound, as shown in Figure 15.23. Figure 15.23. BackColor Property Binding Indicator This icon also indicates that the default value of the setting to which a property is bound is changed automatically whenever the property is changed from the Properties window. To provide easy access to the bound property, notice that the bound property also appears in the Properties window's (ApplicationSettings) | (PropertyBinding) list, shown as bound in Figure 15.24. Figure 15.24. BackColor Bound Property What's nice about having a property bound to a setting is that when the form's BackColor is changed (perhaps via the Options dialog), its value is automatically copied to the Settings class's MainFormBackColor property. In this example, we're remembering the BackColor property, although you could pick any property you like. Sometimes, however, you'll find that you can't bind all the form properties you'd like to application or user settings. Persisting Form State, Size, and PositionAlthough you can bind a form's BackColor to a setting, you can't bind WindowState, Size, and Location. The problem is that when a form is minimized, the location is set to the following: Point hiddenLocation = new Point(-32000, -32000); So if you bind Form.Size to a setting, this size is retrieved when the form is next normalized, thereby making it disappear off the edge of the screen. To solve this problem requires custom code. The following code replicates the experience provided by Office 2003 applications, whose main windows always open normalized or maximized: // MainForm.cs partial class MainForm : Form { public MainForm() { InitializeComponent(); // Take over initial resizing this.StartPosition = FormStartPosition.Manual; // Resize this.Location = FormSettings.Default.MainFormLocation; this.Size = FormSettings.Default.MainFormSize; this.WindowState = FormSettings.Default.MainFormWindowState; } void MainForm_FormClosing(object sender, FormClosingEventArgs e) { // Store location and size data, using RestoreBounds to remember // normal position if minimized or maximized if( this.WindowState == FormWindowState.Normal ) { Properties.Settings.Default.MainFormLocation = this.Location; Properties.Settings.Default.MainFormSize = this.Size; } else { Properties.Settings.Default.MainFormLocation = this.RestoreBounds.Location; Properties.Settings.Default.MainFormSize = this.RestoreBounds.Size; } Properties.Settings.Default.MainFormWindowState = this.WindowState; FormSettings.Default.Save(); } }Here, we operate over three settingsMainFormLocation, MainFormSize, and MainFormWindowStatewhich are located in a separate settings file: FormSettings.settings. When the form is loaded, it is instructed to yield start position handling to code, which is the subsequent code to load the settings and apply them to the form. When the form closes down, it saves the values. If the form is maximized or minimized, we need to use size and location data from the RestoreBounds property so that the form knows where to restore to from the Maximized state in the next session, or we can automatically restore it as we turn a minimized form into a normalized form next load, à la Word. If the form is currently normalized, we simply use the location and size data stored in the Bounds property. You also need to remember the size and position of a UI element when your application has tool strips. Support for Automatic Tool Strip LayoutRecall from Chapter 4 that tool strip controls can be dragged around the edges of a form at run time. Consequently, your application should remember those details and apply them the next time it runs to ensure that its tool strips are laid out as the user expects. Rather than having to write a bunch of code as we did for form size and position, we can lean on the ToolStripManager class (from System.Windows.Forms), which has that support built in: // MainForm.cs public partial class MainForm : Form { public MainForm() { InitializeComponent(); ToolStripManager.LoadSettings(this); } void MainForm_FormClosing(object sender, FormClosingEventArgs e) { ToolStripManager.SaveSettings(this); } }ToolStripManager offers two static methodsLoadSettings and SaveSettingsto persist tool strip settings across application settings by leveraging the settings system. Both methods are passed the form to provide a unique name for the section in user.config, to which the settings are persisted. For MainForm, it looks like this: // user.config <?xml version="1.0" encoding="utf-8"?> <configuration> <configSections> ... </configSections> <userSettings> <System.Windows.Forms.ToolStripSettings. ToolStripManagerSample.MainForm.toolStrip> <setting name="IsDefault" serializeAs="String"> <value>False</value> </setting> <setting name="Name" serializeAs="String"> <value>toolStrip1</value> </setting> <setting name="Size" serializeAs="String"> <value>208, 25</value> </setting> <setting name="Location" serializeAs="String"> <value>36, 0</value> </setting> <setting name="Visible" serializeAs="String"> <value>True</value> </setting> <setting name="ItemOrder" serializeAs="String"> <value>newToolStripButton, ... rest of toolstrip items </value> </setting> <setting name="ToolStripPanelName" serializeAs="String"> <value>toolStripContainer1.Bottom</value> </setting> </System.Windows.Forms.ToolStripSettings. ToolStripManagerSample.MainForm.toolStrip> </System.Windows.Forms.ToolStripSettings. ToolStripManagerSample.MainForm.menuStrip> ... </System.Windows.Forms.ToolStripSettings. ToolStripManagerSample.MainForm.menuStrip> </userSettings> </configuration> As you can see, ToolStripManager stores the size, location, visibility, and order of tool strip items for each tool strip it finds on a form. Although it certainly makes life easier, it doesn't correctly restore tool strip settings in some scenarios, particularly when several tool strips are positioned on the same row. In those cases, you can revert to manually managing your own settings. |


EAN: 2147483647
Pages: 216