Chapter 5: Using Visual Studio Macros
Macros are automation scripts that you can write to take advantage of functionality built into the integrated development environment (IDE). In this chapter, we'll introduce you to a few of the different macro tools in Microsoft® Visual Studio®. The macros engine in Visual Studio lets you record macros to play back later. You can access macros for playback through a window in the IDE called the Macro Explorer. You can edit and debug your macros in a special IDE called the Macros IDE. We'll show you how to record and play macros in Visual Studio and how to write and edit macro projects in the Macros IDE. Finally, we'll also show you how you can share your macros with others.
Macros: The Duct Tape of Visual Studio
The macros facility of Visual Studio uses Microsoft Visual Basic® as its macro language. The Visual Basic language can take full advantage of the Microsoft .NET Framework and its own automation object model, so it offers an extremely powerful and compelling set of features that you can use to automate tasks in the IDE.
Visual Studio macros are saved in files with the .vsmacros extension. These macros are stored in the VSMacros80 folder in your default Visual Studio projects folder. You can specify the Visual Studio projects folder in the Options dialog box, which is on the Projects and Solutions page in the Environment folder. By default, the path to this folder is My Documents\Visual Studio Projects.
Visual Studio macros are usually created in one of two ways. You can record a macro in the IDE (Ctrl+Shift+R); the code generated during the recording session will be stored in the MyMacros.RecordingModule.TemporaryMacro method by default. Alternatively, you can open the Macros IDE (Alt+F11) and create a new method by writing it from scratch. One of the best things about macros is that they're designed to automate functionality in the Visual Studio IDE. This means you can often simply record a macro, copy the generated code to a new method, and then use that as the basis for your own automation project.
Visual Studio macros are accessed in the IDE just like any other named command. You can enter the name of the macro in the Command Window (Ctrl+Alt+A), you can add the macro to a toolbar or a menu, you can assign the macro a keystroke shortcut, you can run the macro by double-clicking it in Macro Explorer, and you can run the macro directly from the Macros IDE.
| Note | When you run a macro by double-clicking it in the Macro Explorer window, the focus returns to the last active window. As a result, you can set the active document, open Macro Explorer, and then double-click the macro to have it affect the last active document. |
We consider macros the "duct tape" of Visual Studio–in the best sense of the term. Duct tape is made of an extremely strong material and can help you accomplish tasks quickly and easily. We would describe macros in the same way–they're extremely powerful tools in the IDE that you don't have to spend a ton of time thinking about. You can create your macro to perform your task and then tuck it away. If the macro is sufficiently important and powerful, you can later turn it into a full-blown add-in and then polish that code as much as you want.
Recording Visual Studio Macros
To record a Visual Studio macro, first press the Ctrl+Shift+R keyboard shortcut. This combination brings up the Recorder toolbar and creates a macros module named RecordingModule if one doesn't already exist. You can see the Recorder toolbar in Figure 5-1. Notice that you can pause, stop, or even cancel the recording session that you've started.

Figure 5-1: The Recorder toolbar
The easiest way to get going with macros is to record a simple macro that you might want to use repeatedly. For example, let's say you want to find the word ItemListView in your code files. You would normally use the Find or Find In Files command for this purpose. But by using one of these commands in the context of a macro, you gain more flexibility and can use the macro in later sessions.
Here are the steps for recording the macro we have in mind:
-
Press Ctrl+Shift+R to start the macro recorder.
-
Press Ctrl+F to open the Find and Replace dialog box.
-
Type ItemListView in the Find What box.
-
Click Find Next.
-
Press Ctrl+Shift+R to stop recording.
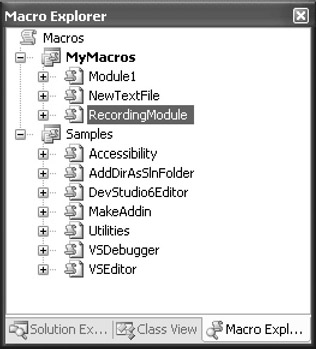
We now have a TemporaryMacro method saved in the module RecordingModule. You can see that macro in Figure 5-2.

Figure 5-2: The Macro Explorer window
Here's the code that's generated by the preceding procedure. Notice that mouse movements and keystrokes (such as Tab for navigating to the Replace dialog box) aren't recorded. Visual Studio limits macro recording to actual named commands that are called during the recording session.
Option Strict Off Option Explicit Off Imports EnvDTE Imports EnvDTE80 Imports System.Diagnostics Public Module RecordingModule Sub TemporaryMacro() DTE.ExecuteCommand("Edit.Find") DTE.Windows.Item("ScreenSaverForm.vb").Activate() DTE.Find.FindWhat = "ItemListView" DTE.Find.Target = _ vsFindTarget.vsFindTargetCurrentDocument DTE.Find.MatchCase = False DTE.Find.MatchWholeWord = False DTE.Find.Backwards = False DTE.Find.MatchInHiddenText = True DTE.Find.PatternSyntax = _ vsFindPatternSyntax.vsFindPatternSyntaxLiteral DTE.Find.Action = vsFindAction.vsFindActionFind If (DTE.Find.Execute() = _ vsFindResult.vsFindResultNotFound) Then Throw New System.Exception("vsFindResultNotFound") End If End Sub End Module To play back this macro, press Ctrl+Shift+P, which is simply a shortcut to the Macros. Macros.RecordingModule.TemporaryMacro command. You should see the Find dialog box open with the first instance of the word you're searching for selected. In our case, this is the first instance of ItemListView in a file named Connect.cpp.
Take a look at the line DTE.Windows.Item("ScreenSaverForm.vb").Activate(). If ScreenSaverForm.vb isn't already open, this line will bring it into focus in the IDE, so this macro won't be very useful if you want to save it for use with a number of different files or projects. Commenting out or removing this line from the code will cause the macro to work with the currently active document.
To save the recorded macro, you can either rename TemporaryMacro to something else in Macro Explorer or you can copy and paste the recorded code into another macro module or method.
Macro Commands
Macro Explorer lets you manage your macros from inside the Visual Studio IDE. You can access the commands related to macros in the IDE from the Macros submenu of the Tools menu or through the shortcut menus within Macro Explorer.
Macros are divided into projects containing modules, which in turn contain methods. Projects are represented hierarchically in Macro Explorer below the Macro icon. Right-clicking the Macro icon brings up the shortcut menu containing commands for creating and loading macro projects. You can access the same functionality via named commands in the Command Window. Table 5-1 lists the macro commands related to macro projects.
| Command | Description |
|---|---|
| Tools.LoadMacroProject | Brings up the Add Macro Project dialog box, in which you can select a macro project file. |
| Tools.NewMacroProject | Brings up the New Macro Project dialog box, in which you can save your macros into specific projects. |
| Tools.MacrosIDE | Brings up the Macros IDE. This command is mapped to Alt+F11. |
You can open Macro Explorer by pressing Alt+F8. Most commands available from the shortcut menus in Macro Explorer are also available from the Command Window (because the items in Macro Explorer lose focus when you change to the Command Window). You can rename a macro project by right-clicking on the project in Macro Explorer and then clicking Rename. Doing so will allow you to edit the name of the macro project in place. You can delete a macro project by choosing Delete from the shortcut menu. The same basic shortcut menu items are available for renaming and deleting modules and methods from within Macro Explorer.
By right-clicking on a macro in Macro Explorer, you can bring up a shortcut menu that lets you work with the macro directly. The Run command executes the Tools.Run command on the currently selected macro. The Rename command allows you to edit the name of the macro in place. The change you make to the name is reflected in the method name in the Macros IDE. The Delete command deletes the currently selected macro. And finally, the Edit command opens the current macro in the Macros IDE.
For organizing the macros you've created, Macro Explorer is a powerful tool. You'll find that you can do quite a bit in Macro Explorer. For example, you can record a macro, rename that macro to save it, and even add that same macro to a toolbar or a menu in the IDE, all without having to go to the Macros IDE. That said, to really get the most out of Visual Studio macros, you'll want to be able to create and edit them from within the Macros IDE.
Editing Macros in the Macros IDE
Working with the Macros IDE is similar to working in Visual Studio. Many of the same shortcuts work in the Macros IDE. The Macros IDE editor features IntelliSense®, and the Help system for macros is integrated into the IDE.
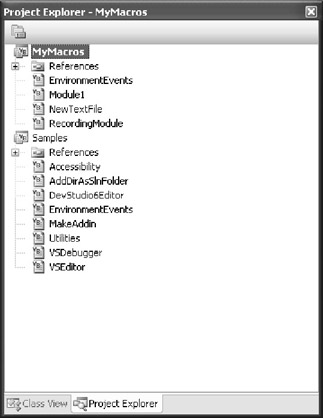
One difference you'll notice right away is that all your loaded macro projects show up in the Project Explorer window. Visual Studio ships with an extremely useful set of macros out of the box. You can see these macros if you expand the Samples project in Project Explorer in the Macros IDE (as shown in Figure 5-3).

Figure 5-3: The Samples project in the Macros IDE
The memory space for macro projects is separated, so if you want to utilize functionality between different macros or if you want to take advantage of a common set of environmental events, you must keep the macros that you write inside the same project. If you want to access functionality from another macro project, you can simply copy the macros you want to access into the project you're working on. For example, you can copy modules from the Samples project into your own project to take advantage of the functionality exposed by those macros.
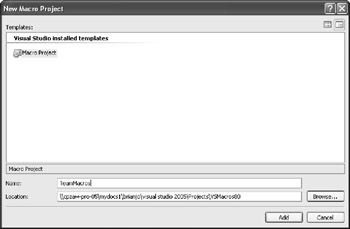
To create a new macro project, you can right-click in the Macro Explorer window, and then click New Macro Project from the shortcut menu to open the New Macro Project dialog box (shown in Figure 5-4). Enter a name and location for your project, and then click OK. Pressing Alt+F11 will toggle you back to the Macros IDE, where you can work on the code in the new project.

Figure 5-4: The New Macro Project dialog box
If you take a look at the new macro project created in Project Explorer, you'll notice that a number of features are added to your project by default. The References folder works similarly to the References folder in the Visual Studio IDE. Two new modules are added to get your macros up and running: the EnvironmentEvents module contains generated code that gives you access to the events in the IDE, and the Module1 module provides a place where you can start writing code.
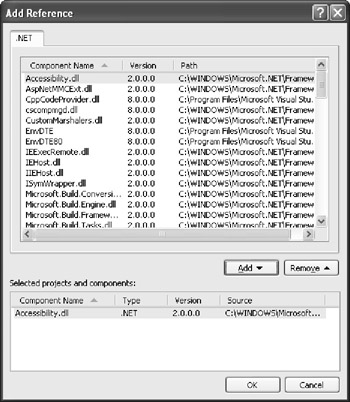
Adding a reference to a macro project is slightly different from adding one to a standard Visual Basic project. If you look at the Add Reference dialog box that's used in the Macros IDE Project Explorer (shown in Figure 5-5), you'll notice that it doesn't offer a way to add custom assemblies.

Figure 5-5: Add Reference dialog box
To add references to your own assemblies, you must copy them to the C:\Program Files\ Microsoft Visual Studio 8\Common7\IDE\PublicAssemblies folder. You can then add your own reference to the assembly from the Add Reference dialog box. Using assemblies, you can write your macro functionality in any language you want and then access that functionality from a fairly simple macro. You can also write assemblies that call to unmanaged code and assemblies that act as COM wrappers to access COM functionality from within your macros.
Let's go over a few examples built from a new project.
A Simple Macro
The File.NewFile command in Visual Studio opens a dialog box that allows you to choose the type of file that you want to create. Some programmers would rather have a command like this generate a new file than present a dialog box. The solution is simple: you just create a macro that does exactly what you want and then assign that macro an alias in the Command Window. The following code is all you really need to create a new text file in the IDE:
Imports EnvDTE Imports System.Diagnostics Public Module NewFile Sub NewTextFile() DTE.ItemOperations.NewFile("General\Text File") End Sub End Module As you can see, this macro has been created in a module named NewFile. It consists of a single method, NewTextFile. The single line of code in this macro simply creates a new file of the type Text File in the General folder of the New File dialog box. We'll talk about the NewFile method that creates the new text file shortly. What's important right now is that we have a macro that will add just the functionality we want to the IDE. To make this macro a tool we're willing to spend some time with, we'll want to make the macro as easy to access as possible.
To access a macro you want to execute, you have a few choices. One approach is to run the macro from Macro Explorer in the Visual Studio IDE. This works fine, but it's probably not the optimal solution for a macro that you're planning to use often. The second choice is to create an alias for the macro in the Command Window. This is probably the best choice for a command that you want to use while you're typing. To alias this command, you type alias followed by the command name, followed by the name of the macro. IntelliSense will kick in when you start to type a macro, so the whole alias line might look something like this:
>alias nf Macros.MyMacros.NewTextFile.NewTextFile
Now you have a new command, nf, that you can use from the Command Window. To create a new text file, you can simply press Ctrl+Alt+A and then type nf to get your new file. Of course, if you want to take it a step further, you can assign the macro a keystroke shortcut from the Options dialog box. In keeping with the Ctrl+0 initial sequence introduced in Chapter 3, Ctrl+0, Ctrl+N might make a good shortcut. Finally, you can add a button to the toolbar that initiates the macro (as described in Chapter 3).
The Imports statement in this sample is important. The API associated with the Visual Studio automation object model is contained in the EnvDTE namespace. The automation object model is discussed in depth throughout the rest of the book. Here we simply want to familiarize you with this object model and get you up and running with some of the more common functionality that you'll use in your macro projects. Most of the subjects covered in the remainder of the book apply to both macros and add-ins. In fact, you can use macros to test code that you want to write into your add-ins. You'll save time because you normally test an add-in by compiling the add-in and loading a second instance of the IDE. Using a macro, you can get to the automation object model, write and test your routines, and then add them to your add-in projects.
EAN: 2147483647
Pages: 100