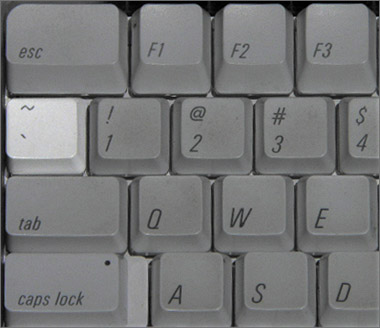
| You have used markers in previous lessons to find a specific location in a sequence, such as where Scene 98 began, where Amanda's cutaway was located, and where music beats occurred in a sequence. You can use markers to identify any location in any sequence or clip. When editing, you can also use markers as snapping points. Creating and Naming Markers When you create a marker, it is added at the playhead location, whether the playhead is stopped over a specific frame or moving in real time. In this exercise, you will create markers at strong beats in a music track. Later you will use those markers to help identify where to place video clips. There are several ways to create a marker once the playhead is correctly positioned: Press the M key. Choose Mark > Markers > Add. In the Viewer or Canvas, click the Add Marker button. Press the grave key (`). It's located to the left of the number 1 key and above the Tab key; it shares the tilde key and looks like a backward accent.
NOTE You will also use this key to delete markers later in this lesson.
1. | In the Timeline, play the Intro Markers sequence.
This is a similar sequence to the Intro Repo sequence you worked with in Lesson 6. Notice that the audio tracks are a different height than the video tracks. You will learn to customize your tracks in the next lesson. Also, even though the name of the music track in this sequence is different than it was in the previous lesson, it still links back to the same music file.
| 2. | Drag the playhead to snap to the first marker in the sequence, beat 1. Then play from this point to the second marker, beat 2.
The bass line riff repeats every four beats (about 3:22) in this music track, the distance between the two markers. Having a marker in the Timeline where these strong beats occur can be helpful when you edit your video clips to this sequence.
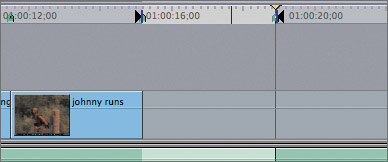
| 3. | Play from the second marker, and stop after the next four beats, somewhere around 1:00:11;18.
| 4. | To set a marker in the Timeline at this location, press M.

A green marker appears in the ruler area of the Timeline and also in the Canvas scrubber bar. Remember, when the playhead is directly over a marker in the Canvas, that marker appears yellow.
| 5. | To name this marker, press M again to open the Edit Marker window. Type beat 3 in the Name field. Take a look at the Edit Marker window before you click OK to close it.
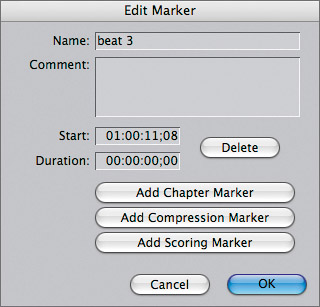
The Edit Marker window has options to set a marker at a specific timecode location, to create a duration for a marker, or to delete a marker. You can also add other types of markers here, such as scoring markers to use with Apple's Soundtrack Pro application, or you can add compression and chapter markers if your Final Cut Pro sequence will be used in a DVD Studio Pro project.
NOTE Naming markers to use them in editing isn't necessary. However, naming them is helpful if you're working with several markers in your sequence. | 6. | Continue playing the music track for another four beats, and stop the playhead at this location. This time, click the Marker button in the Canvas window to set a marker. Press M again to open the Edit Marker window. Name this marker beat 4.

| 7. | Play the music from the beat 4 marker, and this time, without stopping, press M every time you here the strong beat of music until the music stops.
TIP To delete a marker, move the playhead to the marker, and press Cmd-` (grave key). If you want to reposition a marker you've already created, move the playhead forward to a new location and press Shift-`. | 8. | Press Option-M to move the playhead backward to the previous sequence marker in the ruler area. Press Option-M repeatedly until you reach the first marker.
| 9. | Press Shift-M to move forward to the second marker.
TIP Just as you use the up or down arrow to move backward or forward to the next clip, you can use Shift with the up or down arrow to move backward or forward to a marker. | 10. | In the ruler area, Ctrl-click the second marker.
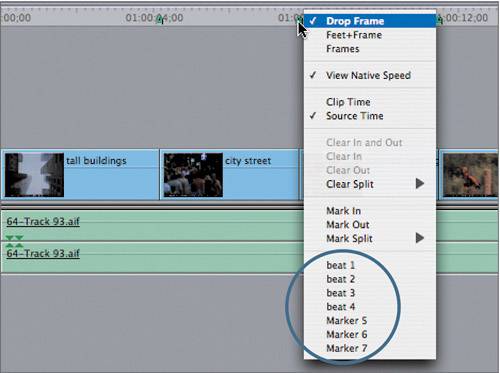
All of the markers in the sequence appear at the bottom of the shortcut menu.
| 11. | Choose beat 4 from the shortcut menu, and release the mouse.
The playhead jumps ahead to the beat 4 marker in the Timeline. Another way to move to markers is to choose Mark > Next > Marker and Mark > Previous > Marker.
| 12. | Move the playhead to each of the markers with a default name, and rename each one with a sequential beat number (rename Marker 5 to beat 5, and so on).
|
TIP To delete all the markers in the Timeline ruler area, press Ctrl-`. You can access these and other marker commands by choosing Mark > Markers.
Adding Markers to Clips You can also place a marker directly on a clip in the Viewer or in the Timeline when the clip is selected. When attached to a clip, a marker will always mark the same point of reference on that clip no matter where the clip is positioned in the sequence. 1. | In the Timeline, play the canyon runner clip.
Although the runner in this clip is very small, you can see him jump onto a rock toward the end of this clip. If you place a marker on the clip at this location, you can use it later to sync this action to a beat of music.
| 2. | Park the playhead where the runner lands after jumping, and select the clip.
NOTE If a clip is not selected when you press M, the marker will appear in the ruler area as a sequence marker. If this happens, press Cmd-Z to undo the step. | 3. | Press M to place a marker on the canyon runner clip.
| 4. | Press M to open the Edit Marker window, and enter runner jumps as the marker name.
With this clip selected, the marker appears on the clip and not in the Timeline ruler area.
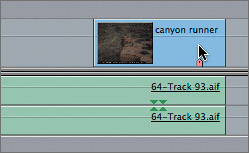
| 5. | Drag this clip to the right, and snap its Out point to the end of the sequence, then deselect the clip.

Clip markers stay with the clip wherever it's positioned in the sequence. Notice that the clip marker is pink, not green.
| 6. | From the Pan to Totem Subclips bin in the Browser, open the subclip pan to paddlers, which you created earlier in this lesson.
| 7. | In the Viewer, park the playhead where the paddlers begin their second complete stroke. Press M to add a marker at this location. Press M again to open the Edit Marker window. Name this marker 2nd stroke.

Like the Canvas marker, the Viewer marker is yellow when the playhead is over it. If you move the playhead away, the Viewer marker is pink.
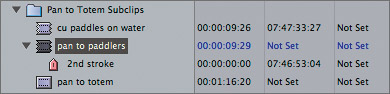
NOTE You can apply the same shortcuts that you used for a sequence marker to delete or go to a clip marker in the Viewer. To apply these shortcuts to a clip in the Timeline, you must first select the clip. | 8. | In the Browser, click the triangle next to the pan to paddlers subclip.
When you add a marker to a clip (or a subclip) in the Viewer, it is attached to the clip and appears as an entry in the Browser.
|
NOTE You can rename or delete a marker in the Browser just as you do a clip or sequence.
Editing with Markers There is real power in using markers to edit. You can set edit points to markers; you can also align a clip marker to a sequence marker. In the following steps, you will set edit points and align the canyon runner jumping to a beat of music. TIP Make sure snapping is on whenever you want to snap to markers as reference points.
1. | In the Timeline, position the playhead on the beat 4 marker. Press I to set an In point at this location. Press Shift-M to move the playhead to the beat 5 marker, and press O to set an Out point.
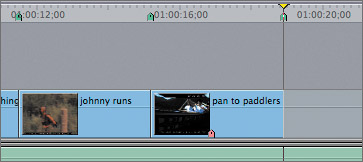
| 2. | With the pan to paddlers subclip still loaded in the Viewer, drag the playhead earlier to include the first paddlers' stroke. Press I to set an In point. Click the Overwrite button to edit this clip to the Timeline. Play this clip.
The clip now fills the exact distance between the two music markers. The marker you added in the previous exercise is still attached to the pan to paddlers clip, although it may be difficult to see if it's close to the thumbnail image.
| 3. | Repeat steps 1 and 2 to make the next edit, and use the totem against mtns subclip as your source.
| 4. | To use a marker as a sync point, click and hold your pointer directly above the marker in the canyon runner clip, but don't move the clip just yet.
Dragging a clip from a marker makes that the active sync point when you snap it to other markers in the Timeline.
| 5. | Drag this clip from its marker over the last sequence marker in the ruler area, which would be beat 7, and release it when the markers snap to each other.

When snapping is on, a snapping line appears that connects the two markers.
| 6. | Play this part of the sequence to see the alignment between the runner jumping and the strong music beat.
| 7. | To complete this sequence, drag the In point of the canyon runner clip to fill the gap before it, and drag its Out point to the end of the music. Play the finished sequence.
|
TIP You can use markers to slip a clip by selecting the Slip tool and dragging the clip marker left or right to snap to a sequence marker. You can also use markers as reference points when you roll or slide a clip.
Using Markers to Create Subclips You previously created subclips from In and Out points in a source clip. But you can also use a marker to create a subclip since it too identifies a specific location in a clip. In this exercise, you will add markers to the Amanda dialogue clips and create subclips from those markers. 1. | In the Browser, hide the contents of the Canoe Club bin, and reveal the contents of the Amanda bin. Open the 98A-amanda clip in the Viewer, and review the clip.
In previous lessons, you marked this clip at different locations to edit the scene. Here you will set markers where Amanda speaks, and use those markers to create subclips. Since this material follows a script that you don't have, you will number these markers for clarity of order.
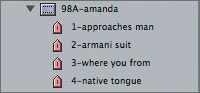
| 2. | Play the clip from the beginning, and stop where you first see Amanda enter the frame. Add a marker at this location, and name it 1-approaches man.
TIP When you add a marker as a reference for making a subclip, as you're doing here, remember to give yourself some extra pad before the action or sound you want to use in editing. | 3. | Play the clip from this marker, and stop the playhead just before Amanda responds to the "Nice suit. Armani?" question. Add a second marker here, and name it 2-armani suit.
| 4. | Add a third marker just before Amanda says where she is from. Name that marker 3-where you from.
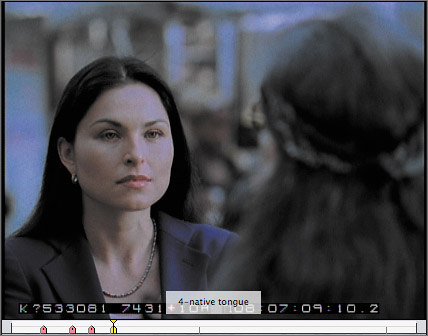
| 5. | Add one more marker just before Amanda speaks in her native tongue, and name that marker 4-native tongue.
You should now have four markers in the Viewer scrubber bar. Each marker represents a start point for a portion of this longer clip.
| 6. | In the Browser, click the disclosure triangle next to the 98A-amanda master clip to see the markers attached to this clip.
| 7. | To organize all of the subclips you will be creating, Ctrl-click the Amanda bin and choose New Bin from the shortcut menu. Name this bin Scene 98 Subclips. Drag the 98A-amanda clip into this bin and reveal the bin contents.
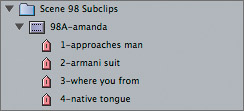
Now when you create subclips from this clip, they will appear in this bin, as they did when you organized subclips earlier in this lesson.
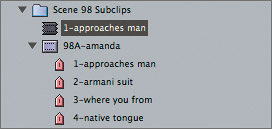
| 8. | To create a subclip from the first to second marker, select the 1-approaches man marker in the Browser, then choose Modify > Make Subclip.
In the Scene 98 Subclips bin, a new subclip has been created using the marker name followed by the master clip name as a reference.
TIP To see the full name of the new subclip, move the pointer between the Name and Duration column heads. When you see the resize arrow, drag right. 
| 9. | To shorten this subclip name, click its name area and delete the portion after the word man. Double-click this new subclip to open it in the Viewer. Play the clip.
The length of this subclip is from the first marker to the second marker. If you set a marker duration in the Edit Marker window, the subclip would be created starting at the marker for the length of the marker duration. If there are no markers following the one you selected, the subclip will be created from that marker to the end of the clip.
| 10. | Select the other markers in the Scene 98 Subclips bin, and choose Modify > Make Subclip. Then shorten the remaining 98A-amanda subclip names.
When you create subclips from markers, you can select a group of markers and convert them all to subclips at the same time.
|
TIP You can drag a marker icon into the Viewer and it opens as a subclip. You can also double-click a marker icon in the Browser to open it in the Viewer. In fact, when you edit with markers, they are subclips.
Project Practice Open the 98B-man clip and add four or so markers at places before the man delivers his lines, similar to the way you marked the 98A-amanda clip. Convert all of those markers into subclips as you did in step 10 in the preceding exercise. You can use the Amanda Subclips sequence if you want to edit together just the subclips from these two master clips. |