| Like previous Apple operating systems, Mac OS X uses icons to represent applications, documents, and other files. The hard-drive icon looks like an image of a hard drive; it is located in the upper-right corner of the Desktop. The applications and documents you will be organizing and working with are stored on the hard drive and can be accessed through that icon. Viewing Columns in a Finder Window In Mac OS X, there are three ways to view the contents of your hard drive: by icon, as a list, or in column view. The latter is especially helpful when working with media files. Note An icon is a visual representation of something.
1. | Turn on your computer and double-click the hard-drive icon to open the contents of the hard drive in a Finder window.
 Tip The keyboard shortcut to opening a Finder window on the Desktop is Cmd-N. The Command key is on either side of the spacebar. | 2. | Click and drag any portion of the outer silver area in the Finder window. This is how you reposition a window on the Desktop. In Final Cut Express HD, you drag from the window's title bar.
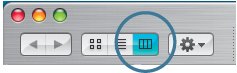
 | | | 3. | In the upper-left area of this window are backward and forward arrows and three view options. If it's not already selected, click the third (right) view option to sort by column layout.
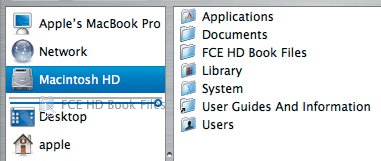
 | 4. | The first column is a sidebar where you can place certain items and applications. Click the Macintosh HD icon once to select it. The Macintosh HD is the root level of the computer.
The content in the hard drive is displayed in the next column.
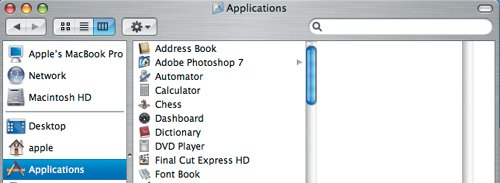
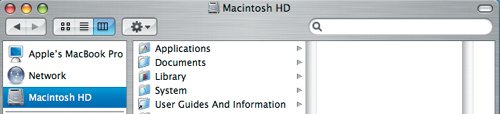 | 5. | In the sidebar, click the Applications icon to display applications.
A list of all the applications on your computer appears alphabetically in the next column, including Final Cut Express HD, if installed.
 |
Resizing Windows Resizing, minimizing, and hiding windows in Mac OS X is necessary at times to see additional columns of computer content in the Finder window. Final Cut Express windows are also manipulated this way. | | 1. | Drag the lower-right corner down and out to enlarge the window.
This allows you to view more columns and more content within each column.
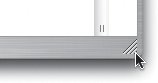 | 2. | Look for the tiny double vertical lines at the bottom of a column. Drag one of these column markers right or left to expand or contract that column width.
 Tip If you want to resize all columns to the same width, press the Option key as you drag a column's vertical marker. If you want to resize the sidebar, move the cursor over the silver column divider. When the pointer changes to a resize arrow, drag left or right. Dragging left all the way hides the sidebar entirely. | 3. | Click the green Zoom button in the upper-left corner to enlarge the window to show additional information, if available, or to shrink it to hide empty areas.
Note When the pointer is positioned over the window buttons, they each display a symbol. The Zoom button displays a plus sign.  | 4. | Click the green Zoom button again to return the window to its previous size.
Note Later, you will click the yellow button to minimize the window and store it in the Dock, and the red button to close the window. |
Loading Lessons and Media onto the Hard Drive Before you begin working with the material from the Final Cut Express HD DVD, you will need to load the files onto your hard drive. 1. | Insert the DVD included with this book into your computer.
The APTS (Apple Pro Training Series) Final Cut Express HD DVD icon appears in the first column of the Finder window. It also appears on the Desktop.
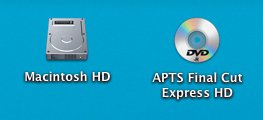 | 2. | Click the APTS Final Cut Express HD DVD icon in the sidebar of the Finder window to view the contents of the DVD in the next column.
| 3. | Click the FCE HD Book Files folder in the second column and then the Lessons folder in the third column.
There is a Final Cut Express project file for each lesson, beginning with Lesson 3.
| 4. | Click the Media folder in the third column.
All of the media files you will use in the lessons are organized by topic into individual folders.
Tip To ensure that each project knows where to locate its associated media files, do not separate the Lessons and Media folders. Keep them together in the FCE HD Book Files folder and move only that folder. | | | 5. | To copy the media files to your hard drive, drag the FCE HD Book Files folder from the second column of the Finder window onto the Macintosh HD icon in the sidebar.
Note Make sure you see an outline around Macintosh HD before releasing the mouse button. The outline indicates that the target has been selected. 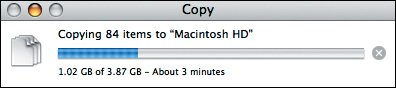 A Copy window appears, listing what is being copied and how long the process will take to complete.
Note Depending on your computer, be prepared to spend about 30 minutes to load the FCE HD Book Files folder onto your hard drive. | 6. | After the copying is complete, eject the DVD from your computer.
The additional folder on the DVD, FXScript DVE's by CGM, holds an effect you will use in Lesson 15. You will install it in that lesson.
| | | 7. | To make the FCE HD Book Files folder easily accessible from the side-bar, click the Macintosh HD icon, then drag the FCE HD Book Files folder from the second column into the sidebar, somewhere in the lower half of the sidebar beneath the Macintosh HD icon. Look for an insert line as you drag.
 This action does not remove the folder from its original location but simply places a copy of the folder icon, called an alias, in the sidebar for easy access.
|
Viewing Media in the Finder At this point, you should have the FCE HD Book Files folder (containing the Lessons and Media folders) from the DVD loaded onto your hard drive as outlined in the previous steps. The Lessons folder contains individual Final Cut Express project files for each lesson. The Media folder contains media files (video clips) used in the lessons. Using the column view, you can access your lesson files quickly and easily, and preview or screen your media files as well. You can also access other information about a media file, such as when it was created, the date it was last modified, and its duration, file size, and frame size. For the moment, you will work with media files from the Media folder. Later, you can work with your own media. 1. | Click the FCE HD Book Files folder in the sidebar of the Finder window, then the Media folder in the next column.
A third column appears, displaying individual folders that organize the media by topic. If necessary, expand the width of the column to read the filenames.
| 2. | Click the Lesson 1 Media folder.
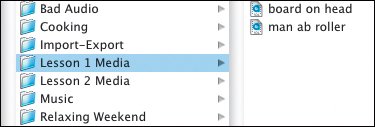 | | | 3. | Click man ab roller once. A single frame appears in the next column. Expand this column to see a larger preview of the media file image.
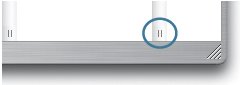
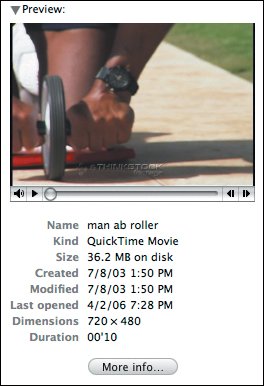 Tip When you select a media file, such as a QuickTime movie, in column view, you can play the file in the far-right column to screen it or use the displayed file information for reference. Note QuickTime is a type of digital media file that is discussed in more detail in Lesson 2. | 4. | The arrow at the bottom left of the preview frame is a Play button. Click the QuickTime movie Play button to play the media file.
 Note When the QuickTime media file is playing, a double vertical bar appears in the Play button position. Press this to pause or stop playing. | | | 5. | Click and drag the frame slider to move quickly through the frames.
 | 6. | Play the clip from the beginning, and click the audio speaker to the left of the image. In the volume slider area, drag up and down to adjust the volume.
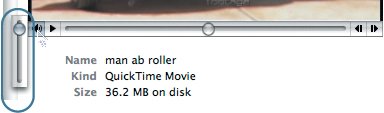 | 7. | Drag the frame slider to the center of the bar, and click the left and right frame buttons to move backward and forward through the clip, frame by frame.
 | 8. | Play the other media file in this lesson, board on head.
|
|