| The sequence is finished, and the tweaking has come to an end. Now it's time to decide just what you want to do with it. There are two things you can do to get your sequence out of your computer: export it as a file or output it to tape. Exporting a sequence as a computer file allows you to play the sequence on another computer, save it as a backup, add it to your project archives, or even import it into another application for further work. 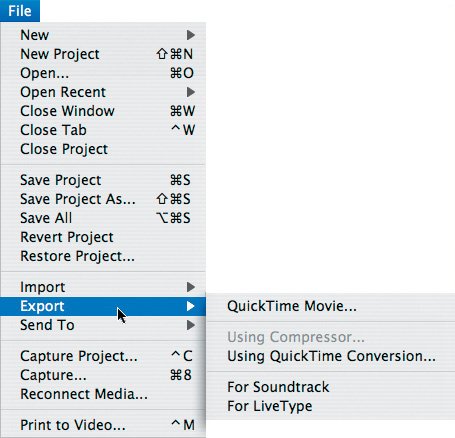 There are five export options in Final Cut Express. Two of these options output the selected clip or sequence using the QuickTime format, and one uses Compressor, an Apple application that offers additional ways to compress and export your work. The other two options, For Soundtrack and For LiveType, allow you to export a sequence to those applications to use as a reference as you score music or add titling effects. Exporting a QuickTime Movie When you want to export a clip or sequence exactly as it is, using its current settings, you export it as a QuickTime Movie. There are two types of QuickTime Movies; one is self-contained, and the other is not. A self-contained movie file contains a copy of the media itself. This creates a much larger file size but makes the file independent so that you can play it on other computers. When you export a QuickTime movie that is not self-contained, the movie file does not contain a copy of the media. This creates a much smaller file size, but you are limited to playing the sequence on the computer that also contains the media files. | | 1. | Make sure the 15-Finished sequence is active in the Timeline.
When you export from the Timeline, you can either mark In and Out points to identify the section you want to export, or remove any marks to export everything in the sequence.
| 2. | Mark an In point at the beginning of the second clip (the slate) and an Out point at the end of the sequence after the final edit.
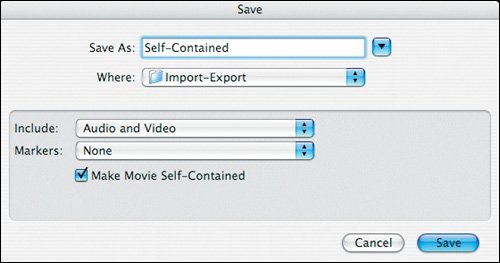
 | | | 3. | Choose File > Export > QuickTime Movie and enter Self-Contained as the name and the Import-Export folder as the destination. Choose Audio and Video from the Include pop-up menu, and None from the Markers menu. Make sure the Make Movie Self-Contained box is selected.
 In this option, you can choose to export Audio and Video, or just one or the other. You can also choose to include specific sets of markers you may have created for the purposes of creating a DVD or to use in the Soundtrack application. In this option, you can choose to export Audio and Video, or just one or the other. You can also choose to include specific sets of markers you may have created for the purposes of creating a DVD or to use in the Soundtrack application.
Note The following steps to save a QuickTime movie file may take about 500 MB of hard drive space. Before you click Save in the following steps, make sure you have enough hard drive space. You can also re-mark a shorter length of sequence, or simply read through the steps and apply them to your own files later. | 4. | To create a QuickTime movie of this sequence, click Save.
The Writing Audio and Video progress bar appears.
| 5. | When the exporting is complete, press Cmd-I and select the Self-Contained movie to import this file into the project.
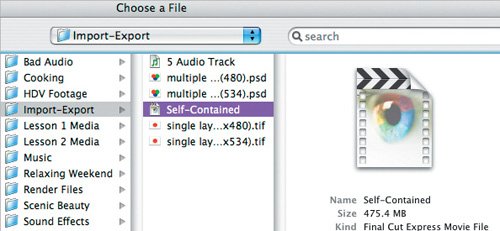 When you select the clip, you see a Final Cut Express movie icon. Look at the file size. In the Browser, the Self-Contained movie icon looks like any other clip icon. When you select the clip, you see a Final Cut Express movie icon. Look at the file size. In the Browser, the Self-Contained movie icon looks like any other clip icon.
Note Unlike other QuickTime media files, double-clicking this type of movie file from the Desktop will automatically launch Final Cut Express. | | | 6. | In the Browser, double-click the clip to open it in the Viewer. Play the Self-Contained movie.
Tip Watching the movie play is a good double-check that everything is the way you want it to be before using or duplicating the file. | 7. | Click in the Timeline to make it active. Repeat steps 3 and 4, but this time enter Not Self-Contained as the name, and deselect Make Movie Self-Contained. If you want to save this file, click Save.
When a movie is not self-contained, the saving is faster because only the sequence information is being saved, not the media itself.
| 8. | Press Cmd-I and navigate to the Not Self-Contained file.
Compare the smaller size of this file to the Self-Contained movie file.
| 9. | Open the Not Self-Contained movie and play it in the Viewer.
Both movies look exactly alike in the Viewer or Timeline. But the Self-Contained movie has the flexibility of being put on a CD or DVD and played independently on another computer. The Not Self-Contained movie can be played only on the computer that has the media to which it is linked.
Note If you want to use a sequence or part of a sequence to author an iDVD project, you must export your material as QuickTime movies. You can even choose not to make the movie self-contained as long you will be working on the same computer that has the media files. |
Exporting Using QuickTime Conversion Exporting using the QuickTime Movie option maintains the sequence settings, such as frame rate and frame size. But you may need to export a clip or sequence with different settings, and for this you will use the Using QuickTime Conversion export option. Several situations may require changing settings. You may want to burn your sequence onto a CD or DVD, perhaps requiring the frame size to be smaller; play it over the Web, requiring it to be smaller still; export it for use in authoring a DVD; export a single clip frame to use in a graphics program; or export the sound track alone as an audio file. Let's export the currently marked sequence so it can play easily on the Web. Note Exporting your sequence requires that it be compressed. When it plays back, it is decompressed. The method in which this process takes place is referred to as a codec, short for compression/ decompression. The QuickTime format supports a wide variety of compression methods, or codecs.
1. | With the Timeline window active, choose Sequence > Settings, and click the Render Control tab.
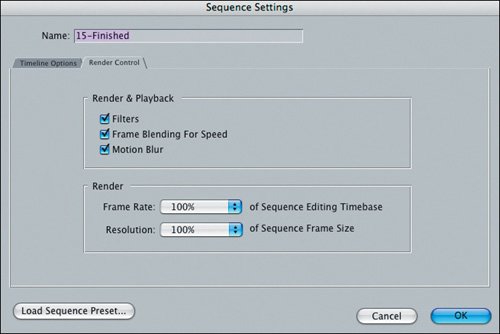 Before you begin to output this sequence, make sure the option boxes are selected, and that the Render pop-ups are each set at 100% for the best render quality. Then click OK. Before you begin to output this sequence, make sure the option boxes are selected, and that the Render pop-ups are each set at 100% for the best render quality. Then click OK.
| 2. | In the Timeline, press Shift-I to move the playhead to the In point in the 15-Finished sequence. Choose File > Export > Using QuickTime Conversion.
Note You can also export a clip or sequence from the Browser by selecting it and then choosing File > Export > and the appropriate export option. | | | 3. | In the Save dialog box, click the Format pop-up menu and look at the different formats in which you can export your sequence.
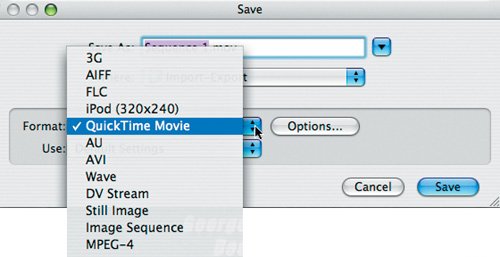 QuickTime Movie is the default format, but you can also export using Still Image, Image Sequence, AVI, AIFF, and other format options. QuickTime Movie is the default format, but you can also export using Still Image, Image Sequence, AVI, AIFF, and other format options.
The Format option you choose determines what appears in the Use pop-up menu.
| 4. | Select the AIFF audio format and then click the Use pop-up menu to see the default audio choices that appear. Click other formats and then the Use pop-up menu to see the default options for those formats.
Note You may notice that one of the Format options is for iPod (320x240). Viewing a clip that was exported using this option opens the clip in iTunes. You can also change the options to conform to your specific needs. Let's export this sequence as a QuickTime movie file that can be easily posted to the Web.
| 5. | Choose the QuickTime Movie format and click the Options button to open the Movie Settings dialog box. Under Video, click the Settings button.
| | | 6. | Click the pop-up menu at the top of the window and look at the different codecs you can use to export this sequence.
When you're selecting a codec, the three important considerations are file size, image quality, and file compatibility. Some codecs use very little compression, which produces an excellent picture quality but a very large file size. Other codecs use greater compression so the file size will be smaller and can be used more easily for other situations, such as the Web or CD.
| 7. | In the Compression Settings dialog box, choose MPEG-4 Video from the pop-up menu. Click the Frame Rate pop-up and choose 15 fps (frames per second), and enter 5 in the Key Frames field. In the Data Rate field, enter 700 as the kbits per second. Then drag the Quality slider to Best, and click OK.
Note The MPEG-4 format is capable of high levels of compression while maintaining good image quality. This makes it a good choice for distributing media on the Web. When you click OK, this dialog box closes and returns you to the previous Movie Settings dialog.
| | | 8. | In the Movie Settings dialog box, in the Video section, click the Size button. When the Export Size Settings dialog box appears, select Custom from the Dimensions pop-up menu. Enter 320 for Width and 240 for Height, and click OK.
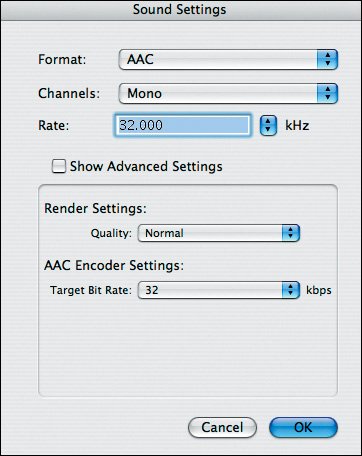
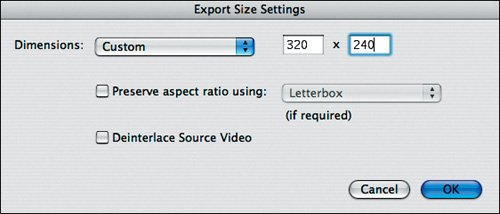 Note This is half the size of a typical television image, which when calculated in square pixels is 640x480. Changing the frame size will greatly reduce the size of the file. Depending on whether you burn the file to a CD (approximately 700 MB) or DVD (approximately 4.5 GB), you may not have to reduce the image size. | 9. | In the Movie Settings dialog box, click the Settings button under Sound. In the Sound Settings dialog box, choose or enter the following settings in this order, then click OK:
Format: AAC Channels: Mono Target Bit Rate: 32 Rate: 32.000
Back in the Movie Settings dialog box, deselect Prepare for Internet Streaming, and click OK.
 | | | 10. | In the Movie Settings dialog box, click OK. In the Save window, change the name to Surfing Web and click Save if you want to create this file.
The saved file can now be posted to the Web.
Tip Not all sequences have the same export requirements, so you may need to experiment with different options to find the best combination for your project. |
Exporting for Other Apple Applications Soundtrack is Apple's music composition and scoring application that provides royalty-free sound loops you can use to create a soundtrack for your sequence. LiveType is Apple's 32-bit animated application that creates animated titles. These two applications come bundled with Final Cut Express, and introductions to each of these applications are on the DVD that came with this book. In Final Cut Express, you can add scoring markers throughout your sequence where you want certain music cues or sound effects to be placed. This allows you to compose the music to match the action in the video. You then export the sequence, including the scoring markers, using the For Soundtrack export option. You can also use the Export option, For LiveType, to export a sequence or clip to use as a background behind a title. Project Tasks 1. | In the Timeline, park your playhead at 1:14;05.
| 2. | To export this as a single frame, choose File > Export > Using QuickTime Conversion.
| 3. | In the Format pop-up menu, choose Still Image. Click Options and select Photoshop or another type of file your graphics program can read. Export this image.
|
|