Editing a Table s Structure
Editing a Table's Structure
Now that you've created a table, let's look at some ways to modify the table's structure, including resizing the entire table, adding and deleting rows and columns, and merging and splitting cells.
Resizing the Overall Table
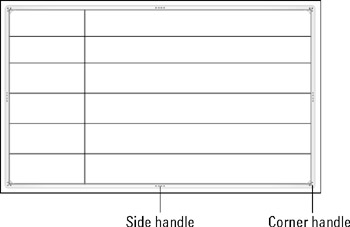
As with any other framed object in PowerPoint, dragging the table's outer frame resizes it. Position the mouse pointer over one of the selection handles (the dots on the sides and corners) so that the mouse pointer becomes a double-headed arrow, and drag to resize the table. See Figure 9.6.

Figure 9.6: To resize a table, drag a selection handle on its frame.
| Note | If you drag when the mouse pointer is over any other part of the frame, so that the mouse pointer becomes a four-headed arrow, you move the table rather than resize it. |
To maintain the aspect ratio (height to width ratio) for the table as you resize it, hold down the Shift key as you drag a corner of the frame. If maintaining the aspect ratio is not critical, you can drag either a corner or a side.
All of the rows and columns maintain their spacing proportionally to one another as you resize them. However, when a table contains text that would no longer fit if its row and column were shrunken proportionally with the rest of the table, the row height does not shrink fully; it shrinks as much as it can while still displaying the text. The column width does shrink proportionally, regardless of cell content.
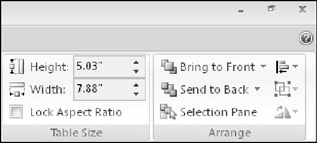
You can also specify an exact size for the overall table frame by using the Table Size group on the Layout tab, as shown in Figure 9.7. From there you can enter Height and Width values. To maintain the aspect ratio, mark the Lock Aspect Ratio check box before you change either the Height or Width settings.

Figure 9.7: Set a precise height and width for the table from the Table Size group.
Inserting or Deleting Rows and Columns
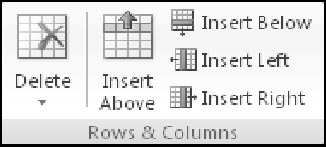
Here's an easy way to create a new row at the bottom of the table: Position the insertion point in the bottom-right cell and press Tab. Need something more complicated than that? The Layout tab contains buttons in the Rows & Columns group for inserting rows or columns above, below, to the left, or to the right of the selected cell(s), as shown in Figure 9.8. By default, each button inserts a single row or column at a time, but if you select multiple existing ones beforehand, these commands insert as many as you've selected. For example, to insert three new rows, select three existing rows and then click Insert Above or Insert Below.

Figure 9.8: Insert rows or columns by using these buttons on the Layout tab.
Alternatively, you can right-click any existing row or column, point to Insert, and choose one of the commands on the submenu. These commands are the same as the names of the buttons in Figure 9.8.
| Caution | Adding new rows increases the overall vertical size of the table frame, even to the point where it runs off the bottom of the slide. You might need to adjust the overall frame size after adding rows. On the other hand, inserting columns does not change the overall frame size; it simply resizes the existing columns so that they all fit and are all a uniform size (unless you have manually adjusted any of them to be a custom size). |
To delete a row or column (or more than one of each), select the row(s) or column(s) that you want to delete, and then open the Delete button's menu on the Layout tab and choose Delete Rows or Delete Columns.
| Note | You cannot insert or delete individual cells in a PowerPoint table. (This is unlike in Excel, where you can remove individual cells and then shift the remaining ones up or to the left.) |
Merging and Splitting Cells
If you need more rows or columns in some spots than others, you can use the Merge Cells and Split Cells commands. Here are some ways to merge cells:
-
Click the Eraser button on the Design tab, and then click the line you want to erase. The cells on either side of the deleted line are merged.
-
Select the cells that you want to merge and click Merge Cells on the Layout tab.
-
Select the cells to merge, right-click them, and choose Merge Cells.
Here are some ways to split cells:
-
Click the Draw Table button on the Design tab, and then drag to draw a line in the middle of a cell to split it.
-
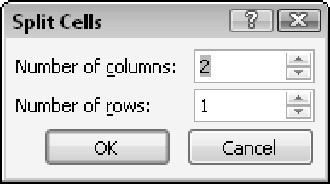
Select the cell that you want to split, right-click it, and choose Split Cells. In the Split
Cells dialog box (see Figure 9.9), select the number of pieces in which to split in each direction, and click OK.
-
Select the cell to split, and then click Split Cells on the Layout tab. In the Split Cells dialog box (see Figure 9.9), select the number of pieces in which to split in each direction, and click OK.

Figure 9.9: Specify how the split should occur.
EAN: 2147483647
Pages: 268