Working with Text Boxes
Text boxes (either placeholder or manual) form the basis of most presentations. Now that you know how to create them, and how to place text in them, let's take a look at how to manipulate the boxes themselves.
| CROSS-REF | Are you looking for information about formatting text boxes-perhaps to apply a background color or a border to one? See the formatting text boxes discussion in Chapter 7. |
Selecting Text Boxes
On the surface, this topic might seem like a no-brainer. Just click it, right? Well, almost. A text box has two possible "selected" states. One state is that the box itself is selected, and the other is that the insertion point is within the box. The difference is subtle, but it becomes clearer when you issue certain commands. For example, if the insertion point is in the text box and you press Delete, PowerPoint deletes the single character to the right of the insertion point. However, if you select the entire text box and press Delete, PowerPoint deletes the entire text box and everything in it.
To select the entire text box, click its border. You can tell that it is selected because the border appears as a solid line. To move the insertion point within the text box, click inside the text box. You can tell that the insertion point is there because you can see it flashing inside, and also because the box's border now consists of a dashed line. Figure 4.13 shows the difference between the two borders.

Figure 4.13: The border of a text box is different when the box itself is selected (left) and when the insertion point is in the box (right).
In the rest of this book, when you see the phrase "select the text box," it means in the first way; the box itself should be selected, and the insertion point should not appear in it. For most of the upcoming sections it does not make any difference, although in a few cases it does.
| EXPERT TIP | When the insertion point is flashing in a text box, you can press Esc to select the text box itself. |
You can select more than one text box at once by holding down the Shift key as you click additional text boxes. This technique is useful when you want to select more than one text box, for example, so that you can format them in the same way, or so that you can resize them by the same amount.
Sizing a Text Box
The basic techniques for sizing text boxes in PowerPoint are the same for every object type (for that matter, they are also the same as in other Office applications). To resize a text box, or any object, follow these steps:
-
Position the mouse pointer over a selection handle for the object. The mouse pointer changes to a double-headed arrow.
If you want to resize proportionally, make sure that you use a corner selection handle, and hold down the Shift key as you drag.
-
(Optional) To resize proportionally, hold down the Shift key.
-
Click and drag the selection handle to resize the object's border.
| Caution | Allowing PowerPoint to manage placeholder size and position through layouts ensures consistency among your slides. When you start changing the sizes and positions of placeholders on individual slides, you can end up creating consistency problems, such as headings that aren't in the same spot from slide to slide, or company logos that shift between slides. |
You can also set a text box's size from the Size group on the Drawing Tools Format tab. When the text box is selected, its current dimensions appear in the Height and Width boxes, as shown in Figure 4.14. You can change the dimensions within these boxes.
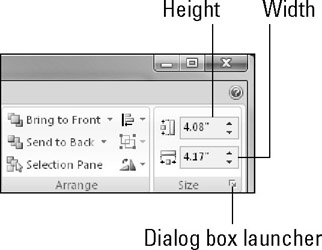
Figure 4.14: You can set an exact size for a text box from the Format tab's Size group.
You can also set the size of a text box from the Size and Position dialog box:
-
Click the dialog box launcher in the Size group on the Drawing Tools Format tab, as shown in Figure 4.14. The Size and Position dialog box opens.
-
On the Size tab, set the height and width for the text box, as shown in Figure 4.15.
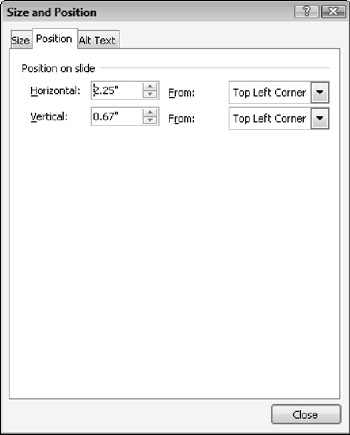
Figure 4.15: You can adjust the size of the text box from the Size and Position dialog box.To keep the size proportional, select the Lock Aspect Ratio check box in the Scale section before you start adjusting the height or width.
-
Click Close to close the dialog box.
| EXPERT TIP | The Size and Position dialog box is non-modal. This means that you can leave it open and continue to work on your presentation. It also means that any changes that you make in this dialog box are applied immediately; there is no Cancel button in the dialog box to cancel your changes. To reverse a change, you can use the Undo command (Ctrl+Z). |
Positioning a Text Box
To move an object, simply drag it by any part of its border other than a selection handle. Select the object, and then position the mouse pointer over a border so that the pointer turns into a four-headed arrow. Then drag the object to a new position. With a text box, you must position the mouse pointer over a border and not over the inside of the frame; with all other object types, you don't have to be that precise; you can move an object by dragging anywhere within it.
To set an exact position, use the Size and Position dialog box:
-
Click the dialog box launcher in the Size group on the Drawing Tools Format tab, as shown in Figure 4.14. The Size and Position dialog box opens.
-
On the Position tab, shown in Figure 4.16, set the horizontal and vertical position, and the point from which it is measured. By default, measurements are from the top-left corner of the slide.
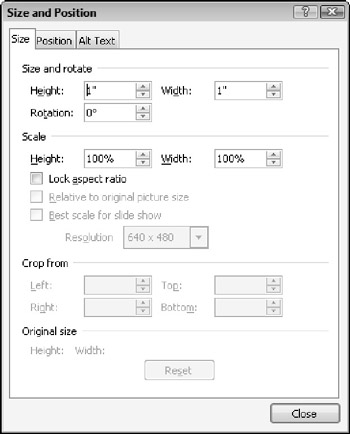
Figure 4.16: You can adjust the position from the Size and Position dialog box. -
Click Close to close the dialog box.
Changing a Text Box's AutoFit Behavior
When there is too much text to fit in a text box, there are three things that may happen:
-
Do Not AutoFit: The text and the box can continue at their default sizes, and the text can overflow out of the box or be truncated.
-
Shrink Text on Overflow: The text can shrink its font size to fit in the text box. This is the default setting for placeholder text boxes.
-
Resize Shape to Fit Text: The text box can enlarge to the size needed to contain the text. This is the default setting for manual text boxes.
Whenever there is too much text in a placeholder box, the AutoFit icon appears in the bottom-left corner. Click that icon to display a menu, as shown in Figure 4.17. From that menu, you can turn AutoFit on or off.
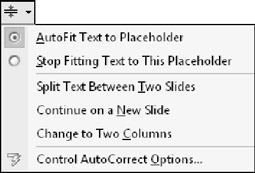
Figure 4.17: You can use the AutoFit icon's menu to change the AutoFit setting for a text box.
With a manual text box, the AutoFit icon does not appear, and so you must adjust the AutoFit behavior in the text box's properties. The following method works for both manual and placeholder boxes:
-
Right-click the border of the text box and choose Format Shape.
-
Click Text Box.
-
In the Autofit section, choose one of the Autofit options, as shown in Figure 4.18.
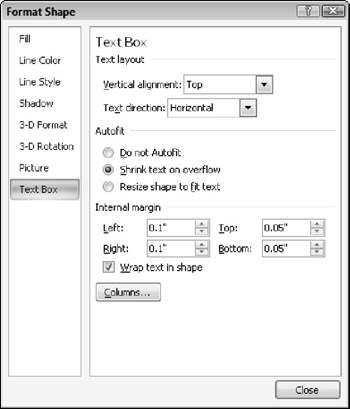
Figure 4.18: You can set AutoFit properties in the Format Shape dialog box. -
Click Close.
One other setting that also affects AutoFit behavior is the Wrap Text in Shape option. This on/off toggle enables text to automatically wrap to the next line when it reaches the right edge of the text box. By default, this setting is On for placeholder text boxes and for manual text boxes that you create by dragging. However, it is Off by default for manual text boxes that you create by clicking. You can change the setting by displaying the text box's properties, as shown in Figure 4.18, and selecting or deselecting the Wrap Text in Shape check box.
Table 4.1 summarizes the various AutoFit behaviors and how they interact with one another.
| Setting | Default For | When Wrap Text in Shape Is On | When Wrap Text in Shape Is Off |
|---|---|---|---|
| Do Not Autofit | n/a | Text overflows at bottom of text box only | Text overflows at right and bottom of text box |
| Shrink Text on Overflow | Placeholders | Text shrinks to fit | Text shrinks to fit |
| Resize Shape to Fit Text | Manual text boxes | Text box expands vertically only (default for manual text box that you create by dragging) | Text box expands vertically and horizontally (default for manual text box that you create by clicking). However, if you clicked to create the text box initially, the width keeps expanding until you press Enter. |
EAN: 2147483647
Pages: 268