Working with Audio-visual Equipment
The first part of this chapter assumed that you were using a computer with a single monitor to show your presentation, but this may not always be the case. This section looks at the entire range of audio-visual options from which you can choose. There are many models of projection equipment in conference rooms all across the world, but most of them fall into one of these categories:
-
Noncomputerized equipment: This can include an overhead transparency viewer, a 35mm slide projector, or other older technology. You face two challenges if you need to work with this category of equipment: one is figuring out how the equipment works because every model is different, and the other is producing attractive versions of your slides to work with them. There are companies that can produce 35mm slides from your PowerPoint files, or you can invest in a slide-making machine yourself. For transparencies, you simply print your slides on transparency film that is designed for your type of printer.
-
Single computer with a single monitor: If there is a computer with a monitor in the meeting room, then you can run your presentation on that computer. You can do this with the Publish to CD feature that is discussed in the preceding sections, and then run the presentation directly from the CD.
-
Single computer with a dual-monitor system: On systems with dual monitors, one monitor is shown to the audience and the other is for your own use. This is useful when you want to display your speaker notes on the monitor that the audience does not see. However, you might need to set up multi-monitor support in Windows so that you can view different displays on each monitor.
-
Projection system (LCD) or large monitor without a computer: If the meeting room has a large monitor but no computer, you will need to bring your own laptop computer and connect it to the monitor. Most of these systems use a standard VGA plug and cable.
The following sections look at some of these options in more detail.
Presenting with Two Screens
If you have two monitors-either your laptop computer screen and an external monitor, or two external monitors hooked up to the same computer-you can display the presentation on one of them and your own notes on the other one. This is a very handy setup!
| Caution | To use two screens, you need the full version of PowerPoint on your laptop, not just the PowerPoint Viewer. You also need compatible hardware. For example, your laptop must have an external VGA port and a built-in video card that supports DualView in your version of Windows. If you have a desktop computer, you must have two separate video cards or a video card with two separate video ports. |
Configuring Display Hardware for Multi-screen Viewing
First, you need to prepare your hardware. On a laptop computer, this means enabling both the built-in and the external monitor ports and connecting an external monitor. Some laptops toggle between internal, external, and dual monitors with an Fn key combination; refer to your laptop's documentation.
On a desktop computer, install a second video card and monitor, and then do the following to set them up in Windows:
-
When Windows restarts after you install the second video card, right-click the desktop and choose Personalize (Windows Vista) or Properties (Windows XP).
-
Click Display Settings (Windows Vista), or click the Settings tab (Windows XP).
-
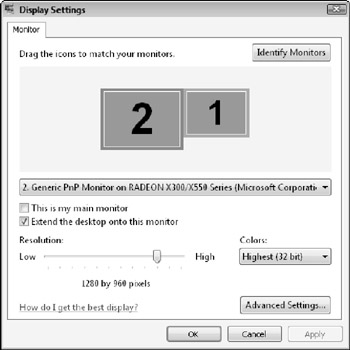
A sample area displays two monitors, as shown in Figure 20.22.

Figure 20.22: You must set up the second monitor in Windows before setting it up in PowerPoint. -
The monitor that you use most of the time should be monitor 1, and the other one should be monitor 2. To determine which is which, click Identify Monitors (or the Identify button if you are using Windows XP); large numbers appear briefly on each screen.
-
If you need to swap the numbering of the monitors, click the one that should be the primary monitor and then select the This is My Main Monitor check box (Windows Vista) or the Use This Device as the Primary Monitor check box (Windows XP). This option will be unavailable if the currently selected monitor is already set to be the primary one.
-
Select the secondary monitor, and then select the Extend my Desktop onto This Monitor check box (Windows Vista) or Extend the Desktop Onto This Monitor check box (Windows XP).
-
(Optional) If the monitors are not arranged in the sample area in the way that they are physically positioned on your desk, you can drag the icons for the monitors to where you want them.
-
(Optional) You can click a monitor in the sample area to adjust its display settings.
EXPERT TIP You can also adjust the refresh rate for each monitor. To do this, make sure that you have selected the video card to which the monitor is attached, and then click the Advanced Settings button (Windows Vista) or the Advanced button (Windows XP). On the Monitor tab in the dialog box that appears, change the refresh rate. A higher refresh rate reduces screen flicker, but if you exceed the monitor's maximum supported rate, the display may appear distorted and the screen may be damaged.
-
Click OK. You are now ready to work with the two monitors in PowerPoint.
You can now drag items from your primary monitor to your secondary one! This can also be useful outside of PowerPoint as well. For example, you can have two applications open at once, each in its own monitor window.
Setting Up a Presentation for Two Screens
If you have two monitors available, and configured as described in the preceding section, you can use the following steps to help PowerPoint recognize and take advantage of these monitors:
-
Open the presentation in PowerPoint.
-
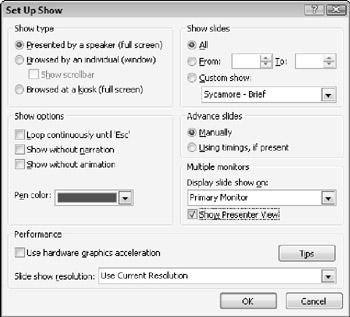
On the Slide Show tab, click Set Up Slide Show. The Set Up Show dialog box opens, as shown in Figure 20.23.

Figure 20.23: You can set up the show for multiple monitors in the Set Up Show dialog box. -
In the Multiple Monitors section, open the Display Slide Show On drop-down list and choose the monitor that the audience will see.
-
Select the Show Presenter View check box. This will give you a separate, very useful control panel on the other monitor during the show, as described in the next section.
-
Click OK. You are now ready to show the presentation using two separate displays-one for you and one for the audience.
Presenting with Two Screens Using Presenter View
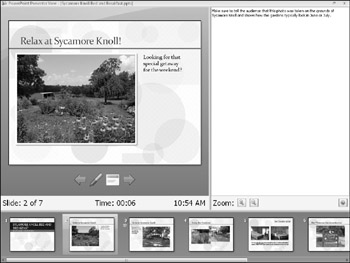
Presenter View is a special view of the presentation that is available only on systems with more than one monitor, and only where you have selected the Show Presenter View check box in the Set Up Show dialog box, as described in the preceding section. This view provides many useful tools for managing the show behind-the-scenes, as shown in Figure 20.24. It appears automatically on the non-audience monitor when you enter Slide Show view, and includes the following features:
-
At the bottom of the screen is a pane containing thumbnail images of each slide. You can jump to a slide by selecting it here. You can also move between slides by using the large left-and right-arrow buttons.
-
The speaker notes for each slide appear in the right pane. You cannot edit them from here, however. Zoom buttons appear below the speaker notes pane, so you can zoom in and out on the notes.
-
A Time and Duration display appears below the current slide. It tells you the current time and how long you have been talking.
-
The panes are adjustable by dragging the dividers between them, so you can have larger thumbnails, a smaller slide display, more or less room for notes, and so on.

Figure 20.24: Presenter View provides tools for helping you manage your slideshow from a second monitor.
Presenter View does not have all of the features that you have learned about so far in Slide Show view. However, keep in mind that the audience's monitor is still active and available for your use! Because you extended the desktop onto the second monitor, you can simply move the mouse pointer onto the audience's display and then use the buttons in the corner (or the right-click menu) as you normally would.
EAN: 2147483647
Pages: 268