Using the On-screen Pen
Have you ever seen a coach in a locker room drawing out football plays on a chalkboard? Well, you can do the same thing in PowerPoint. You can have impromptu discussions of concepts that are illustrated on slides, and punctuate the discussion with your own circles, arrows, and lines. Perhaps during the discussion portion of your presentation, you may decide that one point on the slide is not important. In this case, you can use the pen to cross it out. Conversely, a certain point may become really important during a discussion so that you want to emphasize it. In this case, you can circle it or underline it with the pen cursor.
You can choose your pen color as follows:
-
Move the mouse or press A to make the buttons appear.
-
Click the Pointers button (the one that looks like a pen). A menu appears.
-
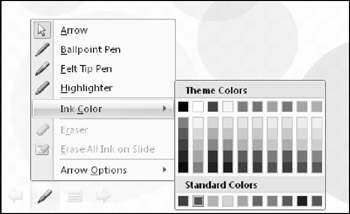
Select Ink Color and then click the color you want, as shown in Figure 20-6.

Figure 20.6: You can select a pen type and an ink color for it.
| EXPERT TIP | To change the default pen color for the show, so that you do not always have to manually select the color you want, click Set Up Show on the Slide Show tab. Then, in the Pen Color drop-down list, choose the color you want. |
You can turn on the type of pen that you want, as follows:
-
Click the Pointers button again.
-
Click the type of pen that you want:
-
Ballpoint: A thin line
-
Felt Tip Pen: A thicker line
-
Highlighter: A thick, semi-transparent line
-
| Note | The on-screen buttons in the slide show continue to work while you have a pen enabled, but you have to click them twice to activate them-once to tell PowerPoint to temporarily switch out of the Pen mode, and then again to open the menu. |
You can also turn on the default pen type (Felt Tip) by pressing Ctrl+P, and then return to the arrow again by pressing Ctrl+A or Esc.
After enabling a pen, just drag-and-draw on the slide to make your mark. You should practice drawing lines, arrows, and other shapes because it takes a while to master. Figure 20.7 shows an example of using the pen.

Figure 20.7: You can draw on the slide with the pen tools.
| Caution | As you can see from Figure 20.7, the on-screen pen is not very attractive. If you know in advance that you are going to emphasize certain points, then you may prefer to build the emphasis into the presentation by making these points larger, bolder, or in different colors. You can also circle the points using an oval shape with a 1-spoke wheel animation. |
To erase your lines and try again, press E (for Erase), or open the Pointer menu and choose Erase All Ink On Slide. To erase just a part of the ink, open the Pointer menu, choose Eraser, and then use the mouse pointer to erase individual lines.
| Note | Unlike in some earlier versions of PowerPoint, drawings stay with a slide, even when you move to another slide. |
When you exit Slide Show view after drawing on slides, a dialog box appears, asking whether you want to keep or discard your annotations. If you choose Keep, the annotations become drawn objects on the slides, which you can then move or delete, similar to an AutoShape.
To change the pen back to a pointer again, open the Pointer menu and choose Arrow, press Ctrl+A, or press Esc. The pen remains a pen when you advance from slide to slide. In earlier versions of PowerPoint, it reverted back to an arrow automatically when you changed slides.
EAN: 2147483647
Pages: 268