Formatting a Diagram
You can format a diagram either automatically or manually. Automatically is the default, and many PowerPoint users don't even realize that manual formatting is a possibility. The following sections cover both.
Applying a SmartArt Style
SmartArt Styles are preset formatting specs (border, fill, effects, shadows, and so on) that you can apply to an entire SmartArt diagram. They make it easy to apply surface texture effects that make the shapes look reflective or appear to have 3-D depth or perspective.
| Note | SmartArt Styles do not include color changes. Those are separately controlled with the Change Colors button on the SmartArt Tools Design tab. |
To apply a SmartArt style, follow these steps:
-
Select the diagram so that the SmartArt Tools Design tab becomes available.
-
On the SmartArt Tools Design tab, click one of the SmartArt Styles samples (see Figure 11.19), or open the gallery and select from a larger list (see Figure 11.20).

Figure 11.19: Select a SmartArt Style.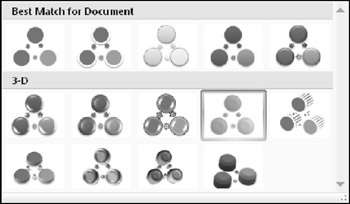
Figure 11.20: Open the SmartArt Style gallery for more choices.
Changing SmartArt Colors
After you apply a SmartArt style, as in the preceding section, you might want to change the colors used in the diagram.
The easiest way to apply colors is to use the Change Colors button's menu on the Design tab. You can select from a gallery of color schemes. As shown in Figure 11.21, you can choose a Colorful scheme (one in which each shape has its own color), or you can choose a monochrome color scheme based on any of the current presentation color theme's color swatches.
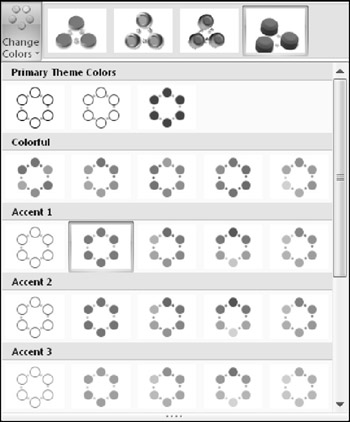
Figure 11.21: Select a color scheme from the Change Colors button's menu.
Manually Applying Colors and Effects to Individual Shapes
In addition to formatting the entire diagram with a SmartArt Style, you can also format individual shapes using Shape Styles, just as you did in Chapter 10 with drawn objects. Here's a quick review:
-
Select a shape in a SmartArt diagram.
-
On the SmartArt Tools Format tab, select a shape style from the Shape Styles gallery.
-
(Optional) Fine-tune the style by using the Shape Fill, Shape Outline, and/or Shape Effects buttons, and their associated menus.
Manually Formatting the Diagram Text
WordArt formatting works the same in a SmartArt diagram as it does everywhere else in PowerPoint. Use the WordArt Styles gallery and controls on the SmartArt Tools Format tab to apply text formatting to individual shapes, or select the entire diagram to apply the changes to all shapes at once. See Chapter 10 for more information about using WordArt Styles.
Making a Shape Larger or Smaller
In some diagram types, it is advantageous to make certain shapes larger or smaller than the others. For example, if you want to emphasize a certain step in a process, you can create a diagram where that step's shape is larger. Then you can repeat that same diagram on a series of slides, but with a different step in the process enlarged on each copy, to step through the process. There are several options for this:
-
You can manually resize a shape by dragging its selection handles, the same as with any other object. However, this is imprecise, and can be a problem if you want multiple shapes to be enlarged because they won't be consistently so.
-
You can set a precise size for the entire diagram using the Size group on the Format tab, a height and width measurement, as shown in Figure 11.22. However, if different shapes are already different sizes, and you want to resize them in proportion, this won't help.
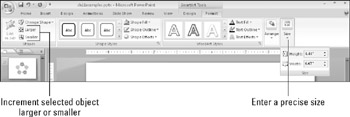
Figure 11.22: Select a color scheme from the Change Colors button's menu. -
You can use the Larger or Smaller buttons on the Format tab to bump up or down the sizes of one or more shapes slightly with each successive click.
Resizing the Entire SmartArt Graphic Object
When you resize the entire SmartArt object as a whole, everything within its frame changes size proportionally. There are several ways to do this:
-
Drag and drop a corner selection handle on the SmartArt graphic's outer frame.
-
Use the Size controls on the SmartArt Tools Format tab to enter a precise height and width.
-
Right-click the outer frame of the SmartArt and choose Size and Position. The Size and Position dialog box opens, as shown in Figure 11.23; on the Size tab, enter a height and width in inches, or scale it by a percentage in the Scale box. Mark the Lock Aspect Ratio check box if you want to maintain the proportions.
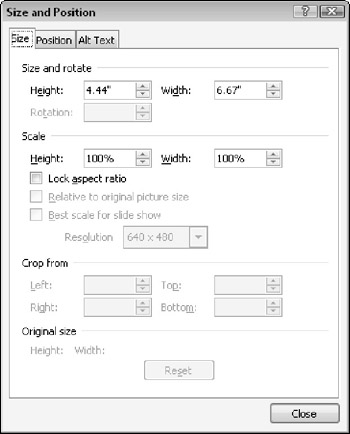
Figure 11.23: Right-click the graphic and choose Size and Position to open this dialog box.
Editing in 2-D
If you choose one of the 3-D selections from the SmartArt Style gallery, the text might become a bit hard to read and edit when you are working with the diagram at a small zoom percentage. There are a couple of ways around this:
-
Right-click a shape and choose Edit Text. The face of the shape appears in 2-D temporarily, making it easier to edit the text.
-
Click the Edit in 2-D button on the SmartArt Tools Format tab. The entire diagram appears in 2-D temporarily.
| Caution | Even though the face of the shape appears in 2-D, which you think would make it easier to read, in some diagram types and styles the text might still be fuzzy and hard to read. You might be better off editing it in the text pane. |
Changing the Shapes Used in the Diagram
Each SmartArt layout has its own defaults that it uses for the shapes, but you can change these manually. On the SmartArt Tools Format tab, click Change Shape to open a palette of shapes, just like the ones you learned to work with in Chapter 10. Then click the desired shape to apply to the selected shape, as shown in Figure 11.24. You can also access this from the right-click menu.
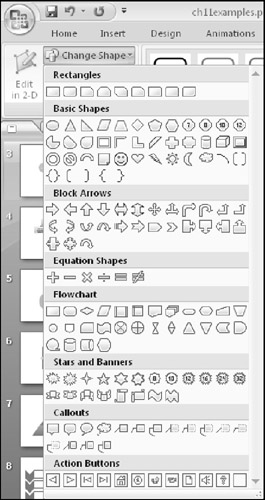
Figure 11.24: Apply a different shape to a part of the diagram.
Each shape is individually configurable. If you simply select the entire diagram, the Change Shape button is not available; you must select each shape you want to change. Hold down the Shift key as you click on each one to be selected.
EAN: 2147483647
Pages: 268