The Rulebase Components A rulebase is a representation of a policy that determines who can do what and when. In SmartDashboard/Policy Editor, several elements make up this policy: objects, rules, topology, and the global properties. This section covers the creation and composition of these components. Objects You can create several types of objects in FireWall-1. The important ones for constructing an initial policy are covered here; others are covered elsewhere in the book. Check Points and Nodes In NG FP1 and previous versions, objects representing nodes running components of the Check Point Suite were grouped together with regular nodes as workstation objects. Now Check Point has created a specific object type for these nodes. In general, objects of type Check Point are very similar to node objects and share many common attributes. Both types of objects are explained in this subsection. You create Check Points or node objects by selecting network objects from the Manage menu. From here, click on the New button; you will then see Check Points, nodes, and other options. You can also click on this icon in the objects tree:  . From here, you can select the appropriate type of object (Check Points, nodes, and so on). When you right-click on the appropriate object type, you will see a New option, where a number of different types of gateways are specified. . From here, you can select the appropriate type of object (Check Points, nodes, and so on). When you right-click on the appropriate object type, you will see a New option, where a number of different types of gateways are specified. NOTE!  | Throughout the text, I will interchange the terms workstation object and node object. They are the same. |
Check Point Gateways A Check Point gateway object is meant to define a multihomed node in your network running a Check Point product (e.g., FireWall-1). Figure 4.12 shows the main components of these objects. Note that other components make up a workstation object. These components are covered in other sections of the book as they are needed; only the critical ones are covered in this section. Figure 4.12. Check Point Gateway, General Properties frame 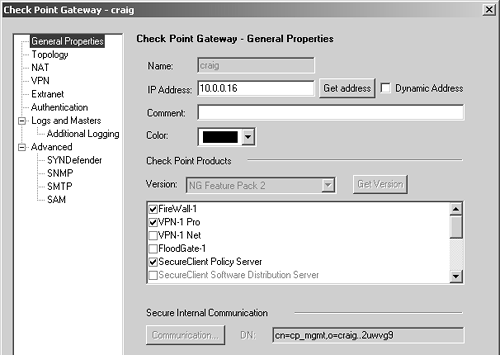 You can specify the following settings on the General Properties frame. Name : Indicates the name you give the object. It should be a name that is different from any other object. Avoid the names fw or fw1 because they have been known to cause problems. If the name is greyed out as it is in Figure 4.12, it means the object was created as part of the initial installation and cannot be renamed or removed. IP Address: Indicates the object's primary IP address. If you are defining a firewall, this IP address should be the external, routable IP address. The Get address button allows you to get an IP address if the object name is resolvable via DNS. Dynamic Address: Indicates whether the object has a dynamic or fixed IP address. If the host represented by this object does not have a fixed IP address (i.e., the host gets the address via DHCP), check the Dynamic Address box. Note that this is not supported for management modules that manage other platforms. Comment: Describes the object in more detail. This is optional. Color : Specifies the object's color. Check Point Products: Specifies the Check Point products installed on this node and the version. If the object shows the version dimmed out as in Figure 4.12, the object is for the management console itself and cannot be changed. When you update to different versions, this option will change accordingly . Version: Specifies the FireWall-1 version. Use the Get Version button to obtain the version from a remote firewall module. This works only if Secure Internal Communication (SIC) is established. Secure Internal Communication: Allows you to check the status of SIC, which is used to authenticate modules to each other. SIC is described in more detail in Chapter 7. For any object that represents a firewall, the Topology frame is vital for correct operation. Figure 4.13 shows this configuration. Figure 4.13. Check Point Gateway, Topology frame 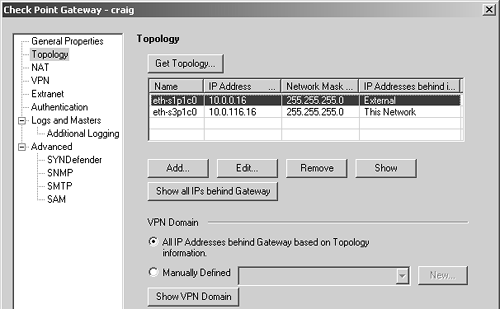 For newly created Check Point objects, click on Get Topology. A connection will be made to that node via SIC, assuming SIC is established. The appropriate node's interfaces will be queried and the routing table will be interrogated. This will be used to establish the topology for the object, which is necessary for setting up anti-spoofing and determining which interface is external. NOTE! | | The external interface for licensing purposes on node-limited licenses is taken from the definitions given in the Topology frame. |
Topology settings include the following. Name: Indicates the physical name of the interface. It should match the name given in ifconfig -a (in UNIX or IPSO) or ipconfig (in Windows NT). IP Address: Indicates the interface's IP address. You must specify the interface's physical IP address. You cannot specify an interface alias. Network Mask: Indicates the netmask for the interface's IP address. IP Addresses behind interface: Shows what IP addresses are protected by this interface. More details about the Topology frame of Figure 4.13 appear in the Topology and Anti-Spoofing subsection later in this chapter. The VPN Domain is discussed in Chapter 11. Check Point Nodes Check Point nodes are similar to Check Point gateway objects except that they are not multihomed machines. They are typically used for management consoles and machines running Check Point Secure Server. For these objects, the General Properties section is generally the only one that requires configuration. Topology is not relevant on nodes without more than one interface. Gateway Clusters Gateway clusters are used when two or more firewall modules participate in a High Availability or Load Sharing configuration. Nodes that participate in a gateway cluster have "shared" properties, which are defined in the gateway cluster object. These objects are discussed in more detail in Chapters 11 and 13. Embedded Devices These are hardware devices that run an "embedded" version of Check Point FireWall-1. As of FireWall-1 NG FP2, the only devices supported here are the Nokia IP51 and certain Xylan switches. Nokia has discontinued the IP51, and Xylan no longer sells the embedded version of FireWall-1 in its switches. Therefore, this object type will not be discussed. However, the configuration for these objects is similar to other Check Point gateways. Externally Managed Gateways and Nodes These types of objects are identical to regular Check Point gateways and nodes except that these are objects not managed by your current management console. You would define these if you were trying to set up a VPN with another site that also ran Check Point FireWall-1 (4.0 or later). Node Gateways and Hosts These are objects for nodes that do not run Check Point FireWall-1 and will not interoperate with Check Point VPN functions. For node host objects, only the general properties are relevant. For node gateway objects, the topology is also relevant, but only if you are using VPE. Network The network object is used to specify a network or a subnet thereof. The IP address and netmask define the network, as shown in Figure 4.14. Figure 4.14. Network Properties, General tab 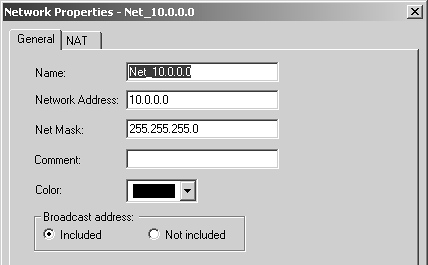 The General tab settings for the Network Properties section include the following. Name: Indicates the name you give the network. Network Address: Indicates the network's IP address. You should use the first IP address of the network. Net Mask: Indicates the network's netmask. Comment: Describes the network in more detail. Color: Specifies the object's color. Broadcast address: Determines whether or not to include the broadcast address of the network in the network definition. The NAT tab for the Network Properties section is discussed in Chapter 10. NOTE! | | You are not allowed to create a network object with a netmask of 255.255.255.255. You must create these kinds of objects as workstation objects. |
Domain The domain object is used to specify a particular DNS domain. FireWall-1 determines whether an IP address fits within this domain by performing a reverse DNS lookup on the appropriate IP address (i.e., it performs an IP-to-name translation). This means that the host that enforces the security policy must be able to perform DNS queries. If it cannot do so for whatever reason, that IP address is not considered part of this domain. To specify a particular domain, provide a domain name beginning with a dot (.). For example, to specify phoneboy.com as a domain name, use ".phoneboy.com". Domain objects are not recommended because DNS is typically not considered a reliable source of information (i.e., it can easily be spoofed), although I suppose once the Secure DNS extensions are widely deployed, this will be less of an issue. However, domain objects also cause a performance hit for all connections because their IP addresses must be looked up. OSE Device OSE device object types are used only when you want to manage an access control list on a router or use the Check Point FireWall-1 features that can be embedded into certain vendors ' switches. These features are not in wide use and therefore are not covered in this book. Unless you plan to use these features, you will not need to create these types of objects. Interoperable Device Interoperable devices are ones that will participate in a VPN with your Check Point gateway and are otherwise identical to node gateway objects. Groups Group objects combine multiple objects so you can refer to them as a single entity. For example, if the network objects net-10.0.10.0-24 and net-10.0.11.0-24 represent your internal network, you can group them together and call them internal-net. An example of a simple group is shown in Figure 4.15. Figure 4.15. Simple group 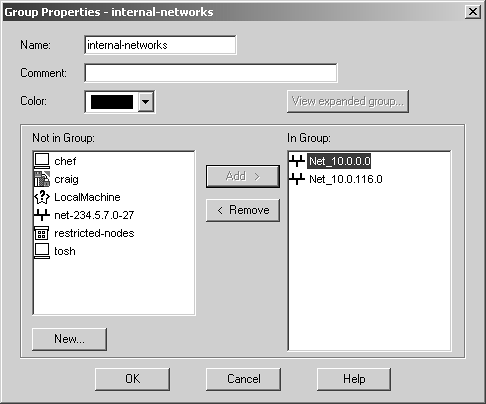 Check Point added a new type of group in the NG version of FireWall-1: group with exclusion. This allows you to exclude items in one group from another group. For example, if you wanted to create a network object that represented all the hosts in your internal network except for a few restricted hosts, you would create two simple groups: one for your internal network (internal-networks) and one for your restricted hosts (restricted-hosts). You could then create a group with exclusion of the form "internal-networks except for restricted-hosts." A sample group with exclusion is shown in Figure 4.16. Figure 4.16. Group with Exclusion Properties  Exclusion groups also allow you to exclude from the Any group, so you can define the Internet as "Any except for internal-networks." Address Range Address range objects are used to define a range of addresses. They cannot be used for any purposes other than address translation rules. These objects are discussed in Chapter 10. Services You can create seven types of services: TCP, Compound TCP, UDP, RPC, ICMP, DCE-RPC, or Other. Similar to network objects, you can also group these services. Most services you will need are already predefined in FireWall-1, but sometimes you will need to define your own. You can create your own service by selecting Services from the Manage menu, then clicking on the New button and choosing the appropriate type of service. Or you can click on this icon in the objects tree:  . From here, right-click on the appropriate type of service, and select New. Figure 4.17 shows a definition for SSH. . From here, right-click on the appropriate type of service, and select New. Figure 4.17 shows a definition for SSH. Figure 4.17. TCP Service Properties 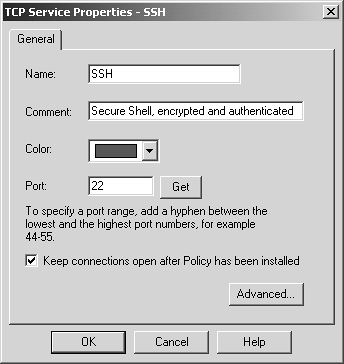 The General tab settings for the TCP Service Properties section include the following. Name: Indicates the name you give the service. The port number can automatically be filled in with the Get button (see below) if the name matches the service's file entry on the management console. Comment: Describes the service in more detail. Color: Specifies the object's color. Port: Indicates the port number that corresponds to the service. In the case shown in Figure 4.17, it is 22. You can also specify a port range (x-y) as well as ports above or below a certain number (e.g., >1024, <1024). The Get button attempts to resolve the service name against the management console's services file ( /etc/services for UNIX platforms, %SystemRoot%\system32\drivers\etc\services for NT platforms). The Advanced button brings up some additional options, shown in Figure 4.18. Figure 4.18. Advanced TCP Service Properties 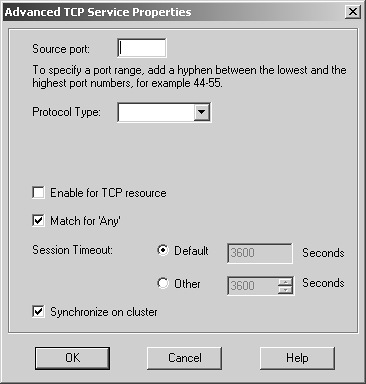 The additional options include those listed below. Source port: Specifies the source port (the port the client uses to connect to the service) or range of source ports permitted by this service. Normally, any source port is allowed. However, if you want to restrict the source port to a specific range, you can do that by using this setting. Protocol Type: Specifies the protocol type. For most services, this is left as None. Services that require special treatment that FireWall-1 supports are specified here. Supported protocols include DNS, FTP, FW1_CVP, H.323, HTTP, IIOP, Netshow, PNA, Rshell, RTSP, SMTP, SQLNET2, and Winframe. If you are using this service in conjunction with Content Security, set the protocol type accordingly (see Chapter 9). Enable for TCP resource: Indicates whether or not you wish to use the Content Security features of FireWall-1 on this particular TCP service. If you do, this option will need to be checked. See Chapter 9 for more details. Match for 'Any': Indicates whether the service will be included in the definition for the Any service. When a rule specifies the Any service, services with this checkbox selected will be included in that definition. If you want to allow the service to be included in the definition only when explicitly listed in a rule, uncheck this box. Session Timeout: Specifies the amount of inactivity permitted for this service before FireWall-1 expires the connection from the connection tables. Note that when a session is removed from the connection tables, any further traffic on that connection will result in TCP Packet Out of State messages in the logs (see Chapter 6). The timeout can be set to Default, which sets the timeout to use either the timeout specified in the Global Properties screen (see Global Properties later in this chapter) or a service-specific value. The maximum amount of time you can specify is 86,400 seconds (24 hours). The minimum amount of time you can specify is 60 seconds. Synchronize on cluster: Synchronizes connections using this service to other members in the cluster when using State Synchronization (see Chapter 13). To increase performance, this should be disabled for services that generate a large number of connections in a short period of time (e.g., HTTP). For UDP connections, the options on the General tab are the same as those for TCP. Clicking on the Advanced button brings up some additional options (see Figure 4.19), most of which are similar to the properties for TCP services. Figure 4.19. Advanced UDP Service Properties 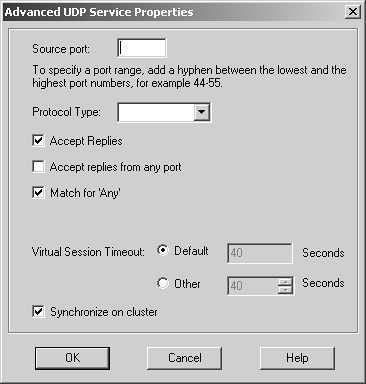 However, some advanced options for UDP connections are different, as listed below. Accept Replies: This option enables FireWall-1's Virtual Session capability for this UDP service. If a client initiates a UDP packet from source port X to the server on destination port Y, packets that come from the server from source port Y to the client on destination port X are considered part of the same "virtual" session. Most well-behaved UDP-based applications operate in this manner. If this feature is not desired for this particular UDP service, then by unchecking the box, you prevent reply packets from being accepted unless an explicit rule is defined permitting it. Accept Replies from Any Port: Some UDP-based applications do not follow the model in the previous option but instead generate a reply packet from a different source port (i.e., a reply packet comes from source port Z instead of Y as above). Generally, you should keep this option disabled, but if you run into a UDP-based application with this behavior, check this box. Virtual Session Timeout: Unlike with TCP, there is no way for FireWall-1 to determine whether or not a UDP "session" has ended. Instead, FireWall-1 assumes that if there has been no activity on that session for a period of time, the session is over. The timeout can be set to Default, which sets the timeout to use either the timeout specified in the Global Properties screen (see Global Properties later in this chapter) or a service-specific value. The maximum amount of time you can specify is 86,400 seconds (24 hours); the minimum is 10 seconds. For RPC, you simply define a name and an RPC program number, as shown in Figure 4.20. The Get button acquires the needed information from the RPC file on a UNIX platform. Protocol type is currently empty, which could change in the future. Figure 4.20. RPC Service Properties 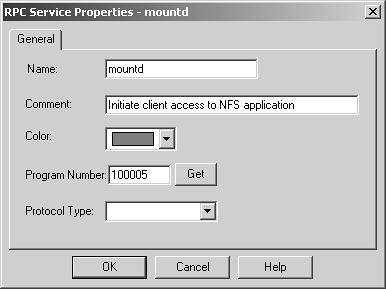 For services of type ICMP, you simply define a name, an ICMP type, and an ICMP code. The ICMP types and codes are defined in RFC792. For services of type Other, you need to write INSPECT code. These kinds of services are discussed in Chapter 14. Time Time objects are created to define different time periods of the day. These objects allow certain activities to take place at certain times of the day and/or on certain days but not others. You create these objects by selecting Time from the Manage menu or by selecting the clock icon in the objects tree, then right-clicking on Time and selecting New. Figure 4.21 shows an example of a time object. Figure 4.21. Time Object Properties, General tab 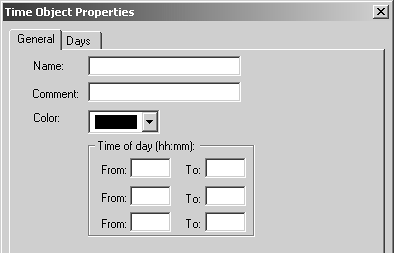 The General tab settings for the Time Object Properties section include the following. Name: Indicates the name you give the time period. Comment: Describes the time period in more detail. Color: Specifies the object's color. Time of day: Specifies up to three different time periods in a 24- hour format. Note that this controls only when the connection can start; if the connection continues past these time frames , it will still be allowed. Figure 4.22 shows the Days tab. On the Days tab you can specify the following settings. Days specification: "None" means every day. "Day in month" allows you to specify a specific date or dates in a particular month. "Day in week" allows you to specify particular days of the week. Days in month: If you selected "Day in month," you can specify particular days in a month. Day in week: If you selected "Day in week," you can specify certain days of the week. Month: If you selected "Day in month," you can specify a specific month. Figure 4.22. Time Object Properties, Days tab 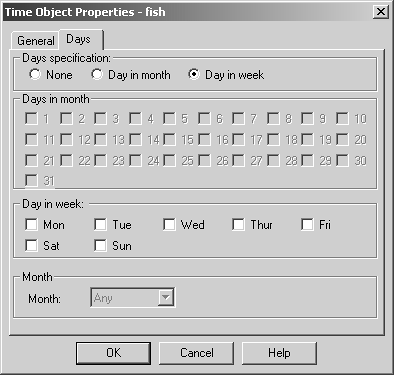 There is also a scheduled event type of time object, which is used specifically to tell Check Point when certain events should occur (e.g., log rotation). Figure 4.23 shows an example. You may set it for either a specific time or an interval of every x period of time. Figure 4.23. Scheduled Event Properties  Topology and Anti-Spoofing It is important to understand which hosts are being protected by the firewall. It is also important to know on which interface any given host is supposed to appear. When a host IP address appears on the "wrong" interface, this is a potentially serious problem ”a misconfigured host or router, or an intruder! To catch these sorts of issues, we establish anti-spoofing on the firewall, that is, preventing the use of IP addresses on interfaces where the hosts should not appear. When you define anti-spoofing, you assert that only packets with source IPs defined for an interface are allowed to originate traffic on the interface. [3] For example, if a valid address is 192.168.182.0/24 and the interface is le0, the following are true. [3] This is different from FireWall-1 4.1, which also validated that a packet being routed to a specific interface was also valid. This caused all sorts of problems with address translation. -
A packet with source IP address 192.168.182.4 can come into le0. -
A packet with source IP address 192.168.1.8 cannot come into le0. -
A packet with destination IP address 192.168.182.4 can come into le0. -
A packet with destination IP address 10.0.0.4 cannot come into le0. In FireWall-1 4.1 and earlier, this was defined in the Valid Address setting in the Interface portion of the gateway object. In the NG version, the setting is now called Topology, and we define it in the Topology frame of the gateway object. Unlike the Valid Address setting in FireWall-1 4.1, the Topology setting is also used to define "external" interfaces, which is important for licensing. Figure 4.24 shows the Topology and Anti-Spoofing settings for a specific interface. Figure 4.24. Interface Properties, Topology tab 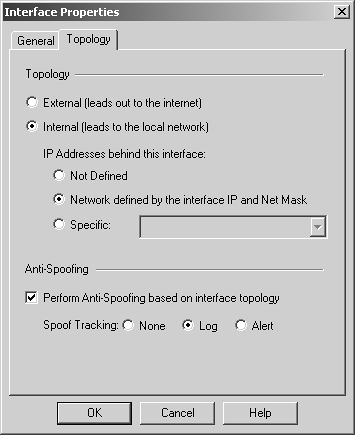 The options on the Topology tab include the following. External: All IP addresses not specified on other interfaces are considered valid on this interface. This is similar to the "others" option in FireWall-1 4.1 and earlier. This is also relevant for node-limited licenses in that it indicates no hosts should be counted on this interface for licensing purposes. Internal: Only the IP addresses specified are considered valid on this interface. The next three options allow you to specify which IPs are valid. Not Defined: The IP addresses reachable from this interface are undefined. This option disables anti-spoofing on this interface. In addition, any IPs behind this interface will not be included in your encryption domain, assuming it is defined by topology instead of manually. Network defined by the interface IP and Net Mask: This option specifically means "the logical network this interface is on." It is defined by the interface's IP address and netmask per the configuration screen. All other networks are not considered valid. In FireWall-1 4.1 and earlier, this option was titled the more confusing This Net. Specific: This option refers to a defined group of network objects (networks, hosts) that make up the valid addresses for this interface. This is typically used where there are multiple networks reachable from this interface. Perform Anti-Spoofing based on interface topology: If this option is checked, anti-spoofing will be performed on this interface, assuming that Not Defined is not selected. If unchecked, anti-spoofing will not be performed on this interface. Spoof tracking can be set to None (no logging), Log, or Alert. If you enable anti-spoofing, it is highly recommended that you enable logging of this property. All anti-spoofing drops will log as Rule 0 (see Chapter 6). If you want to log IP Options drops , go to the Log and Alert frame of the Global Properties screen and enable IP Options Drop logging (see the next section). Global Properties The Properties screens control various parts of the rulebase. It is important to understand what these properties are and how they affect your rulebase. To access the global properties, select Global Properties from the Policy menu in SmartDashboard/Policy Editor. All implied rules are enforced eitherbound (both inbound and outbound) and can be applied in the following ways. -
First: The property is applied before any rules listed in the rulebase. -
Before Last: The property is applied before the last rule listed in the rulebase. -
Last: The property is applied after the last rule listed in the rulebase. The global properties for FireWall-1 are shown in Figure 4.25. The options available include the following. Accept VPN-1 & FireWall-1 control connections: This option allows various FireWall-1 modules to communicate via FireWall-1 communication ports. A complete list of ports that FireWall-1 uses is covered in Tweaking the Global Properties later in this chapter, particularly in Figures 4.38 through 4.40. Accept outgoing packets originating from gateway: This property refers to packets originated by the gateway itself (e.g., an administrator on the gateway executing ssh to a different host). This property eliminates the need to add an explicit rule to allow access from the firewall itself. Accept RIP: If you are running Routing Information Protocol (RIP) on your firewall and you require the ability to communicate with other routers via RIP, you can select this property to permit the necessary traffic, although you can also create explicit rules. Most people who run dynamic routing protocols run Open Shortest Path First (OSPF), so this property can generally be safely disabled in the vast majority of cases. Note that enabling this property does not allow you to move RIP packets from one interface to another, nor does it allow RIP to function if your firewall does not have the appropriate routing daemon present and running. Accept Domain Name over UDP (Queries): This option permits all UDP port 53 traffic from anywhere to anywhere . This is actually a very dangerous setting and should be disabled because non-DNS traffic (such as Back Orifice) could easily use UDP port 53. See FAQ 4.7 later in this chapter for information on how to enable DNS verification, which makes this property far less dangerous. Accept Domain Name over TCP (Zone Transfer): This option is necessary only if your primary and secondary DNS servers are separated by your firewalls. As with the preceding option, this is a dangerous default that should be disabled unless DNS verification is enabled. Accept ICMP requests : In order to accept reply packets for ICMP requests (e.g., an echo reply for an echo request), this property needs to be enabled. However, many people have found this property does not work properly. Accept CPRID connections (SecureUpdate): This allows SmartUpdate/SecureUpdate to remotely upgrade your firewall modules. Accept dynamic address modules' DHCP traffic: This permits DHCP requests to originate from the firewall. It also allows the appropriate DHCP response packets into the firewall. This is useful if you are using modules with dynamic addressing. Log implied rules: By checking this box, you indicate that anything enabled in this property screen should be logged. Anything that gets logged will show up as Rule 0. Figure 4.25. Global Properties, FireWall-1 Implied Rules frame 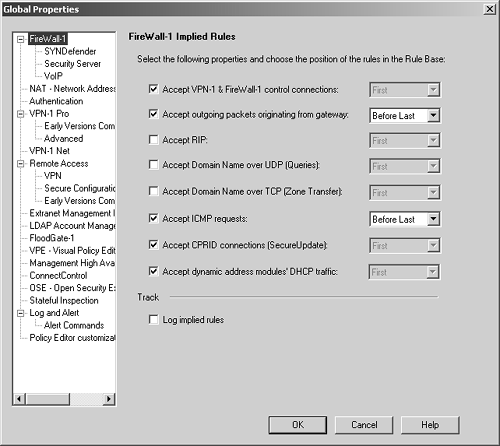 IP Options are a rarely used part of the IP protocol. The features provided by IP Options allow, among other things, IP Spoofing. Most legitimate end- user applications do not use IP Options. As such, most firewalls automatically block packets with IP Options. FireWall-1 is no exception. To enable IP Options drop logging, go to the Log and Alert frame, which is shown in Figure 4.26. Set the IP Options drop setting to Log (or Alert) if you want IP Options logging to occur. Other options on this screen are discussed in Chapter 5. Figure 4.26. Global Properties, Log and Alert frame 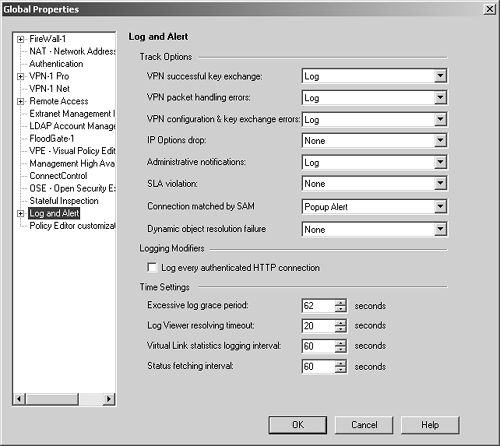 One other important set of properties to look at is the Policy Editor customizations shown in Figure 4.27. Note than in FireWall-1 NG FP1 and earlier, this option does not exist. Figure 4.27. Global Properties, Policy Editor customization frame 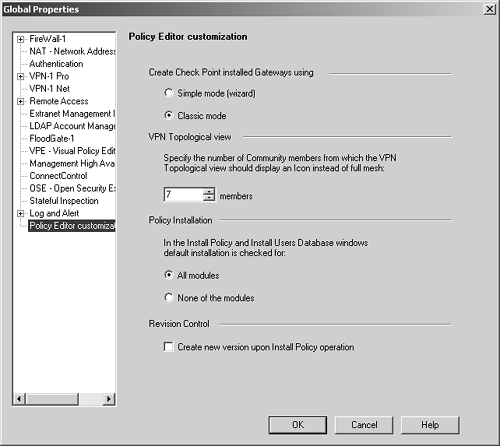 The properties include those listed below. Create Check Point installed gateways using: Allows you to choose between the "classic" screens shown throughout this book and the "wizard" screens, which ask you a series of questions to answer when creating objects. VPN Topological view: Allows you to specify the number of objects that require separate representation in a meshed VPN configuration. This is relevant only when using VPN configurations in Simplified mode. Policy Installation: Specifies whether or not all modules are selected for installation when you choose to install a new security policy to a firewall module. Revision Control: Allows you to create a revision of your security policy each time it is loaded into a firewall module (see Chapter 7).  |