| Profiling for your printer is paramount to a successful color-managed workflow. While it may seem like a lot of work, it's easier than it seems, and it can have a profound impact on the effectiveness of your color management system. Once you have an accurate printer profile, tasks like soft proofing (simulating your printer on your display) and press proofing (simulating a press on your printer) become not only possible but invaluable. Many printers come with high-quality profiles in the box, and some even include profiles for different paper and ink combinations. But while these profiles are often quite accurate and will definitely make an improvement, they do not factor in variables such as subtle differences in ink and paper lots, changes that occur as a printer ages, and other environmental factors. They also don't help if you use third-party inks or papers, as even minor variations in paper noticeably affect how color is reproduced. For more accurate color management, a custom profile is the way to go. To create printer profiles, a color measurement device is used to measure patches printed from your printer. The device is controlled by the profiling software, which generates the profile by comparing the expected values with the actual values. All profile-creation suites offer the capability to profile printers (many also include a suitable measurement device such as a spectrophotometer or colorimeter) in an easy-to-use package. The more expensive packages typically provide more advanced features (and increased complexity), such as greater control over the algorithm used to generate the profile, the capability to profile presses that use more than four colors, and profile editing (adjusting the profile after it has been created). If you need these types of advanced features, then evaluate packages such as GretagMacbeth ProfileMaker Professional or X-Rite's ColorElite. Preparing to Profile Your Printer The fundamental process for creating a printer profile is relatively simple: You just print a target or a set of color patches, which are typically included with the software and measure it with a device. The software then generates a profile. There are some important details to be aware of before starting: Determine whether your output device is CMYK or RGB. The profiling software will require you to print a target for one color space or the other. Most desktop printers are RGB, while most printing presses are CMYK. Desktop printers such as the Epson Stylus Photo and Canon photo printers are RGB, even though they use CMYK inks (the printer driver converts everything to RGB). If you're unsure whether your output device operates in CMYK or RGB, contact the manufacturer's technical support or use the exercise in the section "Determining Your Printer's Native Color Space" in Chapter 3 to find out before you create the profile. Calibrate your measurement device. As discussed in the beginning of this chapter, you will need an appropriate measurement device, such as the GretagMacbeth Eye-One Pro or X-Rite DTP20 spectrophotometer. Calibrating the device before profiling ensures that the device is measuring properly. Select the appropriate target. Most profiling applications include targets for different printers at least for RGB and CMYK devices and are designed to work well with a particular device. However, a number of targets are based on industry standards or are from known color gurus; these targets are often available for download on the Internet. They range in number and diversity of patches, layouts for specific devices, and page sizes. The target included with your software should suffice. If your profiling software supports different targets, try one with more patches to see if more data points improve the quality. Print the target properly. It is extremely important to follow the instructions for printing the target (provided with the profile-creation software), as there are specific steps required for printing the target, such as turning off the color management (compared with turning it on for normal printing) and setting the resolution and size.
Creating a Printer Profile For the purpose of this exercise, we'll use the X-Rite PULSE ColorElite profiling tool. Other profile-creation suites include comparable functionality. 1. | Launch X-Rite PULSE ColorElite and click the Output Profiles button to begin.
Figure 4.55. 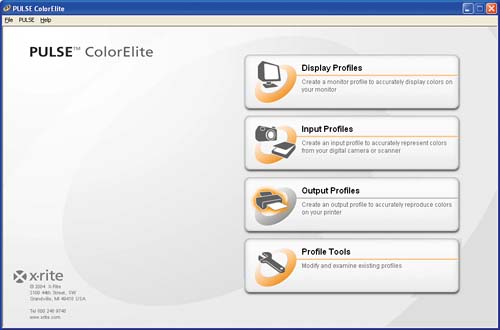
The Printer profiling window appears.
| 2. | Select the Create a Color Target for Your Printer option and click Continue.
Figure 4.56. 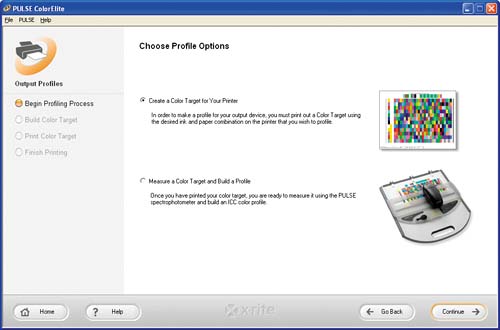
The first step in profiling your printer is to print a target, using your ink and paper. This will factor in any unique characteristics that might exist in your printer. Additionally, the process is easy enough that you should profile each ink and paper combination, or each time you change inks.
| 3. | Now we must set the options for the target that we want to print, including the printer type, quality of the target, and paper size.
Figure 4.57. 
Printer type refers to the color mode of the printer, either RGB or CMYK. In the "Determining Your Printer's Native Color Space" section in Chapter 3, we ran a test to determine which mode your printer uses refer to these results when making a selection.
Quality adjusts the number of patches that will be printed on the target. In theory, the more patches, the higher the quality of the resulting profile and a greater amount of time required to complete the measurements. However, at some point, you'll reach the point of diminishing returns, where you are measuring patches without any increase in quality. X-Rite PULSE ColorElite provides two options: Basic and Best. Basic uses one page of patches; Best uses two pages. I recommend selecting Basic to start with.
Paper size is simply the size of the paper you're printing the target on.
Click Continue.
| 4. | Now we'll print the target. You can choose to print the target directly from X-Rite PULSE ColorElite or to save the file and print it from another application. Click the Print Target button.
Figure 4.58. 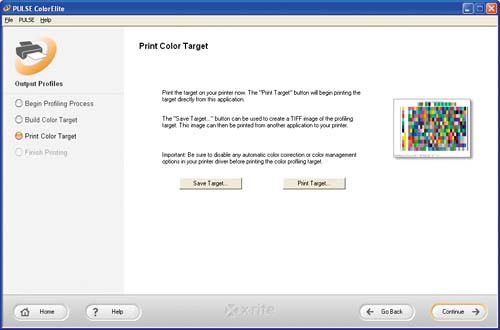
The easiest and most effective option is to select the Print Target button and print directly from X-Rite PULSE ColorElite to your printer. Using this method, you won't need to worry about the effects of opening the file in another application such as Photoshop.
Tip  | The appendix describes the process of printing color management targets from Adobe Photoshop. |
If you are unable to print directly from X-Rite PULSE ColorElite, then use the Save Target option. This is a good choice if you're sending the file to someone else to print. When using this option, ensure that no color management is applied to the file when it is opened or printed.
| 5. | In the Windows XP Print dialog box that appears, select your target printer from the list of devices. Then click the Properties button.
Figure 4.59. 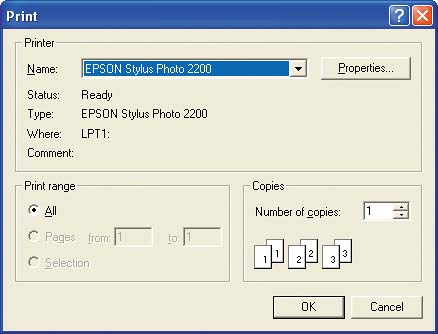
| 6. | Now we need to set the printer options in the printer Properties dialog box. It is essential to set up the printer options properly to ensure that the target is printed correctly. The first step is to select the paper type, which for many printers controls the amount of ink the printer will use. If the paper you're using is not listed, either check with the paper manufacturer or choose the closest available setting. Select a resolution appropriate for printing photographs or high-quality graphics. For example, on the Main tab of the Properties page for my Epson Stylus Photo 2200, I've selected Photo 1440dpi.
Figure 4.60. 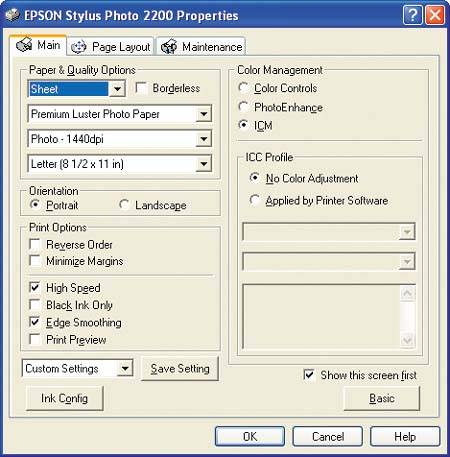
If you have the option, disable any automatic settings and turn off color management. The Epson Stylus Photo 2200 driver requires you to first select ICM from the Color Management options before you can select No Color Adjustment. While your printer settings may be different, be sure to disable color management in the driver if possible. This ensures that the target is being printed without any color management adjustment from the printer driver.
Tip | When printing using a profile, it's ideal to use the exact printer settings that were used when creating the profile. It's a good idea to save the settings in the printer Properties dialog box if your printer driver allows you to do so. |
When you're finished selecting the settings, close the Properties dialog box and click OK to print.
| 7. | When printing has finished, you should examine the target to make sure each color patch is solid. If there are any scratches or lines, reprint the target. Then select "My target looks good and I want to go ahead and measure it now" and click Continue.
Figure 4.61. 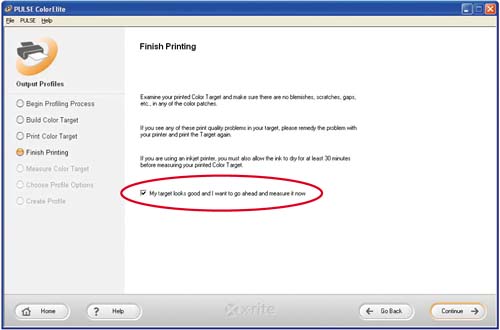
Tip | If you are using an inkjet printer, be sure to wait at least 30 minutes before measuring the target. |
| 8. | We're now ready to begin measuring the target. While each profiling tool has unique characteristics, the process is essentially the same. The first step is to identify the target by scanning the patches with the measurement device.
Figure 4.62. 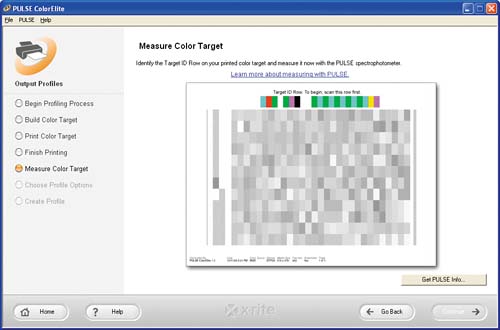
This identifies the target, ensuring that the software uses the proper reference data in generating the profile. The data resulting from your measurements is compared to the reference data, which contains the known, or expected, values for this target. The differences are what is used to calculate the profile.
Tip | It's a good idea to calibrate your device before beginning measurements. |
| 9. | Now begin measuring patches. In the case of X-Rite PULSE ColorElite, a guide tool is included to help guide the measurement device over the patches.
Figure 4.63. 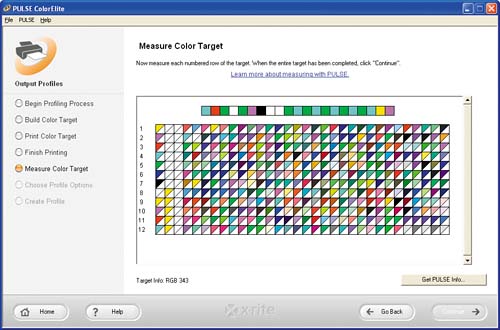
As each row of patches is measured, the software indicates that the patches have been measured correctly by beeping and by changing the row of patches to all solid colors. If a mistake is made, or if the measurement device was moved too quickly across the patches, the software will display an alert.
| 10. | When all the rows have been measured, all of the patches will be solid. Click Continue when you're finished.
Figure 4.64. 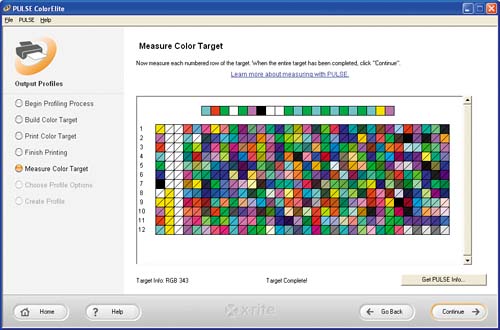
| 11. | Now we need to select the viewing illuminant. This refers to the color temperature of the lighting that will be used when viewing prints made with the resulting profile.
Figure 4.65. 
The graphics art industry standard is D50, or 5000 kelvin. This refers to the color temperature of the lights under which prints will be viewed. For example, if you have a light box, select the color temperature that corresponds to your light box. If you will use ambient lighting to view images, I recommend selecting D65. The best method to determine the correct setting for the viewing illuminant, aside from using a light booth, is to experiment with different settings and compare the results to the display
| 12. | Now the easy part: click the Create Profile button. The software begins calculating the profile.
Figure 4.66. 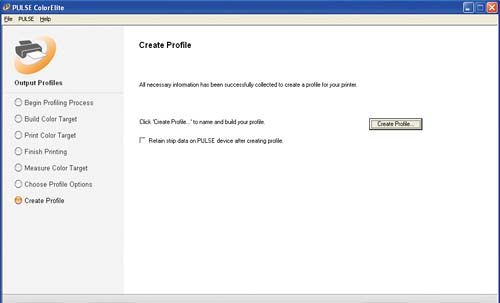
| 13. | In the Save As dialog box, enter a name for the profile.
Figure 4.67. 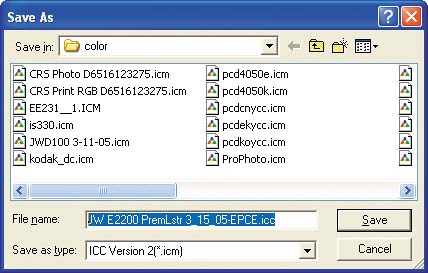
I recommend a descriptive name that includes the name of the printer, the paper type and resolution settings, the date the profile was created, and the name of the profile-creation tool (if you have more than one).
| 14. | When you're finished, X-Rite PULSE ColorElite displays statistics about the resulting profile. Quit X-Rite PULSE ColorElite when you're done.
|
Figure 4.68. 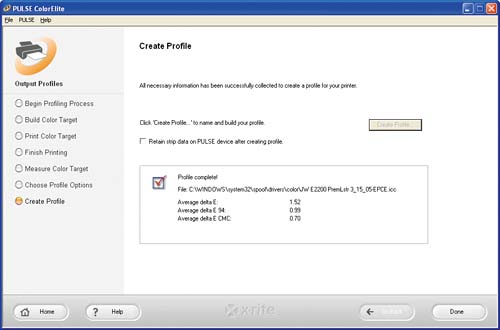
The process of creating output-device profiles generally takes about 15 to 20 minutes once you get the hang of it, a small inconvenience when you consider the hours it will save you when color correcting, printing, and proofing images and color documents. Comparing Generic and Custom Printer Profiles Once you've created a custom printer profile, you can easily compare it with the generic profile for your printer, similar to the way you compared your display profiles earlier in this chapter. This exercise shows you how to do that, and the results illustrate the value of creating a custom profile for your printer. 1. | Launch Chromix ColorThink. From the main menu, choose Graph > Open 3D Graph. The Grapher component of ColorThink appears.
| 2. | In the Plot Items window on the right, click the drop-down arrow beside Add to access the Add menu. Then select Open.
Figure 4.69. 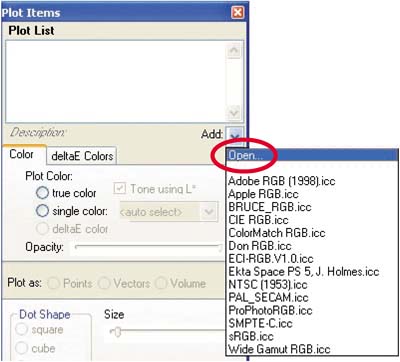
Tip | If you have a generic profile for your printer, select it instead of the Epson profile for this exercise. |
| 3. | In the Open dialog box, navigate to the C:\windows\system32\spool\ drivers\color directory, where Windows XP stores color profiles for your devices, and select the profile SP2200 Premium Luster_PK.icc from the list.
Figure 4.70. 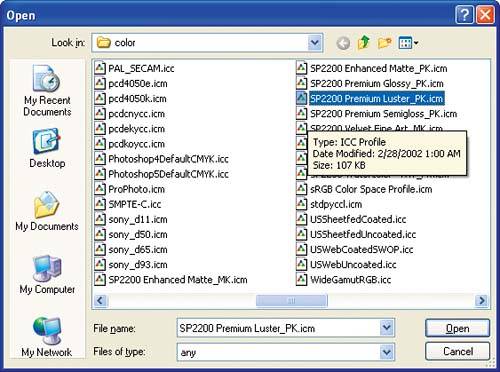
ColorThink's Grapher displays a 3D visual representation of the generic Epson profile's gamut. The colors of the spectrum are mapped to the Lab color space to illustrate the range of colors that can be reproduced.
Figure 4.71. 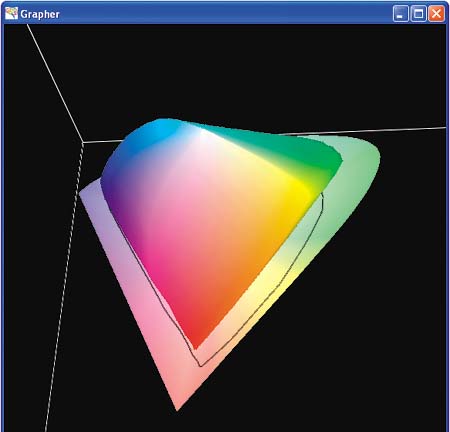
| 4. | Drag the 3D color model to view this profile's color space from multiple angles and then release the mouse. You can also zoom in or out by holding down the Alt key while dragging the mouse up and down.
| 5. | In the Plot Items window, click the drop-down arrow beside the Add button again and select the profile you created for your printer in the last exercise.
I selected JW E2200 PremLstr 3_15_05-EPCE.icc, which is the custom profile for my Epson Stylus 2200 with Premium Luster paper that was created in the previous exercise.
Figure 4.72. 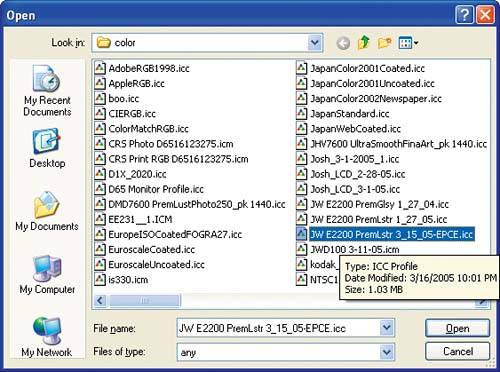
| 6. | Select the custom printer profile by clicking it in the Plot List. On the Color tab, change the option from true color to single color and select Red from the drop-down list.
Figure 4.73. 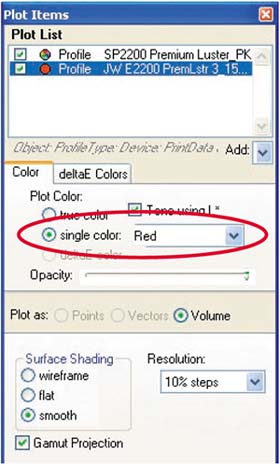
This procedure will display the gamut of the custom printer profile in red, making it easier to distinguish from the monitor gamut.
| 7. | Drag the graph to see the different gamuts of the devices.
Figure 4.74. 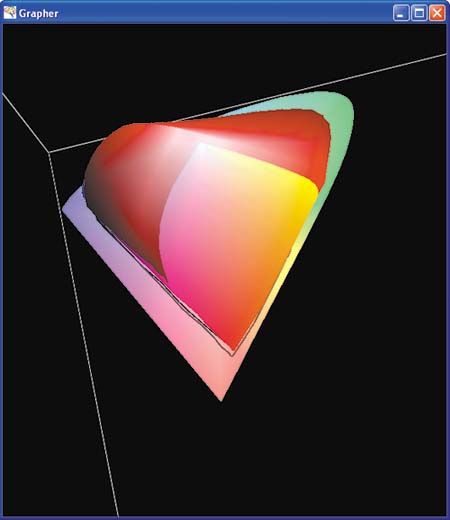
Colors that fall outside of the overlapping areas highlight differences between the generic printer profile and the custom printer profile.
The custom profile's larger color gamut can be attributed to a number of factors: differences in the ink or paper, a newer printer driver that is affecting the output of the printer, or variables in the profiling device and software.
|
This exercise also illustrates the benefits of creating custom printer profiles. In my case, the output of my Epson Stylus Photo 2200 on Premium Luster paper is slightly different than the printer Epson used to create its profiles. You can also use the preceding exercise to compare other disparate profiles, such as to compare your display profile with your printer profile. Such a comparison illustrates the differences between the devices, and you will get a much better picture of the differences by running the comparison yourself. The preceding image shows only one angle of the three-dimensional color gamut. As you rotate the color model, you will see areas of color that do not overlap. Profiling a Printing Press With desktop printers, you can control the device and you are typically making a few prints at a time. However, with a printing press, you typically have no control over the accuracy of the color, a problem made worse by the fact that you're generating a lot of copies. Because printing on presses is usually expensive, color becomes even more critical. You can still take advantage of color management if the final destination for your color work is a printing press, but because you will have less control over the process, you'll need to work with your printing partner to determine how best to manage color. Most printing companies use process control to keep their presses printing consistently, often using one of several printing industry standards (based on the specific process, paper type, and so on). The ideal situation is a printer that understands color management and has custom ICC profiles to which it keeps its press(es) calibrated. Many printers have instructions for using these profiles in conjunction with their services. Chapter 9 covers in more detail the use of profiles to proof and separate your color documents. An important issue to keep in mind with traditional offset printing is this: Getting your document printed, from the moment you hand your color data to the printer to the time the job comes off the press, introduces several steps, each of which has its own variables that can affect the final color. Your document may be output to color-separation films, which are then used to make the plates for the press. The printer will likely insist that a proof be made (often called a contract proof). Since the printer will agree to match this proof (hence the term contract proof), it's important to carefully check the film proofs and make changes based on how they look. The press plates will be made using the same color data as the proof. Digital presses reduce the variability (and cost) of offset printing by eliminating the need for film and plates. Most digital-press operators will still offer a proof, although it will typically be from a desktop printer (such as a high-quality inkjet printer) using profiles that simulate the press. You can also use your desktop printer to simulate the press (a technique covered in Chapter 9). Regardless of the type of press, it's a good idea to give your proof to the printer. Finally, you'll want to insist on a press check to ensure that the prints coming off the press match the contract proof. If your printer doesn't offer ICC press profiles, you have a few choices: Use standard press profiles (such as SWOP) to proof and separate your images. Then communicate with your printer let the printer know what type of press profile or standard you used to separate your images. Be sure to use a contract proof. Press profiles are widely available, and applications such as Photoshop typically include several standard press profiles. Find a new printer that offers ICC profiles and keeps its presses well calibrated. Create the press profile yourself. However, this is not highly recommended unless you operate your own press. It will be expensive, but if you're doing enough printing with a particular printer, it can be worth it. The process is essentially the same as described in the exercises in this chapter, except the choice of target will be different. You'll want a CMYK target, such as the one included with X-Rite PULSE ColorElite or ProfileMaker Professional.
Remember: The most important point in creating or obtaining press profiles is to communicate with your printer about the process. |