| Your display is where you spend most of your time making color-critical decisions and changes and it just so happens to be the easiest device to profile. Creating a custom profile for your display will have a dramatic effect on the predictability and quality of your color work, and it lets you use your display as a predictor of the results on your output device. Price Does Matter You have two main options for display technology: LCD or CRT technology. There is a debate in the technology world as to which one is better for accurate color reproduction. LCDs, also known as flat panels, tend to have more contrast than the more traditional CRTs, although the viewing angle may affect the appearance of the color data. Regardless of whether you choose CRT or flat-panel technology, keep in mind that, as with most things in life, you get what you pay for. So caveat emptor: "Bargain" displays simply don't have the quality or response required for accurate color reproduction. Ultimately, it's a matter of personal preference. Just be sure that for color management, you use a high-quality display. "High" quality is subjective, but generally it includes a small dot pitch (the distance between the dots onscreen), support for high-resolution modes, and controls for color temperature and geometry. The color quality of a display degrades with age, becoming less bright and less reliable for viewing color data. If your display is more than three years old, and if you're dissatisfied with its handling of color data, consider a new display. Tip  | If you use an LCD (flat panel) monitor, make sure that any measurement device you use is designed for an LCD or includes an LCD adapter. Devices with suction cups can damage LCDs. |
Characterization vs. Calibration The terms characterization and calibration are often used interchangeably, but they do describe different parts of the color management process. Calibration changes a device to a standard or to a known state, whereas characterization is the process of measuring the characteristics of the device and creating a profile. Most display color management products do both tasks, so the terms are often used interchangeably. If your profiling product doesn't do both simultaneously, or if you're using different tools for each, just remember to calibrate first and then characterize. This sequence ensures that the profile you create is accurate. You can calibrate and characterize a display in three ways: using visual calibration, using a display calibrator, and using a calibrated display system. After discussing how each method works, we will create and compare profiles using an external display calibrator. Visual Calibration In visual calibration, your eyes are the measurement tool. Although visual calibration does an excellent job of factoring in ambient lighting conditions in the profiling process, this method is very subjective and more prone to errors and inconsistencies than device-based calibration. If your goal is to create consistency among multiple displays say, across all the displays in a production shop or consistency across time, then visual calibration may not be the best solution, because you have no objective reference point. Display Calibrators Display calibrators use a measurement device along with software to profile your display. This approach is automated and much less subjective than visual calibration, in which you adjust the controls until the onscreen image appears a certain way. The software flashes a range of colors on the screen, which are measured by the device. The results are compared with the known values of the various colors, and a profile is created that accounts for the particular results of your display. In most cases, a profile created with a display calibrator will be more accurate (and more expensive) than one created using visual calibration. Calibrated Display Systems The ultimate solution for a color-accurate display is a calibrated display system. It also happens to be the most expensive. Calibrated display systems typically include a very high-quality display, a measurement device, software, and a hood to shield the display from ambient light (a good idea regardless of which type of system you use), all designed to work together. Figure 4.1. The Sony Artisan is an example of a calibrated display system. 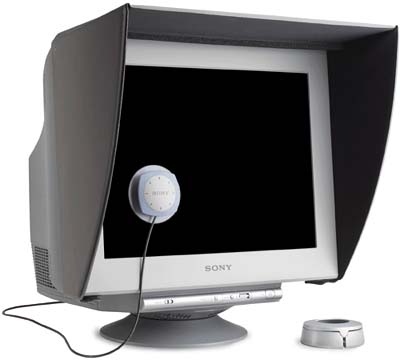
What makes these systems so accurate is the integration of display, software, and calibrator. The software communicates with the display and your graphics card and makes adjustments in the display automatically. Calibrated display systems such as Sony Artisan and Barco Reference Calibrator V are easy to use and provide better results than visual calibration or third-party display calibrators. With a calibrated display system, there is no guesswork involved, no loss of brightness and gamut. If color is a critical component of your work, and if you can afford one of these systems, buy one. The Sony Artisan software, for example, clearly indicates the calibration status of the display, including the target color space, calibration results (including the date of the last calibration), and display configuration details. If the display is out of calibration, a warning alerts the user at startup as well, in the Artisan application. Figure 4.2. The Artisan software warns users when the display is out of calibration. 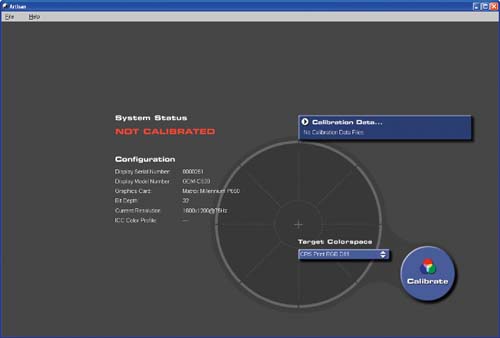
A Display Profiling Checklist We're almost ready to create and compare some display profiles. But first, take a moment to do a few things to increase the accuracy of the profile. Let your display warm up. For CRTs, that's a minimum of 30 minutes, and preferably 1 hour. For LCDs, 5 to 10 minutes should suffice. Turn off screen savers and energy-saving settings. These can interrupt the process. Determine your display's settings: resolution, refresh rate, geometry, and bit depth. And don't change the settings (either through the display's front-panel controls or through the operating system). If you change the settings, you should reprofile the display. Set the desktop background to a neutral gray. Note  | LCDs and laptop displays typically lack controls for white point. |
Set the white point to 5000 kelvin (D50) or 6500 kelvin (D65), if supported by your display. The overall goal is to match the tonal reproduction characteristics of your display to the intended viewing conditions and output. Clean your display using a product specifically formulated for displays. Most office supply stores carry this type of product. Avoid bright light directed at the display. Use a display hood, if one is available.
Tip | If you don't have Adobe Photoshop CS2, you can download a trial version from the Adobe Web site (www.adobe.com). |
Using Visual Calibration Let's use visual profiling, with your eyes functioning as the measurement tool, to create a profile for your display. For this exercise, we'll use the Adobe Gamma utility, which is included in the last several releases of Adobe Photoshop. 1. | Click Start > Control Panel > Adobe Gamma to launch Adobe Gamma.
Figure 4.3. 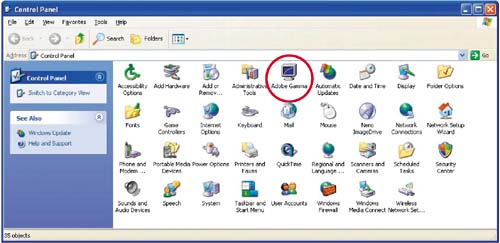
| 2. | The Adobe Gamma utility opens and asks whether you want to use the Wizard or Control Panel version. Select the Step By Step (Wizard) option and click the Next button.
Figure 4.4. 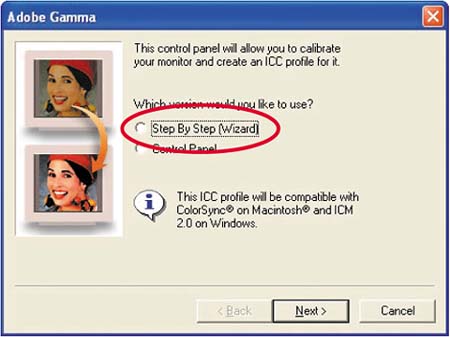
The Wizard offers a step-by-step approach to calibrating your display. While it takes longer than the Control Panel approach, it is easier to use, especially if you are new to the process of display calibration.
| 3. | Enter a descriptive name for your display profile, giving it a meaningful name that will distinguish this profile from others for the same device. For example, include the device name and its calibration date.
Click Next to continue.
Figure 4.5. 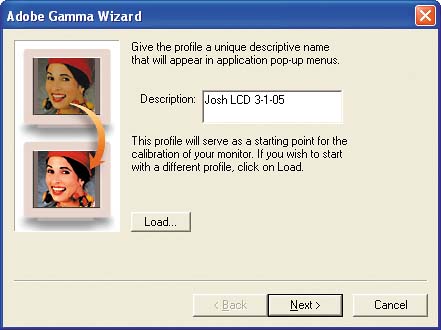
The profile name will be displayed on the Color Management Settings tab in the Windows Display Properties and in applications that support ICC profiles, such as Adobe Photoshop.
| 4. | To begin the calibration process, turn up the contrast on your display to the highest setting. Next, turn the brightness up to the highest setting and then slowly decrease it until you begin to see the gray box within the black frame.
Figure 4.6. 
Avoid decreasing the brightness to the point that the white frame around the box turns gray, rather than white. Make adjustments until you see white on the outside, black within the white frame, and finally the gray box within the black frame. Don't worry if it's not perfect the goal is to set the contrast and brightness settings as best as possible.
Note | Not all displays have contrast controls. If your display does not have buttons that control contrast, look for software controls; otherwise, assume that the monitor is displaying the maximum contrast. |
| 5. | The Wizard shows the type of phosphors it thinks your display uses. If the information is incorrect, select the appropriate phosphor type from the list.
Figure 4.7. 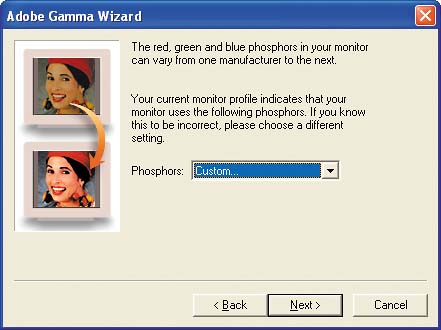
If you don't know what types of phosphors your display uses, leave the default setting in the Wizard.
Tip | Keep in mind that this slider adjustment is a very subjective process, and there are no right or wrong answers simply make the best choices you can. Many users find it easier to squint their eyes slightly while adjusting the sliders. |
| 6. | Adjust the slider under the red, green, and blue box until the center square fades into the surrounding frame. Make the best adjustment you can, as you did in Step 4. Note that your display will change contrast and color while you are adjusting the sliders.
Figure 4.8. 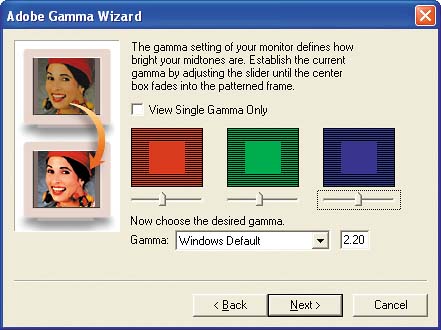
Alternatively, you can select the View Single Gamma Only option, which will replace the red, green, and blue sliders with a single gray slider. Although this option is easier (by two thirds), it will not produce as accurate results.
| 7. | Once you have adjusted the three sliders to your satisfaction, select a gamma setting from the Gamma pop-up menu. I highly recommend selecting the Windows Default option (which is 2.20).
Figure 4.9. 
Gamma is the ratio of contrast that is displayed. The higher the number, the more contrast you will see. Notice that there is a difference between Macintosh and Windows gamma settings.
| 8. | Select the white point of your display. Then click the Measure button.
Figure 4.10. 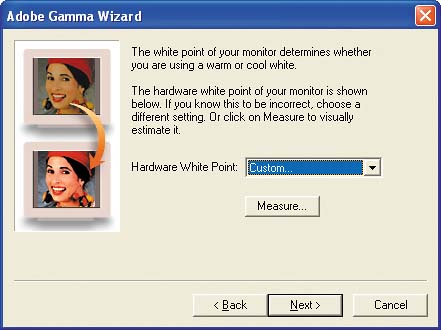
White point is the color temperature of the display, measured on the Kelvin scale. The higher the white point, the bluer the white will appear; the lower the white point, the redder the white will appear.
To understand this concept, notice the light at different times of the day. During the morning and evening, when the sun is low on the horizon, the light is warm and rich in color, or about 3500 kelvin. In the middle of the day, when the sun is overhead, the light is cooler, about 6500 kelvin (the warmer the temperature of the light, the lower the number on the Kelvin scale). These temperatures are often noted as D50 (for 5000) or D65 (for 6500).
Most professional proofing systems and color-correct viewing booths in use by printers and photographers use D50 lights to simulate daylight. D50 was established as the prepress industry standard, although new standards are emerging based on D65. The challenge, however, is that printed materials and photographs will be viewed under many light conditions. It's important to choose a setting that your display can actually reproduce. D50 may also make your display appear dim and yellow. As a result, many users select D65, which results in a much closer match to your output device.
| 9. | Clicking the Measure button produces instructions for how to measure your white point.
Figure 4.11. 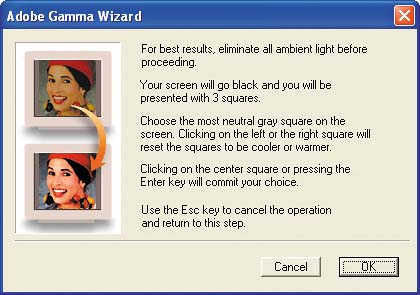
When you click OK, your screen goes black, and then three squares appear.
Select the most neutral gray square. Each time you click a square, the Adobe Gamma utility presents three new squares again click the most neutral choice. Make this selection three of four times, and then press the Enter key to confirm your choice and move to the next step of the wizard.
Repeatedly selecting the most neutral square and confirming your choice is more accurate than selecting a preset hardware white point, although not as accurate as using an external display calibrator (discussed in the next section).
| 10. | Click Next. The wizard again gives you the opportunity to change the white point, overriding the measured white point in the preceding step. This is a bit confusing, so just click Next to continue.
Figure 4.12. 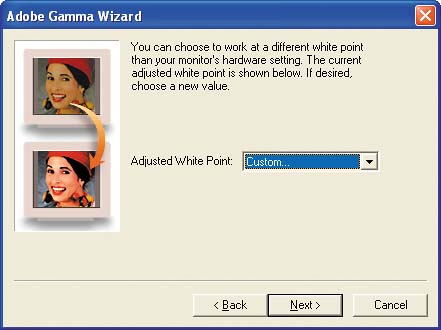
| 11. | At this point, you have finished calibrating your display with the Adobe Gamma utility. You can switch between Before and After options to compare the results of the calibration. When you are finished, click Finish.
Figure 4.13. 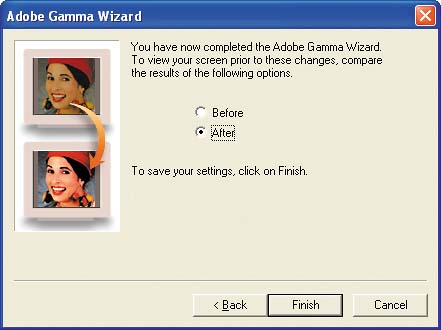
| 12. | The Wizard prompts you to save your profile, and it automatically selects the proper directory in Windows to store the profile. Again, be sure to enter a description name, such as the device name and date of calibration.
Figure 4.14. 
| 13. | Click Save when you are finished entering a profile name. The wizard automatically closes when it finishes saving the profile.
The Adobe Gamma utility loads these settings into the Windows startup folder so that they are automatically loaded when you restart your computer.
|
Using External Display Calibrators Tip | If you are using a different display calibration solution, be sure to disable the Adobe Gamma utility. This can be done by removing it from the Startup folder on the Start menu. |
This exercise uses the GretagMacbeth Eye-One Match system to demonstrate how to calibrate and characterize, or profile, a display with an external calibration device. If you don't have a calibrator, or if you have a different product, you can still follow this exercise to learn the general process. 1. | Launch Eye-One Match from the Start menu. The home screen appears.
Figure 4.15. 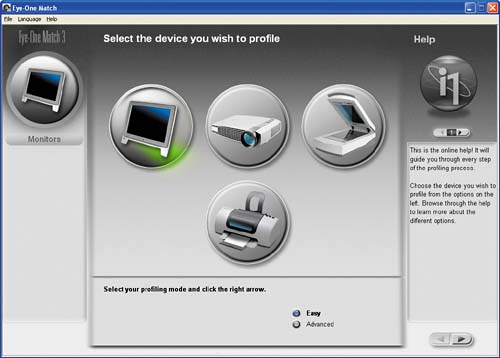
The home screen shows the types of devices that the software can profile: displays (also called monitors), projectors, scanners, and printers. The Eye-One tool is very easy to use: help is available from every screen, and the interface leaves little room for error.
| 2. | Since we are creating a display profile, click the display icon. Select the Advanced profiling mode, as illustrated here, which lets you choose the white point and gamma of your display. Click the right arrow at the lower right of the screen to begin.
Figure 4.16. 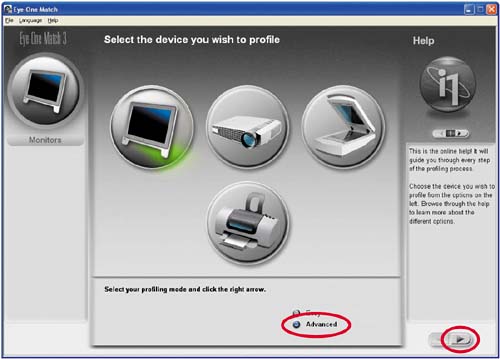
Tip | If you're not sure which type of display you have, consult the manufacturer's Web site or the display's documentation. |
| 3. | Select the display type. Select LCD, CRD, or Laptop from the list. Click the right arrow at the lower right of the screen to continue.
Figure 4.17. 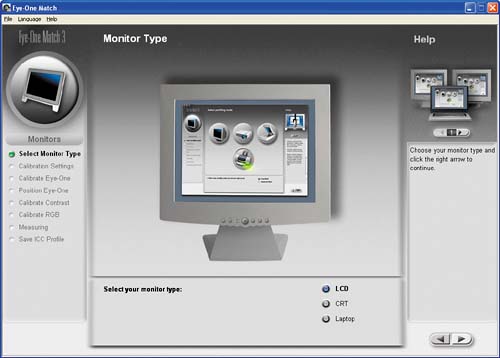
| 4. | The first step is to choose your display calibration settings, including white point, gamma, and luminance. For each of the settings, select different options and observe the changes they make to your display.
Figure 4.18. 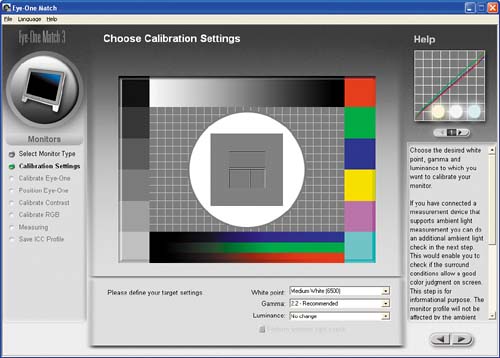
The White point selection determines the color of the white of the display. The device will measure the actual or native white point of the display, and then the software will adjust the display to achieve the desired white point (or a point as close to it as possible). The higher the number, the cooler (or bluer) the white; the lower the number, the warmer (or redder) the white. The Native white point setting instructs the software to use the measured white-point value. This is often a good choice for displays that lack controls to select a white point, particularly LCDs. As noted earlier, the typical setting for Windows is 6500 kelvin (also called D65).
Tip | Certain display calibrators are able to measure the ambient light. Although this measurement doesn't affect the calibration and resulting profile, it can provide feedback on the appropriateness of your lighting conditions. |
The Gamma selection determines the relationship between light and dark values, similar to contrast. Select 2.2, the default for Windows systems.
Luminance is the amount of light emitted by the display. Eye-One Match will recommend different luminance levels based on your display type.
| 5. | Now calibrate the measurement device. Be sure that Eye-One is resting on its base, which includes a reference target used to calibrate the device. When you're ready, click the Calibrate button.
Figure 4.19. 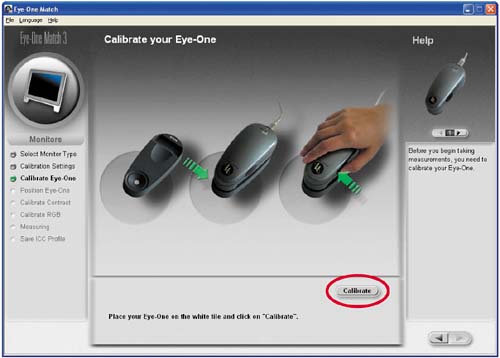
Eye-One automatically compares the results with the known value of the calibration patch and makes any adjustments as needed.
| 6. | Attach the device to your display. How you do this depends on the type of display that you are using.
Figure 4.20. 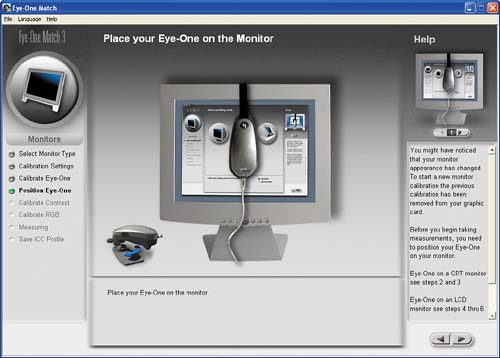
If you use an LCD such as a flat-panel display or laptop, make sure that your calibration device is safe to use on an LCD. The suction cups on devices designed for CRTs can damage the LCD. Most manufacturers have an adapter or a version that specifically works on LCDs. If you're using an LCD, be sure to use the appropriate attachment, which usually hangs the device with a counterweight.
If you are using a CRT, the attachment will typically have suction cups that stick to the glass. Once the device is attached, the software first automatically detects where on the screen the sensor is located, and then it begins the measurement (some products require you to manually start the process).
Once you have the device attached to the display, click the right arrow at the lower right of the screen.
| 7. | Find the best contrast setting for the display. Start by setting the contrast to 100% and adjust downward until the contrast is in the correct range, as indicated by the Contrast Quality indicator (not shown).
Figure 4.21. 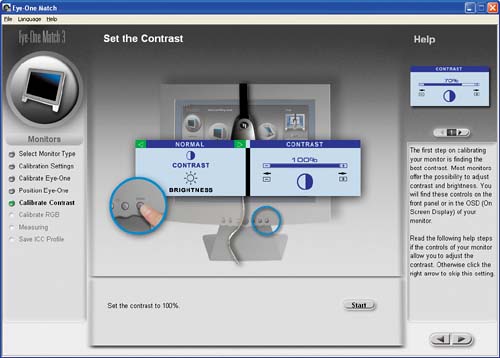
Setting the correct contrast ratio ensures that the correct gamma is set in the display for calibration. Various calibration products provide different tools for determining the optimal contrast setting. In the previous exercise, we set the contrast ratio using a visual tool. Eye-One Match actually measures the contrast ratio and provides a guide to help adjust the contrast setting on the display. As you change the setting, the measurement device measures the setting and provides real-time feedback on the results.
Click the right arrow when you're finished adjusting the contrast.
| 8. | Next you'll adjust the white point settings to the target white point you selected in Step 4.
Figure 4.22. 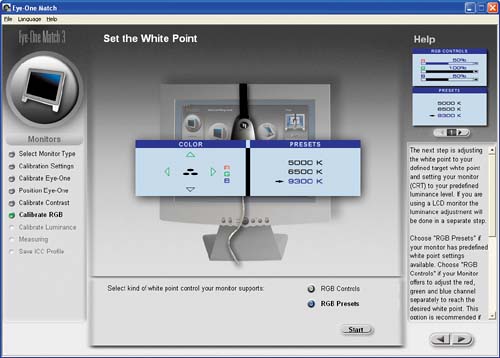
If your display includes preset white points, select 6500K (also referred to as D65). If your display doesn't include preset white points but does include color controls that let you adjust red, green, and blue levels, you can measure the actual white point while adjusting the settings until you reach the desired white point (6500K in this case).
Remember that the white point is the color temperature of the display, measured on the Kelvin scale. The higher the white point, the bluer the white will appear; the lower the white point, the redder the white will appear. Notice the changes to your display as you adjust either the white point presets or RGB levels.
Click the right arrow when you're finished setting the white point.
| 9. | If you are using an LCD display, the next step is to adjust the luminance. (If you are using a CRT, the luminance was automatically set when you set the white point in Step 8.)
Figure 4.23. 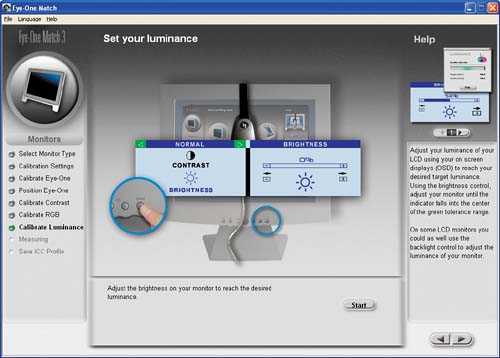
You set the luminance in a fashion similar to the way you set gamma, except that for luminance, you adjust the brightness control until the target setting is reached. The Luminance indicator shows the current luminance as read by the Eye-One device. The following two images show the luminance on my LCD, first with the brightness set to maximum and then with it turned down a couple of notches. The goal is to get the indicator (the black bar) in the green zone. When the indicator is in the zone, the brightness is set to the proper level for the desired luminance value (which you selected in Step 4).
Figure 4.24. 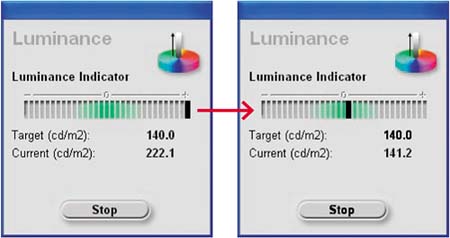
Click the right arrow when you're finished adjusting the brightness. Eye-One Match begins measuring your display, which typically takes about 5 minutes.
| 10. | You've now completed the calibration process, and it's time to save the profile for your display. Enter a descriptive name for your profile.
Figure 4.25. 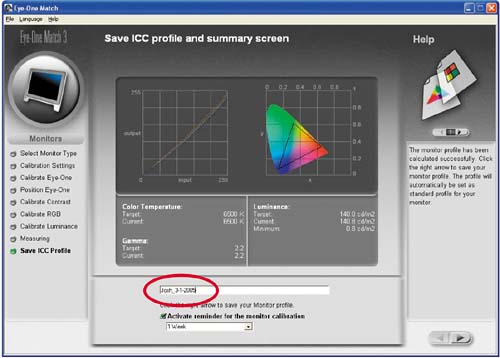
Eye-One Match displays information about your display, including target and current color temperature, gamma, and luminance. If the target and current measurements are substantially different than each other, you should return to the calibration process and adjust whichever value is off. If you are unable to get the current settings close to the target settings, your display may not be capable of reproducing the desired values.
You can also set a reminder, which will prompt you to calibrate your display after a set period of time. I recommend setting the reminder to one week it's a small investment to make on a weekly basis for improved color predictability.
| 11. | When you have entered a name for your profile and set the calibration reminder, click the right arrow to continue. Eye-One automatically saves the profile to the proper directory and sets it as the default profile for your display.
|
Figure 4.26. 
Note | If your profiling product does not automatically set the display profile, you will need to change it by selecting the correct profile from the list. Chapter 2 demonstrates how to select the display profile. |
Comparing Default and Custom Profiles Now that you have at least two display profiles the default profile included with your display and the profile created with either Adobe Gamma or the Eye-One system you can compare them. If your display didn't come with a default profile, then use one of the profiles included with the sample profiles; this is simply an exercise to illustrate the value of creating a custom profile. 1. | Launch Chromix ColorThink and, from the main menu, choose Graph > Open 3D Graph.
Figure 4.27. 
The Grapher component of ColorThink appears.
Figure 4.28. 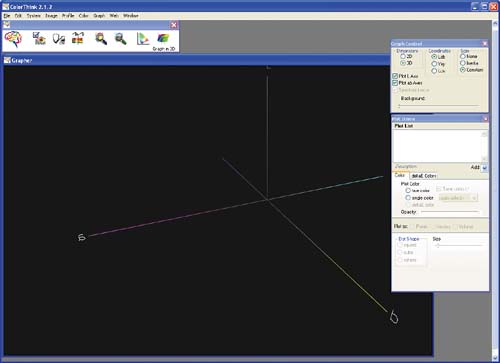
| 2. | In the Plot Items window on the right, click the drop-down arrow beside Add to access the Add menu and select Open.
Figure 4.29. 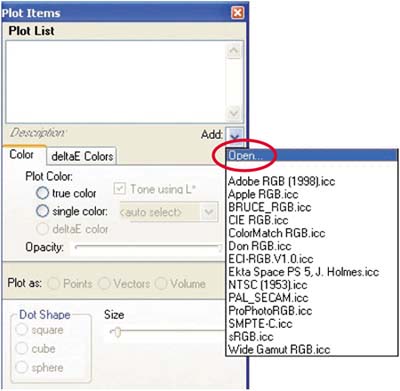
Tip | If you have a profile for your display, select it instead of D65 Monitor Profile.icc for this exercise. |
| 3. | In the Open dialog box, navigate to the C:\windows\system32\spool\drivers\color directory, where Windows XP stores ICC color profiles, and select the profile D65 Monitor Profile.icc from the list.
ColorThink's Grapher displays a 3D visual representation of the selected profile's gamut. The colors of the spectrum are mapped to the Lab color space to illustrate the range of colors that can be reproduced.
Figure 4.30. 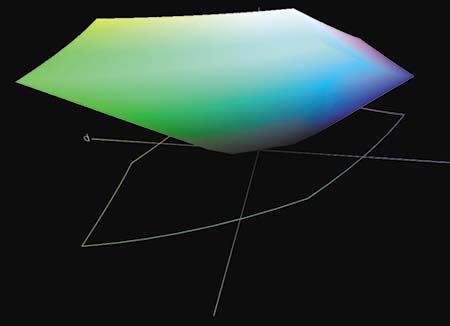
| 4. | Make sure you have D65 Monitor Profile.icc (or your monitor profile) selected in the ColorThink Grapher. Next, click the drop-down arrow beside the Add menu in the Plot Items box, and select the profile you created using Adobe Gamma or Eye-One Match (or whatever calibration product you used).
| 5. | Select the profile you created by clicking it in the Plot List. On the Color tab, change the Plot Color option from true color to single color and select Red from the drop-down list. The gamut of the custom profile is displayed in red, making it easier to distinguish from the generic profile's gamut.
| 6. | Drag the graph to see the different gamuts of the devices, as shown in the next figure.
|
Figure 4.31. 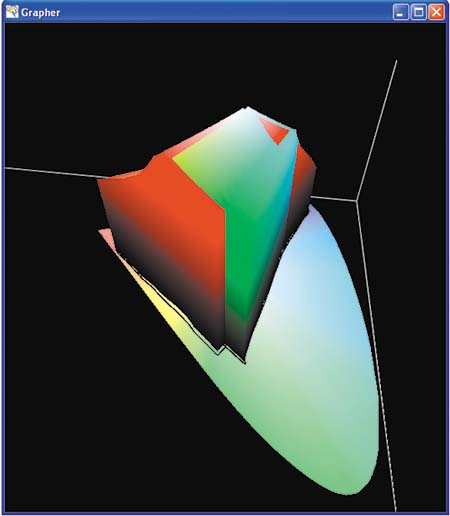
Notice how there are differences between the generic profile for my LCD and the custom profile I created in the previous exercise. Colors contained in the overlapping areas can be matched between the printer and the monitor. Colors that fall outside the overlapping areas will not be matched. Where the color gamut of my custom profile is larger than that of the default profile, it contains more colors; conversely, where it is smaller, it contains fewer colors. The custom profile will be more accurate when used for soft proofing (using your monitor to simulate the output of your printer). In some cases, the differences between two profiles may be very slight, and you will not be able to see any variation in the color model. Display Consistency If one of your goals is consistency across multiple displays in your workflow, for example, in a studio, the simplest way to reduce variability is to use the same make and model of display and the same calibration system at each workstation. If you choose to use an external display calibrator, you can save money by purchasing one physical device (or a few if you have a lot of systems) and running the software on each monitor. Just be sure to check the manufacturer's policy about software licensing you may need a license for each computer. Whichever approach you select to calibrate displays, be sure to use only that method to create a profile for each display. Consistency is one of the keys to successful color management. How Often Should You Recalibrate? A good rule of thumb is to recalibrate your display once a week: calibration is easy, free, and effective. It's also a good idea to recalibrate prior to any important color work say, a big job. Many calibration products will remind you to calibrate. The Eye-One system lets you set a time period for a reminder; the Sony Artisan will alert you after 30 days to recalibrate. |