7.6 Basic Configuration and Operation
| < Day Day Up > |
| The bluez - utils package contains the tools you need to configure and test your Bluetooth setup. Once you've installed the package, run the init script ( /etc/init.d/bluez-utils start on Debian, /etc/init.d/bluetooth start on Red Hat) to start the Bluetooth subsystem. These scripts normally run on boot, so they may have been started already if you installed from RPMs or Debian packages. The hcid daemon should now be running. This program controls the initialization of Bluetooth devices on the system and handles the bonding process with other devices. We discuss configuration of hcid later in this chapter. The prefix "hci" derives from the name of the interface between the computer and the Bluetooth device, the Host Controller Interface. 7.6.1 Examining Local DevicesThe hciconfig tool allows the configuration of the characteristics of your Bluetooth adapter. If you are familiar with the configuration of network interfaces, you will find it parallel in operation to ifconfig . Use -a to display extended information about each Bluetooth device attached to the computer: # hciconfig -a hci0 : Type: USB BD Address: 00:80:98:24:15:6D ACL MTU: 128:8 SCO MTU: 64:8 UP RUNNING PSCAN ISCAN RX bytes:4923 acl:129 sco:0 events:168 errors:0 TX bytes:2326 acl:87 sco:0 commands:40 errors:0 Features: 0xff 0xff 0x05 0x00 Packet type: DM1 DM3 DM5 DH1 DH3 DH5 HV1 HV2 HV3 Link policy: HOLD SNIFF PARK Link mode: SLAVE ACCEPT Name: 'saag-0' Class: 0x100100 Service Classes: Object Transfer Device Class: Computer, Uncategorized HCI Ver: 1.1 (0x1) HCI Rev: 0x73 LMP Ver: 1.1 (0x1) LMP Subver: 0x73 Manufacturer: Cambridge Silicon Radio (10) From this output, you can observe several things, which have been rendered in bold text in the example.
When diagnosing and reporting problems to kernel driver authors, you may be asked for the output of hciconfig -a . Note that you must be the root user to use some of the features of hciconfig . Table 7-6 shows the most useful options of the hciconfig tool. Table 7-6. Common usages of the hciconfig tool
7.6.2 Scanning for Remote DevicesThe acid test is, of course, to see if your computer can detect other Bluetooth devices. The hcitool toolcan be used to do this. Switch on your other Bluetooth device, and ensure it is in "discoverable" mode. Issue the command hcitool scan and wait (see Example 7-2). You don't need to be root in order to run this command. Example 7-2. An example scan of remote Bluetooth devices$ hcitool scan Scanning ... 00:0A:D9:15:CB:B4 ED P800 00:40:05:D0:DD:69 saag-1 Example 7-2 shows a typical output of a scan. In this case, the author's cell phone, "ED P800," and second Bluetooth adapter, "saag-1," are shown as discoverable.
The hcitool and hciconfig programs produce similar output for the remote devices. You must be root to use this option of hcitool . Here's an example session with hcitool where we specify the Bluetooth address of the P800 cell phone discovered in Example 7-2: # hcitool info 00:0A:D9:15:CB:B4 Requesting information ... BD Address: 00:0A:D9:15:CB:B4 Device Name: ED P800 LMP Version: 1.1 (0x1) LMP Subversion: 0x9040 Manufacturer: Ericsson Mobile Comunications (0) Features: 0xff 0xfb 0x01 0x00 <3-slot packets> <5-slot packets> <encryption> <slot offset> <timing accuracy> <role switch> <hold mode> <sniff mode> <park mode> <RSSI> <SCO link> <HV2 packets> <HV3 packets> <u-law log> <A-law log> <CVSD> 7.6.3 Pinging a Remote DeviceThe ping command is an incredibly useful tool for discovering whether remote computers are reachable over a TCP/IP network. BlueZ has an analog to ping , called l2ping . Its name refers to the fact that it attempts to create a connection to the device using the logical link control and adaptation protocol (L2CAP), the lowest -level link-based protocol in Bluetooth. In other words, before despairing because you cannot connect to a device, check it with l2ping . There may be a fault with software higher up the chain; l2ping enables you to determine whether a basic connection can be established with a remote device. Here's an example of l2ping in action (you need to run l2ping as root): # l2ping 00:0A:D9:15:CB:B4 Ping: 00:0A:D9:15:CB:B4 from 00:80:98:24:15:6D (data size 20) ... 0 bytes from 00:0A:D9:15:CB:B4 id 200 time 54.85ms 0 bytes from 00:0A:D9:15:CB:B4 id 201 time 49.35ms 0 bytes from 00:0A:D9:15:CB:B4 id 202 time 34.35ms 0 bytes from 00:0A:D9:15:CB:B4 id 203 time 28.33ms 4 sent, 4 received, 0% loss
7.6.4 Configuring hcidThe hcid daemon handles various low-level aspects of a system's Bluetooth devices, including activating and configuring the Bluetooth interfaces, and handling device bonding. hcid should be running at all times on your system, and it is usually started by initialization scripts installed along with the rest of the tools from the bluez-utils package. The configuration file for hcid , /etc/bluetooth/hcid.conf , has two parts : global configuration and Bluetooth device configuration. In normal operation, most of the default options are acceptable. In this chapter, we cover only the options that are most useful to change. 7.6.4.1 Global optionsThis section is introduced by the options keyword in the configuration file and controls the behavior of the hcid program. The most useful option in this section is pin_helper , which tells the computer the program to run in order to obtain a PIN code when pairing . The default PIN helper that ships with bluez-utils is a Python script, which uses the Python bindings to the GTK graphical toolkit. Unless you have Python and the Python-GTK package installed on your computer, this helper will not work, and you will not be able to pair your computer with other Bluetooth devices. (See the Section 7.1.4 earlier in this chapter for instructions on replacing the PIN helper with one that returns the same PIN code every time.) A better-looking PIN helper is available separately from bluez-utils, in a package called bluez-pin. Installing this package is recommended, and several Linux distributions ship it as a default. If you install bluez-pin, you must amend the pin_helper option accordingly . Figure 7-5 shows bluez-pin in action. Figure 7-5. A request for a PIN from bluez-pin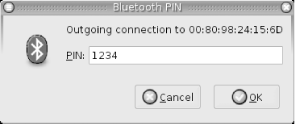 7.6.4.2 Device optionsThis section is introduced by the devices keyword, which controls the configuration that hcid gives to each Bluetooth device as it is activated. This has the same effect as if you were to manually configure the device with hciconfig . Table 7-7 explains the most useful options available in this section. Table 7-7. Useful device-level options from /etc/bluetooth/hcid.conf
7.6.5 Bonding/PairingMany devices require that bonding, or pairing, is performed before a Bluetooth connection is established. Bonding may be initiated by the computer or by the remote device. If the computer initiates bonding ”usually by making an outgoing connection ”then the pin_helper program (usually bluepin ) will present a graphical dialog box to the user requesting that he input a PIN, which should match the code set on the remote device. If the remote device initiates bonding, then the remote device is required to provide a PIN to match that set in the file /etc/bluetooth/pin .
If bonding is successful, the hcid daemon will store the resulting link key, used to authenticate all future connections between the two devices concerned , in the database file /etc/bluetooth/link_key . 7.6.6 Service DiscoveryBluetooth devices implement the service discovery profile (SDP) in order to describe to other devices how their services may be accessed. SDP is generally used in two ways: browsing and searching. An SDP browse request causes a device to respond with a list of services that it supports. A search request is a query for details of a particular service. Two tools found in the bluez-sdp package handle SDP on Linux. The first is sdpd , which provides an SDP server and allows remote devices to query the computer. The second, sdptool , allows administration of the SDP server and querying of the remote device.
7.6.6.1 Using sdptoolThe simplest invocation of sdptool is sdptool browse . This performs an inquiry and then browses each available device. Example 7-3 shows the result of this command. Example 7-3. Results of an SDP browse$ sdptool browse Inquiring ... Browsing 00:80:98:24:15:6D ... Service Name: SDP Server Service Description: Bluetooth service discovery server Service Provider: BlueZ Service RecHandle: 0x0 Service Class ID List: "SDP Server" (0x1000) Protocol Descriptor List: "L2CAP" (0x0100) PSM: 1 Version: 0x0001 Language Base Attr List: code_ISO639: 0x656e encoding: 0x6a base_offset: 0x100 Service Name: Public Browse Group Root Service Description: Root of public browse hierarchy Service Provider: BlueZ Service RecHandle: 0x804d008 Service Class ID List: "Browse Group Descriptor" (0x1001) Language Base Attr List: code_ISO639: 0x656e encoding: 0x6a base_offset: 0x100 Service Name: LAN Access Point Service RecHandle: 0x804d6f0 Service Class ID List: "LAN Access Using PPP" (0x1102) Protocol Descriptor List: "L2CAP" (0x0100) "RFCOMM" (0x0003) Channel: 3 Profile Descriptor List: "LAN Access Using PPP" (0x1102) Version: 0x0100 Service Name: OBEX Object Push Service RecHandle: 0x804d7f0 Service Class ID List: "OBEX Object Push" (0x1105) Protocol Descriptor List: "L2CAP" (0x0100) "RFCOMM" (0x0003) Channel: 4 "OBEX" (0x0008) Profile Descriptor List: "OBEX Object Push" (0x1105) Version: 0x0100 The output from the browse command shows a list of service descriptions obtained from the SDP server. In this case, you can see that the device is running an SDP server, has support for public browsing of the SDP server contents, is offering network access via PPP, and supports OBEX via OBEX PUSH. The two profiles that use RFCOMM as a base protocol also indicate the RFCOMM channel on which the service is available. The term "channel" is somewhat overloaded in radio technologies such as Bluetooth, so you may find it helpful to consider each RFCOMM channel a virtual serial port number. If the BDADDR of the device to query is known, it can be specified on the command line: sdptool browse 00:80:98:24:15:6D . The sdptool program is also used to search for devices supporting a particular service. For instance, sdptool search OPUSH returns the service descriptor for OBEX PUSH support from any available device supporting it. Unfortunately, unlike the browse command, there is no way of searching only one device with the current version of sdptool ; it must perform an inquiry and search for the service on every device. Table 7-8 shows the service abbreviations that sdptool understands. Table 7-8. Service abbreviations for sdptool
Although the use of sdptool appears clumsy, in practice it is normally required only for diagnostic purposes. Bluetooth application software generally performs its own SDP requests to determine how to connect to a service on a remote device. 7.6.6.2 Configuring sdpd with sdptoolUnlike hcid , sdpd does not remember its settings by use of a static configuration file. The service directory is dynamic, allowing services to register and deregister themselves as they come and go. Most applications do this by using the BlueZ SDP libraries, but on occasion, it is useful to configure this manually using sdptool . To see which services the system's SDP daemon is advertising, use the special Bluetooth address FF:FF:FF:00:00:00 , which refers to the local Bluetooth device: sdptool browse FF:FF:FF:00:00:00 . The add subcommand of sdptool registers a service via SDP. It takes the service name as a parameter, with an optional parameter for the RFCOMM channel. For instance, to advertise a serial port connection on RFCOMM channel 3, use the following command: sdptool add --channel=3 SP . Obviously, the channel option makes sense only for those services based on serial emulation, such as dial-up networking, OBEX, and fax. Removing a service is slightly more complex, requiring the identifying "handle" of the record. In the output from an SDP browse in Example 7-3, there is a Service RecHandle entry for each record; the del command requires this number. So, assuming Example 7-3 refers to a local SDP server, you could remove the object push record with the command sdptool del 0x804d7f0 . The sdptool command provides even more granular control over the SDP records through the use of setattr and setseq , which adjust particular parameters. Use of setattr and setseq require knowledge that is likely to be useful only if you are writing sophisticated Bluetooth programs. 7.6.7 Serial ConnectionsUsing BlueZ's RFCOMM implementation, it is possible to create and use emulated serial port connections over Bluetooth. RFCOMM actually underlies many Bluetooth profiles such as dial-up networking and OBEX. As with SDP, BlueZ provides both application libraries, so programs can create and utilize RFCOMM connections and an administrative tool for the user to set up connections herself. 7.6.7.1 Ensuring RFCOMM is set upTo use RFCOMM connections, you must ensure that:
Kernel configuration was covered in Section 7.4.2 earlier in this chapter. Most Linux distributions should automatically create the RFCOMM device entries for you, but if they don't exist, create them using the script in Example 7-4, which must be run as the root user. Example 7-4. Creating the /dev/rfcomm devices#!/bin/sh # script: mkrfcomm C=0; while [ $C -lt 256 ]; do if [ ! -c /dev/rfcomm$C ]; then mknod -m 666 /dev/rfcomm$C c 216 $C fi C=`expr $C + 1` done 7.6.7.2 Connecting to a cell phoneTo see an example of RFCOMM usage, you could set up a serial connection to a cell phone's modem and try some commands on it. First, you must discover the RFCOMM channel that dial-up networking uses on the phone. For this, use sdptool browse ADDR (where ADDR is a Bluetooth address you retrieved with sdptool browse ): $ sdptool browse 00:0A:D9:15:CB:B4 ... Service Name: Dial-up Networking Service Description: Dial-up Networking Service Provider: Sony Ericsson Service RecHandle: 0x10002 Service Class ID List: "Dialup Networking" (0x1103) Protocol Descriptor List: "L2CAP" (0x0100) "RFCOMM" (0x0003) Channel: 3 The phone uses channel 3 for dial-up networking. A virtual serial port on the Linux machine must be bound to this channel on the phone. As the root user, use the rfcomm command to bind the port and then again to confirm that the port is bound, as shown in Example 7-5. Example 7-5. Binding to and checking an RFCOMM serial port# rfcomm bind 0 00:0A:D9:15:CB:B4 3 # rfcomm rfcomm0: 00:0A:D9:15:CB:B4 channel 3 clean The in bind 0 corresponds to the in the device /dev/rfcomm0 , which can now be used with applications in the same way that traditional serial ports (known as /dev/ttyS0 , etc.) are used. A terminal emulation package, such as the popular minicom , can be used to confirm that the phone's modem is working, as shown in the following listing. The command ATI3 usually returns useful model information for a remote modem. OK ATI3 P800 Bluetooth (TM) Modem OK
7.6.7.3 Internet access via a cell phoneBy creating PPP connections with RFCOMM serial ports, you can use your cell phone for Internet access. (To learn how to do this with GPRS cell phones, see Chapter 9.) For example, to connect to AT&T Wireless's GPRS network with a Nokia 3650 (see "GSM/GPRS Phone with Data Cable" in Chapter 9), use the peers script shown in Example 7-6. Be sure to use rfcomm bind as shown in Example 7-6. You can use the attws-connect and attws-disconnect scripts from Chapter 9. Example 7-6. PPP peer settings for AT&T Wireless and the Nokia 3650 over Bluetooth# File: /etc/ppp/peers/attws-rfcomm # /dev/rfcomm0 # Nokia 3650 115200 # speed defaultroute # use the cellular network for the default route usepeerdns # use the DNS servers from the remote network nodetach # keep pppd in the foreground nocrtscts # no hardware flow control lock # lock the serial port noauth # don't expect the modem to authenticate itself local # don't use Carrier Detect or Data Terminal Ready connect "/usr/sbin/chat -v -f /etc/chatscripts/attws-connect" disconnect "/usr/sbin/chat -v -f /etc/chatscripts/attws-disconnect" 7.6.8 Object ExchangeOBEX is a simple file transfer protocol. It is used when you "beam" files from one device to another. This is known as OBEX PUSH. Some devices also support OBEX FTP. As its name suggests, OBEX FTP behaves similarly to the Internet FTP protocol, allowing file uploads and downloads to a device. The OBEX protocol was introduced as part of the group of technologies created for infrared device connections. Its implementation in devices such as cell phones is widespread but not without its quirks . OBEX itself is a binary protocol layered on top of a serial connection. With Bluetooth, it is layered on top of an RFCOMM connection. Example 7-3 shows an entry for the OBEX PUSH profile, using RFCOMM channel 4. Some older cell phones don't actually provide OBEX implementation in this way. Instead, they have extended AT commands accessible from a serial connection to their internal modem, as described in the previous section. These commands place the connection into OBEX mode. We do not cover this use, often called "cable OBEX," but rather focus on the Bluetooth OBEX profiles. OBEX FTP over Bluetooth is not very well supported on Linux. The most popular package, obexftp, still has Bluetooth support in development at the time of writing. We advise you to check the project's home page at http://triq.net/obex. OBEX PUSH is better supported and is more practical since it is consistently implemented in consumer devices such as cell phones. There are several graphical programs available to support OBEX PUSH on Linux, as we shall see later. First, we look at the command-line tools available to perform file transfers. 7.6.8.1 Basic supportOBEX support on Linux is implemented through a project called OpenOBEX. Any OBEX- related program requires you to have these libraries installed. They can be obtained and compiled from the project's home page at http://openobex. sourceforge .net/ or installed through your Linux system's package management system.
The OpenOBEX libraries have a companion package called openobex-apps. The openobex-apps package contains a set of basic test programs that you can use to get started. They are by no means production quality, but they enable you to test your setup. We'll use the obex_test program to test receiving and sending files. To send a file to a remote device, you must first discover the RFCOMM port the OBEX PUSH support uses, as shown in Example 7-3. Use sdptool to discover this, and then run obex_test . Let's suppose our remote device has the address 11:22:33:44:55:66 and uses RFCOMM port 3 for OBEX PUSH. Here is an imaginary session: $ obex_test -b 11:22:33:44:55:66 3 > c > p localfilename remotefilename This session presents two arguments to the p command: the location of the file you want to send and the name of the file to use when it reaches the remote device. To receive a file from a remote device, use the test program in server mode. (This is shown in the following listing.) You can then push a file to your computer from a remote device. $ sdptool add --channel=4 OPUSH $ obex_test -b ff:ff:ff:00:00:00 4 > s Note that some devices require the OBEX capability to be reflected in your Bluetooth device's device class setting before they allow transfers to be made to your computer. (See the section Section 7.2.2.6 for a detailed discussion on the exact values that this can take.) In most cases, it is sufficient to set the class to service_class_obex device_class_computer ( 0x100100 ). This can be set in /etc/bluetooth/hcid.conf or by dynamically using the hciconfig command. The test applications that come with the OpenOBEX libraries are necessarily very rough and require you to do the legwork. Happily, more polished applications are available. These applications form part of the KDE and GNOME desktop projects, and are mentioned later in this chapter. Other software meriting investigation can be found on the Web. These programs include ussp-push, obextool, and the OBEX PUSH daemon. They can be found either by searching the Web or visiting a page on Linux and Bluetooth, created by BlueZ maintainer Marcel Holtmann, at http://www.holtmann.org/linux/bluetooth. 7.6.9 PPP NetworkingPoint-to-point networking is useful for networking two computers together. If one of the peers permits routing or bridging to a wider network, then the other gains access to that network. This is what happens when you dial up your Internet service provider on a traditional modem. PPP networking is used in the implementation of the Bluetooth LAN access profile. Here is what an SDP record for the LAN access profile looks like: Service Name: LAN Access over PPP Service RecHandle: 0x804dae0 Service Class ID List: "LAN Access Using PPP" (0x1102) Protocol Descriptor List: "L2CAP" (0x0100) "RFCOMM" (0x0003) Channel: 2 Profile Descriptor List: "LAN Access Using PPP" (0x1102) Version: 0x0100 You can use LAN access to provide Bluetooth devices with access to your local network. Many PDA devices support this connection method, both for purposes of synchronization over TCP/IP and general Internet access. In order to use LAN access, you need the bluez-pan package installed on your computer. This contains two tools: dund and pand . LAN access is provided by dund , which we discuss here. You also need PPP support in your Linux kernel, and the PPP daemon pppd installed on your computer. With most Linux distributions, this is already installed. While no pppd expertise is assumed in this section, you are strongly recommended to familiarize yourself with its documentation. The Linux PPP HOWTO at http://www.linux.org/docs/ldp/howto/PPP-HOWTO is a good starting point. The dund daemon can be used to manage both sides of the LAN connection. It provides PPP access to a remote device or connects to a provider. Acting as the server, it listens on a specific RFCOMM channel, and when a connection is made, it invokes pppd to establish the network connection. Acting as the client, it establishes a connection over Bluetooth to a remote device and then invokes pppd to handle the network connection. 7.6.9.1 Creating a LAN access serverThe simplest invocation of dund is dund --listen --persist . You should run this command from the account of a user with permission to run pppd (as a fallback, you can always run it as the root user.) This command line causes dund to register the LAN access profile with the local SDP server and listen for incoming connections as a daemon. (For debugging purposes, dund can be given the --nodetach argument, which causes it to run in the foreground like a normal program.) The persist option causes the daemon to continue running after a connection has terminated and await new connections. You can check the system log /var/log/syslog for status messages from dund . When a connection is established, dund invokes pppd with its default options. You can normally find these in /etc/ppp/options . Some systems use /etc/pppd instead of /etc/ppp . However, it's better to create a separate configuration file especially for your connections. Anything you pass to dund on the command line after its own configuration options is sent straight to pppd . Create a file called dun in /etc/ppp/peers with the content shown in Example 7-7. Example 7-7. PPP daemon configuration for LAN accessnoauth debug crtscts lock local proxyarp ms-dns 192.168.0.5 # local : remote 192.168.7.1:192.168.7.2 You may want to adjust the last two entries in the configuration to suit your setup: the ms-dns line specifies the IP address of your DNS server. This will become useful when you enable routing. The two colon -separated addresses are the local IP address and the IP address to give the remote device. You should choose addresses in the 10.x.x.x or 192.168.x.x ranges that don't clash with any of your internal subnets. The dund program can then be invoked with dund --listen --persist call dun . When a remote device connects, the PPP connection is brought up. Because of the "debug" option to pppd , you should see a verbose report of the connection in the system log. To confirm that a connection has been established, run the ifconfig command and look for the ppp0 network interface. Invoke the ping command to confirm that your remote device is reachable: $ ping 192.168.7.2 PING 192.168.7.2 (192.168.7.2): 56 data bytes 64 bytes from 192.168.7.2: icmp_seq=0 ttl=255 time=77.8 ms 64 bytes from 192.168.7.2: icmp_seq=1 ttl=255 time=80.5 ms 64 bytes from 192.168.7.2: icmp_seq=2 ttl=255 time=78.3 ms The final step is to ensure that your Linux box can route for the remote device, so it can take advantage of your network facilities. Various Linux distributions have their own way of doing this in their network configuration, but to test you can enable it by issuing the command echo 1 > /proc/sys/net/ipv4/ip_forward . Further instructions on routing can be found on the iptables home page (http://www.netfilter.org) and also in "Sharing a Network Connection over IrDA" in Chapter 8. There are a few ways to set up this kind of routing, depending on your distribution and kernel version, but make sure that other machines on your network know how to route to your connected Bluetooth device.
Our setup so far has no security considerations. There are several steps one can take to improve the security situation:
You should rely on neither of these to provide more than basic security. Bluetooth is still a relatively new technology, and its security measures have not yet been subjected to many attacks in the wild. It's always best, if the remote device is capable of it, to assume link-level security is weak and to use secure connection tools such as ssh to encrypt your network traffic at the application layer. 7.6.9.2 Connecting to a LAN access serverThe dund program can be configured to connect to a known LAN access point or to search for one and connect to it. Here are the command lines for these two functions: dund --connect 11:22:33:44:55:66 dund --search You can also specify a PPP configuration file by appending the call keyword and the name of the configuration in /etc/ppp/peers/ to the command line. 7.6.10 Personal Area NetworkingWhile you can achieve much with file transfers via OBEX and point-to-point networking with PPP, devices can take the full advantage of being interlinked in the same way that Ethernet networks are. They can then run protocols such as IPv4, IPv6, and IPX. For this reason, the Bluetooth specifications define a protocol called Bluetooth Network Encapsulation (BNEP). BNEP is used by the Personal Area Networking (PAN) profiles. The PAN profiles cover two basic modes of networking. The first profile is a network access point (NAP). NAPs provide network access in the same way that an access point for a Wi-Fi network does. They are typically connected to a wider network and provide bridging. Figure 7-6 shows the structure of a NAP network. Clients connect using a profile called PAN user (PANU). Figure 7-6. Structure of a network connected to a NAP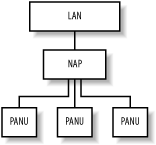 The second PAN profile is a group ad-hoc network (GN). GNs are not intended to provide access to any further network but can be used to create ad-hoc networks among a group of devices. Figure 7-7 shows the structure of a GN. Figure 7-7. Structure of a GN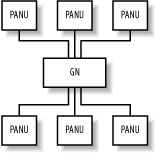 Both of these types of network are supported under Linux. To set them up, you must have some familiarity with Linux network administration. 7.6.10.1 Creating a GNGNs are easier to create, so they are good starting points to test PAN functionality. To set up a GN or NAP, the bluez-pan package must be compiled and installed. You must also ensure that your kernel has the BNEP module compiled (Table 7-3). Load the BNEP module with modprobe bnep . On the server machine, run this command as root: # pand --master --listen --role GN On the client machine, run this command, substituting the Bluetooth address of the master machine: # pand --connect 11:22:33:44:55:66 As usual, you can check for status reports from pand in the system log file. To bring a network up, configure the interfaces' network addresses. On the master: # ifconfig bnep0 192.168.7.1 and on the client: # ifconfig bnep0 192.168.7.2 If you use the 192.168.7.x network locally, substitute other suitable IP addresses. Test the connection by using ping to verify the connection from each end. Use ifconfig to display the interface configuration: # ifconfig bnep0 bnep0 Link encap:Ethernet HWaddr 00:80:98:24:15:6D inet addr:192.168.7.1 Bcast:192.168.7.255 Mask:255.255.255.0 inet6 addr: fe80::280:98ff:fe24:156d/64 Scope:Link UP BROADCAST RUNNING MULTICAST MTU:1500 Metric:1 RX packets:0 errors:0 dropped:0 overruns:0 frame:0 TX packets:5 errors:0 dropped:0 overruns:0 carrier:0 collisions:0 txqueuelen:1000 RX bytes:20 (20.0 b) TX bytes:188 (188.0 b) You may not want to specify the GN host's Bluetooth address on the client. By default, pand registers the GN or NAP service with the master host's SDP server. To make the client find its access point via SDP, give the client the following command line: # pand --role PANU --search --service GN Omitting the service argument causes pand to search for the NAP by default. Specifying the --persist option to the client's pand line causes it to search for the GN whenever it is not connected. Using this option, you can configure a machine to automatically connect to the network whenever it comes in range of the master machine. To automate the IP address configuration, use the methods provided by your Linux distribution. On Red Hat, this means creating suitable scripts to go into /etc/sysconfig/network-scripts . On Debian, you should edit /etc/network/interfaces . The BNEP network interfaces are not present at boot time, but they will be initialized by the hotplug utility when a BNEP connection is made. For further details of this configuration, read the manpages on your system for ifup , interfaces (Debian only), and hotplug . The ideal configuration is to give the GN master a static IP address and require the clients to use DHCP. If your DHCP server is running on the GN master, you may need to run a command to cause it to take note of the new network interface to listen on. This should be possible through your system's network configuration. 7.6.10.2 Bridging interfacesAs you will discover if you attempt to connect more than one client machine to your host, each connection is given its own network interface: bnep0 , bnep1 , bnep2 and so on. Not only is it a nuisance to specify multiple configurations on the master side for each interface, but it leaves the client devices unable to communicate with each other. The solution to this is called bridging. Bridging enables multiple network devices to appear as one interface on a network by tying, on the master side, all the bnep* devices into one interface. The first step is to ensure that bridging is enabled in your Linux kernel; bridging is supported in both the 2.4 and 2.6 series of kernels . This option can be found under "Networking options" from the kernel's menu configuration and is called 802.1d Ethernet Bridging. You also need the bridge-utils software package installed. If this is not part of your Linux distribution, download it from http://bridge.sourceforge.net/. Once you have the kernel modules and tools installed, you can bring up and configure a bridge interface: # brctl addbr pan0 # ifconfig pan0 192.168.7.1 # brctl setfd pan0 0 # brctl stp pan0 disable This bridged interface then handles all the BNEP interfaces. The latter two commands disable two features of Ethernet bridging known as Listening and Learning States and Spanning Tree Protocol. For noncomplex networks, they are not required and may cause delays to initializing the network. Further information on these features can be found on the O'Reilly Network web site at http://www.oreillynet.com/pub/a/network/2001/03/30/net_2nd_lang.html. The second part of the trick is to get pand to add each interface to the bridge as it comes up. Create a script, as shown in Example 7-8, and save it to /etc/bluetooth/pan/dev-up . Ensure it is executable. Example 7-8. A script to add each BNEP network interface to the bridge#!/bin/sh brctl addif pan0 ifconfig 0.0.0.0 The bridging method provides another advantage: you don't need to inform your DHCP server of the existence of a new interface whenever a BNEP connection is made. Here is the configuration of the network interfaces after a bridged network connection has been established with one NAP and two PANU clients: bnep0 Link encap:Ethernet HWaddr 00:40:05:D0:DD:69 inet6 addr: fe80::240:5ff:fed0:dd69/64 Scope:Link UP BROADCAST RUNNING MULTICAST MTU:1500 Metric:1 RX packets:11 errors:0 dropped:0 overruns:0 frame:0 TX packets:13 errors:0 dropped:0 overruns:0 carrier:0 collisions:0 txqueuelen:1000 RX bytes:789 (789.0 b) TX bytes:880 (880.0 b) bnep1 Link encap:Ethernet HWaddr 00:80:98:24:15:6D inet6 addr: fe80::280:98ff:fe24:156d/64 Scope:Link UP BROADCAST RUNNING MULTICAST MTU:1500 Metric:1 RX packets:49 errors:0 dropped:0 overruns:0 frame:0 TX packets:72 errors:0 dropped:0 overruns:0 carrier:0 collisions:0 txqueuelen:1000 RX bytes:6453 (6.3 KiB) TX bytes:9019 (8.8 KiB) pan0 Link encap:Ethernet HWaddr 00:40:05:D0:DD:69 inet addr:192.168.7.1 Bcast:192.168.7.255 Mask:255.255.255.0 inet6 addr: fe80::200:ff:fe00:0/64 Scope:Link UP BROADCAST RUNNING MULTICAST MTU:1500 Metric:1 RX packets:11 errors:0 dropped:0 overruns:0 frame:0 TX packets:13 errors:0 dropped:0 overruns:0 carrier:0 collisions:0 txqueuelen:0 RX bytes:700 (700.0 b) TX bytes:1254 (1.2 KiB) 7.6.10.3 Creating a network access pointIf you intend to incorporate PAN networking as part of your network's infrastructure, you will want to set up a NAP. The initial part of NAP configuration is exactly the same as for the aforementioned GN configuration, except it specifies --role NAP to the pand command line rather than --role GN . The remaining configuration required is to set up the routing in your network to ensure that the client machines and the rest of your LAN know how to reach each other. To illustrate , consider a network where the LAN uses the 10.x.x.x subnet and your NAP machine has the IP 10.0.3.2 . The Bluetooth access point you just set up uses the 192.168.7.x subnet with 192.168.7.1 as your NAP machine. On your client machines, you must run: # route add -net 10.0.0.0 netmask 255.0.0.0 gw 192.168.7.1 On the LAN router, you must run the following command, or insert an equivalent configuration in the case of a non-Linux router: # route add -net 192.168.7.0 netmask 255.255.255.0 gw 10.0.3.2 As with the configuration for dund , you must also ensure your NAP machine has IP forwarding enabled. Finally, for further information, you should consult the "PAN HOWTO" document, available from the documentation area of the BlueZ web site (http://www.bluez.org/documentation.html). This document serves as the source for much of the information in this section. 7.6.11 Experimental FeaturesThe uses of Bluetooth covered so far in this chapter are the widespread applications of the BlueZ stack. In this section, we cover the more experimental uses: printing over Bluetooth, connecting Bluetooth mice and keyboards, and using audio with Bluetooth headsets. If you're not afraid of some system configuration, happy with compiling programs from source, and understand how to use CVS, this section is for you. 7.6.11.1 Printing over BluetoothThe Common Unix Printing System (CUPS) is a popular solution for managing printers on Linux systems. If you run CUPS, you can add a Bluetooth printer to your system. Assuming you don't already have a Bluetooth-enabled printer, you can buy Bluetooth-to-Centronics dongles that plug into the back of your printer. These devices are produced by several manufacturers, which include AnyCom, Axis, HP, and TDK. To configure CUPS to use a Bluetooth printer, you must first download and install Marcel Holtmann's software from http://www.holtmann.org/linux/bluetooth/cups.html. Once you have compiled and installed the software as per Marcel's instructions, you can configure the CUPS backend. Edit the file /etc/bluetooth/printers.conf and add an entry similar to the following: default { # Bluetooth address of the device device 00:40:8C:5E:5D:A4 ; # Bluetooth printing protocol protocol serial; # Description of the connection comment "My Bluetooth printer"; } Restart your CUPS system, and you should then see the printer ready for administration. The Bluetooth backend performs an SDP inquiry on the target printer to discover the RFCOMM channel on which to send data. 7.6.11.2 Connecting input devicesVendors such as Apple and Microsoft both produce Bluetooth-connected mice and keyboards. There is experimental support available from the BlueZ project for these devices, and they will be supported more fully in the 2.0 release of the BlueZ tools. Input device support entails enabling the user-level driver support in the Input device drivers section of your Linux kernel. As its name suggests, this allows regular programs to inject events into the system's input device channels. Secondly, you must compile and configure the development version of BlueZ: # cvs -d :pserver:anonymous@cvs.bluez.sourceforge.net login # cvs -z3 -d :pserver:anonymous@cvs.bluez.sourceforge.net \ co libs2 utils2 # cd libs2 # ./bootstrap # ./configure --prefix=/opt/bluez2 # make && make install # cd ../utils2 # ./bootstrap # ./configure --prefix=/opt/bluez2 --with-bluetooth=/opt/bluez2 # make && make install # echo /opt/bluez2/lib >> /etc/ld.so.conf # ldconfig
Next, you must verify that the user-level input module is working. Check that the device /dev/misc/uinput exists. If not, create it with mknod /dev/misc/uinput c 10 223 . Load the module with modprobe uinput . If you use your mouse with the XFree86 windowing system, ensure that it has a suitable entry. If you already use a USB mouse, you should have this already. Here is a configuration appropriate for the Microsoft Bluetooth mouse, supporting its scroll wheel: Section "InputDevice" Identifier "MSMouse" Driver "mouse" Option "Protocol" "IMPS/2" Option "Device" "/dev/input/mice" Option "ZAxisMapping" "4 5" Option "Buttons" "5" Option "Emulate3Buttons" "false" EndSection Additionally, ensure that InputDevice "MSMouse" "SendCoreEvents " is added to the ServerLayout section of your XFree86 configuration. Adding Bluetooth input devices to your system is now a matter of invoking the /opt/bluez2/bthid program. This runs once as a daemon, and then you should invoke it again, each time to add a device: # /opt/bluez2/bin/bthid -d # /opt/bluez2/bin/bthid -c 11:22:33:44:55:66 Note that the input devices need to be paired before they will connect. With mice, the manufacturer presets the PIN, usually to 0000 . With keyboards, you enter a PIN and press return on the Bluetooth keyboard. As ever, keep an eye on the system log to help diagnose failures. 7.6.11.3 Connecting to Bluetooth ISDN modemsMarcel Holtmann has written the necessary tools to interface with Bluetooth-enabled ISDN modems. The relevant software and instructions can be found on his web site at http://www.holtmann.org/linux/bluetooth/cmtp.html. |

| < Day Day Up > |
EAN: 2147483647
Pages: 100